Troubleshoot ASP.NET Errors Remotely–while Appearing Local
For years I’ve wanted to be able to troubleshoot website remotely by seeing the detailed error report, while ensuring that other users on the web only see the friendly non-detailed error.
This is now possible with URL Rewrite 2.0. Through a simple rule, you can make it appear to ASP.NET that you are testing from the local server, without opening it up to the rest of the world. You can do this by using URL Rewrite to change the REMOTE_ADDR server variable, essentially fooling ASP.NET into thinking that you are testing locally.
However, there is one gotcha. If you are on a shared or corporate server, you will need your host or admin department to approve one setting that is likely not enabled for you, or exposed in their control panel. That will prevent some users from being able to apply this. Keep reading for more details on that.
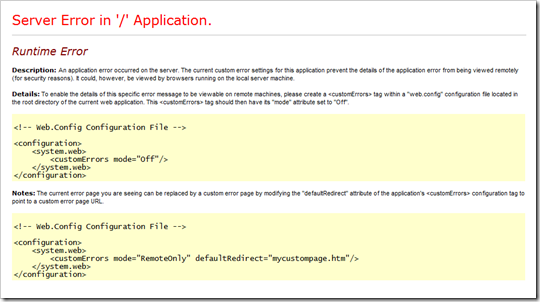
Before
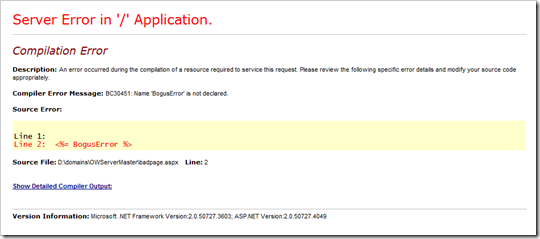
After
After the following changes, you, and only you, will be able to see the detailed error message when testing remotely.
What are Custom Errors
Custom Errors allow you to hide the real error from your visitors. You don’t want to expose sensitive information about your website. The detailed errors can show a few lines of code, which could be sensitive information, for example, your connection string to your database.
The custom error page can be Microsoft’s default error page, or it can be one that you create and pretty up to match the rest of your website.
The ASP.NET <customErrors /> mode property has 3 possible values. They are Off, On and RemoteOnly.
In brief, here is what they mean:
| Off | Show everyone the detailed error message. This is rarely a good idea. |
| On | Don’t show anyone the detailed error message. |
| RemoteOnly | Only show the detailed error message if you are testing from the local server where the site resides. |
If you have access to the server, you can use RemoteOnly which allows you to test without opening up your errors to the world.
However, you may not always have local access, or you may run into an issue that only occurs from certain computers or browsers.
If you are like me, you have done troubleshooting in the past where you’ve temporarily changed the mode to Off, reproduce the error, then changed the mode back again.
Of course there are other options for debugging your application, but the detailed errors page is one of the easiest first steps to troubleshooting an issue.
Three Steps to Secure Remote Troubleshooting
There are 3 steps to leverage RemoteOnly from a remote location.
- Set RemoteOnly for customErrors
- Have server administrator approve server variable REMOTE_ADDR
- Create URL Rewrite rule
Let’s look at them one at a time.
1) Set RemoteOnly for customErrors
You’re probably well familiar with ASP.NET customErrors so I’ll just summarize.
In the <system.web> section of your web.config file, add the following:
<customErrors mode="RemoteOnly" />
Or, feel free to add your own custom errors. Here’s a link with documentation on how to do that.
2) Have Server Administrator Approve Server Variable REMOTE_ADDR
For this functionality to work, you will need to have the server administrator approve REMOTE_ADDR as a server variable that can be overwritten. I can’t think of a security reason why it shouldn’t be changed, unless you have a custom application that depends on knowing the remote address, and you don’t trust the site owner. So, if you ask nicely, you can hopefully get this changed.
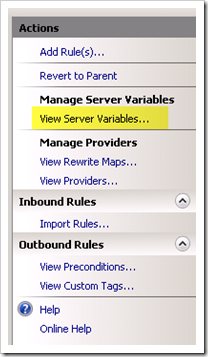
To approve REMOTE_ADDR, from IIS Manager, they will need to select the website and open up URL Rewrite. Go to View Server Variables from the Actions pane.
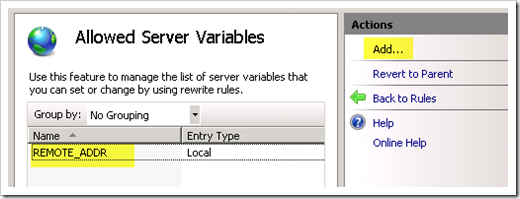
Add a Server Variable called REMOTE_ADDR
3) Create URL Rewrite rule
Finally, you need to create a rule that can tell that it’s you visiting, and changes REMOTE_ADDR to 127.0.0.1 to make you appear local.
There are multiple ways to tell if it’s you. One is by IP address. This is probably the easiest in most cases, but be careful if you have a dynamic IP, that it could change over time and expose your detailed errors to someone else.
Another option is to check by querystring, so if you ever want to see the error, just add ?ShowMeDetailedErrors=true to the URL.
If you want to get adventurous, you could write a cookie with another page, and use cookies to authenticate yourself. URL Rewrite has access to the non-encrypted cookie.
For this example, I’ll show how to do it based on your IP address.
First, find out what your IP is. Use www.whatsmyip.org or whatever method you prefer. Note that if you’re using a VPN (like I often am), than your network may see a different IP than whatsmyip.org sees. To be absolutely sure what IP your server sees, you could write a script to show all server variables as I blogged about here.
To create the Rewrite rule from IIS Manager, go to URL Rewrite for your website (or folder) and add a new blank rule.
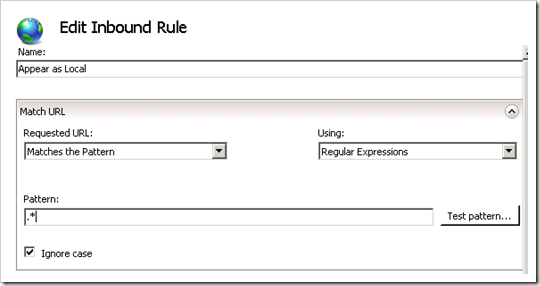
Give it a friendly name like “Appear as Local” and set the Pattern to “.*”.
Create a condition for your IP address. Set the condition to {REMOTE_ADDR} and the pattern to your IP address. You can enter the IP address directly, like 69.132.61.123, or to be more accurate, the proper regex is 69\.132\.61\.123. The . (dot) is a wildcard in regex which is why either method works.
Now here’s where the trickery comes in. Rewrite the REMOTE_ADDR Server Variable to 127.0.0.1 by adding a rule to set REMOTE_ADDR to 127.0.0.1.
Finally set the Action to None since you don’t want to do anything else besides the Server Variables rewrite.
It’s worth noting that the IIS Logs use REMOTE_HOST rather than REMOTE_ADDR, so this change won’t affect the IIS logs. The logs will still see your real IP address.
The rule that is created will look something like this:
<rule name="Appear as Local">
    <match url=".*" />
    <serverVariables>
        <set name="REMOTE_ADDR" value="127.0.0.1" />
    </serverVariables>
    <action type="None" />
    <conditions>
        <add input="{REMOTE_ADDR}" pattern="69\.132\.61\.123" />
    </conditions>
</rule>
If you want to allow multiple IP addresses, then use the pipe (|), which means OR in RegEx, like so: “69.132.61.123|69.132.61.124|192.168.1.110|10.0.5.5”.
Pretty clean and simple really. Now remote troubleshooting of your site has gotten easier without exposing the detailed errors to the rest of the world!
