Bind Custom Radio Buttons to True/False Property
Bind Custom Radio Buttons to True/False Property
In the last blog post I showed you how to create a different look and feel for radio buttons. We used the button groups and glyph icons from bootstrap to build this different look. Now let’s bind these radio buttons to a single boolean property in a class.
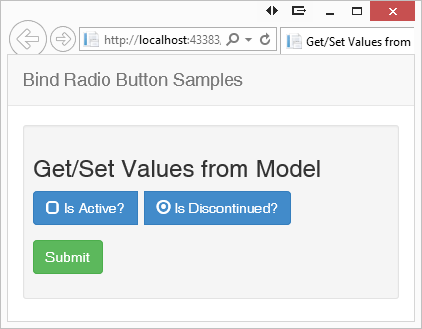
Let’s say you have a Product class that has an IsDiscontinued property that you would like a user to select between an “Active” and a “Discontinued” product. You might design the screen to look like Figure 1.

Figure 1: Choose between two Boolean states.
To build this screen you first create your Product class. The code below shows an example Product class. The IsDiscontinued property is the property you bind to.
namespace BootstrapRadio2
{
public partial class Product
{
public int ProductId { get; set; }
public string ProductName { get; set; }
public decimal Price { get; set; }
public bool IsDiscontinued { get; set; }
}
}
Create your cshtml view and specify the name of the model to use at the top of the file. I also added a little styling to a class called pdsa-radiobutton that puts a little spacing between the two radio buttons.
@model BootstrapRadio2.Product
@{
ViewBag.Title = "Get/Set Values from Model";
}
<style>
.pdsa-radiobutton {
margin-right: .5em;
text-align: left;
}
</style>
Build your view using the Html.BeginForm() helper to emit a <form> tag. Create a “form-group” into which you put a “btn-group”. If you are not familiar with button groups in Bootstrap you should look at www.getbootstrap.com for more information. The <label>, and <span> tags should be self-explanatory, especially if you read my first blog post on creating these types of radio buttons.
The next item you need is to bind the IsDiscontinued property to an HTML radio button. You use the @HtmlRadioButtonFor() helper to do this binding. The first parameter to this helper is the expression to bind to the product in the model. The second parameter is the value to return to the model if this button is chosen. The third parameter is a collection of other attributes you wish to be emitted into the HTML. Lastly we need a submit button to post the data back to our controller.
@using (Html.BeginForm())
{
<h3>Get/Set Values from Model</h3>
<div class="form-group">
<div class="btn-group" data-toggle="buttons" id="product">
<label class="pdsa-radiobutton btn btn-primary">
<span class="glyphicon glyphicon-unchecked"></span>
@Html.RadioButtonFor(m => m.IsDiscontinued, "false",
new { id = "IsActive" }) Is Active?
</label>
<label class="pdsa-radiobutton btn btn-primary">
<span class="glyphicon glyphicon-unchecked"></span>
@Html.RadioButtonFor(m => m.IsDiscontinued, "true",
new { id = "IsDiscontinued" }) Is Discontinued?
</label>
</div>
</div>
<div class="form-group">
<button type="submit"
class="btn btn-success">Submit</button>
</div>
}
The Controller
There are two methods you add to the controller for this view. First is the GET method, defined here as “Radio06”. This method creates a new instance of the Product class and sets the IsDiscontinued property to either a true or false. Normally this data would be coming from a database, but this mock data illustrates how binding selects the default button chosen when the view renders.
public ActionResult Radio06()
{
Product entity = new Product();
entity.IsDiscontinued = true;
return View(entity);
}
The second method to add the controller is called when the user clicks on the submit button on the screen. The ‘value’ attribute of the button selected at the time of the submit will be automatically assigned to the instance of the Product class, named ‘entity’ in this sample. Within this method I put a Debugger.Break() so you can inspect the properties of the entity variable to see the IsDiscontinued property and verify that it is set to the correct value.
[HttpPost]
public ActionResult Radio06(Product entity)
{
System.Diagnostics.Debugger.Break();
return View(entity);
}
That is pretty much all there is to binding to a true/false value using MVC.
Script for Toggling
The jQuery and JavaScript used on this page is the same as what I presented in my last blog post. The only difference is I added code that runs when the page is loaded. This code will select the radio button that is “checked” and ensure that the proper glyph is rendered on the button. All radio buttons on your page should have the ‘glyphicon-unchecked’ in the class attribute. This class attribute is changed on the selected radio button by the code that runs when the page is loaded.
@section scripts
{
<script>
$(document).ready(function () {
// Detect radio button that is checked and toggle glyph
$("input[type='radio']:checked").prev()
.removeClass('glyphicon-unchecked')
.addClass('glyphicon-record');
});
</script>
}
The jQuery code that runs when the page is loaded will first select any radio buttons that are checked. You then need to move the previous element in the DOM which will be the <span> tag with the glyph icon to change. You remove the ‘glyphicon-unchecked and add the class ‘glyphicon-record’.
Summary
In this blog post you saw how to take our custom radio buttons and bind them to a true/false property on a class. In addition you learned how to take the selected radio button and toggle the glyph icon when the page is loaded.
Past Blog Content
Blog Archive
-
2015
-
2014 (18)
-
2013 (11)
-
2012 (19)
-
2011 (29)
-
2010 (19)
-
2009 (28)
-
2008 (0)
-
2007 (14)
-
2006 (6)