Making a List, Checking it Twice (Cool Ajax Sample App with ASP.NET 2.0 and Atlas)
In case you haven’t checked out the new Atlas preview
release yet (which given that it shipped a few days ago
and almost everyone is on vacation this week is very
likely), you might want to consider finding some time
to-do so when you get a chance and are back online. It makes common Ajax-style scenarios a breeze to build,
and really makes programming a lot of fun.
I played around using the Atlas drop with ASP.NET 2.0 a
few days ago on a plane ride to the east-coast, and put
together a simple task/to-do list application that shows
off one of the new features that comes with it
(specifically the new <atlas:updatepanel> server
control that allows you to use any shipping ASP.NET
server control and get incremental Ajax-style updates in
your ASP.NET 2.0 application).
You can download the full source-code to the
application
here. Feel free to re-use/modify/re-ship it
however you want.
Basically, this simple sample I built provides a basic
interface to create/manage/delete lists, and then items
within those lists. What is neat is that
all of the inserts, updates, deletes, sorts, and paging
operations within the application are done in an
I’ll walkthrough how this all works after the
sceenshots below – although obviously the best way to
learn about it yourself is to download the sample and
run it on your local system (note: if you have the free
Visual Web Developer Express tool installed and SQL
Express active, then you should be able to just copy the
above .zip file to your local hard-drive, expand it,
open the web-site and hit run). Note: I
used CSS for all style information, and I’ve tested the
markup output from the sample and it should be XHTML
compliant.
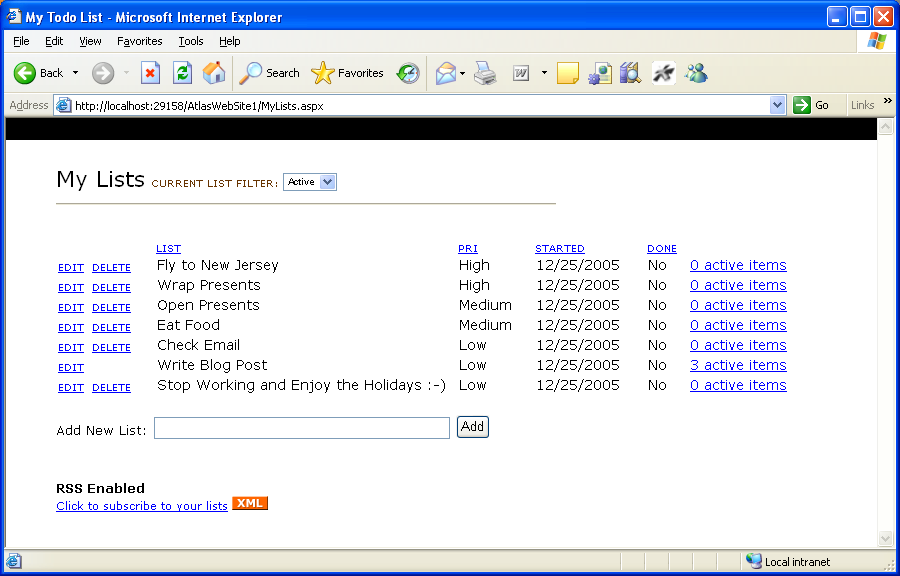
Quick Tour of the Application
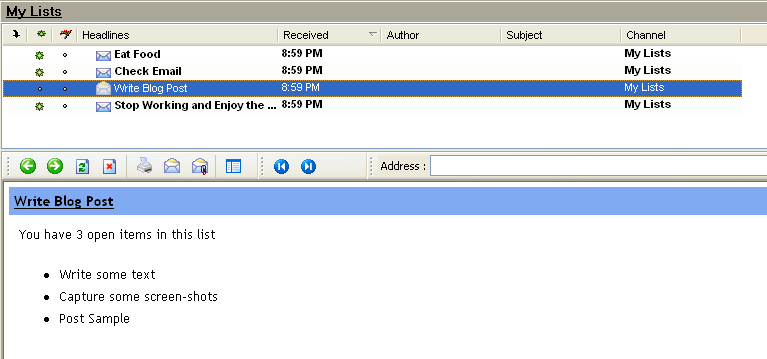
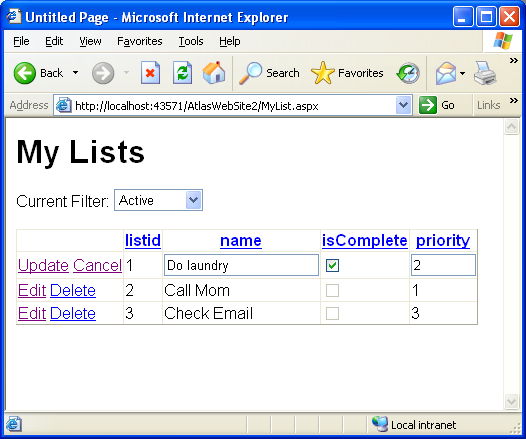
Basically, this to-do list application provides a
simple Ajax-enabled interface to manage lists of items
(note: the screenshots are done with FireFox – but
obviously it works with IE as well):
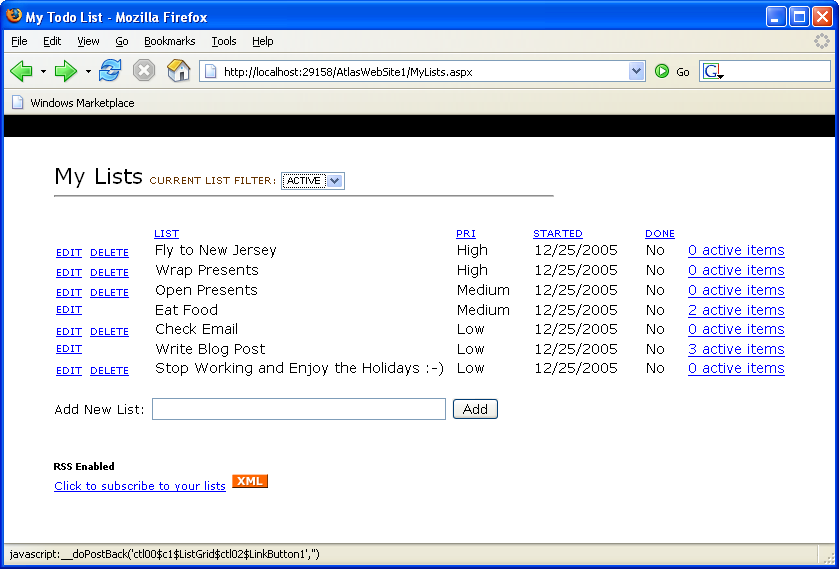
In addition to adding lists (which are done using an
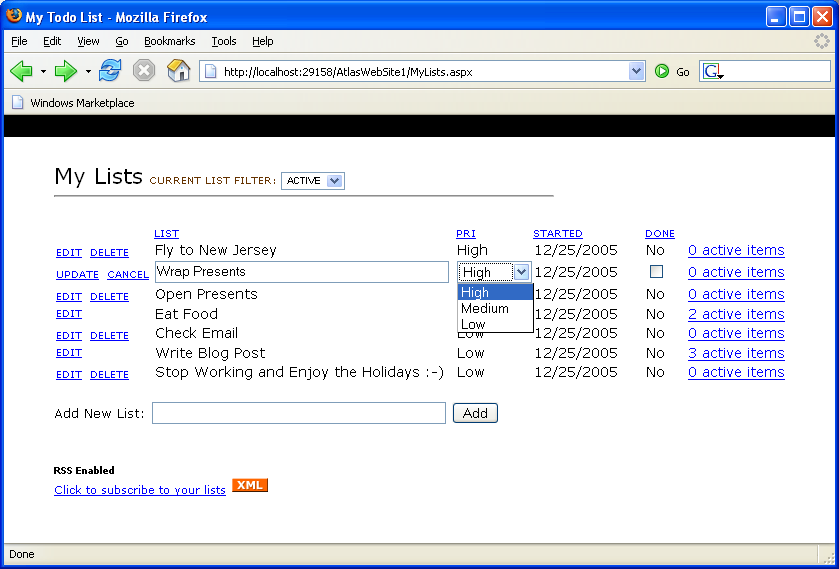
As well as sorting (note: also done in an Ajaxish way
with no full page refresh) by any of the columns (just
click on a column heading to set the sort-order):
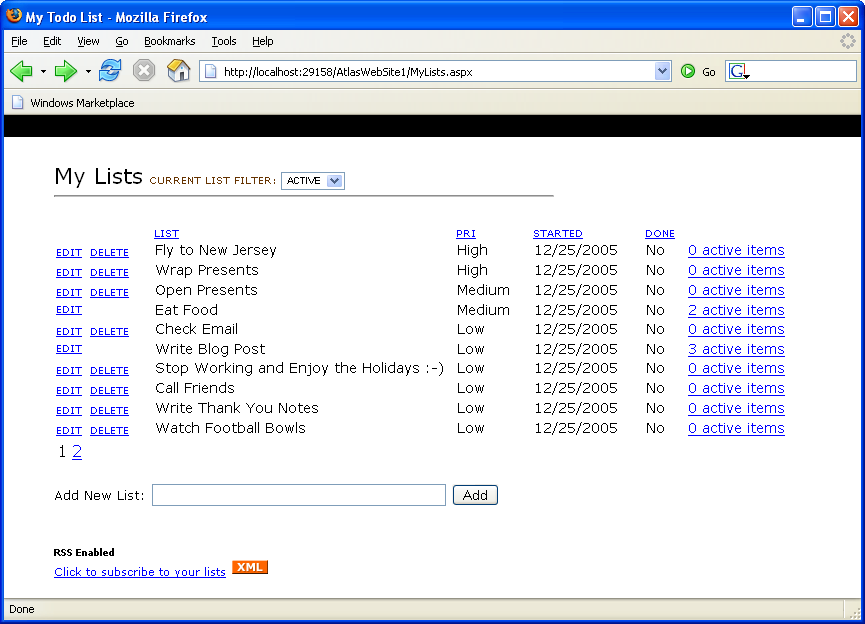
Automatic paging support is enabled when you have more
than 10 lists in your current filter (note: also done in
an Ajaxish way):
In addition to adding/editing/sorting/paging/deleting
lists, you can also drill into list items and add
individual sub-items (just click the “view active items”
link to drill into this):
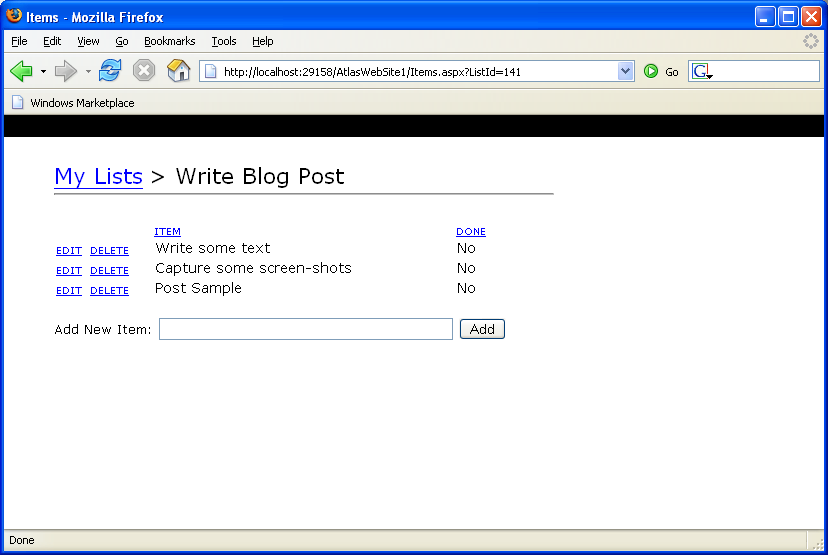
Note that the number of active items is shown for each
list in the far-right of the list manager screen (I also
added code to disable the “delete” button on a list if
there is 1 or more active items in the list):
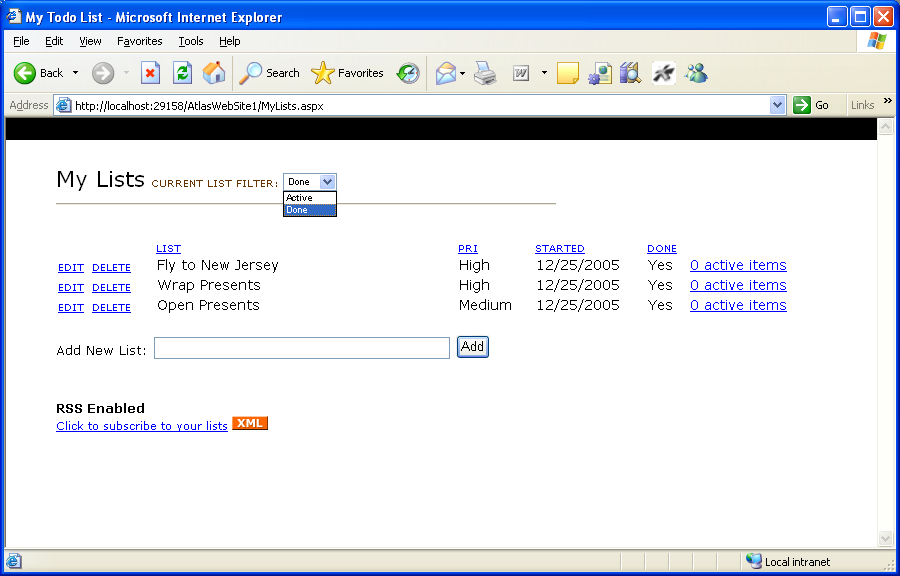
When you are done with a list (and presumably its
items), you can edit the list and checkbox it as being
“done”. This will remove the list from the
“active” filter and hide it from the default view. You can still go in and see it by changing the
top-filter drop-down list to “done” (also done in an
Ajaxish way):
Lastly, I also added support for viewing your current
task-list using RSS. Just click the
“subscribe to your lists” link and you’ll see an RSS XML
view of the data.
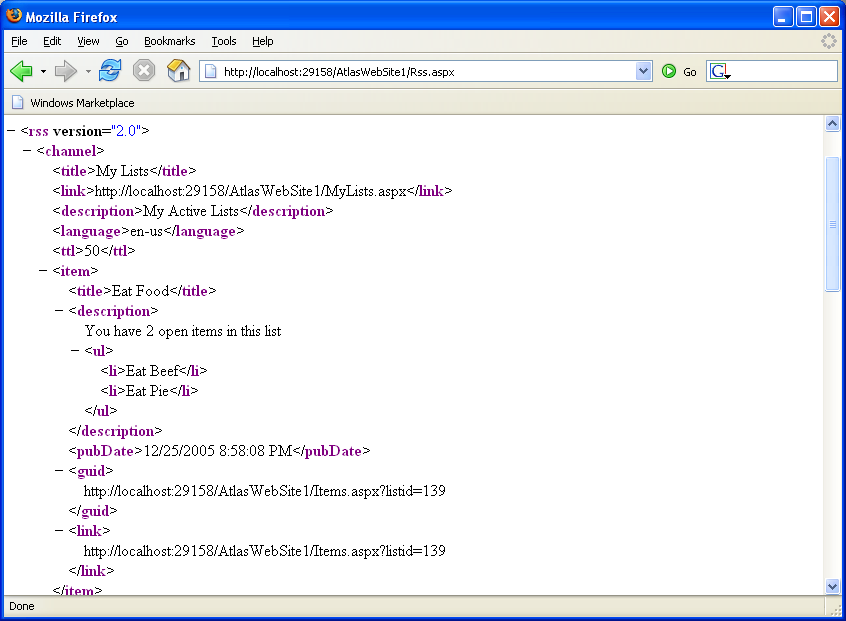
You can then add a subscription to this RSS feed in
your favorite RSS reader. You will then be
able to easily track your current to-do list, and even
see the active items that are in it (every time you
refresh your RSS feeds, it will automatically update
your to-do list with the latest information:
A little about what the sample code
Use this
link
to download all of the source for the sample (this .zip
file also includes an atlas install – so you should just
be able to download it with a vanilla Visual Web
Developer or VS 2005 install and hit run to launch
it). Note that I wrote this on a plane
with a screaming kid behind me – so please be a little
forgiving of the imperfections you find (and I am sure
there are some).
Here is what it looks like in either the free
Visual Web Developer
IDE or in VS 2005:
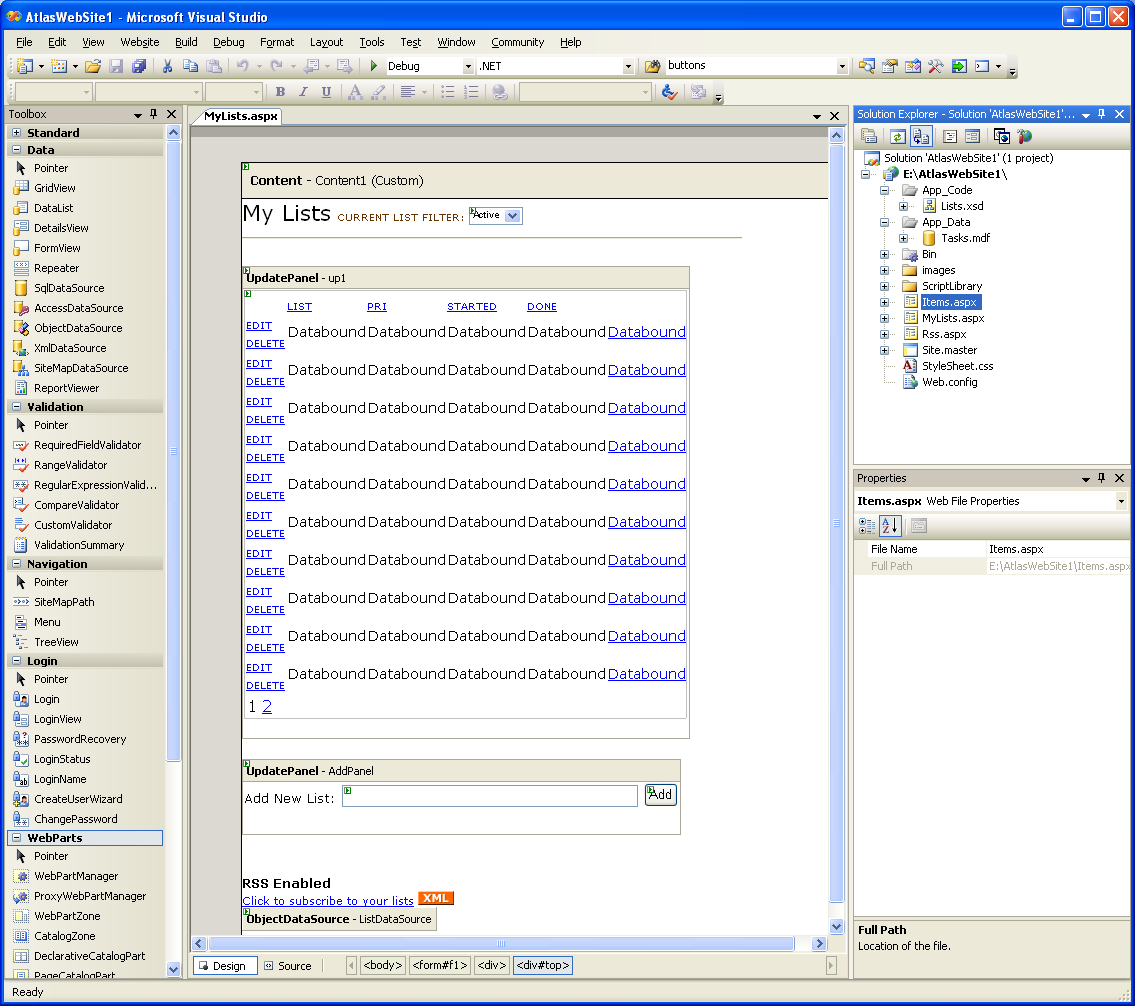
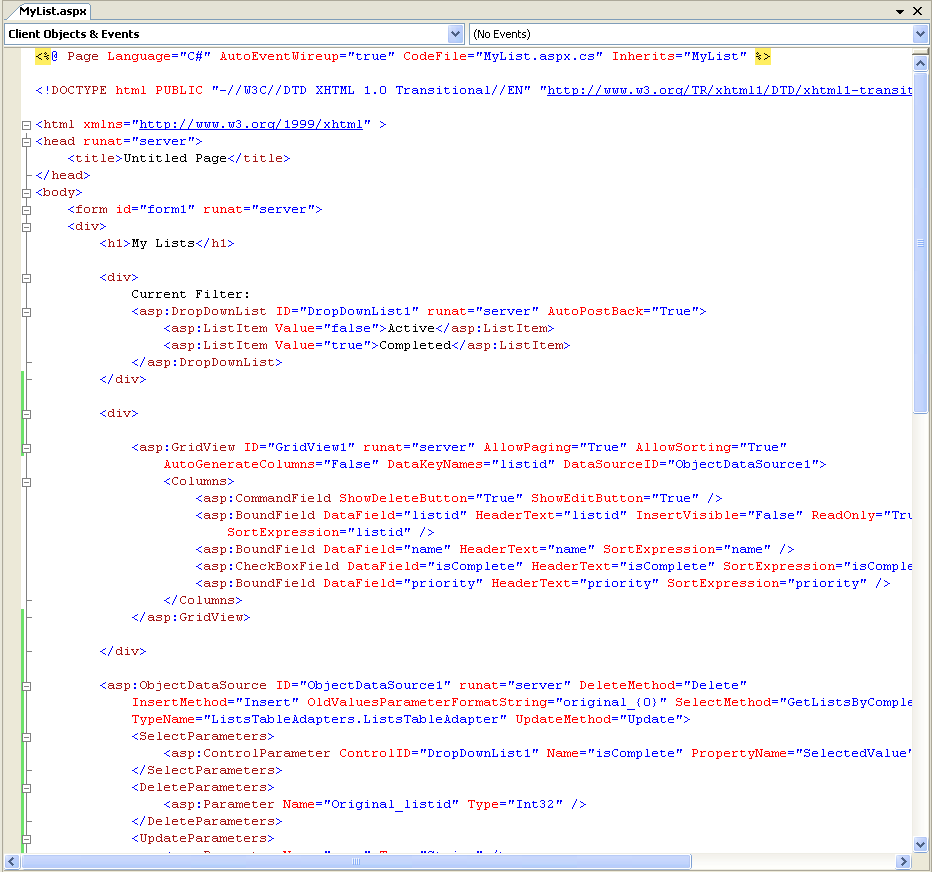
Note that it contains three .aspx pages – MyList.aspx,
Items.aspx, and RSS.aspx. MyList.aspx and
Items.aspx are both based on a common master-page
(Site.Master) that provides common layout
information. All style information is
stored in the .css file.
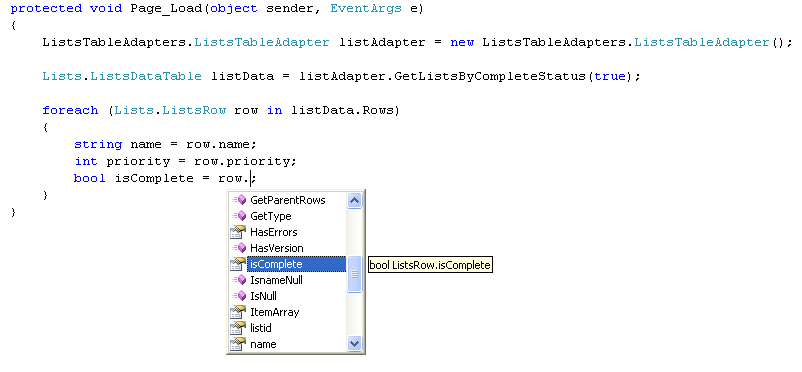
The data for the application is stored within the
Tasks.mdf file (which is a SQL Express file). I then also created a set of strongly-typed dataset
table adapters for the two tables I used within the
database (these table adapters are declaratively defined
within the Lists.xsd file).
As you can see above, both MyList.aspx and Items.aspx
are fully supported in the WYSIWYG designer mode. Here is the full code-listing for what the MyList.aspx
code-behind file looks like (note: this code-behind is
the largest of the three files):
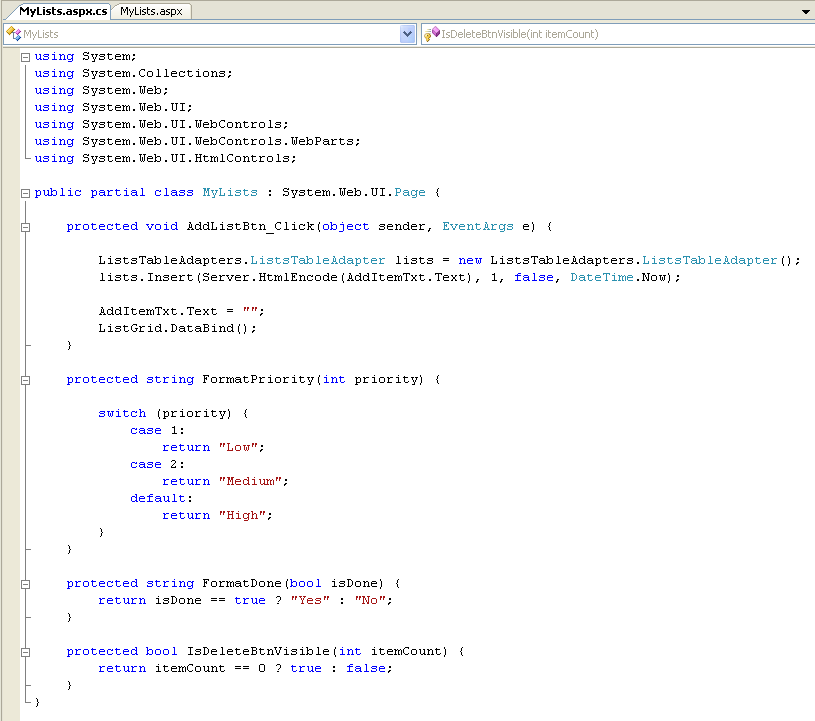
Note that the first method is the event handler action
for the “add” button gets clicked. It
creates a new List in the database. The
next three methods are formatting methods I use during
data-binding to perform some fancier data-transforms
(for example: I store the priority of lists as an
integer in the database as opposed to a string for
better sorting semantics, but want a nice drop-down list
and text value displayed in the browser, etc). If I wanted a quick and dirty bare-bones list editing
system, I could have just skipped doing these. I’m then using a declarative ObjectDataSource binding
(a new ASP.NET 2.0 feature) to-do update and delete data
semantics with the List adapter as well.
How you’d build something like this from scratch
If you want to build something like the above sample
from scratch yourself, you’d want to follow these steps
below:
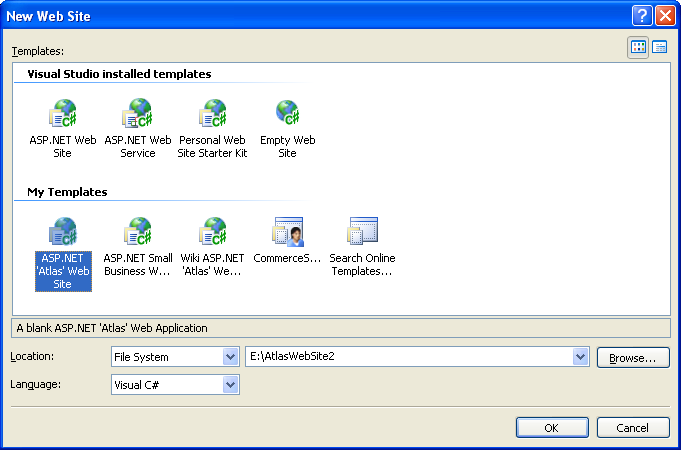
1) Create a new web-site using the free Visual Web
Developer Tool and optionally the December Atlas Site
Template .VSI file:
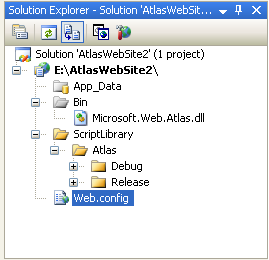
2) After deleting the default Eula, Readme and
Default.aspx files, you’ll be left with a solution that
looks like this (note: the Atlas binary is added to your
\bin directory by default, along with both debug and
release versions of the Atlas .js files)
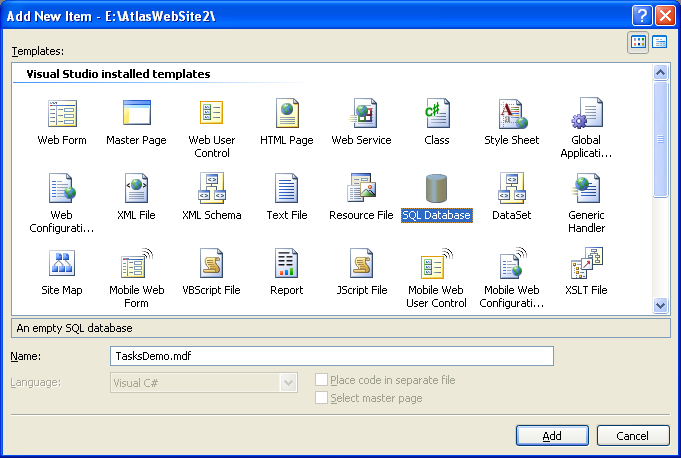
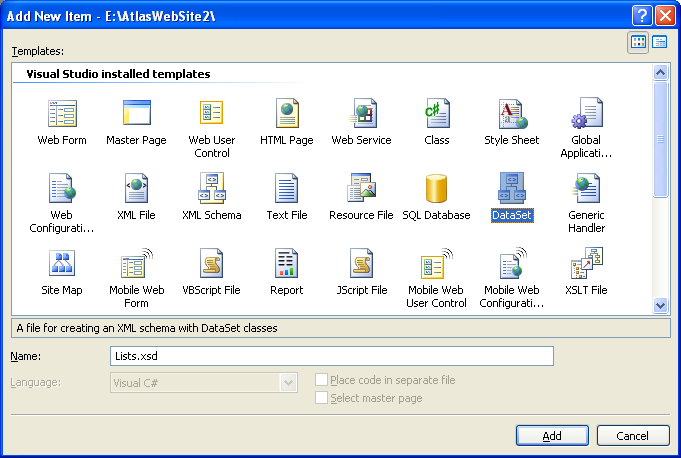
3) Create a new SQL Express database. To-do this, just select “Add New Item” and choose the
“SQL Database” item and name it:
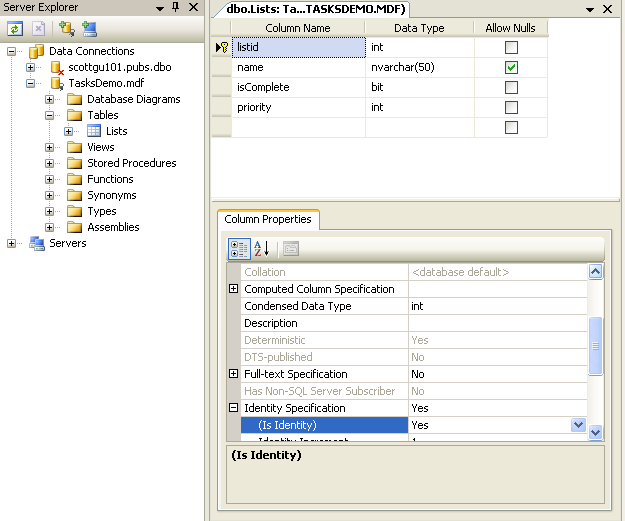
4) Use the built-in database design and editing features within Visual Web Developer (note: this VWD is free) to create a new table with some basic list schema (and optionally add an “items” table as well for sub-items). Make the listId column both the primary key, as well an identity column (with an auto-increment value of 1):
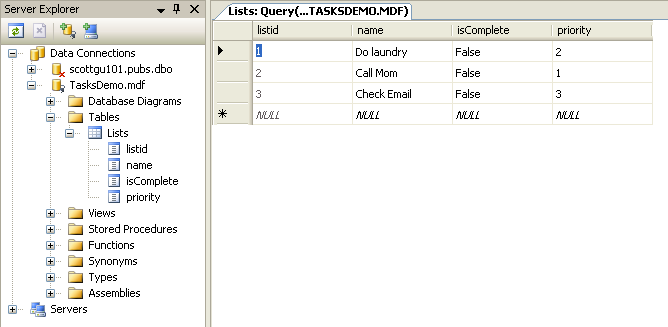
Once the schema for the table has been defined, open up
the lists table and add 3-4 rows of sample information
within it (right click on the table in the server
explorer and choose “Show Table Data” to-do this):
5) Once you’ve built your database tables, close the
database designer, and then select “Add New Item” on the
project again. Choose the “Dataset”
item:
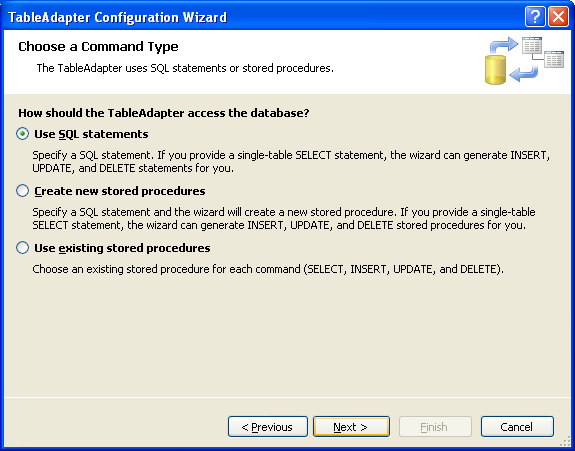
Walkthrough the table-adapter wizard that runs by
default to connect to the SQL database we just created
and choose to build a data-adapter using a standard set
of SQL statements:
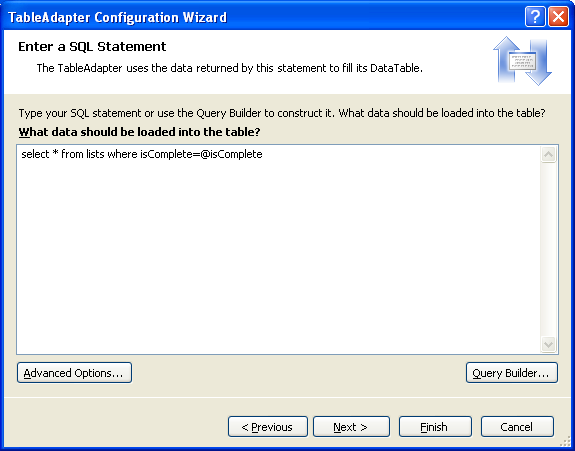
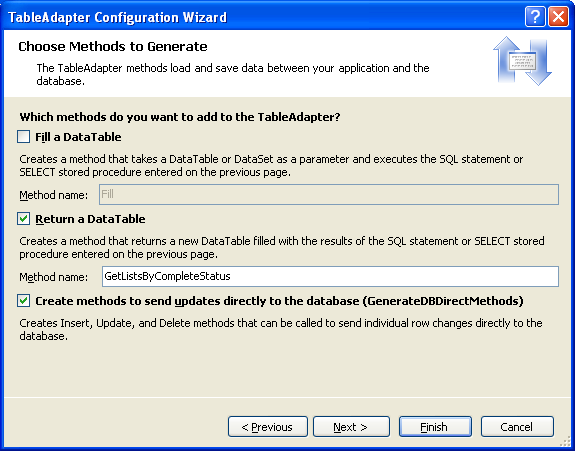
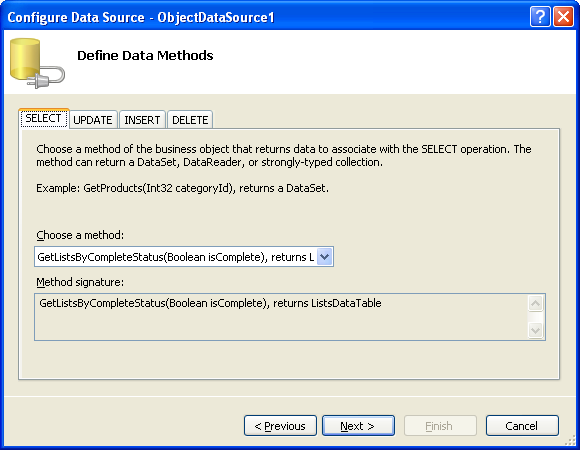
Name the select method we defined in the step above
“GetListsByCompleteStatus” (or anything else you want to
call it). Note that you’ll be able to add
any number of methods you want to the adapter later –
and can define a separate SQL statement for each method
(the adapter will then also by default generate
automatic Insert, Update and Delete statements for the
default Select statement in your adapter).
The adapter will encapsulate all of the ADO.NET data
access code needed to execute them – and generate a
strongly-typed set of data objects you can use.
For example, with the method we just
defined above, you could now write the below code to use
the strongly-typed adapter and corresponding datatables
and datarows anywhere within our project:
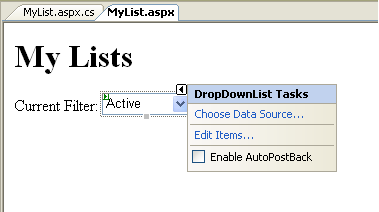
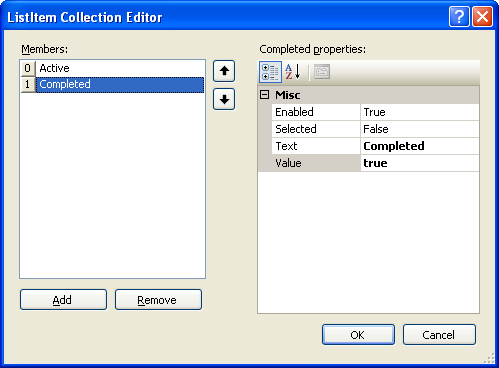
6) Create a new ASP.NET page in your project called
“MyLists.aspx”. Add a title called
“MyLists”, then a drop-downlist onto the page, and edit
its items to have two elements: “active” and
“done”. Set the value of “active” to
false, and the value of “done” to true (we will use this
to filter the “isComplete” field in our database).
Also make sure that you set the “Enable
Auto-Postback” checkbox to true:
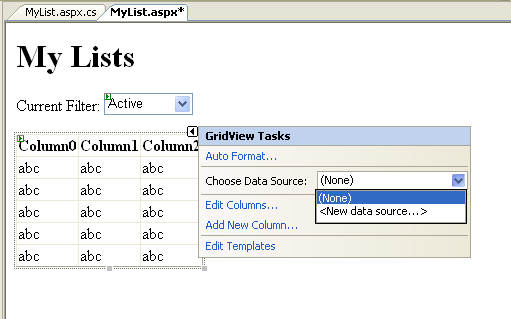
7) Drag/drop a GridView control onto the page, choose
“new datasource”, choose the “Object” data binding
option, and choose to bind it to the data adapter we
built above:
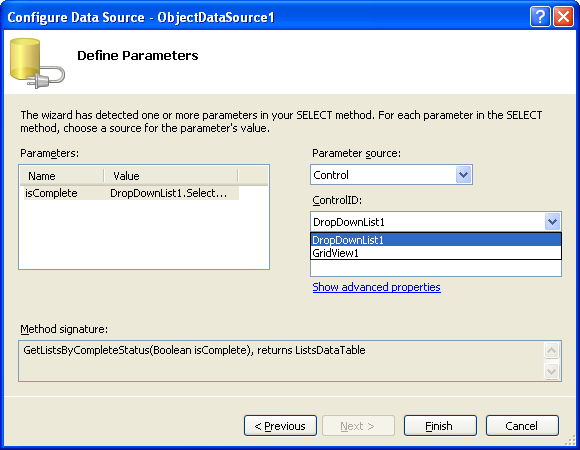
8) Bind the default query operation against the
“GetListsByCompleteStatus” method we defined above, and
bind the isComplete parameter to that method to the
drop-downlist we built:
9) Then enable paging, sorting, editing and deleting
with the grid:
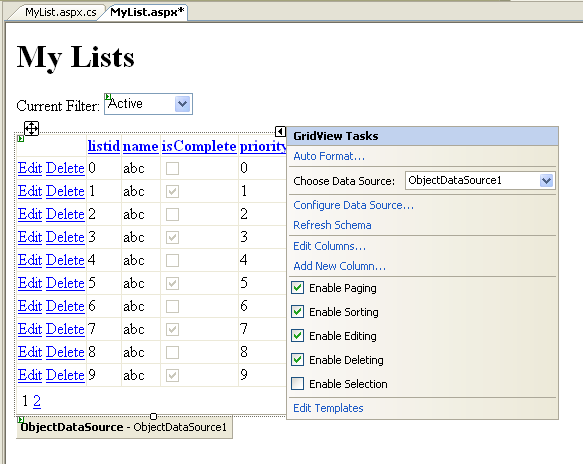
Lastly, you can optionally disable “viewstate” for the
GridView, by setting its “EnableViewState” property to
“false”. With ASP.NET 2.0, the GridView
and other controls no longer require ViewState to
perform paging, sorting, updating and deleting
operations.
10) And then hit either F5 (to run and debug) or
Ctrl-F5 (to just run) the app:
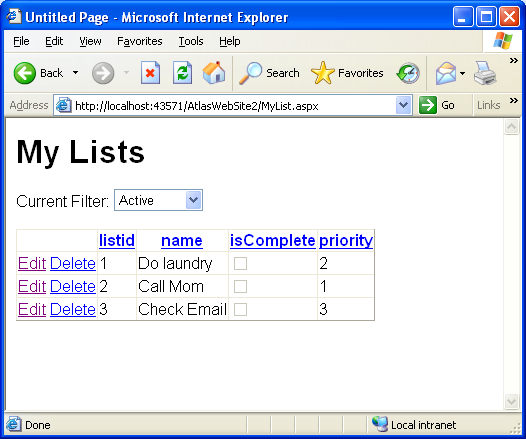
If you click the “edit” button on any of the items, you
will switch into edit more, and you’ll be able to edit
and change the column values. If you
select “update”, the Grid will call through to the data
adapter you built (or any intermediate class you built
that you want to use to either encapsulate or sub-class
it) and update the database for you. A
similar binding action happens with “delete”
operations.
If you change the drop-down list selection, the grid
will re-bind with the appropriate isComplete filter
selection. If you click on any of the
columns in the grid, the row values will sort (ascending
or descending). If you add more than 10
values in the grid, page numbers (along with default
page semantics) will show up at the bottom.
11) If you click on the html source-tab, you can see
what is persisted in the .aspx file:
Basically, it contains our drop-down control
definition, along with the GridView definition, along
with an ObjectDataSource that provides declarative
data-binding support. You can write code
and event handlers to customize any of the three
controls in the code-behind file.
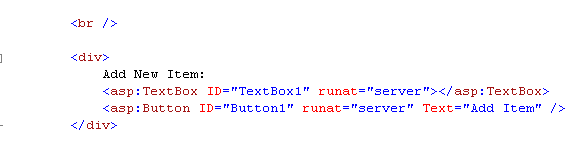
12) Our last step before adding Atlas functionality,
will be to add a textbox and button to help us add new
list items to our Grid:
And then add a code-behind event handler that will fire
when the “Add” button is clicked, and use our data
adapter to insert a new list into the Lists table, and
re-bind our grid:
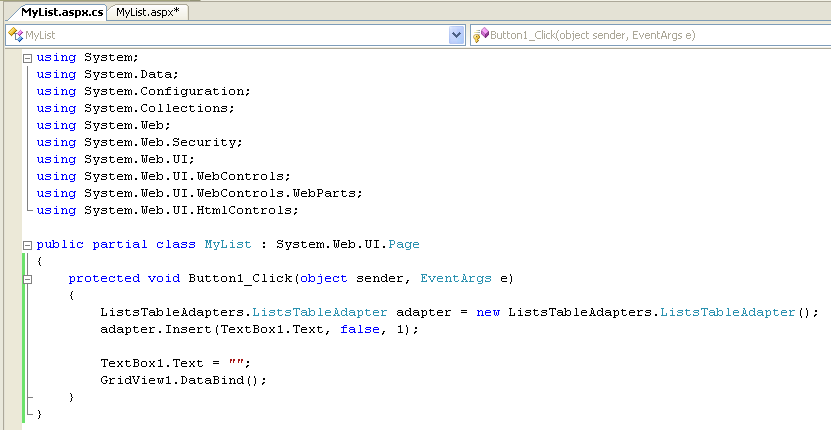
Note that there is
no other
code in our code-behind file.
Step 13) Try running the application again. Now you can add, delete, update, sort, page and filter
the data:

Adding Atlas Support
So far, all of the steps we have followed work with the
vanilla ASP.NET 2.0 and Visual Web Developer tool
products – we haven’t used any Atlas features yet.
What we want to-do is to use Atlas to replace the
built-in ASP.NET post-back model so that instead of
refreshing the entire page when a post-back occurs, we
use XMLHttp to only send back the regions of a page that
have changed. This enables us to make the
page feel much more dynamic, perform faster, and obtain
a much richer user-experience.
Step 14) Our first step to add Atlas support will be to
add the <atlas:scriptmanager> server control to
the page, and set its “EnablePartialRendering” attribute
to “true”:

Step 15) We are then going to add an
<atlas:updatepanel> control onto the page, and use
it to wrap our GridView control and associated
content:
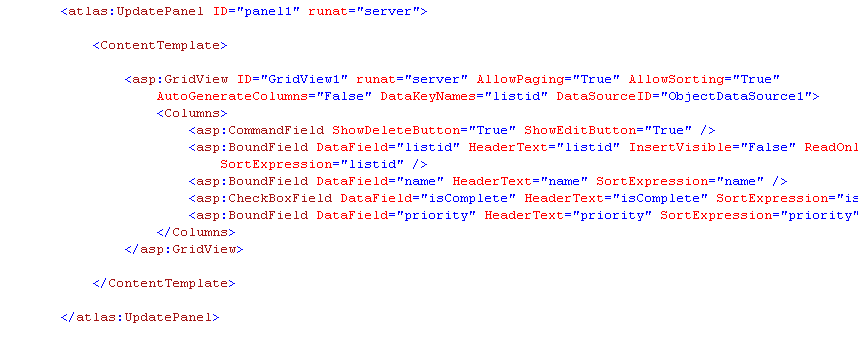
This is now an “updatable” region within our page –
which means that when a post-back event occurs, Atlas
will intercept the event, and instead of refreshing the
entire page it will use XMLHTTP to just send back
partial updates from the server, and then dynamically
repaint those portions of the page.
Try running the application again, and add a new item,
then sort, filter, and edit items. Notice
how fast it feels – and the fact that the page wasn’t
refreshed on each action.
Step 16) When running the above app, you might have
noticed when you added a new item to the list, the
textbox value wasn’t cleared. This is
because the textbox lived outside of the
<asp:updatepanel> we added above – and so wasn’t
refreshed as part of our post-back call.
We could either move it to be inside the above
<asp:updatepanel> or more optimally choose to add
a new <asp:updatepanel> to the page that contains
in. This is more optimal because we
will not
update this panel every-trip to the server, but instead
only when a declarative trigger that we’ll specify
occurs (or alternatively if someone writes code on the
server to explicitly trigger it).
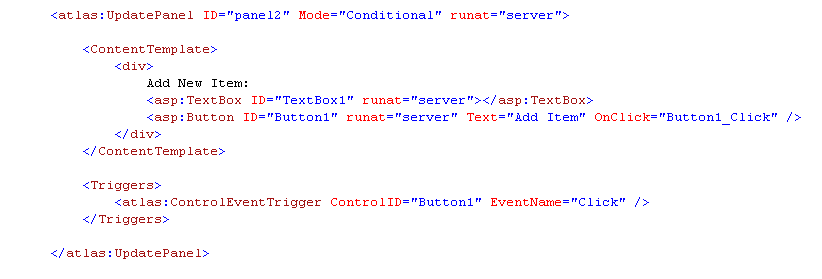
The above trigger means that this panel will only be
refreshed only if the “add” button fired (or if we wrote
code on the server to explicitly refresh it). This means it will not fire in response to the
drop-down filter changing, or to sorts, edits, updates,
deletes within the GridView.
And now when we run our application again, it is
The full-blown sample I showed at the beginning does a
few more cool things, but the walkthrough above captures
the basic concepts from it. As you can
see, building one of these types of apps be done in
minutes, doesn’t require much code at all (you only have
to manually write 4 lines of code total), and enables
you to start building Ajax applications with a fraction
of the concept count from before.
Hope this helps -- and happy holidays,
Scott