Building Distributed Node.js Apps with Azure Service Bus Queue
In this blog post, I will take a look at Azure Service Bus Queue for building distributed apps in Node.js. Azure Service Bus Queues provides, a queue based, brokered messaging communication between apps, which lets developers build distributed apps on the Cloud and also for hybrid Cloud environments. Azure Service Bus Queue provides First In, First Out (FIFO) messaging infrastructure. Service Bus Queues can be leveraged for communicating between apps, whether the apps are hosted on the cloud or on-premises servers.
Service Bus Queues are primarily used for distributing application logic into multiple apps. For an example, let’s say, we are building an order processing app where we are building a frontend web app for receiving orders from customers and want to move order processing logic into a backend service where we can implement the order processing logic in an asynchronous manner. In this sample scenario, we can use Azure Service Bus Queue, where we can create an order processing message into Service Bus Queue from frontend app for processing the request. From the backend order processing app, we can receives the message from Queue and can process the request in an efficient manner. This approach also enables better scalability as we can separately scale-up frontend app and backend app. For this sample scenario, we can deploy the frontend app onto Azure Web Role and backend app onto Azure Worker Role and can separately scale-up both Web Role and Worker Role apps. We can also use Service Bus Queues for hybrid Cloud scenarios where we can communicate between apps hosted on Cloud and On-premises servers.
Using Azure Service Bus Queues in Node.js Apps
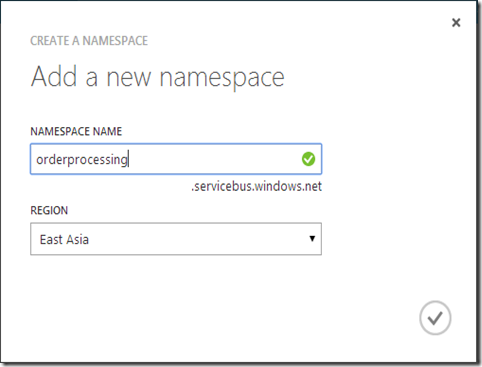
In order to working with Azure Service Bus, we need to create a Service Bus namespace from Azure portal.
We can take the connection information of Service Bus namespace from the Connection Information tab in the bottom section, after choosing the Service Bus namespace.
Creating the Service Bus Client
Firstly, we need to install npm module azure to working with Azure services from Node.js app.
npm install azure
The code block below creates a Service Bus client object using the Node.js module azure.
var azure = require('azure');
var config=require('./config');
var serviceBusClient = azure.createServiceBusService(config.sbConnection);
We create the Service Bus client object by using createServiceBusService method of azure. In the above code block, we pass the Service Bus connection info from a config file. The azure module can also read the environment variables AZURE_SERVICEBUS_NAMESPACE and AZURE_SERVICEBUS_ACCESS_KEY for information required to connect with Azure Service Bus where we can call createServiceBusService method without specifying the connection information.
Creating a Services Bus Queue
The createQueueIfNotExists method of Service Bus client object, returns the queue if it is already exists, or create a new Queue if it is not exists.
var azure = require('azure');
var config=require('./config');
var queue = 'ordersqueue';
var serviceBusClient = azure.createServiceBusService(config.sbConnection);
function createQueue() {
serviceBusClient.createQueueIfNotExists(queue,
function(error){
if(error){
console.log(error);
}
else
{
console.log('Queue ' + queue+ ' exists');
}
});
}
Sending Messages to Services Bus Queue
The below function sendMessage sends a given message to Service Bus Queue
function sendMessage(message) {
serviceBusClient.sendQueueMessage(queue,message,
function(error) {
if (error) {
console.log(error);
}
else
{
console.log('Message sent to queue');
}
});
}
The following code create the queue and sending a message to Queue by calling the methods createQueue and sendMessage which we have created in the previous steps.
createQueue();
var orderMessage={
"OrderId":101,
"OrderDate": new Date().toDateString()
};
sendMessage(JSON.stringify(orderMessage));
We create a JSON object with properties OrderId and OrderDate and send this to the Service Bus Queue. We can send these messages to Queue for communicating with other apps where the receiver apps can read the messages from Queue and perform the application logic based on the messages we have provided.
Receiving Messages from Services Bus Queue
Typically, we will be receive the Service Bus Queue messages from a backend app. The code block below receives the messages from Service Bus Queue and extracting information from the JSON data.
var azure = require('azure');
var config=require('./config');
var queue = 'ordersqueue';
var serviceBusClient = azure.createServiceBusService(config.sbConnection);
function receiveMessages() {
serviceBusClient.receiveQueueMessage(queue,
function (error, message) {
if (error) {
console.log(error);
} else {
var message = JSON.parse(message.body);
console.log('Processing Order# ' + message.OrderId
+ ' placed on ' + message.OrderDate);
}
});
}
By default, the messages will be deleted from Service Bus Queue after reading the messages. This behaviour can be changed by specifying the optional parameter isPeekLock as true as sown in the below code block.
function receiveMessages() {
serviceBusClient.receiveQueueMessage(queue,{ isPeekLock: true },
function (error, message) {
if (error) {
console.log(error);
} else {
var message = JSON.parse(message.body);
console.log('Processing Order# ' + message.OrderId
+ ' placed on ' + message.OrderDate);
serviceBusService.deleteMessage(message,
function (deleteError){
if(!deleteError){
console.delete('Message deleted from Queue');
}
}
});
}
});
}
Here the message will not be automatically deleted from Queue and we can explicitly delete the messages from Queue after reading and successfully implementing the application logic.
You can follow me on Twitter @shijucv

