Adding additional controls to CreateUserWizard (CUW) Control
Nothing fancy or new in this post.
CreateUserWizard(CUW) control comes with some default controls for entering UserName,Password, ConfirmPassword, Email, etc. Sometimes you might want to add additional controls eg. for storing Firstname,LastName,CompanyName, etc.
Here is how you can add these additional controls. IDE used is Visual Studio 2005.
-
Drag and drop a CUW in the designer Panel.
-
Selet the Control.
-
Select the small arrow on top right corner of the contol
-
Select the 'Customize Create User Step'

Now Switch to the Source view. You will find the markup for the CreateUserWizard as below:
<asp:CreateUserWizard ID="CreateUserWizard1" runat="server">
<WizardSteps>
<asp:CreateUserWizardStep ID="CreateUserWizardStep1" runat="server">
<ContentTemplate>
<table border="0">
<tr>
<td align="center" colspan="2">
Sign Up for Your New Account</td>
</tr>
<tr>
<td align="right">
<asp:Label ID="UserNameLabel" runat="server" AssociatedControlID="UserName">User Name:</asp:Label></td>
<td>
<asp:TextBox ID="UserName" runat="server"></asp:TextBox>
<asp:RequiredFieldValidator ID="UserNameRequired" runat="server" ControlToValidate="UserName"
ErrorMessage="User Name is required." ToolTip="User Name is required." ValidationGroup="CreateUserWizard1">*</asp:RequiredFieldValidator>
</td>
</tr>
<tr>
<td align="right">
<asp:Label ID="PasswordLabel" runat="server" AssociatedControlID="Password">Password:</asp:Label></td>
<td>
<asp:TextBox ID="Password" runat="server" TextMode="Password"></asp:TextBox>
<asp:RequiredFieldValidator ID="PasswordRequired" runat="server" ControlToValidate="Password"
ErrorMessage="Password is required." ToolTip="Password is required." ValidationGroup="CreateUserWizard1">*</asp:RequiredFieldValidator>
</td>
</tr>
<tr>
<td align="right">
<asp:Label ID="ConfirmPasswordLabel" runat="server" AssociatedControlID="ConfirmPassword">Confirm Password:</asp:Label></td>
<td>
<asp:TextBox ID="ConfirmPassword" runat="server" TextMode="Password"></asp:TextBox>
<asp:RequiredFieldValidator ID="ConfirmPasswordRequired" runat="server" ControlToValidate="ConfirmPassword"
ErrorMessage="Confirm Password is required." ToolTip="Confirm Password is required."
ValidationGroup="CreateUserWizard1">*</asp:RequiredFieldValidator>
</td>
</tr>
<tr>
<td align="right">
<asp:Label ID="EmailLabel" runat="server" AssociatedControlID="Email">E-mail:</asp:Label></td>
<td>
<asp:TextBox ID="Email" runat="server"></asp:TextBox>
<asp:RequiredFieldValidator ID="EmailRequired" runat="server" ControlToValidate="Email"
ErrorMessage="E-mail is required." ToolTip="E-mail is required." ValidationGroup="CreateUserWizard1">*</asp:RequiredFieldValidator>
</td>
</tr>
<tr>
<td align="right">
<asp:Label ID="QuestionLabel" runat="server" AssociatedControlID="Question">Security Question:</asp:Label></td>
<td>
<asp:TextBox ID="Question" runat="server"></asp:TextBox>
<asp:RequiredFieldValidator ID="QuestionRequired" runat="server" ControlToValidate="Question"
ErrorMessage="Security question is required." ToolTip="Security question is required."
ValidationGroup="CreateUserWizard1">*</asp:RequiredFieldValidator>
</td>
</tr>
<tr>
<td align="right">
<asp:Label ID="AnswerLabel" runat="server" AssociatedControlID="Answer">Security Answer:</asp:Label></td>
<td>
<asp:TextBox ID="Answer" runat="server"></asp:TextBox>
<asp:RequiredFieldValidator ID="AnswerRequired" runat="server" ControlToValidate="Answer"
ErrorMessage="Security answer is required." ToolTip="Security answer is required."
ValidationGroup="CreateUserWizard1">*</asp:RequiredFieldValidator>
</td>
</tr>
<tr>
<td align="center" colspan="2">
<asp:CompareValidator ID="PasswordCompare" runat="server" ControlToCompare="Password"
ControlToValidate="ConfirmPassword" Display="Dynamic" ErrorMessage="The Password and Confirmation Password must match."
ValidationGroup="CreateUserWizard1"></asp:CompareValidator>
</td>
</tr>
<tr>
<td align="center" colspan="2" style="color: red">
<asp:Literal ID="ErrorMessage" runat="server" EnableViewState="False"></asp:Literal>
</td>
</tr>
</table>
</ContentTemplate>
</asp:CreateUserWizardStep>
<asp:CompleteWizardStep ID="CompleteWizardStep1" runat="server">
</asp:CompleteWizardStep>
</WizardSteps>
</asp:CreateUserWizard>
Add a Label and Texbox
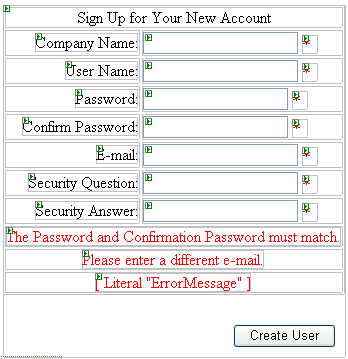
Now you can add new controls or modify the existing controls as per your requirement. For our case we will add a Label and a TextBox contols to allow users to enter their Company name right before they enter their UserName.<tr>
<td align="right">
<asp:Label ID="CompanyNameLabel" runat="server" AssociatedControlID="CompanyName">Company Name:</asp:Label></td>
<td>
<asp:TextBox ID="CompanyName" runat="server"></asp:TextBox>
<asp:RequiredFieldValidator ID="CompanyNameValidator" runat="server" ControlToValidate="CompanyName"
ErrorMessage="Company Name is required." ToolTip="Company Name is required." ValidationGroup="CreateUserWizard1">*</asp:RequiredFieldValidator>
</td>
</tr>
This is how our control will look.

Points to Note
-
See the ValidationGroup property property for the new control added is equal to "CreateUserWizard1" i.e. ID of the CreateUserWizard.
-
How to insert that new field in the database is not shown here. You might want to use ASP.NET Profiles. Check out the resources below.
Conclusion
Here we saw adding extra controls to CUW in the createUser Step. Now if you want to add additional steps to the CUW, check out the Resources below.
Edit
Check this post on 'Storing Additional User Information in Custom Profiles Table'.
Resources
-
Create Profile in CreateUser Step: http://dotnet-friends.com/tutorials/asp/tutinasp97d3c33a-53a2-4a03-a9c4-30920e0b7feb.aspx
-
Adding new steps to CreateUserWizard: http://weblogs.asp.net/scottgu/archive/2005/10/18/427754.aspx