Bind Custom Radio Buttons to Integer Data
Bind Custom Radio Buttons to Integer Data
In the last blog post I showed you how to bind radio buttons to a boolean value. In this blog post we will look at how to bind to integer values. In certain business applications you might have the user select a single value from a list of items coming from a database. You want to display these options as radio buttons and then retrieve the value the user selects.
Create List of Radio Buttons
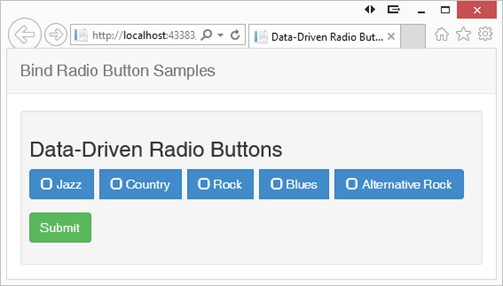
If you look at Figure 1 you see a row of radio buttons using the custom look I created a few blog posts ago. This set of radio buttons comes from a collection of MusicGenre objects. Each MusicGenre class contains a GenreId and Genre property. GenreId is an integer value that represents the primary key. Genre is the string value such as ‘Jazz’, ‘Rock’, ‘Blues’, etc.

Figure 1: A list of Radio Buttons
The MusicGenre Entity Class
To create the list of radio buttons in Figure 1, you first need a MusicGenre class as shown in the listing below:
public class MusicGenre
{
public MusicGenre()
{
GenreId = 0;
Genre = string.Empty;
}
public MusicGenre(int id, string genre)
{
GenreId = id;
Genre = genre;
}
public int GenreId { get; set; }
public string Genre {get;set;}
}
Create a Manager Class
Next you create a “Manager” class to create the collection of MusicGenre objects. In this blog post you will use some mock data, but you could replace this with data from a real database table.
public partial class MusicGenreManager
{
public MusicGenreManager()
{
Genres = new List<MusicGenre>();
LoadAllMock();
}
public List<MusicGenre> Genres { get; set; }
protected void LoadAllMock()
{
Genres.Add(new MusicGenre(1, "Jazz"));
Genres.Add(new MusicGenre(2, "Country"));
Genres.Add(new MusicGenre(3, "Rock"));
Genres.Add(new MusicGenre(4, "Blues"));
Genres.Add(new MusicGenre(5, "Alternative Rock"));
}
}
Create a View Model
Now that you have these two classes created, create a View Model class that you can use from the Controller in our MVC application. This View Model class simply uses the two previous classes to populate a ‘Genres’ property that is a generic list of MusicGenre objects. We will also create one additional property in the View Model class to which to bind the selected genre id.
public class MusicGenreViewModel
{
public MusicGenreViewModel()
{
Genres = new List<MusicGenre>();
LoadGenres();
}
public List<MusicGenre> Genres { get; set; }
public int SelectedId { get; set; }
public void LoadGenres()
{
MusicGenreManager mgr = new MusicGenreManager();
// Get list of Music Genres
Genres = mgr.Genres;
}
}
Create a View
Create a .cshtml view page that will use the MusicGenreViewModel class that holds the list of MusicGenre objects. At the top of your view add the @model statement to specify you will be using the view model class. I added a little styling to provide some separation between each of the radio buttons.
@model BootstrapRadio2.MusicGenreViewModel
@{
ViewBag.Title = "Data-Driven Radio Buttons";
}
<style>
.pdsa-radiobutton {
margin-right: .5em;
text-align: left;
}
</style>
Next you use the BeginForm statement to wrap all of the radio buttons and a submit button within a <form> tag. Notice that the RadioButtonFor() helper is binding to the SelectedId property in the View Model. If you select a radio button on the form and click the submit button, the GenreId from the 2nd parameter to the RadioButtonFor() helper is moved into the SelectedId property.
@using (Html.BeginForm())
{
<div class="well well-sm">
<h3>Data-Driven Radio Buttons</h3>
<div class="form-group">
<div class="btn-group" data-toggle="buttons" id="genre">
@foreach (var item in Model.Genres)
{
<label class="pdsa-radiobutton btn btn-primary">
<span class="glyphicon glyphicon-unchecked">
</span>
@Html.RadioButtonFor(m => m.SelectedId,
item.GenreId,
new { id = item.GenreId })
@item.Genre
</label>
}
</div>
</div>
<div class="form-group">
<button type="submit"
class="btn btn-success">Submit</button>
</div>
</div>
}
Create the Controller
Let’s now create the controller to instantiate an instance of the MusicGenreViewModel class and pass that instance to the view.
public ActionResult Radio07()
{
MusicGenreViewModel vm = new MusicGenreViewModel();
return View(vm);
}
Retrieve the Value Selected
Once you select a radio button and click on the Submit button you post back to another controller action as shown below. The SelectedId property is automatically bound to the view model class. All you have to do to retrieve the appropriate MusicGenre object is loop through the list of MusicGenre objects and find where the selected id matched the GenreId. You can accomplish this with the Find() method on the collection class.
[HttpPost]
public ActionResult Radio07(MusicGenreViewModel vm)
{
MusicGenre entity;
entity = vm.Genres.Find(g => g.GenreId == vm.SelectedId);
System.Diagnostics.Debugger.Break();
return View(vm);
}
Summary
This blog post showed you how to bind a set of radio buttons to a set of objects with a unique ID. This simulates using data coming from a database table with an integer primary key.
Past Blog Content
Blog Archive
-
2015
-
2014 (18)
-
2013 (11)
-
2012 (19)
-
2011 (29)
-
2010 (19)
-
2009 (28)
-
2008 (0)
-
2007 (14)
-
2006 (6)