Building an HTML5 Web Sockets Server with Node.js
In a previous post I discussed how an HTML5 Web Sockets server could be created using ASP.NET 4.5. In this post I’m going to walk through the process of getting a socket server up and running using Node.js.
I was first introduced to Node.js several years ago while having lunch with my good friend Rick Garibay. He showed me how simple it was to get started with Node.js and later put together a nice picture app that leveraged Web Sockets. Although the application I’ll show here is different (I’ll admit his looked better :-)), I definitely want to give credit to Rick for the initial concept and thank him for starting me down the Node.js path. Since Rick and I initially talked things have changed a lot and cloud platforms like Azure now make deploying Node.js apps a snap!
Throughout this post I’ll cover the following concepts:
- Creating a Node.js HTTP server to handle serving HTML content
- Using a Node.js module to create a Web Sockets server
- Using HTML5 Web Sockets to send and receive data to/from a Node.js socket server
The code that I’ll be discussing throughout the post can be downloaded here. Let’s start off by discussing how to create an HTTP and Web Sockets server using Node.js.
Creating an HTTP and Web Sockets Server with Node.js
The first thing that you’ll want to do is install Node.js if it’s not already installed. It runs on a variety of operating systems and is easy to get going. Simply visit http://nodejs.org and click on the Install button to get started:
Once Node.js is installed you can use a variety of modules to create an HTML5 Web Sockets server. In this post I’m going to use a module named websocket.io which provides a simple way to get started. It only works with pure Web Sockets and doesn’t provide any fallbacks for older browsers like other modules like socket.io but it’s easy to get up and running quickly.
To start, create a new directory to hold the Web Sockets code you’ll be writing and then open a command prompt and navigate to the directory. Run the following command to install the websocket.io module into the site that we’ll be creating in the directory:
npm install websocket.io
This command uses the Node Package Manager (npm) to download and install the websocket.io module. If you come from a Microsoft background you can think of npm as being similar to NuGet.
Now create a file named socketService.js in the root of the directory you’re in and add the following code to create a socketServer object, import different modules such as websocket.io, http and others, and export the socketServer object as a Node.js module:
var socketServer = function () {
    var data = null,
    timerID = null,
    sockets = [],
    socketServer = null,
    ws = require('websocket.io'),
    http = require('http'),
    fs = require('fs'),
    url = require('url'),
    domain = require('domain'),
    reqDomain = domain.create(),
    socketDomain = domain.create(),
    httpDomain = domain.create(),


    // Add Code Here
}();

/* Add module exports here */
module.exports = socketServer;
The socketServer object will handle serving up HTML content as well as processing Web Socket requests. To handle requests for HTML resources the following code can be added below the Add Code Here comment shown in the socketServer object:
httpListen = function (port) {
    httpDomain.on('error', function (err) {
        console.log('Error caught in http domain:' + err);
    });

    httpDomain.run(function () {
        http.createServer(function (req, res) {
            var pathname = url.parse(req.url).pathname;
            console.log(pathname);
            if (pathname == '/' || pathname == '/index.html') {
                readFile(res, 'index.html');
            }
            else {
                readFile(res, '.' + pathname);
            }
        }).listen(port);
    });
},


readFile = function(res, pathname) {
    fs.readFile(pathname, function (err, data) {
        if (err) {
            console.log(err.message);
            res.writeHead(404, {'content-type': 'text/html'});
            res.write('File not found: ' + pathname);
            res.end();
        }
        else {
            res.write(data);
            res.end();
        }
    });
},
This code uses the http and fs modules provided by Node.js to handle serving HTML content. The code starts by calling createServer() and assigning it a callback function that will handle the incoming request and outgoing response. If the incoming request URL points to the root of the directory or to a file named index.html then the index.html file will be served up to the client. If it points to another location then that file will be served (the else condition isn’t actually used in this example and is added only for demo purposes). Once the server is created the listen() function is called and the port to listen on for HTTP requests is passed into it.
To handle Web Socket connections the websocket.io module functionality is put to use by using the following code. This code handles listening for Web Socket connections from clients and processes messages that are received.
socketListen = function(port) {
    socketDomain.on('error', function(err) {
        console.log('Error caught in socket domain:' + err);
    });

    socketDomain.run(function() {
        socketServer = ws.listen(port);

        socketServer.on('listening',function(){
            console.log('SocketServer is running');
        });

        socketServer.on('connection', function (socket) {

            console.log('Connected to client');
            sockets.push(socket);
            if (data == null) getPixData();

            socket.on('message', function (data) {
                console.log('Message received:', data);
            });

            socket.on('close', function () {
                try {
                    socket.close();
                    socket.destroy();
                    console.log('Socket closed!');
                    for (var i = 0; i < sockets.length; i++) {
                        if (sockets[i] == socket) {
                            sockets.splice(i, 1);
                            console.log('Removing socket from collection. Collection length: ' + sockets.length);
                            break;
                        }
                    }

                    if (sockets.length == 0) {
                        clearInterval(timerID);
                        data = null;
                    }
                }
                catch (e) {
                    console.log(e);
                }
            });

        });
    });
},
Once a client makes a connection a call is made to a function named getPixData() that calls out to Flickr and grabs some images. The code for this function is shown next:
getPixData = function() {
    var options = {
        host: 'api.flickr.com',
        port: 80,
        path: '/services/feeds/photos_public.gne?format=json&tags=puppies&jsoncallback=?',
        method: 'GET'
    };

    reqDomain.on('error', function(err) {
        console.log('Error caught in request domain:' + err);
    });

    reqDomain.run(function() {
        var req = http.request(options, function(res) {
            res.setEncoding('utf8');
            var json = '';

            res.on('data', function (chunk) {
                json += chunk;
            });

            res.on('end', function(){
                processJson(json);
            });
        });

        req.on('error', function(err) {
            console.log('Problem with request: ' + err);
        });

        req.end();
    });
},
This code makes a request out to Flickr using the Node.js http module and processes the data that’s returned. The data returned is formatted using JavaScript Object Notation (JSON) and processed using the custom processJson() function. This function cleans up the JSON data and then calls sendPicture() which handles sending picture data back to any clients connected to the socket server. The processJson() and sendPicture() functions are shown next:
sendPicture = function() {
    if (sockets.length) {
        var randomPicIndex = Math.floor(Math.random()*data.items.length);
        console.log('Sending data...');
        for(i=0;i<sockets.length;i++)
        {
            try {
                sockets[i].send(JSON.stringify(data.items[randomPicIndex]));
            }
            catch (e)
            {
                console.log(e);
            }
        }
    }
},

processJson = function(json) {
    json = json.substring(1, json.length - 1);
    json = json.replace(/\\\'/g,'');
    console.log(json);
    data = JSON.parse(json);
    //Send initial picture down
    sendPicture();
    timerID = setInterval(sendPicture, 5000);
},
Notice that the processJson() function starts a timer that fires every 5 seconds. When the timer fires the sendPicture() function is called to push picture data down to any clients that are connected to the socket server. The ability for a server to push data to one or more clients in real-time is a great feature of Web Sockets and in my opinion will have a significant impact on the Web in the near future.
The final piece of the socketServer object is the init() function which kicks off everything. It handles calling httpListen() and socketListen() to listen on the appropriate ports. After the init() function you’ll see a return statement that handles returning an object literal that exposes the init() function outside of the socketServer object (this code follows the Revealing Module Pattern):
init = function(httpPort, socketPort) {
    httpListen(httpPort);
    socketListen(socketPort);
};

return {
    init: init
};
Now that the socketServer object is complete its init() function needs to be called and ports need to be passed to it. A file named server.js (also located in the root of the directory – same location as socketServer.js) handles this:
var socketServer = require('./socketServer');
socketServer.init(8080, 9000);
Connecting a Browser to a Node.js Socket Server using Web Sockets
Now that the server-side code is complete, the client-side code needs to be created. First, we need a webpage that can be called which we’ll name index.html. This page can be added in the same location as the Node.js scripts discussed earlier:
<!doctype html>
<html>
<head>
    <title>WebSockets and Node.js</title>
    <link rel="stylesheet" type="text/css" href="css/style.css"/>
    <script src="http://code.jquery.com/jquery.js"></script>
    <script src="Scripts/modernizr.custom.61082.js"></script>
    <script src="Scripts/pixSocket.js"></script>
    <script src="Scripts/script.js"></script>
</head>
<body>
    <div id="container">
        <div id="pictureContainer">
            <img id="picture" />
            <br /><br />
            <span id="title">Loading....</span>
        </div>
    </div>
</body>
</html>
The index.html page relies on jQuery, Modernizr and two custom scripts. The first script is named pixSocket.js and handles creating a Web Socket connection to the Node.js server. Although we still need to add the code for the two custom scripts, the socket server can be started at this point by going to the command prompt (ensure that you’re in the directory where server.js is located) and running the following:
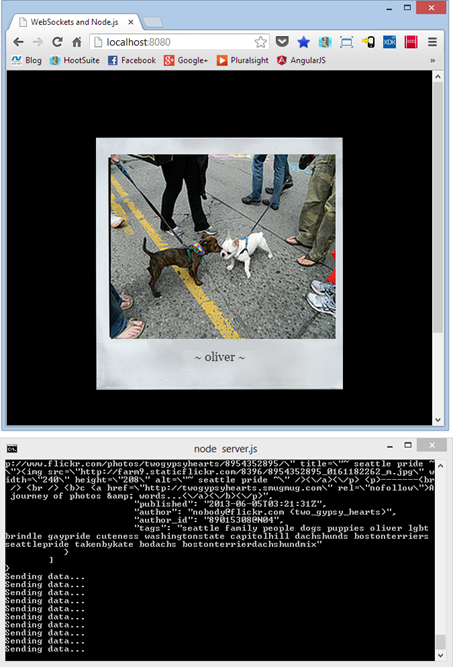
node server.js
Keep the command prompt up and running (this is your Node.js server) and navigate to the following URL in the browser. The page won’t work yet but you should at least see a page being served up by the Node.js server:
http://localhost:8080
Assuming that the page loads, you can move on to the next part of the client-side code which is adding the custom pixSocket.js script (it should be added to a Scripts folder that is created off the root of the directory you’ve been working in). This script is responsible for using Web Sockets to communicate with the server:
var pixSocket = function() {
    var settings,

    connect = function(_settings) {
        settings = _settings;
        var connection = new WebSocket(settings.host);

        connection.onopen = function () {};

        connection.onmessage = function (message) {
            var pix = JSON.parse(message.data);
            showPicture(pix.media.m, pix.title);
        };
    },

    showPicture = function(src, title) {
        var picContainer = $('#' + settings.pictureContainerID);
        picContainer.fadeOut(500, function() {
            $('#' + settings.pictureID).attr('src', src);
            $('#' + settings.titleID).html(title);
            picContainer.fadeIn(500);
        });
    };

    return {
        connect: connect
    };
}();
This code creates a new HTML5 Web Socket object and passes in the host/port to use (more on this in a moment). Is then wires the onopen and onmessage events to functions. The onopen function doesn’t do anything at this point but the onmessage callback function handles parsing the data that’s received from the socket server (picture data if you recall) and then passes it off to the showPicture() function which handles updating the user interface using jQuery. Like the socketServer object, the pixSocket object relies on the Revealing Module Pattern to expose the connect() function.
The final script that needs to be added is named script.js (it should be added in the Scripts folder as well). It’s responsible for firing up the pixSocket object and passing it information about the host/port to use to call the Node.js server. It only does this if the browser supports HTML5 Web Sockets though. In this example, Modernizr is used to check for the presence of Web Sockets before calling pixSocket’s connect() function.
$(document).ready(function () {
    if (!Modernizr.websockets) {
        alert('WebSockets are not supported.');
        return;
    }

    var settings = {
        host: 'ws://localhost:9000',
        pictureContainerID: 'pictureContainer',
        pictureID: 'picture',
        titleID: 'title'
    };

    pixSocket.connect(settings);
});
At this point all of the necessary code is in place. Try navigating to http://localhost:8080 again (make sure your Node.js server is running) and if everything has been added properly you should see pictures being pushed from the server to the client using Web Sockets.
Summary
You’ve now seen the entire process for creating an HTML and Web Socket server using Node.js and then calling it and connecting using Web Sockets from any modern browser. Web Sockets are great because they provide real-time communication between a client and server and allow a server to push data to connected clients as with this example. The completed code for this example can be downloaded here. If you want to use Node.js and gracefully fallback to other solutions when a browser doesn’t support Web Sockets check out the socket.io module at http://socket.io.


