
Creating a Silverlight 2 Client Access Policy Socket Server
Silverlight 2 provides built-in support for sockets which allows servers to push data to Silverlight clients. By using this feature clients can avoid polling the server on a timed basis to ensure that clients are kept up-to-date. If you're new to the socket features built-into Silverlight 2 you'll want to read my previous posts to get additional details about how data can be pushed from a server to a client:
- Pushing Data to a Silverlight Client with Sockets: Part I
- Pushing Data to a Silverlight Client with Sockets: Part II
Silverlight 2 Beta 2 (and beyond) checks for a client access policy before accessing sockets located on host domain or cross-domain servers. An example of a client access policy for sockets is shown next:
<?xml version="1.0" encoding ="utf-8"?>
<access-policy>
  <cross-domain-access>
    <policy>
      <allow-from>
        <domain uri="*" />
      </allow-from>
      <grant-to>
        <socket-resource port="4530" protocol="tcp" />
      </grant-to>
    </policy>
  </cross-domain-access>
</access-policy>
This XML code allows Silverlight to access a TCP socket on port 4530. A range of ports can be specified in the port attribute if needed (ex: 4530-4532). Before Silverlight tries to call a server with a socket, it makes a call to the target server on port 943 to check the client access policy and see if the server allows socket connections. This helps minimize various types of hacker attacks. If a client access policy is available on the server and the policy allows access to the port the client is trying to call, processing of the socket code continues and Silverlight tries to connect. If not, the client will be unable to connect due to access being denied by Silverlight.
An example of creating a client access policy socket server that Silverlight can connect to on port 943 is shown next:
using System;
using System.Collections.Generic;
using System.Text;
using System.Net;
using System.Net.Sockets;
using System.IO;
using System.Threading;
using System.Reflection;
using System.Configuration;

namespace PolicySocketServices
{
    class PolicySocketServer
    {
        TcpListener _Listener = null;
        TcpClient _Client = null;
        static ManualResetEvent _TcpClientConnected = new ManualResetEvent(false);
        const string _PolicyRequestString = "<policy-file-request/>";
        int _ReceivedLength = 0;
        byte[] _Policy = null;
        byte[] _ReceiveBuffer = null;

        private void InitializeData()
        {
            string policyFile = ConfigurationManager.AppSettings["PolicyFilePath"];
            using (FileStream fs = new FileStream(policyFile, FileMode.Open))
            {
                _Policy = new byte[fs.Length];
                fs.Read(_Policy, 0, _Policy.Length);
            }
            _ReceiveBuffer = new byte[_PolicyRequestString.Length];
        }

        public void StartSocketServer()
        {
            InitializeData();

            try
            {
                //Using TcpListener which is a wrapper around a Socket
                //Allowed port is 943 for Silverlight sockets policy data
                _Listener = new TcpListener(IPAddress.Any, 943);
                _Listener.Start();
                Console.WriteLine("Policy server listening...");
                while (true)
                {
                    _TcpClientConnected.Reset();
                    Console.WriteLine("Waiting for client connection...");
                    _Listener.BeginAcceptTcpClient(new AsyncCallback(OnBeginAccept), null);
                    _TcpClientConnected.WaitOne(); //Block until client connects
                }
            }
            catch (Exception exp)
            {
                LogError(exp);
            }
        }

        private void OnBeginAccept(IAsyncResult ar)
        {
            _Client = _Listener.EndAcceptTcpClient(ar);
            _Client.Client.BeginReceive(_ReceiveBuffer, 0, _PolicyRequestString.Length, SocketFlags.None,
                new AsyncCallback(OnReceiveComplete), null);
        }

        private void OnReceiveComplete(IAsyncResult ar)
        {
            try
            {
                _ReceivedLength += _Client.Client.EndReceive(ar);
                //See if there's more data that we need to grab
                if (_ReceivedLength < _PolicyRequestString.Length)
                {
                    //Need to grab more data so receive remaining data
                    _Client.Client.BeginReceive(_ReceiveBuffer, _ReceivedLength,
                        _PolicyRequestString.Length - _ReceivedLength,
                        SocketFlags.None, new AsyncCallback(OnReceiveComplete), null);
                    return;
                }

                //Check that <policy-file-request/> was sent from client
                string request = System.Text.Encoding.UTF8.GetString(_ReceiveBuffer, 0, _ReceivedLength);
                if (StringComparer.InvariantCultureIgnoreCase.Compare(request, _PolicyRequestString) != 0)
                {
                    //Data received isn't valid so close
                    _Client.Client.Close();
                    return;
                }
                //Valid request received....send policy data
                _Client.Client.BeginSend(_Policy, 0, _Policy.Length, SocketFlags.None,
                    new AsyncCallback(OnSendComplete), null);
            }
            catch (Exception exp)
            {
                _Client.Client.Close();
                LogError(exp);
            }
            _ReceivedLength = 0;
            _TcpClientConnected.Set(); //Allow waiting thread to proceed
        }

        private void OnSendComplete(IAsyncResult ar)
        {
            try
            {
                _Client.Client.EndSendFile(ar);
            }
            catch (Exception exp)
            {
                LogError(exp);
            }
            finally
            {
                //Close client socket
                _Client.Client.Close();
            }
        }

        private void LogError(Exception exp)
        {
            string appFullPath = Assembly.GetCallingAssembly().Location;
            string logPath = appFullPath.Substring(0, appFullPath.LastIndexOf("\\")) + ".log";
            StreamWriter writer = new StreamWriter(logPath, true);
            try
            {
                writer.WriteLine(logPath,
                    String.Format("Error in PolicySocketServer: "
                    + "{0} \r\n StackTrace: {1}", exp.Message, exp.StackTrace));
            }
            catch { }
            finally
            {
                writer.Close();
            }
        }
    }
}
Looking through the code you'll see that it uses the TcpListener class to listen for incoming client connections. Once a client connects the code checks the request for the following value:
<policy-file-request/>
Silverlight automatically sends this text to the policy file socket once it connects. If the request contains the proper value the code writes the contents of the client access policy back to the client stream (see the OnReceiveComplete() method). Once the policy file is received, Silverlight parses it, checks that it allows access to the desired port, and then accepts or rejects the socket call that the application is trying to make.
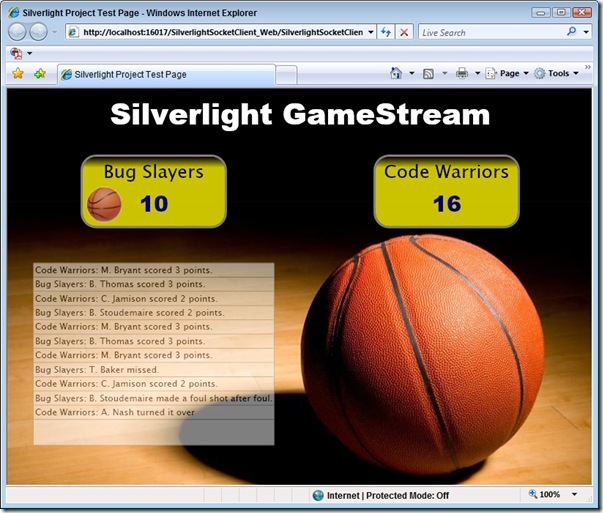
An example of the Silverlight GameStream socket application I created to demonstrate the fundamentals of using sockets is shown next. The code for the application can be downloaded here.
If you're brand new to Silverlight 2 and are interested in getting started with it check out the following video tutorials:
Silverlight 2.0 Video Tutorials
| Part 1: Creating "Hello World" with Silverlight 2 and VS 2008 | Tutorial | Video Tutorial |
| Part 2: Using Layout Management | Tutorial | Video Tutorial |
| Part 3: Using Networking to Retrieve Data and Populate a DataGrid | Tutorial | Video Tutorial |
| Part 4: Using Style Elements to Better Encapsulate Look and Feel | Tutorial | Video Tutorial |
| Part 5: Using the ListBox and DataBinding to Display List Data | Tutorial | Video Tutorial |
| Part 6: Using User Controls to Implement Master/Details Scenarios | Tutorial | Video Tutorial |
| Part 7: Using Templates to Customize Control Look and Feel | Tutorial | Video Tutorial |
| Part 8: Creating a Digg Desktop Version of our Application using WPF | Tutorial | Video Tutorial |
Subscribe to my Free FlipBoard Magazines: | ||||
 |  |  |  |  |