Globalization & Localization in ASP.Net Core 7
In today's world, it is becoming increasingly common for applications to be written with a global audience in mind. Globalization and localization are two key concepts that developers must consider when creating software to support multiple languages / cultures.
Globalization
Globalization refers to the process of making your application ready for multiple cultures and languages. This includes ensuring all your content can be properly displayed in different languages or regions around the world.
Localization
Localization is another essential part of developing a successful global application; this involves adapting your product’s user interface (UI) elements like buttons & menus as well as its content to specific cultural conventions associated with certain locales or language groups.
Applications for the Global Audience
With the increasing diversity and interconnectedness of our global population, businesses and organizations must adapt to a multicultural and multilingual audience in order to thrive and remain relevant in the modern marketplace. By implementing globalization and localization features, you can make your application accessible to a wider audience, including users who speak different languages and come from different regions of the world. This can help to enhance the user experience and increase user engagement with your application.
Ignoring the importance of globalization can lead to missed opportunities and decreased competitiveness in today's global economy. Cloud computing has significantly contributed to globalization by offering unparalleled scalability and accessibility to businesses and organizations, enabling them to easily reach and serve a global audience.
Implementation in ASP.Net Core 7
In the past, I wrote an article about developing multilingual applications using ASP.Net 4. You may find that article here, much has changed since then, Microsoft introduced ASP.Net Core and Web forms are no longer the preferred option for new applications. In this article, I am going to showcase how you can achieve globalization and localization in ASP.Net 7. For the purpose of demonstration, I am focusing on ASP.Net Core Razor Pages, However, the approach is similar for other types of .Net application such as ASP.Net MVC.
As supported in ASP.Net Webforms in the early days, ASP.Net Core also uses the Resource files(.resx) files for localizing applications. In the remaining part of this article, you will see how you can use resource files to define contents for different languages / cultures.
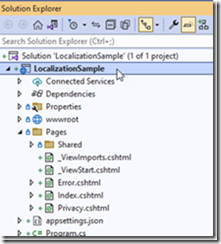
First thing, let us create a basic ASP.Net Core application. I am using Visual Studio 2022 and ASP.Net Core Web application template, for this exercise. The following screenshot shows the default application that is displayed in the solution explorer.
The default template produces the following output when executed.
Now let us enable this application to support English, Arabic and French. During your application development process, it is quite common that you initially support few languages, and then as your application grows, you add support for further languages.
I mentioned earlier that ASP.NET Core also utilizes resource files for globalization. To add globalization support to your application, you can use the following code in the Program.cs file.
var builder = WebApplication.CreateBuilder(args);
builder.Services.AddLocalization(options => options.ResourcesPath = "Resources");
builder.Services.AddRazorPages().AddViewLocalization();
var app = builder.Build();
See the following lines,
builder.Services.AddLocalization(options => options.ResourcesPath = "Resources");
builder.Services.AddRazorPages().AddViewLocalization();
This adds localization support for your application, and also specify the path to the resource files where you create your .resx files.
The next step is to tell your application about the supported cultures and default culture. In the Program.cs file, add the following code.
    var supportedCultures = new[] { "en", "fr", "ar" };
    var localizationOptions = new RequestLocalizationOptions()
        .SetDefaultCulture(supportedCultures[0])
	.AddSupportedCultures(supportedCultures)
        .AddSupportedUICultures(supportedCultures);
    app.UseRequestLocalization(localizationOptions);
You may notice, we are setting Culture and UICulture. The Culture is responsible for culture dependent data such as date, currency, numbers etc. However UICulture impacts which resource file is loaded by the application.
The above code enable support for English, French and Arabic to the application. The code also set the default culture to English. Also it sets the Supported Cultures and Supported UI Cultures. It is good to notice the purpose for Culture and UI Culture. The Culture is responsible for culture dependent data such as date, currency, numbers etc. However UICulture impacts which resource file is loaded by the application.
Also you may notice, I am using only two letter cultures, you may use two letter or 4 letter culture code. For e.g. “en” refers to English language in general, but you can be more specific like “en-GB” for English Great Britain and “en-US” for English United States. Refer the URL http://www.lingoes.net/en/translator/langcode.htm for the culture codes and their meaning.
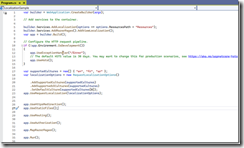
The following images shows the completed Program.cs file.
Add Resource Files
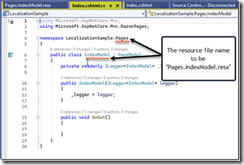
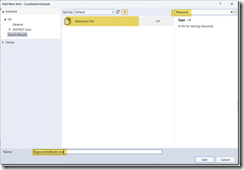
The next step is to add resource files for localized text in the application. First create a folder “Resources” in the project. Now, in the Resources folder, create a resource file with name of your Page Model class with respect to the Assembly name. In our case it is Pages.IndexModel.resx.
In Solution Explorer, right click Resources Folder and add -> new item and add a resource file named “Pages.IndexModel.resx”
Now add the values that represents the values in the Index.cshtml file. Basically you can use your own Name for the resource items, and in the value column, you can specify the localized text.
The next thing is to enable code generation for the resource file. In the resx file tool bar, select Access Modifier to public.
Now right click the Resources folder and add new Resources for Arabic and French. It must be named “Pages.IndexModel.ar.resx” and “Pages. IndexModel.fr.resx” respectively. I just did the translation with goole and updated the corresponding resource files.
File: Pages.IndexModel.ar.resx
File: Pages.IndexModel.fr.resx
Use Resource File in the cshtml
in the Index.cshtml file, you need to replace the text data with the resource values. Here you will require to use IStringLocalizer and IHtmlLocalizer. The former is designed to localize the text data and the later is specifically for HTML text localization. By using the AddLocalization method in the Program.cs file, both IStringLocalizer and IHTMLLocalizer are available to you through the dependency Injection (DI). See the updated index.cshtml file that displays the data from the resource files.
@page
@using Microsoft.AspNetCore.Mvc.Localization;
@using Microsoft.Extensions.Localization;
@model IndexModel
@inject IStringLocalizer<IndexModel> stringLocalizer;
@inject IHtmlLocalizer<IndexModel> htmlLocalizer;
@{
    ViewData["Title"] = stringLocalizer["PageTitle"];
}
<div class="text-center">
<h1 class="display-4">@stringLocalizer["WelcomeText"]</h1>
<p>@htmlLocalizer["HtmlContent"]</p>
</div>
The code is self-explanatory. First you get the instance for localizers through Dependency Injection. Then replace your html markup with corresponding resources. See the output for the page when you run it.
You can see, the contents from the Index.cshtml file is fetching the data from the resource file.
Localizing the Request
The final step in localizing the app is to apply the localization to each request. In the Program.cs file, remember we added the following line.
app.UseRequestLocalization(localizationOptions);
ASP.Net Core already implementing the logic for localizing the request. It decide the request culture based on querystring, cookies or the request headers. Let me explain the options one by one.
Query String
You can pass the query string variables, culture & ui-culture to set the culture for the request. If you pass only one parameter, the same will be applied to both parameters. In case you need different culture than the ui-culture, you need to pass them separately.
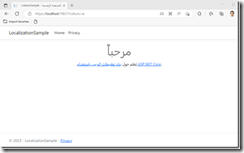
Let me load Arabic version of our page by passing the query string. The URL is
https://localhost:7067/?culture=ar
The output is below.
Cookies
Though passing query string parameters work, for Production ready applications, it is better to use the Cookie Provider to set the culture. When the user changes the language, you can write the selected culture to the cookie and subsequent requests will automatically fetches the selected culture.
By default, the provider uses the cookie name “.AspNetCore.Culture” to determine the culture. To set the culture using cookies, you can use the parameter c for culture and uic for ui culture. See the following cookie value that set the culture to French.
c=fr|uic=fr
Let me show you how can you set the cookie from the .Net Core. To load each language, I am using a handler method. The handler method write the cookie and redirect the request to the root page. You may choose your own logic to set the cookie based on your application requirements.
public IActionResult OnGetLoadArabic()
{
    Response.Cookies.Append(".AspNetCore.Culture", "c=ar|uic=ar", new CookieOptions { Expires=DateTime.Now.AddDays(1)});
    return Redirect("/");
}
public IActionResult OnGetLoadFrench()
{
    Response.Cookies.Append(".AspNetCore.Culture", "c=fr|uic=fr", new CookieOptions { Expires = DateTime.Now.AddDays(1) });
    return Redirect("/");
}
public IActionResult OnGetLoadEnglish()
{
    Response.Cookies.Append(".AspNetCore.Culture", "c=en|uic=en", new CookieOptions { Expires = DateTime.Now.AddDays(1) });
    return Redirect("/");
}
Let me load the French version by using the URL https://localhost:7067/?Handler=LoadFrench
You may observe the cookie value in the Edge developer tools. You may use appropriate handler endpoints to load the corresponding languages.
Headers
Another option to set the culture is by using the Accept-Language or the Content-Language header. Refer the following URLs for more details.
Summary
Globalizing an ASP.Net core application is fairly easy. I recommend you to implement the globalization and localization to every project you develop. You may refer the localization project I created in this article from the following GitHub.
Note:- In this blog post, we only looked in to how to update the text that is coming from the razor pages. For updating content in the Layout and for Data Annotations I will write another article soon.
