Integrate Amazon SNS with Asp.Net Core Application
Amazon SNS is a notification service that offer message delivery. SNS basically supports messaging between a variety of publishers and consumers. Publishers shall send notifications to Topics and Subscribers can consume the messages. Amazon SNS supports Application to Application messaging and Application to Person messaging.
In this article I am going to demonstrate the Application to Person subscription in Amazon SNS. In Application to Person messaging, SNS supports the following.
- SMS Messaging
- Mobile Push Notifications
- Email Notifications
Now for the purpose of this demo, I am going to create an Amazon SNS Topic that deliver the message to Email and SMS. Then using the ASP.Net core application, I will show you how you can create subscribers to the topic and then send messages to the subscribers. Cool!
A SNS topic is a logical component that group multiple end points such as Email, SMS, SQS, HTTP/S etc. When you create a topic you need to specify the type of the topic, a name and a display name. The type can not be changed later and I will be using the standard type that supports various delivery protocols.
Login to your AWS Console, go to Amazon SNS and create a topic.
I just leave other settings as default. You can refer more details about creating a Topic using AWS Console from https://docs.aws.amazon.com/sns/latest/dg/sns-create-topic.html#create-topic-aws-console. Once created, the SNS topic will be available in the topics list page.
Now our Topic is ready, let us use it in the ASP.Net application. This application will add subscribers to the topic and send message to the subscribers. To use in the ASP.Net application, you need to copy the ARN of the Topic.
I am using Visual Studio 2022 and ASP.Net 6.0 to create this application. However the steps mentioned here are similar if you use another version of .Net core or use console instead of Visual Studio to create the project.
In Visual Studio create a new ASP.Net Core Web App.
I named the project as SNSSample. First thing you need to do is to add the reference to the following Nuget packages.
The AWSSDK.Extensions.NETCore.Setup Nuget package helps you to setup the AWS credentials with your .Net Core App. You may refer the details from the below link.
https://docs.aws.amazon.com/sdk-for-net/v3/developer-guide/net-dg-config-netcore.html
You need to have an AWS account, If you don’t have one, you can set up one for free, visit the following URL to create a free tier account.
Once you create the account, you need to setup access key ID and secret key. To setup one for you, refer the below URL.
https://docs.aws.amazon.com/powershell/latest/userguide/pstools-appendix-sign-up.html
Once you have the access key ID and secret key, the next thing is to create a profile in your computer and specify the access key ID and secret. Refer the following URL for the same
https://docs.aws.amazon.com/sdk-for-php/v3/developer-guide/guide_credentials_profiles.html
I added a profile in the credentials file in the .aws folder.
Now you are ready to use this profile in your .Net Core 6 application. AWS SDK supports the dependency injection model for configuring the AWS credentials. I registered the profile in the appsettings.Development.json file. After updated, my appsettings looks like below.
{
  "DetailedErrors": true,
  "Logging": {
    "LogLevel": {
      "Default": "Information",
      "Microsoft": "Warning",
      "Microsoft.Hosting.Lifetime": "Information"
    }
  },
  "AWS": {
    "Profile": "SNSTest",
    "Region": "me-south-1"
  }
}
Next you need to configure AWS options in the ConfigureServices method in the Startup.cs of your .Net Core project. See the modified ConfigureServices below.
public void ConfigureServices(IServiceCollection services)
{
    services.AddRazorPages();
    //Configure AWS to use the configuration from the app settings file
    services.AddDefaultAWSOptions(Configuration.GetAWSOptions());
    //Make sure SNS is available in the DI context
    services.AddAWSService();
}
Now the .Net core application is ready to use AWS SDK calls to interact with SNS. Let me create two pages, one to add subscription to the Amazon SNS topic and the other to publish the messages to the topic so that it will be delivered to the registered subscribers.
Subscribe to Topic
I created a page “AddSubscription” in the pages folder. Add controls to collect email address and telephone number from the user. The razor page looks like below.
<form method="post">
    <div>
        <input type="email" placeholder="Enter Your Email" asp-for="EmailId">
    </div>
    <div>
        <input type="text" placeholder="Enter Your Phone" asp-for="PhoneNo">
    </div>
    <div>
        <input type="submit" value="Submit">
    </div>
</form>
This will display the below output in the browser.
In the AddSubscriptionModel, create a property of type IAmazonSimpleNotificationService.
IAmazonSimpleNotificationService SNSClient { get; set; }In the Model Constructor, use dependency injenction (DI) to get the SNS object.
public AddSubscriptionModel(IAmazonSimpleNotificationService snsClient)
{    SNSClient = snsClient;
}
Now in the Post Method create an object of class SubscribeRequest to register an email address with the topic. The SubscribeRequest class is responsible for creating the subscription requests, which can be posted to Amazon SNS using SubscribeAsync method. The subscribe request accepts three arguments, the first one, is the ARN of the topic we created in the AWS Console. Depending on your application you may store this in database or in configuration settings, but here I am just using the ARN in a local variable. The second argument to SubscribeRequest is the protocol. First let me create an email subscription, the protocol to use in this case is email. The third parameter to SubscribeREquest is the actual email ID that is entered by the user.
SubscribeRequest emailRequest = new SubscribeRequest(topicArn, "email", EmailId);Once you created the Subscribe Request object, you can invoke the SubscribeAsync and pass the SubscribeRequest object.
SubscribeResponse emailSubscribeResponse = await SNSClient.SubscribeAsync(emailRequest);Now the subscription to the topic will be created. You can get the subscription request Id from the metadata of the request as below.
var topic emailRequestId = emailSubscribeResponse.ResponseMetadata.RequestId;You may use the ResponseMetadata.RequestId property to log the request Id for auditing/tracing purpose.
Now let us see, how to create a subscription to the topic with a mobile number. To subscribe a mobile number to the Topic, it is similar to the email subscription, the only difference is that you need to use “sms” as the protocol and then pass the Mobile Number.
var smsRequest = new SubscribeRequest(topicArn, "sms", PhoneNo);See the complete code for the Post method here.
public async Task OnPostAsync()
{
    if(ModelState.IsValid)
    {
        try
        {
            string topicArn = "arn:aws:sns:me-south-1:xxxxxxxxxxxx:TestSNSTopic";

            //add email as the subscriber
            SubscribeRequest emailRequest = new SubscribeRequest(topicArn, "email", EmailId);
            SubscribeResponse emailSubscribeResponse = await SNSClient.SubscribeAsync(emailRequest);
            var emailRequestId = emailSubscribeResponse.ResponseMetadata.RequestId;

            //add phone number as the subscriber
            var smsRequest = new SubscribeRequest(topicArn, "sms", PhoneNo);
            SubscribeResponse smsSubscribeResponse = await SNSClient.SubscribeAsync(smsRequest);
            var smsRequestId = emailSubscribeResponse.ResponseMetadata.RequestId;
            Result = $"Subscription successful";
        }
        catch (Exception ex)
        {
            Result = $"Unexpected Error!";
        }
    }
    else
    {
        Result = "Check your input";
    }
}
I ran the code and registered used my email id and mobile number. I received an email with the following content.
The subscription of type Email will require the user to click on the confirm subscription link. This is to avoid spams. Now let me go to the Topics Page and see the subscriptions there.
You will see the email subscription is pending, as I didn’t click on the confirmation link. When you click on the confirmation, you will see the confirmation page as below.
And now you can see, both subscriptions are confirmed.
Note:- If you are not receiving SMS message, from the AWS console, check whether you are in the Sandbox. If you are in the Sandbox, you need to register the mobile number in the sandbox, which I did so that SNS will send SMS to the mobile number. You can exit sandbox by initiating a service request to AWS.
Refer: https://docs.aws.amazon.com/sns/latest/dg/sns-sms-sandbox.html
Send Message to Subscribers
The next thing is to send message from the Topic, you can use AWS console and use the publish message option there to test the messaging. However, in real life, you will need your application to publish messages to the Topic, let me show you, how a message can be published from our .Net Core application.
For this purpose, I created a page named SendMessage. In the Send Message, I have the following markup.
PublishRequest pubRequest = new PublishRequest(topicArn, Message);This allows user to type a message and click on the submit button to publish the message to the Topic.
Now the Post method create the PublishRequest Object by passing the topic ARN and the string message that is entered by the user.
PublishResponse pubResponse = await SNSClient.PublishAsync(pubRequest);Call the PublishAsync method with the Publish Request Object
Result = $"MessageId: {pubResponse.MessageId}";You may get the messageId from the MessageId property of the PublishResponse object and log it for audit trials.
The entire code for the Post Method is given below.
public async Task OnPostAsync()
{
    if (ModelState.IsValid)
    {
        try
        {
            string topicArn = "arn:aws:sns:me-south-1:653594899301:TestSNSTopic";
            PublishRequest pubRequest = new PublishRequest(topicArn, Message);
            PublishResponse pubResponse = await SNSClient.PublishAsync(pubRequest);
            Result = $"MessageId: {pubResponse.MessageId}";
        }
        catch (Exception ex)
        {
            Result = $"Unexpected Error!";
        }
    }
    else
    {
        Result = "Check your input";
    }
}
Let me try this out.
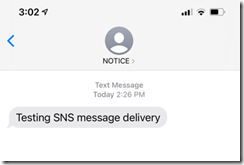
The moment I fired the Submit button, I received the SMS and email message as below.
Cool. When an application sends messages, sometimes you may want to send different messages for different protocols, for e.g. you may need to send a detailed message to the email but keep a short message for SMS. With SNS you can easily achieve this, what you need to do is set the MessageStructure property of the PublishRequest to “json” and specify different message for each protocol with a default message.
pubRequest.MessageStructure = "json";
Then set the Message as a Json string. Refer the following code that sends different message for email and SMS.
public async Task OnPostAsync()
{
    if (ModelState.IsValid)
    {
        try
        {
            string topicArn = "arn:aws:sns:me-south-1:653594899301:TestSNSTopic";
            var jsonMessage = $@"{{""default"": ""{Message}"",
                              ""email"": ""Dear User,
                              The following is the formatted email message:
                              {Message}
                              Thank You."",
                              ""sms"" : ""{Message}""
                              }}";
             PublishRequest pubRequest = new PublishRequest(topicArn, JObject.Parse(jsonMessage).ToString());
             pubRequest.MessageStructure = "json";
             PublishResponse pubResponse = await SNSClient.PublishAsync(pubRequest);
             Result = $"MessageId: {pubResponse.MessageId}";
         }
         catch (Exception ex)
         {
             Result = $"Unexpected Error!";
         }
    }
    else
    {
         Result = "Check your input";
    }
}
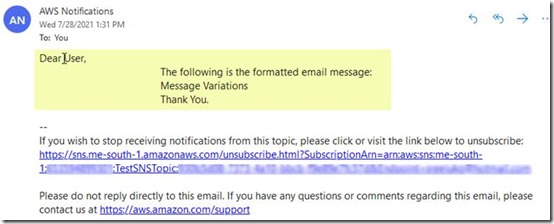
When I execute the code by entering the message “Message Variations”, I received the following messages in the email and phone, notice the email message is different than the SMS message.
Email Message:
SMS Message:
Summary
Amazon Simple Notification Service aka Amazon SNS is a pay as you go service, where you can easily integrate with your applications to deliver notifications. You can refer more about Amazon SNS pricing from the below link
https://aws.amazon.com/sns/pricing/
Thanks for reading.


