Introduction to canvas element in HTML 5
One of the new features in HTML 5 is the canvas element. Canvas is a rectangular area where you can draw various objects using the script. In a more simple way you can consider canvas as a rectangular area where you can create your own graphics in the web page.
The syntax for the element is as follows
<canvas id="myCanvas" width="400" height="500"></canvas>
The above script will create a canvas element in the browser with id myCanvas having dimensions 400 pixel width and 500 pixel height. The definition of canvas element is pretty standard and like most other tags. Using the id, you can refer the element from script. The canvas is supported by standard DOM syntax. For e.g. you can create a reference to the above canvas using the below statement
var objCanvas = document.getElementById(“myCanvas”);
To perform any action on the canvas, you need to use the context inside the canvas. The context is the drawing area inside the canvas. Current specifications support only the 2D context for the canvas element, but with the advent of technology, you can expect the support for 3D or other contexts in future.
To do any action inside the canvas, you need to get a reference to the 2d context. In order to do that you can use the getContext method of the canvas object
var context = objCanvas.getContext("2d");
Note that the 2d is the only supported context now and make sure it is used in the correct case.
Now using the 2d context object of the canvas element, you can draw various elements using script. The ability to draw on the canvas area, makes the canvas element distinct from other html elements available till date.
You can draw only one type of primitive shape on the canvas – rectangle. To draw a rectangle in the canvas, there are 3 functions available.
fillRect(x,y,width,height) ; // Draws a filled rectangle
strokeRect(x,y,width,height) ;//Draws a rectangular outline
clearRect(x,y,width,height) //makes the specified area transparent.
See the sample output attached.
To draw any other shapes in the canvas, you need to combine one or more paths. Internally the paths are stored as lists of sub paths. So a typical drawing process can be described as
- Clear the existing path / set a new path
- Add sub paths to the path collection
- stroke/fill through the paths
To start with a new set of paths, you need to call beginPath() method. This method clear all the paths from the current path collection. Once you start with beginPath() method, you need to move your path to the specific co-ordinates, from where you start your drawing. The moveTo method is built for this purpose. The moveTo method is optional as you may or may not call it after calling biginPath().
To add sub-paths to the path collection, you have a set of methods available such as
- lineTo
- moveTo
- arc
- arcTo
- etc
Once you define the path, you need to call stroke
The references to the functions are given at the end of this article.
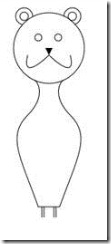
To demonstrate the drawing options available with the canvas object, I drew a simple figure using the following script. I have a JavaScript function that creates the figure. The function is as follows.
function canvasTest()
{
var objCanvas = document.getElementById("myCanvas");
var context = objCanvas.getContext("2d");
//head
context.beginPath();
context.arc(75,75,50,0,6.28,false);
context.stroke();
//left ear
context.beginPath();
context.arc(40,30,12,1.8,0, false);
context.stroke();
context.beginPath();
context.arc(40,30,6,6.28,0, false);
context.stroke();
//right ear
context.beginPath();
context.arc(108,30,12,3.1,1.3, false);
context.stroke();
context.beginPath();
context.arc(108,30,6,0,6.28, false);
context.stroke();
//left eye
context.beginPath();
context.arc(60,60,5,6.28,0, false);
context.stroke();
//right eye
context.beginPath();
context.arc(88,60,5,6.28,0, false);
context.stroke();
//nose
context.beginPath();
context.moveTo(70,75);
context.lineTo(80,75);
context.lineTo(75,85);
context.closePath();
context.fill();
context.beginPath();
context.bezierCurveTo(75,85,115,125,105,85);
context.stroke();
//left mostaq
context.beginPath();
context.bezierCurveTo(75,85,35,125,45,85);
context.stroke();
//leftneck
context.beginPath();
context.moveTo(95,120) ;
context.bezierCurveTo(85,130,85,150,105,170);
context.stroke();
//right neck
context.beginPath();
context.moveTo(55,120) ;
context.bezierCurveTo(65,130,65,150,45,170);
context.stroke();
//left body
context.beginPath();
context.moveTo(105,170) ;
context.bezierCurveTo(135,200,115,230,90,300);
context.stroke();
//right body
context.beginPath();
context.moveTo(45,170) ;
context.bezierCurveTo(15,200,35,230,60,300);
context.lineTo(90,300);
context.stroke();
//left leg
context.beginPath();
context.moveTo(65,300);
context.lineTo(65,315);
context.moveTo(68,300);
context.lineTo(68,315);
context.stroke();
//right leg
context.beginPath();
context.moveTo(85,300);
context.lineTo(85,315);
context.moveTo(82,300);
context.lineTo(82,315);
context.stroke();
}
In the body of the html page, I have a canvas element placed. I called this function in the on-load event of the page.
<body onload="canvasTest();">
<canvas id="myCanvas" width="400" height="500" ></canvas>
</body>
The output of the above script is below
References:

