SharePoint 2010 : Sharing data between Visual Web Parts
Web Parts are essential parts of SharePoint 2010 that helps developers and site owners to customize the SharePoint portal. There are lots of out of the box web parts available in SharePoint 2010. When you are building business portals definitely you will be in need to create your own web parts corresponding to your business requirements. SharePoint 2010 supports Visual web parts. Visual web parts allow developers to easily design the user interface as they are doing in conventional ASP.Net applications.
I have published an article that describes how to build Visual web part for SharePoint 2010. You can read that article from this link.
Sometimes developers might need to shared data between web parts. In this article I am going to demonstrate how you can share data between two Visual web parts.
For the purpose of article, I am going to create two web parts one will ask user to select the gender and the other web part will display the selected gender. This scenario looks so simple, but for the purpose of demonstrating how to share data between Visual web parts, I believe the scenario is ok.
For the purpose of this Article, I am going to create two Visual web parts as follows.
- GenderProvider web part – This web part will allow users to select the gender using a radiobuttonlist. This web part will provide gender data to other web parts.
- GenderConsumerWebpart – This web part will display what the user has selected in the first web part.
The following are the steps for building such an application.
- Create an Empty SharePoint 2010 project
- Create an Interface that represents the data to be shared
- Create a provider web part that implement the Interface
- Create a consumer web part that consumes the string
- Include these web parts in a page and define the connections
Create the SharePoint 2010 project
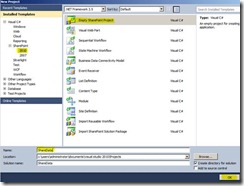
Open Visual Studio 2010, select File -> New -> Project, from the template selection Dialog, Select empty SharePoint project and give a name for the project. I just named the project as ShareData
Click OK once you are there. In the next step make sure you choose to deploy as farm solution.
Create Interface
Now you need to add an Interface that defines the data to share. Right click the project, select Add -> New Item, from the Template selection dialog, Select, Code -> Interface, name the Interface as IGender
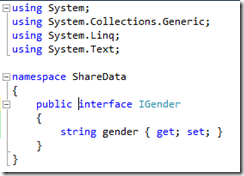
Create a string variable named gender in the interface. The code for the interface is as follows.
Create data provider web part
Now you need to create a web part that allows user to select a gender. This web part should have the capability to provide the selected gender information to other web parts.
I am going to create a web part named “GenderProvider” .
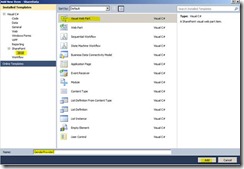
From the solution explorer right click the project, select Add -> New Item, Select Visual Web Part as the template, enter the name as GenderProvider. Click on Add button once you are done.
Now Visual Studio 2010 will create the necessary files for Visual web part. The visual web part mainly consists of two components, a class file for web part and a user control file where you define your controls.
From solution explorer, Expand the GenderProvider, you will see GenderProvider.cs. Open the code file and you can see your web part class definition starts as follows
Here you need just to implement the interface IGender, once implemented; the class definition will be as follows.
Now in the web part class, you need to implement the gender property which is a string as you defined in the Interface. Actually the webpart will load the user control to its control collection in the CreateChildControls. By default a Visual Webpart will have the following code in the CreateChildControls() method.
The code is self-explanatory. It is loading the ascx file using the LoadControl method and add it to the control collection. The member variable “gender” defined in the web part class needs to be accessed from the ascx page. To achieve this, you need to do the below 3 tasks
· Create a UserControl variable in the web part class and in the CreateChildControls method assign its value to the loaded user control
· In the UserControl class, create a public variable of type web part class.
· Assign the web part variable of UserControl in the CreateChildControls method.
Once you have done these changes, the code for web part class file and UserControl code are given below.
GenderProvider.cs
GenderProviderUserControl.ascx.cs
In the user control I have placed a radio button list and a button. I just assign the value of gender from the page load method but you can access the value from any event handler, e.g. button click, select index changed etc. depending on your requirements.
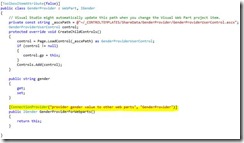
Now you are almost done. Now in the GenderProvider.cs class, create a public method that returns the Interface you have created (IGender) and specify the Connection provider attribute. The complete code for the GenderProvider.cs is as follows.
Now you are done with the connection provider.
Create data consumer web part
Now you need connection consumer web part that uses the gender data provided by the above web part. Add a new Visual web part GenderConsumer that can consume the data from the connection provider. You need to perform the below actions
- In the consumer web part (GenderConsumer.cs), create an object for Interface “IGender”. The purpose of this variable is to receive/consume data from the other web part.
- The object needs to be accessed from the UserControl, so you can create a web part variable in user control and a user control variable in the web part code and inside CreateChildControls method, assign the web part variable (These steps are similar to what we have performed for ConnectionProvider webpart)
- It is recommended to access the data from the onprerender method of the web part. So override the prerender event handler and call some method in UserControl to update the user interface.
In the user control, I have placed a Label with ID lblMessage and create a public function Show Message for updating the Label value. Refer the code for both web part class and user control class as follows.
See the code for GenderConsumer.cs
Code for GenderConsumerUserControl.cs
Configure web parts in the page
You have created both provider and consumer web parts. In a SharePoint page add both the web parts and configure the connections between them. See the screenshot of both web parts added to the page.
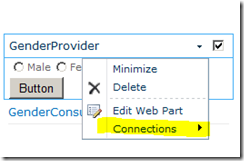
From the top right corner of the Web part, select “Edit web part”. When you are in edit mode, click on the down arrow in the top right corner, you will see the connections link.
Click on connections will give you options to provide the data to consumer web part. Make sure the checkbox of the consumer web part is selected. Now when you configure this, SP will make the necessary settings for consumer.
Now you have done everything. Save and browse the page. See the output of the page, GenderConsumer webpart shows the selected value from the radiobuttonlist from the GenderProvider webpart.
It is easy to share data between web parts. In real life developers can build complex web parts that share data each other.
