Develop SharePoint Add-In using SharePoint 2016 On Premise and Visual Studio
In this article, I am going to explain how to create SharePoint hosted Add-In using Visual Studio and how to deploy this Add-In to SharePoint 2016 on premise version.
Building a successful Add-in include two steps. First you need to author your Add-In using Visual Studio. Once you build your Add-in you need to deploy this Add-In to a SharePoint environment and test the Add-In. You can deploy the Add-In to SharePoint online or to the on-premise SharePoint. This article covers the deployment of Add-in to the On Premises version.
Step 1: Create Your Add-In
Open Visual Studio as administrator. From the Menu, select File -> New -> Project
In the new Project Dialog box, from the left menu, expand Visual C#, then Office/SharePoint and choose SharePoint Add-in. Also you can use the search box in the top right corner to locate the Add-n Project template.
Enter a name for your add in and click OK. The other settings such as location of the project, whether to store the solutin in source control etc will depend on your development environment, You can leave those values as default values suggested by Visual Studio.
In the next step you need to enter the SharePoint site url to debug your Add-In. Also you need to choose the type of Add-In you are going to develop. This article covers the development of SharePoint-Hosted Add-In, so choose the corresponding radio button and click Next.
In the next step you need to choose the SharePoint Version. My on premises SharePoint version is 2016, so I selected that option. Now click on the finish button and Visual Studio will create the project.
From the solution explorer, the Add-In looks as following
As you can see the Add-In contains folders for content, images and pages. When you develop your Add-In you need to include your Add-In artifacts in the corresponding folders. The default.aspx page under the pages folder is your default Page created by Visual Studio. You can add more pages as required by your application needs. Below is the content for default.aspx page included by Visual Studio.
Now let us deploy this SharePoint hosted App to my SharePoint 2016 environment. Right click the Add-In project and select Deploy.
You will see the progress from the output window.
Initially When I deploy the Add-In I got the following error. The error detail includes Apps are disabled on this site message.
Step 2: Setup your SharePoint for Add-Ins
The following MSDN article details the steps required to set up an on-premises development environment for SharePoint Add-Ins.
https://msdn.microsoft.com/en-us/library/fp179923(v=office.15)
In the above page, refer the section “Configure an isolated add-in domain in SharePoint”, which helps you to configure the isolated add-in domain in SharePoint. So Let us configure the isolated Add-in Domain now.
Ensure required services are started.
Make sure you started the admin and timer services. If not started, you can use the following powershell scripts to start those services.
net start spadminv4
net start sptimerv4
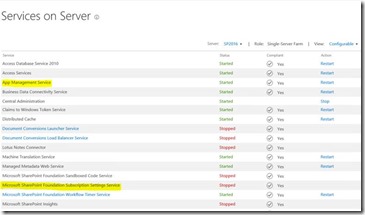
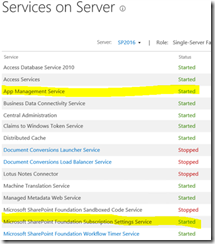
Also you need to ensure app management service and Subscription settings service are started. From the central administration, go to services on server, you can view app management service and Subscription settings service as below.
If they are not started, you can use PowerShell commands as below.
Start Subscription Settings Service
To start the subscription settings service, use the following PowerShell command
$app = Get-SPServiceInstance | where{$_.GetType().Name -eq “SPSubscriptionSettingsServiceInstance"}
Start-SPServiceInstance $app
Start App Management Service
To start the app management service, use the following PowerShell commands.
$app = Get-SPServiceInstance | where{$_.GetType().Name -eq “AppManagementServiceInstance"}
Start-SPServiceInstance $app
Once you are done, once again make sure all services are running as required.
Set your App Domain
Create your isolated app domain your apps, for example " MyAddins.com". To set your app domain, open SharePoint management shell as administrator and enter the following command.
Set-SPAppDomain "MyAddins.com”
Now you need to configure the App domain. Use the following PowerShell script.
$account = Get-SPManagedAccount "mydomain\spsetup"
$appPoolSubSvc = New-SPServiceApplicationPool -Name SettingsServiceAppPool -Account $account
$appPoolAppSvc = New-SPServiceApplicationPool -Name AppServiceAppPool -Account $account
$appSubSvc = New-SPSubscriptionSettingsServiceApplication -ApplicationPool $appPoolSubSvc -Name SettingsServiceApp -DatabaseName SettingsServiceDB
$proxySubSvc = New-SPSubscriptionSettingsServiceApplicationProxy -ServiceApplication $appSubSvc
$appAppSvc = New-SPAppManagementServiceApplication -ApplicationPool $appPoolAppSvc -Name AppServiceApp -DatabaseName AppServiceDB
$proxyAppSvc = New-SPAppManagementServiceApplicationProxy -ServiceApplication $appAppSvc
Note:- You need to use the managed account from your environment. Now you need to specify your add-in prefix. Enter the following script in the SharePoint Management Shell.
Set-SPAppSiteSubscriptionName -Name "add-in" -Confirm:$false
Now from Visual Studio, right click the Add-In project and click Deploy. Now when you deploy the add-n from visual studio, you can find the success message. See the output window indicating that the solution is deployed successfully.
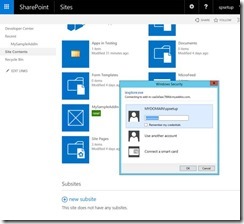
Now if you go to the Site Contents pages in your application, You will see the Add-In in the Site contents.
For production farms, you would have to create a DNS routing strategy within your intranet and optionally configure your firewall. For more information about how to create and configure a production environment for SharePoint Add-ins.
https://technet.microsoft.com/en-us/library/fp161232(v=office.15)
When I clicked on my Add-in, I got the following password prompt. If you get the below credentials prompt in your development environment, you need to disable the loopback check.
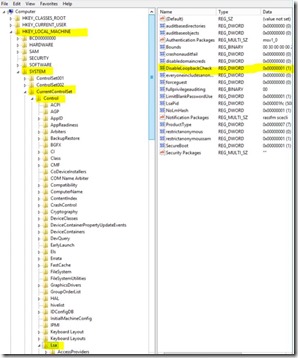
After lot of search I found that I need to disable the loopback check. I added a registry key under HKey_Local_Machine -> System -> CurrentControlSet -> Control -> LSA with name DisableLoopbackCheck and set its value to 1.
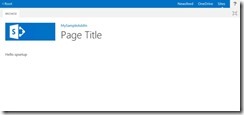
With this I was able to open the App. See the default output I received from my default Add-In.
I hope this documentation will help you to do the on-premises add-in development. If you face any issues following the steps mentioned, post it here so that it will help others.


