Etching sketches with a Netduino Go
 Netduino Go is designed for much more than toy projects, but one has to recognize that toy projects are fun and also great learning experiences. Today, I want to take you through the process of reproducing the behavior of a famous toy that you will surely recognize. That toy, that has helped many of us realize what poor motor skills we possess, has two knobs that control the horizontal and vertical coordinates of a pen that draws into the dust on the back of a simple screen. It’s a great mechanical device that is part of western culture.
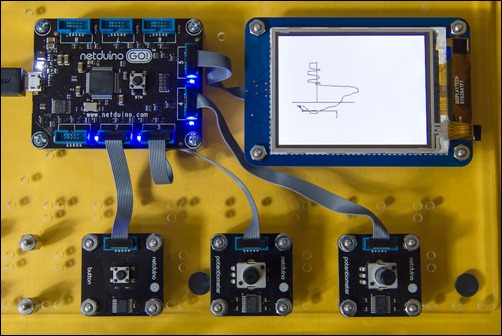
Our version will use two potentiometers, a 320x240 LCD display, a button to erase the screen, and of course a Netduino Go. The hardware setup looks like the following:
We connected the button to port 2 (but it doesn’t matter as there’s only one), the two potentiometers to ports 3 and 4, and the display to port 5.
We can initialize this setup with the following code:
private Potentiometer Vertical = new Potentiometer(GoSockets.Socket3);
private Potentiometer Horizontal = new Potentiometer(GoSockets.Socket4);
private Button Button = new Button();
private VirtualCanvas Canvas = new VirtualCanvas();
To initialize the display, I wrote this method, which initializes a VirtualCanvas object on socket 5, sets the orientation of the display to landscape, fills the screen with white and flushes the command buffer:
public void InitCanvas() {
    Canvas.Initialize(GoSockets.Socket5);
    Canvas.SetOrientation(Orientation.Landscape);
    Canvas.DrawFill(white);
    Canvas.Execute();
}
The VirtualCanvas object can be seen as the driver for the display. It’s a simple vector API, but a crucial point is that these vector drawing primitives are not executed on the Netduino. Instead, they are serialized, sent to the display and executed there. This keeps communication between the microcontroller and the screen to a minimum, and frees the Netduino main board computing power. Essentially, you have a graphics coprocessor bundled with that screen. This is also why you need to call Execute when you want a command batch to be sent to the display and drawn.
To do the actual drawing, all we need is to read the values from both potentiometers and convert them into screen coordinates:
public int ReadY() {
    return (int)(Vertical.GetValue() * Canvas.Height);
}

public int ReadX() {
    return (int)(Horizontal.GetValue() * Canvas.Width);
}
And then render that on the screen:
Canvas.DrawLine(currentX, currentY, x, y, black);
Canvas.Execute();
I’m using DrawLine here and not DrawPixel so that the drawing looks continuous even if the potentiometers are rotated very fast. This requires remembering the previous coordinates, which is fairly simple to do.
All this is pretty easy really. You can see it in action in the following video. To keep things exciting, I threw in some debugging and live command drawing…
The source code for this can be downloaded here:
https://aspblogs.z22.web.core.windows.net/bleroy/Telecran.zip
All parts used in this demo can be purchased from Nwazet.