Archives
-
Was Softwear a Joke?
Earlier this month I heard about Microsoft’s Softwear line of t-shirts. It was supposedly launching on the 15th of December. Launching where?
-
AVCHD Editing Software
I have enjoyed the ease of use and surprising power of the built-in Windows Movie Maker product but it really hasn’t progressed with the times and the newest “Windows Live” version of Movie Maker seems to be going backwards.
-
Excel RTD Servers: A Topic’s Initial Value
What is the initial value displayed for a particular topic? Before you come up with an answer take another look at the ConnectData method used by Excel to subscribe to a particular topic.
-
Excel RTD Servers: How to use UpdateNotify Properly
UpdateNotify is the primary method provided by the IRTDUpdateEvent callback interface that an RTD server uses to let Excel know that updates are available. I have however noticed that this method tends to be used incorrectly by many developers (specifically those developers without a strong foundation in COM). I’ve also received a few emails from readers reinforcing my belief that its proper usage is not obvious to many developers.
-
Excel RTD Servers: C# without the Excel Assembly Reference
In the description of a minimal C# implementation I suggested you simply reference the “Microsoft Excel Object Library” to get the definition of IRtdServer. Of course this introduces an unnecessary reference and can be problematic. This assembly ends up being tied to a particular version of Excel even though the COM interfaces for the RTD server remains the same. As we’ve seen in the C++ implementation, there’s no reason to have a hard reference to any Excel binaries and we can define all of the interfaces ourselves.
-
Excel RTD Servers: Multiple Topics in C#
The last few entries in this series got a bit long but I didn’t feel like spinning off a mini-series just to focus on COM fundamentals. I skimmed over a lot but hopefully it was enough to give you an idea of what’s involved. Hopefully from now on there should be enough groundwork in place to keep things short.
Having got a minimal single-topic RTD server working in C# and C++ it makes sense to take a look at what it takes to support multiple topics. Fortunately it’s quite straightforward. For starters we’ll update the minimal C# implementation to support multiple topics. But first let’s recap how topics are fed into the RTD server.
The Excel RTD function is prototyped as follows:
=RTD(progId, server, topic1, [topic2], ...)
Unfortunately this is a bit misleading. The topics here really should be called parameters. So an RTD function starts with a ProgId, an optional server name, and one or more parameters. Each unique list of parameters forms an individual topic for which Excel will call the RTD server’s ConnectData method.
Imagine you’ve populated four cells in Excel with the following functions:
A1 =RTD("ProgId", , "one")
A2 =RTD("ProgId", , "one")
A3 =RTD("ProgId", , "one", "two")
A4 =RTD("ProgId", , "two", "one")
Excel will call the RTD server’s ConnectData method once for A1 and A2 as they have the same list of parameters. It will then call ConnectData for both A3 and A4 as they have a different list of parameters. As far as the RTD server is concerned Excel is interested in three unique topics with each topic identified by a unique number provided by Excel. That number is how the RTD server communicates values back for individual topics when Excel calls the RTD server’s RefreshData method.
With that let’s update the C# RTD server to support multiple topics. The initial version just printed out the time as follows:
DateTime.Now.ToString("hh:mm:ss:ff")
Instead of hard coding the format string lets take the first parameter of the topic and use that as the format string so that the user can display the time in whatever format he or she desires.
Start by replacing the m_topicId member variable with a dictionary of topic Ids and format strings:
private Dictionary<int, string> m_topics;
You should create the dictionary in the ServerStart method and then add topics to it in the ConnectData method:
string format = strings.GetValue(0).ToString();
m_topics[topicId] = format;
The DisconnectData method also needs a bit of work. Previously we simply stopped the timer. Now that wouldn’t make sense as there may still be other topics that are in use. Instead we need to simply remove the specific topic from the dictionary.
Finally, the RefreshData method now has to enumerate the topics in the dictionary and build the multi-dimensional array. Remember that the first dimension is for the list of topic Ids and the second is for the values corresponding to those topics.
You can test it in Excel using a variety of RTD functions with different format strings. Here’s an example:
=RTD("Kerr.Sample.RtdServer", , "hh:mm:ss")
Below is the complete source code for the updated RTD server:
[
Guid("B6AF4673-200B-413c-8536-1F778AC14DE1"),
ProgId("Kerr.Sample.RtdServer"),
ComVisible(true)
]
public class RtdServer : IRtdServer
{
private IRTDUpdateEvent m_callback;
private Timer m_timer;
private Dictionary<int, string> m_topics;
public int ServerStart(IRTDUpdateEvent callback)
{
m_callback = callback;
m_timer = new Timer();
m_timer.Tick += new EventHandler(TimerEventHandler);
m_timer.Interval = 2000;
m_topics = new Dictionary<int, string>();
return 1;
}
public void ServerTerminate()
{
if (null != m_timer)
{
m_timer.Dispose();
m_timer = null;
}
}
public object ConnectData(int topicId,
ref Array strings,
ref bool newValues)
{
if (1 != strings.Length)
{
return "Exactly one parameter is required (e.g. 'hh:mm:ss').";
}
string format = strings.GetValue(0).ToString();
m_topics[topicId] = format;
m_timer.Start();
return GetTime(format);
}
public void DisconnectData(int topicId)
{
m_topics.Remove(topicId);
}
public Array RefreshData(ref int topicCount)
{
object[,] data = new object[2, m_topics.Count];
int index = 0;
foreach (int topicId in m_topics.Keys)
{
data[0, index] = topicId;
data[1, index] = GetTime(m_topics[topicId]);
++index;
}
topicCount = m_topics.Count;
m_timer.Start();
return data;
}
public int Heartbeat()
{
return 1;
}
private void TimerEventHandler(object sender,
EventArgs args)
{
m_timer.Stop();
m_callback.UpdateNotify();
}
private static string GetTime(string format)
{
return DateTime.Now.ToString(format, CultureInfo.CurrentCulture);
}
} -
Excel RTD Servers: Minimal C++ Implementation (Part 2)
Continuing on from part 1, here I’m concluding the walkthrough of a minimal RTD server written in C++.
It’s a COM Class
What we haven’t done yet is actually define the COM class to implement the RTD interface. Start by defining the class as follows:
class DECLSPEC_NOVTABLE DECLSPEC_UUID("B9DCFAAD-4F86-44d4-B404-9E530397D30A") RtdServer :
public CComObjectRootEx<CComSingleThreadModel>,
public CComCoClass<RtdServer, &__uuidof(RtdServer)>,
public IDispatchImpl<IRtdServer>
{
It’s not actually as daunting as it looks.
DECLSPEC_NOVTABLE is an optional hint to the compiler indicating that we don’t need the vtable, which can result in a reduction in code size.
DECLSPEC_UUID associates a GUID with the class so that you can later reference it using the __uuidof keyword. This avoids having to define the GUID elsewhere in a CPP file for example.
CComObjectRootEx provides the code for implementing the reference counting portion of the IUnknown interface that IDispatch derives from.
CComCoClass provides the code for creating instances of the COM class.
IDispatchImpl provides the implementation of IDispatch. I’ll talk more about this implementation in the upcoming section on Automation.
Next up is the implementation of IUnknown’s QueryInterface method. For this ATL provides a family of macros:
BEGIN_COM_MAP(RtdServer)
COM_INTERFACE_ENTRY(IRtdServer)
COM_INTERFACE_ENTRY(IDispatch)
END_COM_MAP()
This actually just builds a data structure and a set of supporting functions. The actual IUnknown methods are provided by another class such as CComObject used to create instances of a particular COM class.
We also need to identify a resource that includes the registration script for the class:
DECLARE_REGISTRY_RESOURCEID(IDR_RtdServer)
For this to work you need to add a resource script to your project and add a text file as a "REGISTRY" resource type. Here’s what a minimal registration script looks like for an in process RTD server:
HKCR
{
Kerr.Sample.RtdServer
{
CLSID = s '{B9DCFAAD-4F86-44d4-B404-9E530397D30A}'
}
NoRemove CLSID
{
ForceRemove {B9DCFAAD-4F86-44d4-B404-9E530397D30A} = s 'Kerr.Sample.RtdServer'
{
InprocServer32 = s '%MODULE%'
{
val ThreadingModel = s 'Apartment'
}
}
}
}
This script just adds a ProgId and CLSID to the registry so that instances can be created given one or the other. It also defines the threading model for the COM class indicating in what type of apartment the COM class expects to be created. In this case, I’ve specified “Apartment” to indicate that the COM class needs to be created on a thread that is initialized as a single thread apartment and includes the necessary plumbing to support that apartment model namely a message pump. ATL takes care of parsing the script when registering and unregistering the COM server and updating the registry accordingly.
Now we can finally declare the interface methods that we must implement ourselves:
HRESULT __stdcall ServerStart(/*[in]*/ IRTDUpdateEvent* callback,
/*[out]*/ long* result) override;
HRESULT __stdcall ConnectData(/*[in]*/ long topicId,
/*[in]*/ SAFEARRAY** strings,
/*[in,out]*/ VARIANT_BOOL* newValues,
/*[out]*/ VARIANT* values) override;
HRESULT __stdcall RefreshData(/*[in,out]*/ long* topicCount,
/*[out]*/ SAFEARRAY** data) override;
HRESULT __stdcall DisconnectData(/*[in]*/ long topicId) override;
HRESULT __stdcall Heartbeat(/*[out]*/ long* result) override;
HRESULT __stdcall ServerTerminate() override;
And that’s it for the class definition. The only thing remaining is to add the class to ATL’s map of COM classes so that it can automatically register, unregister, and create instances of it.
OBJECT_ENTRY_AUTO(__uuidof(RtdServer), RtdServer)
It’s an Automation Server
Component Automation, more commonly known as OLE Automation, is a set of additional specifications built on top of the COM specification geared towards improving interoperability with scripting languages, tools and applications. There are pros and cons to Automation. For example the Automation Marshaller can be very handy in lieu of custom proxies even for C++-only systems. On the other hand Automation types and interfaces can be quite unwieldy to use from C++. Fortunately ATL does a great job of making Automation programming in C++ a whole lot less painful.
Although there are many parts to Automation, we only need to cover a few of them to support the RTD server. Firstly we need to implement the IDispatch-based RTD interface. ATL’s implementation of IDispatch relies on a type library so we’ll need one of those too. Finally, the RTD interface relies on Automation safe arrays and variants so we’ll need to know how to handle those.
An interface, like IRtdServer, that derives from IDispatch is known as a dual interface because it allows interface methods to be access either directly via the interface vtable or indirectly via the methods provided by IDispatch for resolving a method by name and then invoking it. Excel does the latter. ATL provides a generic implementation of IDispatch that relies on a type library to resolve method names and invoke methods. If you’re coming from a .NET background, a type library is the precursor to CLR metadata.
A type library is generated by the MIDL compiler given an IDL file as input. IDL is used for much more than just generating type libraries but that’s all we need it for right now. In a future post I’ll share some other tricks that you can perform with IDL and RTD servers.
Start by adding a “Midl File” called TypeLibrary.idl to your project. Here’s what it should contain. I won’t go into detail into what this all means but it should be pretty self-explanatory and it should not surprise you to learn that IDL stands for Interface Definition Language. :)
import "ocidl.idl";
[
uuid(A43788C1-D91B-11D3-8F39-00C04F3651B8),
dual,
oleautomation
]
interface IRTDUpdateEvent : IDispatch
{
[id(0x0000000a)]
HRESULT UpdateNotify();
[id(0x0000000b), propget]
HRESULT HeartbeatInterval([out, retval] long* value);
[id(0x0000000b), propput]
HRESULT HeartbeatInterval([in] long value);
[id(0x0000000c)]
HRESULT Disconnect();
};
[
uuid(EC0E6191-DB51-11D3-8F3E-00C04F3651B8),
dual,
oleautomation
]
interface IRtdServer : IDispatch
{
[id(0x0000000a)]
HRESULT ServerStart([in] IRTDUpdateEvent* callback,
[out, retval] long* result);
[id(0x0000000b)]
HRESULT ConnectData([in] long topicId,
[in] SAFEARRAY(VARIANT)* strings,
[in, out] VARIANT_BOOL* newValues,
[out, retval] VARIANT* values);
[id(0x0000000c)]
HRESULT RefreshData([in, out] long* topicCount,
[out, retval] SAFEARRAY(VARIANT)* data);
[id(0x0000000d)]
HRESULT DisconnectData([in] long topicId);
[id(0x0000000e)]
HRESULT Heartbeat([out, retval] long* result);
[id(0x0000000f)]
HRESULT ServerTerminate();
};
[
uuid(358F1355-AA45-4f59-8838-9A21E7F4628C),
version(1.0)
]
library TypeLibrary
{
interface IRtdServer;
};
The MIDL compiler parses this file and produces a few things. The main thing we need is a type library but it also produces the C and C++ equivalent of the IDL interface definitions so that we don’t have to define those ourselves. The type library produced by the MIDL compiler needs to be included in the DLL as a resource. You can achieve this by adding the following to your resource script:
1 TYPELIB "TypeLibrary.tlb"
Finally, you can update your ATL module class to tell it where to find the type library:
class Module : public CAtlDllModuleT<Module>
{
public:
DECLARE_LIBID(LIBID_TypeLibrary)
};
LIBID_TypeLibrary will be declared in the header file and defined in the C source file produced by the MIDL compiler.
It’s an RTD Server
With all that out of the way we can finally add the actual minimal RTD server implementation. For this example I’m just going to port the minimal C# implementation that simply supports a single topic displaying the time.
We need just a few variables to make it work:
TimerWindow m_timer;
long m_topicId;
TimerWindow is simple C++ implementation of the Windows Forms Timer class used by the C# implementation. It just creates a hidden window to handle WM_TIMER messages and then calls the RTD callback interface on this timer:
class TimerWindow : public CWindowImpl<TimerWindow, CWindow, CWinTraits<>>
{
private:
CComPtr<IRTDUpdateEvent> m_callback;
void OnTimer(UINT_PTR /*timer*/)
{
Stop();
if (0 != m_callback)
{
m_callback->UpdateNotify();
}
}
public:
BEGIN_MSG_MAP(TimerWindow)
MSG_WM_TIMER(OnTimer)
END_MSG_MAP()
TimerWindow()
{
Create(0);
ASSERT(0 != m_hWnd);
}
~TimerWindow()
{
VERIFY(DestroyWindow());
}
void SetCallback(IRTDUpdateEvent* callback)
{
m_callback = callback;
}
void Start()
{
SetTimer(0, 2000);
}
void Stop()
{
VERIFY(KillTimer(0));
}
};
As with the C# implementation, since the timer relies on window messages it requires a message pump to function. Fortunately this particular RTD server lives in a single threaded apartment that provides one.
Now we can implement the RTD server methods quite simply. I’m not going to explain here why they’re called as I’ve already talked about the semantics in the walkthrough of the minimal C# implementation.
HRESULT ServerStart(/*[in]*/ IRTDUpdateEvent* callback,
/*[out]*/ long* result)
{
if (0 == callback || 0 == result)
{
return E_POINTER;
}
m_timer.SetCallback(callback);
*result = 1;
return S_OK;
}
ServerStart passes the callback interface to the timer which holds a reference to it. It returns 1 to indicate that all is well.
HRESULT ServerTerminate()
{
m_timer.SetCallback(0);
return S_OK;
}
ServerTerminate clears the callback held by the timer to ensure that it isn’t accidentally called subsequent to termination.
HRESULT ConnectData(/*[in]*/ long topicId,
/*[in]*/ SAFEARRAY** strings,
/*[in,out]*/ VARIANT_BOOL* newValues,
/*[out]*/ VARIANT* values)
{
if (0 == strings || 0 == newValues || 0 == values)
{
return E_POINTER;
}
m_topicId = topicId;
m_timer.Start();
return GetTime(values);
}
ConnectData saves the topic identifier, starts the timer, and returns the initial time.
HRESULT GetTime(VARIANT* value)
{
ASSERT(0 != value);
SYSTEMTIME time;
::GetSystemTime(&time);
CComBSTR string(8);
swprintf(string,
string.Length() + 1,
L"%02d:%02d:%02d",
time.wHour,
time.wMinute,
time.wSecond);
value->vt = VT_BSTR;
value->bstrVal = string.Detach();
return S_OK;
}
GetTime is a simple helper function that produces a string with the current time and returns it as a variant.
HRESULT DisconnectData(/*[in]*/ long /*topicId*/)
{
m_timer.Stop();
return S_OK;
}
DisconnectData simply stops the timer.
HRESULT Heartbeat(/*[out]*/ long* result)
{
if (0 == result)
{
return E_POINTER;
}
*result = 1;
return S_OK;
}
Heartbeat simply returns 1 to indicate that all is well.
HRESULT RefreshData(/*[in,out]*/ long* topicCount,
/*[out]*/ SAFEARRAY** result)
{
if (0 == topicCount || 0 == result)
{
return E_POINTER;
}
CComSafeArrayBound bounds[2] =
{
CComSafeArrayBound(2),
CComSafeArrayBound(1)
};
CComSafeArray<VARIANT> data(bounds, _countof(bounds));
LONG indices[2] = { 0 };
HR(data.MultiDimSetAt(indices, CComVariant(m_topicId)));
CComVariant time;
HR(GetTime(&time));
indices[0] = 1;
HR(data.MultiDimSetAt(indices, time));
*result = data.Detach();
*topicCount = 1;
m_timer.Start();
return S_OK;
}
The RefreshData method is where you need to finally deal with Automation safe arrays and you can start to appreciate just how much work the CLR’s marshaller does for you. Fortunately ATL provides a fairly clean wrapper for the various structures and API functions needed to create and interact with safe arrays. RefreshData creates a safe array by first defining its dimensions and bounds using ATL’s CComSafeArrayBound class. Here the safe array will have two dimensions. The first dimension has two elements and the second has one. The first dimension of the array will always have two elements. The first element is for the topic Ids and the second is for the values. The second dimension will have as many elements as there are topics with data to return. In our case there is only one.
The rest of the implementation just goes about populating the safe array with the topic Id and value and then restarts the timer.
That’s all for today. I skimmed over many details as this entry was getting way too long, but I hope this walkthrough has given you some idea of what’s involved in writing a minimal RTD server in C++.
With that out of the way, I can start talking about some of the more interesting challenges and techniques you can employ in your implementations and various other topics related to RTD server development. -
Excel RTD Servers: Minimal C++ Implementation (Part 1)
Continuing the discussion of Excel RTD servers, this time I’m going to show you how to write a minimal RTD server in native C++. There’s quite a bit more to discuss so I broke this entry into two parts.
Last time I showed you a minimal RTD server written in C# and it sure is easy to bang it together. There isn’t a whole lot of code to write thanks to the mountains of abstractions provided by the CLR and the .NET Framework. Those abstractions can however get in the way. If nothing else they get in the way of our understanding of what is actually going on under the covers and that in turn can lead to unexplained bugs. If you’ve learnt anything from reading my blog I hope it is the value of understanding how things work, not just how to get them to work. Did you catch the difference?
Although C++ affords you many more options for implementing and deploying an RTD server, here I’m focusing on the simplest implementation of an in-process apartment model COM server. Subsequent entries will explore additional scenarios that go beyond this starting point.
It’s a Visual C++ Project
Every good project starts with an empty Visual C++ project. :)
Create a new project in Visual Studio based on the Visual C++ “Win32 Project” template. Select the Application Settings tab in the Win32 Application Wizard. Select the “DLL” application type and also check the “Empty project” option.
Add a precompiled header to the project and include the following:
#pragma once
#include <atlbase.h>
#include <atlcom.h>
#define ASSERT ATLASSERT
#define VERIFY ATLVERIFY
#define TRACE ATLTRACE
#define HR(expr) { HRESULT expr_hr = expr; if (FAILED(expr_hr)) return expr_hr; }
atlbase.h is the main ATL header that includes the main Windows SDK headers and the most common ATL functions and classes used by virtually all native C++ applications (that use ATL).
atlcom.h provides most of the code for generating all the boilerplate code required to implement a COM server.
The macros are optional but help to simplify the code and should be self-explanatory.
It’s a DLL
Since we’re limiting this implementation to an in-process COM server it will be packaged as a dynamic-link library. DLLs built with the C run-time library use an entry point function called DllMain. This should be used as an indicator of when the operating system is loading and unloading your DLL and not much else.
STDAPI_(BOOL) DllMain(HINSTANCE /*module*/,
DWORD /*reason*/,
void* /*reserved*/)
{
return TRUE;
}
DLLs typically communicate with the outside world by providing a set of exported functions. One way to define these exports is via a module definition file. Add a file to the project called Exports.def and include the following text:
LIBRARY "RtdServer"
EXPORTS
The name in quotes must match the name of the DLL produced by the linker. Any functions you wish to export are listed under the EXPORTS header. You need to also tell the linker about your module definition file. You can set this in the linker’s “Input” properties from within the project’s property pages.
Although DllMain isn’t strictly an exported function, I tend to stick it along with any other exported functions in a C++ file called Exports.cpp just so that it’s obvious where all the code paths within the DLL originate from.
It’s a COM Server
A COM server must provide a way for a client to get the class object for a particular CLSID. COM servers hosted in a DLL achieve this by exporting a function called DllGetClassObject. The DllRegisterServer and DllUnregisterServer functions are also typically exported and called by installers or simply by the built-in regsvr32.exe tool to register and unregister the server. Finally, the DllCanUnloadNow function should also be exported to allow the COM runtime to unload your DLL promptly.
These functions are well defined in the COM specification and I won’t go into their implementation details too much. The best thing you can do is rely on ATL to provide the implementation. Start by defining an ATL module class for your DLL as follows.
class Module : public CAtlDllModuleT<Module>
{
};
Amazingly you can now implement the DLL’s entry point and all of the necessary exported functions simply by delegating to the ATL implementation as follows:
Module s_module;
STDAPI_(BOOL) DllMain(HINSTANCE, DWORD reason, LPVOID reserved)
{
return s_module.DllMain(reason, reserved);
}
STDAPI DllRegisterServer()
{
return s_module.DllRegisterServer(FALSE);
}
STDAPI DllUnregisterServer()
{
return s_module.DllUnregisterServer(FALSE);
}
STDAPI DllGetClassObject(REFCLSID clsid, REFIID iid, void** object)
{
return s_module.DllGetClassObject(clsid, iid, object);
}
STDAPI DllCanUnloadNow()
{
return s_module.DllCanUnloadNow();
}
Now that the exported functions are implemented you can add them to the list of exports in the module definition file:
EXPORTS
DllRegisterServer PRIVATE
DllUnregisterServer PRIVATE
DllGetClassObject PRIVATE
DllCanUnloadNow PRIVATE
The PRIVATE keyword prevents other binaries from directly linking to these functions. You can of course still call them via LoadLibrary/GetProcAddress which is exactly what COM and tools like regsvr32.exe would do.
That’s it for today. Next time we’ll conclude the minimal C++ implementation with: -
Windows with C++: X64 Debugging With Pseudo Variables and Format Specifiers
My latest Windows with C++ column in the December 2008 issue of MSDN Magazine is now online:
-
Visual Studio 2010 Mouse Wheel Zooming
I just noticed that Visual Studio 2010 has duplicated the mouse wheel zooming feature used by Windows Explorer and Word 2007. Simply hold down the Ctrl key and scroll the mouse wheel to zoom the text editor in and out.
-
Excel RTD Servers: Minimal C# Implementation
Continuing the discussion of Excel RTD servers, here is about the simplest RTD server I could come up with. I used C# for this example to allow us to focus on semantics. Next time I’ll show a minimal C++ implementation.
[
Guid("9AA100A8-E50E-4047-9C60-E4732391063E"),
ProgId("Kerr.Sample.RtdServer"),
]
public class RtdServer : IRtdServer
{
As you can see, the RtdServer class is attributed with a CLSID and ProgId that can be used by COM clients to locate the COM server. By default (if you don’t employ registration-free COM), COM clients will locate the COM server by looking up either the ProgId (to find the CLSID) or the CLSID directly in the registry. You can register your assembly using the RegAsm tool that ships with the .NET Framework as follows:
%SystemRoot%\Microsoft.Net\Framework\v2.0.50727\RegAsm.exe RtdServer.dll /codebase
Remember also to mark your assembly as being visible to COM as follows:
[assembly: ComVisible(true)]
Next we need to define a minimal set of member variables in order for the RTD server to function:
private IRTDUpdateEvent m_callback;
private Timer m_timer;
private int m_topicId;
m_callback is needed to hold onto a reference to the callback interface provided by Excel. This interface is primarily used to let Excel know that new data is available. m_timer is a Windows.Forms timer used to periodically notify Excel via the callback interface. This timer is obviously optional and you are free to implement update notifications any way you want. I did however use this technique for a reason which I’ll outline in a moment. Finally, m_topicId is used to identify the topic that Excel is “subscribing” to. Again, this is just one approach which as you’ll see in a moment is very naïve.
public int ServerStart(IRTDUpdateEvent callback)
{
m_callback = callback;
m_timer = new Timer();
m_timer.Tick += new EventHandler(TimerEventHandler);
m_timer.Interval = 2000;
return 1;
}
ServerStart is the first method called by Excel and is where we prepare the RTD server. In particular we set the callback member variable and prepare the timer. Notice that the timer is not yet enabled. Returning 1 indicates that everything is fine.
public void ServerTerminate()
{
if (null != m_timer)
{
m_timer.Dispose();
m_timer = null;
}
}
ServerTerminate is called when Excel is ready to unload the RTD server. Here we simply release the timer.
public object ConnectData(int topicId,
ref Array strings,
ref bool newValues)
{
m_topicId = topicId;
m_timer.Start();
return GetTime();
}
ConnectData is called for each “topic” that Excel wishes to “subscribe” to. It is called once for every unique subscription. As should be obvious, this implementation assumes there will only be a single topic. In a future post I’ll talk about handling multiple topics. ConnectData also starts the timer and returns an initial value that Excel can display.
public void DisconnectData(int topicId)
{
m_timer.Stop();
}
DisconnectData is called to tell the RTD server that Excel is no longer interested in data for the particular topic. In this case, we simply stop the timer to prevent the RTD server from notifying Excel of any further updates.
private void TimerEventHandler(object sender,
EventArgs args)
{
m_timer.Stop();
m_callback.UpdateNotify();
}
TimerEventHandler is the private method that is called when the timer Tick event is raised. It stops the timer and uses the callback interface to let Excel know that updates are available. Stopping the timer is important since we don’t want to call UpdateNotify repeatedly.
public Array RefreshData(ref int topicCount)
{
object[,] data = new object[2, 1];
data[0, 0] = m_topicId;
data[1, 0] = GetTime();
topicCount = 1;
m_timer.Start();
return data;
}
RefreshData is called when Excel is ready to retrieve any updated data for the topics that it has previously subscribed to via ConnectData. The implementation looks a bit strange. That’s mainly because Excel is expecting the data as a COM SAFEARRAY. Although it isn’t pretty, The CLR’s COM infrastructure does a commendable job of marshalling the data for you. All you need to do is populate the two-dimensional array with the topic Ids and values and set the topicCount parameter to the number of topics that are included in the update. Finally, the timer is restarted before returning the data.
public int Heartbeat()
{
return 1;
}
Heartbeat is called by Excel if it hasn’t received any updates recently in an attempt to determine whether your RTD server is still OK. Returning 1 indicates that everything is fine.
private string GetTime()
{
return DateTime.Now.ToString("hh:mm:ss:ff");
}
}
GetTime is a private method used to get a formatted time string that represents the data to display in Excel. As you can imagine, this RTD server simply updates the time in the cell roughly every two seconds.
Clearly this RTD server implementation leaves a lot to be desired but it does demonstrate enough functionality to give you an idea of how RTD servers work. To give it a try you can use the following function from within Excel:
=RTD("Kerr.Sample.RtdServer", , "topic")
The only thing left that’s worth mentioning about this implementation is the use of the Windows.Forms.Timer class and why this even works. If you look at the way the RegAsm tool (and internally the RegistrationServices class) registers the types within the assembly you may notice that it is registered with a threading model of “Both” which indicates that the COM class is able, from a threading perspective, to load into the apartment of the caller (no proxy). In the case of Excel, the apartment happens to be a single-threaded apartment which as part of its contract provides a message pump and the message pump is all the timer needs to function. Internally it creates a hidden window to handle the WM_TIMER messages and then raise the Tick event. So it happens to work because Excel creates the RTD server in a single threaded apartment and the RTD server is happy to run directly in that apartment. This is incidentally also how ActiveX controls work. -
Excel RTD Servers: C# Interfaces
So it turns out that there are in fact quite a few developers who care about writing RTD servers. I’ve received a few emails asking for more information so I may post a few more entries on the subject. Last time I simply showed what the RTD server interfaces look like in C++. Here’s the equivalent in C#:
[Guid("A43788C1-D91B-11D3-8F39-00C04F3651B8")]
interface IRTDUpdateEvent
{
void UpdateNotify();
int HeartbeatInterval { get; set; }
void Disconnect();
}
[Guid("EC0E6191-DB51-11D3-8F3E-00C04F3651B8")]
interface IRtdServer
{
int ServerStart(IRTDUpdateEvent callback);
object ConnectData(int topicId,
ref Array strings,
ref bool newValues);
Array RefreshData(ref int topicCount);
void DisconnectData(int topicId);
int Heartbeat();
void ServerTerminate();
}
Of course what these interfaces look like and how they are actually called by Excel are two very different things thanks to the horrors wonders of IDispatch.
I’m including C# in the discussion as its very tempting for .NET developers to implement an RTD server in managed code. Unfortunately it’s easy to forget that you still need to follow the rules outlined by the COM specification. If you don’t, it will come back to haunt you later on. -
Excel RTD Servers: C++ Interfaces
Excel provides a function called RTD (real-time data) that lets you specify a COM server via its ProgId so that you can push data into Excel. Recently I had to implement an RTD server for a client and was frustrated at how hard it was to find the COM interface definitions to implement. It doesn’t appear to be documented anywhere. They’re clearly geared toward VB6 or VBA or VBScript or whatever. Anyway, I sucked out the necessary COM interfaces from the type library embedded inside the Excel executable. Here’s what an RTD server written in C++ needs to implement:
struct __declspec(novtable) __declspec(uuid("A43788C1-D91B-11D3-8F39-00C04F3651B8"))
IRTDUpdateEvent : IDispatch
{
virtual HRESULT __stdcall UpdateNotify() = 0;
virtual HRESULT __stdcall get_HeartbeatInterval(/*[out]*/ long* value) = 0;
virtual HRESULT __stdcall put_HeartbeatInterval(long value) = 0;
virtual HRESULT __stdcall Disconnect() = 0;
};
struct __declspec(novtable) __declspec(uuid("EC0E6191-DB51-11D3-8F3E-00C04F3651B8"))
IRtdServer : IDispatch
{
virtual HRESULT __stdcall ServerStart(/*[in]*/ IRTDUpdateEvent* callback,
/*[out]*/ long* result) = 0;
virtual HRESULT __stdcall ConnectData(long topicId,
/*[in]*/ SAFEARRAY** strings,
/*[in,out]*/ VARIANT_BOOL* newValues,
/*[out]*/ VARIANT* values) = 0;
virtual HRESULT __stdcall RefreshData(/*[in,out]*/ long* topicCount,
/*[out]*/ SAFEARRAY** data) = 0;
virtual HRESULT __stdcall DisconnectData(long topicId) = 0;
virtual HRESULT __stdcall Heartbeat(/*[out]*/ long* result) = 0;
virtual HRESULT __stdcall ServerTerminate() = 0;
};
I’m posting this mostly so that I can quickly find it in future but perhaps it will come in handy for others. I could write some more about how the heck you implement these crazy interfaces and other tricks I’ve picked up but I suspect there’s a very small number of developers who care. :) -
Windows 7 and Concurrency
Now that the Windows 7 keynote is over we can finally start exploring some of the improvements. This is going to be a truly awesome upgrade. As Paul puts it, Windows 7 is Windows Vista done right.
If you’re not sure where to start then I’d suggest starting right at the bottom. Listen to Mark Russinovich introduce many of the improvements made to the Windows kernel. This is really going to benefit those of you with more than 64 processing cores. :)
Incidentally, if you’re wondering why Mark referred to the Concurrency Runtime as “concert” the reason is that the APIs for the scheduler are included in the concrt.h header file. For more on that check out what Rick has to say about Visual C++ 10. -
Time to Move?
I’m starting to think it’s about time I moved this blog. I’ve appreciated not having to worry about hosting and taking advantage of Microsoft’s hosting bandwidth, but it has been frustrating at times not having as much control as I wanted. The weblogs.asp.net server in particular seems to have branched from the blogs.msdn.com server some time back. Originally they were running the same code if I remember correctly.
-
Recent Reading List
My family loves books. Here are a few of the better books I've read this year.
-
The Biggest Release of the Year...
I’ve been a bit distracted over the last few weeks as our third son Samuel John was born earlier this month. I hope to catch up on email soon.
-
MSDN Library without the Bling
The MSDN Library is one of those things I install locally right after installing Visual Studio. It’s an invaluable resource to have at your fingertips. There are however occasions when I don’t have it installed or I’m using the web for some extra search power. Inevitably I end up with something like this:
-
Installing Visual Studio for C++ Development
Installing Visual Studio for .NET development is pretty easy: Install Visual Studio and the latest service pack. You’re done.
-
Windows with C++: Exploring High-Performance Algorithms
My latest Windows with C++ column in the October 2008 issue of MSDN Magazine is now online:
-
Visual C++ in Short: Unblock downloaded applications
Raymond Chen published an article earlier this week about ShellExecute hooks and it reminded me of a shell hook of sorts that still exists in Windows Vista despite Raymond’s very good argument that shell hooks are often used for evil and certainly can’t be used to add security. Granted this hook is not a ShellExecute hook in the literal sense but it amounts to the same thing.
Since I’m long overdue for a Visual C++ in Short article I thought I’d talk about a security feature in Windows that isn’t, well, secure. I’ve previously written about User Account Control and cannot say enough about it being a major step forward in providing a more secure environment for normal users to work and surf the web (with Internet Explorer). But there is this little so called security feature that the Windows shell introduced prior to Windows Vista that somehow came along for the ride but never quite got the UAC makeover and that is the topic of this article.
Many applications are distributed simply as an executable without an installer. You can for example go to live.sysinternals.com and get various great system tools by simply downloading the executable and running it. Similarly you can download the Window Clippings executable and run it without first going through an installer.
Downloading an application and then running it often results in the following dialog box appearing before the application starts: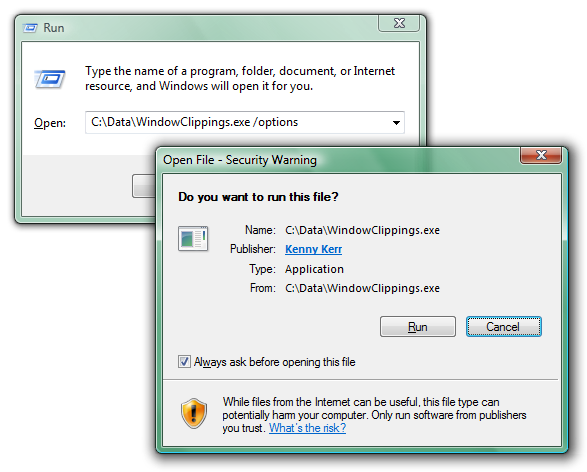
There are so many things wrong with this dialog box that I don’t really know where to start. Perhaps the most glaring problem is that it is neither consistent nor integrated into the secure desktop prompt used by User Account Control. Granted, the UAC prompt is not used since the application does not need to be elevated but the inconsistency is still jarring for the user.
A more serious problem is that, unlike UAC, this security warning is not coming from the Windows kernel but merely from the ShellExecute function called by Windows Explorer. A simple way to demonstrate this is by using the command prompt instead of Windows Explorer to run the downloaded application: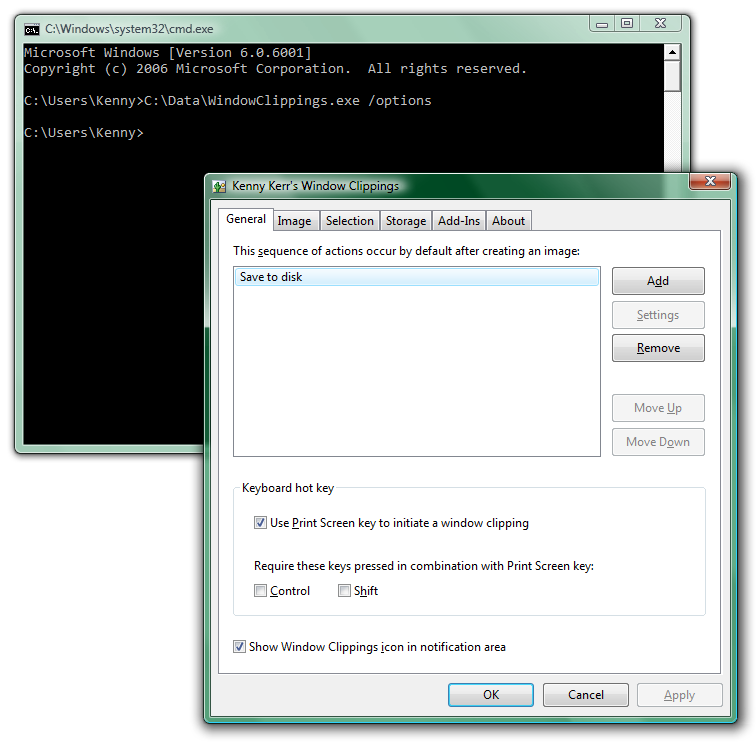
Sure enough there’s no security warning and the application runs immediately.
What about some code?
Here’s the equivalent of what Windows Explorer does, hardcoded for this example:
::ShellExecute(0, 0, L"C:\\Data\\WindowClippings.exe", L"/options", 0, SW_SHOWNORMAL);
And here’s the equivalent of what the command prompt does:
WCHAR commandLine[] = L"C:\\Data\\WindowClippings.exe /options";
::CreateProcess(0, commandLine, 0, 0, FALSE, 0, 0, 0, &si, &pi);
In fact you can even use ShellExecute’s big brother and tell it to forgo the security warning:
SHELLEXECUTEINFO info = { sizeof(info) };
info.fMask = SEE_MASK_FLAG_DDEWAIT | SEE_MASK_NOZONECHECKS;
info.nShow = SW_SHOWNORMAL;
info.lpFile = L"C:\\Data\\WindowClippings.exe";
info.lpParameters = L"/options";
::ShellExecuteEx(&info);
The magic flag in this case is SEE_MASK_NOZONECHECKS.
It might seem that developers should just avoid ShellExecute(Ex) but that is far from the truth. It does add valuable features such as initiating the UAC prompt if needed, whereas CreateProcess would simply fail with ERROR_ELEVATION_REQUIRED.
As the application developer you can’t control whether the user will run your application using the command prompt or by simply double clicking the executable. Arguably the latter is far more common. Short of providing an installer there isn’t much you can do to avoid this security warning. All is not lost however. Take another look at the security warning: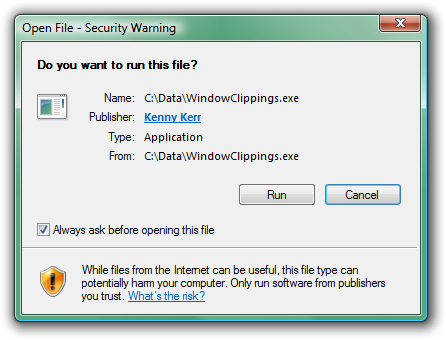
Most users when confronted with obstacles like this one seem to just do whatever they can to overcome them as quickly as possible so they can perform the task they originally intended to perform. It is then not surprising that they completely overlook the little check box in the corner. All they need to do is clear this check box and Windows will no longer prompt them for this application. This check box only exists to annoy the user further. Think about it. Once the user has run the application a single time there’s no reason to prompt the user again in the name of security since a malicious application would have already had the opportunity to cause any intended harm. In fact the application could even unblock itself once it has been given an opportunity to execute some code!
To understand how this is possible we need to take a look at how Windows Explorer knows to block an application from running directly. For starters, you can quickly determine whether an application is blocked by looking at its properties window: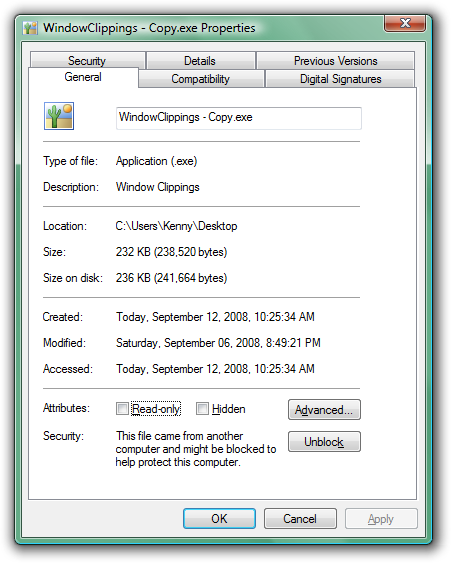
Notice the security warning at the bottom. Clicking the Unblock button has the same effect as clearing the check box in the security warning dialog box. When the application was first downloaded, the browser created an alternate NTFS data stream where it stored zone information. You can view this information using the command prompt: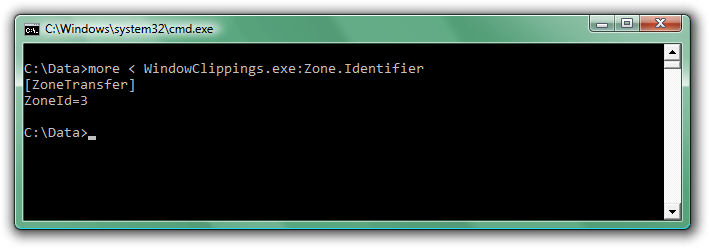
Unblocking the application simply involves removing this data stream. Although not foolproof, such as when the application does not have the file permission to delete the data stream, it works in most cases.
Start by getting the full path to the executable. You can do this with the QueryFullProcessImageName function that was introduced with Windows Vista. If needed, you can fall back to the slightly less reliable GetModuleFileNameEx function for previous versions of Windows. Now simply append ":Zone.Identifier" to the path and call the DeleteFile function to get rid of it. Here is a complete example. The UnblockProcessImage function returns S_OK if the file was unblocked, S_FALSE if it wasn’t blocked to begin with, or another HRESULT describing what went wrong.
HRESULT UnblockProcessImage()
{
static const WCHAR streamName[] = L":Zone.Identifier";
WCHAR fileName[MAX_PATH + _countof(streamName)] = { 0 };
DWORD length = MAX_PATH; // Deliberately not the actual size
#if _WIN32_WINNT >= 0x0600
// QueryFullProcessImageName updates the length parameter.
if (!::QueryFullProcessImageName(::GetCurrentProcess(),
0, // flags
fileName,
&length))
{
return HRESULT_FROM_WIN32(::GetLastError());
}
#else
// GetModuleFileNameEx returns the length.
length = ::GetModuleFileNameEx(::GetCurrentProcess(),
0, // module
fileName,
length);
if (0 == length)
{
return HRESULT_FROM_WIN32(::GetLastError());
}
#endif
wcscpy_s(fileName + length, _countof(fileName) - length, streamName);
if (!::DeleteFile(fileName))
{
const DWORD error = ::GetLastError();
if (ERROR_FILE_NOT_FOUND == error)
{
return S_FALSE;
}
else
{
return HRESULT_FROM_WIN32(error);
}
}
return S_OK;
}
Please understand that I’m not advising developers to do this. I’m merely demonstrating that it is possible. A better solution is to simply ship your product with an installer, which is exactly what the next version of Window Clippings will provide.
Produce the highest quality screenshots! Use Window Clippings. -
Window Clippings v3 Sneak Peek – New Options Window – Take 2
I’ve updated the layout a bit to reduce the focus on the configurations. I felt that the configuration selection was too prominent in the earlier builds and I also wanted to make the window simpler and more approachable.
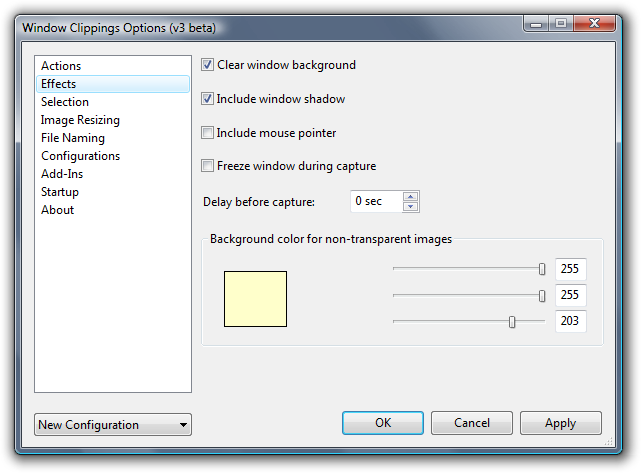
Here you can see the options corresponding to the Image tab in version 2 of Window Clippings. There’s nothing really new here aside from the new color picker. I’ve never liked the built-in color picker that Windows provides so I decided to bake it into the options window even though it’s not a very necessary feature. -
Feedback Forum for Window Clippings
Window Clippings has always been very much driven by the feedback I receive from the community. Up till now I have received that feedback primarily via email and comments on my blog.
As I work on version 3 I thought I should try and make this a bit more manageable and open so I’ve set up a Feedback Forum for Window Clippings. I’ve also seeded it with a few suggestions. I still need to go through all my emails and comments and add various other suggestions that I’ve received but hopefully this is enough to get things started as far as the forum is concerned. I obviously can’t guarantee that every suggestion will turn into a product feature but you can bet that popular suggestions will seriously be considered for inclusion.
Please add suggestions and vote! -
Back to the Future... Please
A new day and a new job as a technology consultant in London. I think this screenshot says it all:
-
Window Clippings v3 Sneak Peek – New Options Window
I’m hoping to get Window Clippings version 3 released before the end of the year but being an evenings and weekends project it’s hard to say for sure. What I did want to start doing is give you a sneak peek of where I’m heading and get your feedback along the way. To kick things off here are some screenshots of the new Options window. In subsequent posts I’ll talk more about the individual features but you can probably guess at a lot of what’s coming up based on what’s in these screenshots. These screenshots are taken on a high resolution screen at 120 DPI so they may appear a bit larger than usual if you’re using the default scaling.
-
Send your Window Clippings to ImageShack
Maximilian Krauß recently sent me an add-in he wrote for uploading images to ImageShack. I’d never heard of the ImageShack service before but it turns out you can upload and host images for free and without needing to create an account. As you can see, the add-in itself provides no settings:
-
ActionFTP for Window Clippings
Sorry for the lack of updates again. I have a pile of posts in the queue but I just haven’t had the time polish them enough for publishing. Anyway...
-
Windows Vista Performance Tuning
Microsoft recently published a document entitled Windows Vista Performance and Tuning. It collects much of the “common knowledge” about optimizing the performance of Windows Vista into a single document. This is a great reference if you’re not that familiar with Vista and want some ideas on how to improve its performance. It’s by no means a complete list but hits on some of the most effective and easily adjusted settings.
-
Visual C++ in Short: Determining whether a path refers to a file system object
If you’ve been programming Windows for a while (prior to Windows 2000) you may well have come across a number of techniques to determine whether a path refers to a file system object such as a file or directory.
-
Windows with C++: Asynchronous WinHTTP
My latest Windows with C++ column in the August 2008 issue of MSDN Magazine is now online: Asynchronous WinHTTP.
-
Windows 2008 Remote Desktop Color Depth
One of the features of the Remote Desktop Protocol (RDP) 6.1 is the ability for clients to connect with a color depth of 32 bits per pixel (bpp). This allows alpha blending in a terminal session which in turn allows layered windows to work correctly. Although it's a bit of a bandwidth hog, it can be really handy for developers testing graphics applications remotely (or to take great screenshots remotely).
-
Visual C++ in Short: Converting between Unicode and UTF-8
The Windows SDK provides the WideCharToMultiByte function to convert a Unicode, or UTF-16, string (WCHAR*) to a character string (CHAR*) using a particular code page. Windows also provides the MultiByteToWideChar function to convert a character string from a particular code page to a Unicode string. These functions can be a bit daunting at first but unless you have a lot of legacy code or APIs to deal with you can just specify CP_UTF8 as the code page and these functions will convert between Unicode UTF-16 and UTF-8 formats. UTF-8 isn’t really a code page in the original sense but the API functions lives on and now provide support for UTF conversions.
-
Visual C++ in Short: Encoding and decoding with Base64
Base64 is a popular encoding to convert arbitrary data into a format that can be transmitted as an ASCII string. ATL provides a few functions that implement the Base64 specification.
-
Visual C++ in Short: Converting between numbers and strings
C++ developers have a number of options available to them for converting between numbers and strings, few of which are very appealing. Most developers are familiar with the likes of atoi and itoa from the C Run-Time Library. The main problem is that these functions don’t have a coherent way of reporting errors. Although there have been some attempts to improve these functions, most notably the addition of the security enhancements introduced by Microsoft, they are still not very helpful.
-
Visual C++ in Short: Regular Expressions
ATL includes a lightweight regular expression implementation. Although originally part of Visual C++, it is now included with the ATL Server download.
-
This and that
It’s been a while since I posted anything. I spent some time in South Africa. Increasingly I feel like it’s time to go home. If only it were that simple. We’ve also had a bit of a rough time here in England. I have also heard that a few people assumed that I’d be driving around in a Ferrari after the announcement about PlateSpin’s acquisition for $205 million in cash. I should just mention that I left PlateSpin about six months before the acquisition and did not get to share in the big payout for a variety of subtle and not so subtle reasons. So if you’ve enjoyed my articles feel free to support me by purchasing a license for Window Clippings – it will be much appreciated! :)
-
Parallel Programming in Native Code
Rick Molloy just mentioned to me that he’s created a new blog on MSDN to coincide with Stephen’s talk at TechEd today about the Concurrency Runtime for Visual C++.
-
XmlLite and Windows XP Service Pack 3
The April 2007 issue of MSDN Magazine included an article I wrote about the excellent XmlLite parser for native C++ developers. In October of that year I wrote about the lack of a redistributable for Windows XP. Although the XML team at Microsoft told me that they hoped to provide a redistributable it never did materialize.
-
Windows with C++: Windows Imaging Component (Part 2 of ... oops!)
In April 2007 MSDN Magazine published part 1 of a 3 part series of articles on the Windows Imaging Component. Part 1 provides a good introduction to using WIC to encode and decode various image formats using this new imaging API. Part 2 and 3 were meant to show you how to extend WIC with your own image formats. Unfortunately it didn’t quite work out as planned.
-
MSDN Link Spring Cleaning
Every year or so the folks who manage the MSDN and TechNet websites decide to update the site is some way and pretty much break every single URL referring to their content. Traditionally this hasn’t affected MSDN Magazine but the magazine now joins the club and older links to MSDN Magazine articles no longer work either.
-
Quick Update
I’m doing some traveling over the next few days and will unfortunately be offline for most of that time. I will be back online on Tuesday so if you’ve sent me an email, please don’t expect a response before then.
-
Window Clippings 2.1: How to open the Options Window
Did you know there are three ways to open the options window?
-
Window Clippings: A note to Microsoft employees
It looks like the public mail servers used for receiving mail sent to @microsoft.com addresses are regularly blocking the emails that are sent automatically with your Window Clippings license keys. In these cases I need to manually send an email with your license key.
-
Beef Up Windows Apps with the Visual C++ 2008 Feature Pack
Back in December of last year the Visual C++ team asked me to write an article for MSDN Magazine about the new Visual C++ 2008 Feature Pack. Well the article has finally made it into print in the May 2008 issue and you can also read it online.
-
Special offer for Paint.NET users
To promote the new integration between Paint.NET and Window Clippings, Rick and I are offering a special deal to Paint.NET users. For the month of May we’re offering Window Clippings at a special discounted price!
-
Window Clippings 2.1: Send to Paint.NET
Earlier this week I hinted at a surprise new feature that was introduced with the 2.1.28 build of Window Clippings. I can now tell you what it is!
-
Window Clippings 2.1.28
As usual, you can get the update via the “Check for Updates” button on the About tab. New users can download the latest version from http://www.windowclippings.com/.
-
Window Clippings Website Redesign
I finally got around to updating the Window Clippings website with a fresh new look. I’ve tried to keep it simple and easy to use.
-
Windows with C++: Windows Imaging Component (Part 1)
My latest column is now available in the April 2008 issue of MSDN Magazine. This is part 1 of a 3 part series about the Windows Imaging Component that ships with Windows Vista as well as the .NET Framework 3.0 and later.
-
Window Clippings 2.1: How to Capture Menus and Other Interactive Effects
One of the more popular features that Window Clippings provides is the ability to capture menus, tooltips as well as other interactive effects that applications may produce. Here’s how it’s done.
-
Window Clippings 2.1: How to Include a Disabled Parent Window
In my last “how to” article I showed how you can select multiple windows with Window Clippings by holding down the Ctrl key while clicking additional windows. You may however come across a window that is disabled and thus cannot be selected. By far the most common reason for this is when an application is displaying a modal dialog box and the parent window is then disabled until the dialog box is closed.
-
Window Clippings 2.1.22 ... and Add-Ins!
I know I said I was going to start focusing on the upcoming 2.5 release but I needed to make some minor improvements to the way Window Clippings handles external add-ins as a few users have asked about this.
-
Window Clippings 2.1: How to Select Multiple Windows
In my last “how to” article I showed you how easy it is to get started with Window Clippings and take your first screenshot of a window, but what about multiple windows? Let’s start again with the capture screen:
-
Window Clippings 2.1: How to Get Started
So you’ve compared the results of using Window Clippings with the other options provided by Windows. You’ve installed Window Clippings. You might even have purchased a license. Now what?
-
Window Clippings 2.1.18
I’ve just released an updated build of Window Clippings 2.1 with a handful of minor bug fixes. It’s mainly just a few loose ends that I wanted to tie up before I start focusing 100% on the upcoming 2.5 release.
-
Microsoft MVP 2008
I just heard that I have received the Microsoft MVP award again this year for my contributions to the Visual C++ community. Thanks to my friends at Microsoft. It’s been a pleasure getting to know all of you.
-
Window Clippings 2.1: Comparing Results with Windows Vista Tools
Reader mikedopp asks why he should use Window Clippings over the screen capture capabilities built into Windows. I think the easiest way to explain is by showing a few examples.
-
Some exciting news for C++ developers
Herb Sutter announced some very exciting news coming from the C++ committee. We can look forward to lambda expressions, closures, inheriting constructors, nested exceptions, and more.
-
Window Clippings 2.1: How to Install
As Window Clippings 2.1 does not include an installer and requires no real installation or configuration steps prior to using it, it’s quite straightforward to “install” it. I do however realize that it may not be obvious to everyone and that is why the upcoming 2.5 release includes an installer. For now however I thought I’d briefly walk through the steps you need to follow to get Window Clippings up and running for the first time.
-
Window Clippings 2.1
Sorry for the lack of updates on my blog lately. But in the famous words of Dean Hachamovitch: “please don’t mistake silence for inaction”. :)
-
Terminal Services Sessions: Then and Now
Recently Daniel Moth from Microsoft UK asked me to write a short article for the MSDN Flash newsletter. The only caveat was that it absolutely had to be no more than 500 words. Yikes.
-
Novell PlateSpin
Today Novell announced that it has agreed to acquire PlateSpin. I spent five and half years helping to get PlateSpin started before moving on last year. Congratulations Stephen, Ari, John, Adam and the rest of the gang. You’ve certainly earned it.
-
Offline in the UK... again
BT has once again shut down my account for no reason. We’re shortly moving to a new house so I’m not even going to bother fighting it. I’m cancelling my BT account as well as my Virgin DSL, paying the cancelation fees, and looking for a cable provider that can offer both telephone and Internet access. I just can’t handle the stupidity of it all any longer.
-
Windows with C++: Windows Services Enhancements
My latest column is now available in the Visual Studio 2008 launch issue of MSDN Magazine.
-
Unit Testing for Native C++
I often get asked about unit testing native code and quite frankly I’ve never really had a good answer. Until now that is. Maria Blees was kind enough to share a unit testing framework she developed for C++ called WinUnit and I must say I’m really impressed. Go read about it now in her article published in this month’s issue of MSDN Magazine:
-
Looking Back at 2007
As I did last year, I thought I'd provide a quick summary of some of the highlights from 2007.
-
Parallel Programming with C++ – Part 4 – I/O Completion Ports
So far in the Parallel Programming with C++ series I've talked about asynchronous procedure calls (APCs) and how they can be used to build efficient and responsive client applications quite easily by waiting for I/O requests to complete asynchronously without having to create additional worker threads.