Displaying an image on a LED matrix with a Netduino
 In the previous post, we’ve been flipping bits manually on three ports of the Netduino to simulate the data, clock and latch pins that a shift register expected. We did all that in order to control one line of a LED matrix and create a simple Knight Rider effect.
It was rightly pointed out in the comments that the Netduino has built-in knowledge of the sort of serial protocol that this shift register understands through a feature called SPI. That will of course make our code a whole lot simpler, but it will also make it a whole lot faster: writing to the Netduino ports is actually not that fast, whereas SPI is very, very fast.
Unfortunately, the Netduino documentation for SPI is severely lacking. Instead, we’ve been reliably using the documentation for the Fez, another .NET microcontroller.
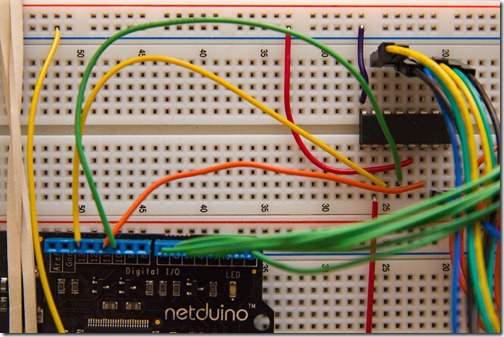
To send data through SPI, we’ll just need to move a few wires around and update the code. SPI uses pin D11 for writing, pin D12 for reading (which we won’t do) and pin D13 for the clock. The latch pin is a parameter that can be set by the user. This is very close to the wiring we had before (data on D11, clock on D12 and latch on D13). We just have to move the latch from D13 to D10, and the clock from D12 to D13.
The code that controls the shift register has slimmed down considerably with that change. Here is the new version, which I invite you to compare with what we had before:
public class ShiftRegister74HC595 { protected SPI Spi; public ShiftRegister74HC595(Cpu.Pin latchPin) : this(latchPin, SPI.SPI_module.SPI1) { } public ShiftRegister74HC595(Cpu.Pin latchPin,All we have to do here is configure SPI. The write method couldn’t be any simpler. Everything is now handled in hardware by the Netduino. We set the frequency to 1MHz, which is largely sufficient for what we’ll be doing, but it could potentially go much higher.
SPI.SPI_module spiModule) {
var spiConfig = new SPI.Configuration( SPI_mod: spiModule, ChipSelect_Port: latchPin, ChipSelect_ActiveState: false, ChipSelect_SetupTime: 0, ChipSelect_HoldTime: 0, Clock_IdleState: false, Clock_Edge: true, Clock_RateKHz: 1000 ); Spi = new SPI(spiConfig); } public void Write(byte buffer) { Spi.Write(new[] {buffer}); } }
The shift register addresses the columns of the matrix. The rows are directly wired to ports D0 to D7 of the Netduino. The code writes to only one of those eight lines at a time, which will make it fast enough.
The way an image is displayed is that we light the lines one after the other so fast that persistence of vision will give the illusion of a stable image:
foreach (var bitmap in matrix.MatrixBitmap) {
    matrix.OnRow(row, bitmap, true);
    matrix.OnRow(row, bitmap, false);
    row++;
}
Now there is a twist here: we need to run this code as fast as possible in order to display the image with as little flicker as possible, but we’ll eventually have other things to do. In other words, we need the code driving the display to run in the background, except when we want to change what’s being displayed.
Fortunately, the .NET Micro Framework supports multithreading. In our implementation, we’ve added an Initialize method that spins a new thread that is tied to the specific instance of the matrix it’s being called on.
public LedMatrix Initialize() {
    DisplayThread = new Thread(() => DoDisplay(this));
    DisplayThread.Start();
    return this;
}
I quite like this way to spin a thread. As you may know, there is another, built-in way to contextualize a thread by passing an object into the Start method. For the method to work, the thread must have been constructed with a ParameterizedThreadStart delegate, which takes one parameter of type object. I like to use object as little as possible, so instead I’m constructing a closure with a Lambda, currying it with the current instance. This way, everything remains strongly-typed and there’s no casting to do. Note that this method would extend perfectly to several parameters.
Of note as well is the return value of Initialize, a common technique to add some fluency to the API and enabling the matrix to be instantiated and initialized in a single line:
using (var matrix = new LedMS88SR74HC595().Initialize())
The “using” in the previous line is because we have implemented IDisposable so that the matrix kills the thread and clears the display when the user code is done with it:
public void Dispose() {
    Clear();
    DisplayThread.Abort();
}
Thanks to the multi-threaded version of the matrix driver class, we can treat the display as a simple bitmap with a very synchronous programming model:
matrix.Set(someimage);
while (button.Read()) {
    Thread.Sleep(10);
}
Here, the call into Set returns immediately and from the moment the bitmap is set, the background display thread will constantly continue refreshing no matter what happens in the main thread. That enables us to wait or read a button’s port on the main thread knowing that the current image will continue displaying unperturbed and without requiring manual refreshing. We’ve effectively hidden the implementation of the display behind a convenient, synchronous-looking API. Pretty neat, eh?
Before I wrap up this post, I want to talk about one small caveat of using SPI rather than driving the shift register directly: when we got to the point where we could actually display images, we noticed that they were a mirror image of what we were sending in. Oh noes! Well, the reason for it is that SPI is sending the bits in a big-endian fashion, in other words backwards. Now sure you could fix that in software by writing some bit-level code to reverse the bits we’re sending in, but there is a far more efficient solution than that. We are doing hardware here, so we can simply reverse the order in which the outputs of the shift register are connected to the columns of the matrix. That’s switching 8 wires around once, as compared to doing bit operations every time we send a line to display.
All right, so bringing it all together, here is the code we need to write to display two images in succession, separated by a press on the board’s button:
var button = new InputPort(Pins.ONBOARD_SW1, false,
                           Port.ResistorMode.Disabled);
using (var matrix = new LedMS88SR74HC595().Initialize()) {
    // Oh, prototype is so sad!
    var sad = new byte[] {
        0x66, 0x24, 0x00, 0x18, 0x00, 0x3C, 0x42, 0x81
    };
    DisplayAndWait(sad, matrix, button);
    // Let's make it smile!
    var smile = new byte[] {
        0x42, 0x18, 0x18, 0x81, 0x7E, 0x3C, 0x18, 0x00
    };
    DisplayAndWait(smile, matrix, button);
}
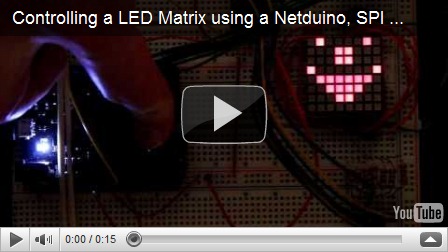
And here is a video of the prototype running:
I’ve added an artificial delay between the display of each row of the matrix to clearly show what’s otherwise happening very fast. This way, you can clearly see each of the two images being displayed line by line.
Next time, we’ll do no hardware changes, focusing instead on building a nice programming model for the matrix, with sprites, text and hardware scrolling. Fun stuff. By the way, can any of my reader guess where we’re going with all that?
The code for this prototype can be downloaded here:
https://aspblogs.z22.web.core.windows.net/bleroy/Samples/NetduinoLedMatrixDriver.zip
