Archives
-
How to find the name of a special character - Windows Character Map
There are plenty of times that you may need to find the name of special character on the keyboard such as when referencing it in a blog post or email. Usually Google can help out but sometimes searching for something like the tilde character on Google with the search phrase:
What is the name of the "~" character?
just does not get you what you want.
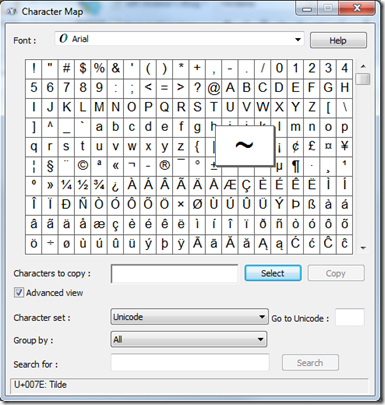
Here is where the Windows Character Map tool comes in very handy.
Found here: All Programs > Accessories > System Tools > Character Map
The Windows Character Map tool will let search for a particular character and then give you the name at the bottom when you click on it.
-
Outlook 2010 Sent Items not sorting
I ran into an issue today with my Outlook where the Sent Items folder would not sort. For some reason it had become sorted on the “To” field and then whenever I would try to sort by the “Sent” column (which is the default sort order) the view would change to the “Searching...” view and would just sit there.
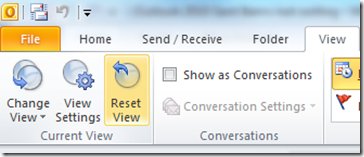
I eventually figured out that the View > “Reset View” menu option would reset the view of the Sent Items folder and then return the view to the normal ordered by “sent” date.
-
Binding multiple websites to HTTPS on your development machine
On your development machine you can use host headers to bind to different websites within IIS, allowing you to host multiple websites on a single development machine (you can do this too in production but this article is focusing on the development environment).
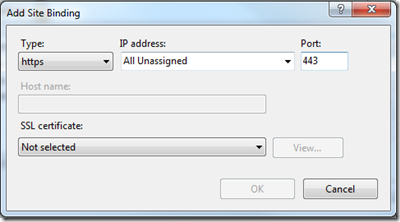
Host headers work only with HTTP since IIS is not able to see the host header information in an HTTPS request until it reaches the website so it would not know which site to bind to. For this reason, IIS does not allow you to specify a host header when setting up an HTTPS binding:
When you select the Binding Type of HTTPS, then the Host name box is disabled.
You then have two other choices to allow multiple websites on your development IIS environment to both run with HTTPS. You can either vary the Port or the IP Address between the two. Changing the Port is not desirable because this would usually mean extra code to make sure a special port number was used in requests (and then would not match a production environment). So this leaves you with IP address.
Most development machines have only a single network card and therefore, by default, a single IP address. So only having one IP address will not help you run more than one site under SSL.
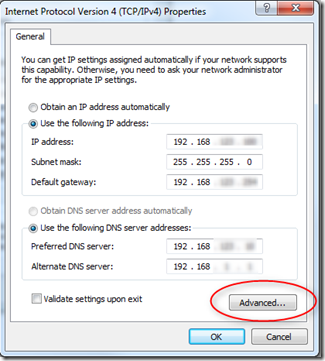
But hidden within the Network Connection properties dialog is a way to specify a second (or third) IP address for your development machine; which is exactly what is needed to allow multiple websites to use SSL on your development machine.
Go to Control Panel > Network and Sharing Center > Change adapter settings (or just get to the properties of your Network Adapter).
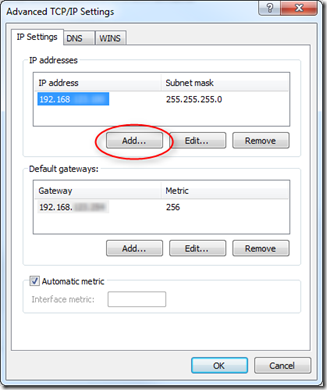
Here is where you will see the primary IP address for your machine (either it will be as above if you have a static IP address, or more likely you have a dynamic IP address and then both of the Obtain IP address and DNS server automatically options will be selected. But there is a way to add a second (or third) IP address. Just click that Advanced button in the lower right.
Now click the Add… button where you will be able to add a static IP address (you will need a static IP address to be able to do this).
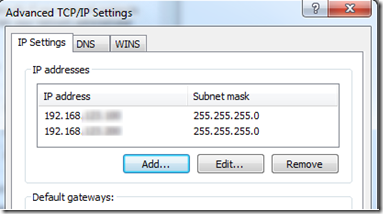
OK your way out and now your machine will have two IP addresses.
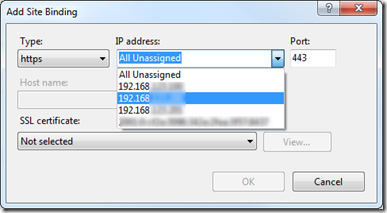
Returning back to the IIS Add Site Binding dialog and now in the IP Address drop down you will see your second IP address (or in the case of the screenshot below a third too).
Just choose one of these IP addresses for one site and the other for the other site that you also want to allow HTTPS (SSL) requests on.
Now there is one last thing to take care of and that is to make sure the request to this site is resolving to the correct IP address. In most cases, if you are using host headers to host multiple websites on your development machine, then you have entered entries into your Hosts file using the local loopback IP address 127.0.0.1. But now you will need to make sure you change these to the IP addresses that you specified for that particular website.
You can confirm that the host header is resolving to the correct IP address by pinging that host header.
Technorati Tags: Binding multiple websites to HTTPS on your development machine -
How to increase the timeout for a SharePoint 2010 website
The default timeout for an Http Request in SharePoint Foundation 2010 is 120 seconds*. Any Http Requests above this 120 seconds will be met with a “Request timed out” error as displayed in the SharePoint logs:
Unexpected System.Web.HttpException: Request timed out.
Note: The SharePoint logs can be found at:
C:\Program Files\Common Files\Microsoft Shared\Web Server Extensions\14\LOGSTo increase this timeout you will need to modify the web.config file for the SharePoint Website. If you are using the default SharePoint configuration, then the web.config file will be found at:
C:\inetpub\wwwroot\wss\VirtualDirectories\80\web.config
Open this file in Notepad and then scroll down to the system.web > httpRuntime element (about half way down the file). To increase the timeout, add the executionTimeout attribute to the httpRuntime element with a value of the number of seconds for the timeout. For example, to increase the timeout to 5 minutes, add an executionTimeout of 300 like this:
<httpRuntime maxRequestLength="51200" executionTimeout="300" />
In the default SharePoint Foundation 2010 web.config file it will look like this:
Save the web.config file and now the timeout for HttpRequests will have been increased (Of course you need to ask why a request is taking more than 2 minutes to justify increasing the timeout in the first place… increasing the timeout to make the error go away but yet your customers have a horrible user experience is not a valid solution).
*The ASP.NET MSDN reference indicates that the default setting for the executionTimeout property is 110 seconds: http://msdn.microsoft.com/en-us/library/e1f13641.aspx. But the SharePoint logs show a timeout occurring at exactly 120 seconds with the default executionTimeout setting. I am not sure where the extra 10 seconds are coming from but I used 120 seconds in this article since that is what someone will find when investigating the SharePoint logs.
-
How to troubleshoot a SharePoint 2010 error
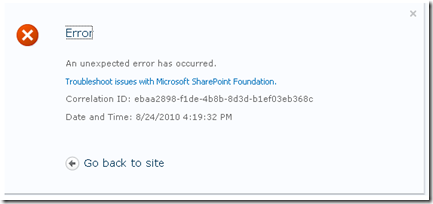
When an error occurs within Microsoft SharePoint Foundation 2010 a Correlation ID will be displayed in the error message:
This Correlation ID is logged within the SharePoint log files and you can use it to find out more details about the error that occurred.
The two pieces of information you will need from the error message above are the Correlation ID and the date and time of the error.
Once you have those two pieces of information, browse to the SharePoint log files on your SharePoint server located at:
C:\Program Files\Common Files\Microsoft Shared\Web Server Extensions\14\LOGS
The log files will be labeled with a date time stamp so find the one that corresponds to the time frame of the error and then open this log file in Notepad (or the text editor of your choice) and search for the Correlation ID.
You will probably find it listed in several places, from the beginning GET request to when the error occurred, and finally to when the logging of correlation data stops. Of course you are probably most interested in the error message but there will be more information in the log associated with the Correlation ID to help you find the root cause of the error.
-
How a sewing machine works
This awesome blog post, Complicated Mechanisms Explained in simple animations, does a great job of explaining how engines, gears, and even sewing machines work:
-
How to switch between HTTP and HTTPS in ASP.NET MVC2
ASP.NET MVC2 has the new RequireHttpsAttribute that you can use to decorate any action to force any non-secure request to come through HTTPS (SSL). It can be used as simply as this:
[RequireHttps]
public ActionResult LogOn()
{
.....
}Now any request to the LogOn action that is not over HTTPS will automatically be redirected back to itself over HTTPS. This is very useful and easy to implement.
Unfortunately though, once the scheme is changed to HTTPS, all following requests will also be under HTTPS, which is not necessarily what you want. In most cases you do not need all requests to your site to be secure but only certain ones such as the logon page or pages that accept credit card information.
To handle this you can override the Controller.OnAuthorization method. From within this method, you can check to see if the RequireHttps attribute is set on the Controller Action by searching the Attributes collection of the ActionDescriptor object. If the RequireHttpsAttribute is not set AND the request is under SSL, then return a redirect result to the HTTP (non-SSL) url:
public class ControllerBase : Controller
{protected override void OnAuthorization(AuthorizationContext filterContext)
{//the RequireHttpsAttribute set on the Controller Action will handle redirecting to Https.
// We just need to handle any requests that are already under SSL but should not be.
if (Request.IsSecureConnection)
{
Boolean requireHttps = false;
requireHttps = filterContext.ActionDescriptor.GetCustomAttributes(typeof(RequireHttpsAttribute), false).Count() >= 1;
//If this request is under ssl but yet the controller action
// does not require it, then redirect to the http version.
if (!requireHttps && !filterContext.IsChildAction)
{
UriBuilder uriBuilder = new UriBuilder(Request.Url);
//change the scheme
uriBuilder.Scheme = "http";
uriBuilder.Port = 80;
filterContext.Result = this.Redirect(uriBuilder.Uri.AbsoluteUri);
}
}
base.OnAuthorization(filterContext);
}}
Now any HTTPS requests to controller actions that are not decorated with a RequireHttps attribute will be forced back to an HTTP (non-secure) request.
EDITED (2010-08-21): Modified the code as recommended by the comment from Donnie Hale to move the check for Request.SecureConnection to the outermost if block.
EDITED (2011-01-06): Modified the code as recommended by the comment from Sergio Tai to not perform this check if use Html.Action in views
-
SharePoint 2010 - The Security Token Service is not available
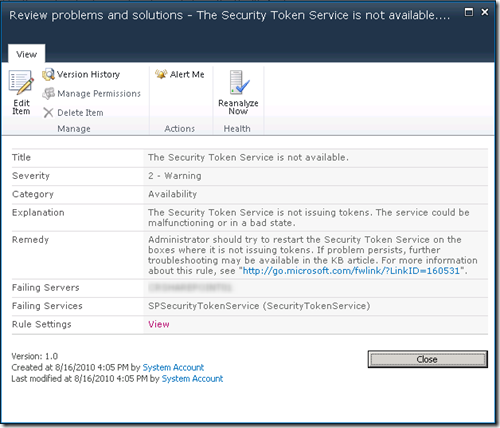
I am in the process of setting up a SharePoint Foundation 2010 machine. After installing SharePoint Foundation 2010 I noticed a warning in the Central Admin > Review problems and solutions report that the Security Token Service is not available.
The Security Token Service is not available.
The Security Token Service is not issuing tokens. The service could be malfunctioning or in a bad state.
SPSecurityTokenService (SecurityTokenService)The problem ended up being that the default configuration of the IIS Application Pools were set to 32-bit:
When SharePoint was installed all of the application pool accounts were added with 32-Bit enabled which prevented the SharePoint application pools from starting. I had corrected this for the Central Admin site and also the root SharePoint site but the application pools for the Security Token Service were still set to use the 32-Bit application which was preventing the service from starting.
Changing this setting in each of the application pools (there were several created so check them all) fixed the issue and then the warning went away.
-
Configuring Incoming Email for SharePoint 2010 Foundations
SharePoint sites can receive email and store incoming messages in lists. This allows a user to send an email to a particular email address and have the contents of the email show up in a SharePoint list. You can also email enable a calendar in SharePoint 2010 Foundations and then connect that calendar to Outlook to create a shared calendar for all of your users. Below are instructions on how to enable incoming email in SharePoint 2010 Foundations.
There are three places you will need to modify to get incoming email to show up in SharePoint lists and calendars. The first is in the SharePoint Central Administration, the second is within the IIS 6.0 Manager (for the SMTP settings), and the third is enabling it in the list itself.
Step 1 - SharePoint Central Administration
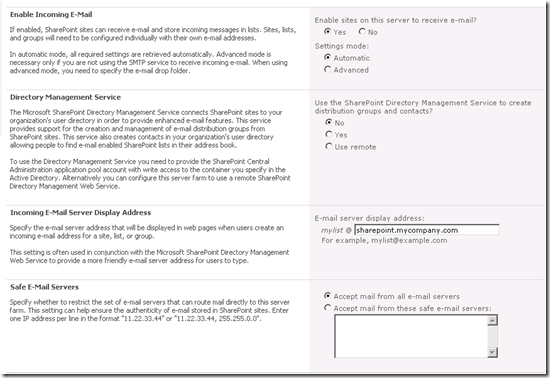
Go to SharePoint Central Administration on your SharePoint server and then browse to System Settings > Configure incoming e-mail settings:
Within the Configure incoming e-mail settings page you will need to select the “enable sites on this server to receive e-mail” option and then set the domain name of the e-mail server:
Step 2 - IIS 6.0 Manager for SMTP configuration
You will now use the IIS 6.0 Manager to add the domain name you are using to send mail to the email enabled lists to this server (so that it will accept email to this domain name).
Go to Administrative Tools > Internet Information Services (IIS) 6.0 Manager
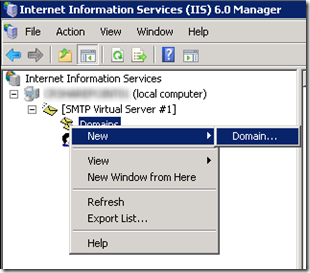
In the IIS6 MMC expand the local server and then expand the SMTP Virtual Server. You now need to add the domain name specified in the Central Admin configuration settings to the domains that will receive email on this SMTP Server.
Right click Domains and then choose New > Domain…
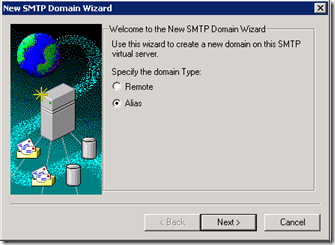
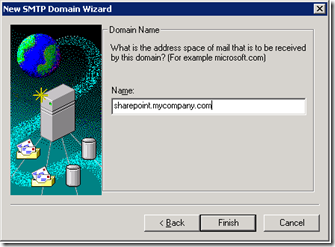
Choose the Alias option and then click Next
Then add the domain name where users will send email as an alias for the SMTP server. Note: Of course make sure the DNS MX records are set to point this domain name to the IP address of this server. Note2: Also make sure port 25 is open to your server so it can receive email.
Step 3 – Enabling incoming email in the SharePoint list
The final step is to enable incoming email on the lists that you want to accept email and also specify an email address for the list.
To do this, browse to the List Settings of the List:
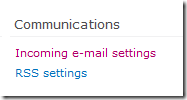
Then on the right-hand side will be the Communications section with the Incoming e-mail settings link.
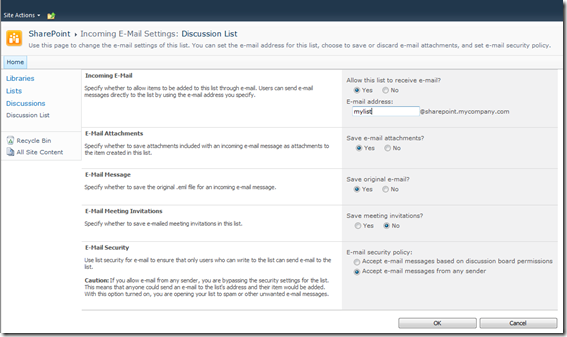
Click this link to bring up the Incoming E-mail Settings dialog for this list. Choose Yes to enable the list to receive email and then enter an email address for this list. (There are also other options to set to control what content from the email is added to the list and the permissions.) Click OK to save your settings.
Now you can send an email to this list email address (in the example above it would be mylist@sharepoint.mycompany.com) and the contents of the email will be automatically added to the discussion list.
Technorati Tags: Configuring Incoming Email for SharePoint 2010 Foundations -
How to implement ISNULL(SUM(ColumnName),0) in Linq2SQL
I had a Linq2Sql statement like this:
var q = from o in db.OrderItem
where o.UserId == UserId
select o.Amount;And then I was trying to get the sum of the OrderItem.Amount column by doing this:
total = q.Sum();
This worked fine as long as there were rows for this UserId in the OrderItem table. But if there are no rows in the table for this UserId I was getting this exception:
System.InvalidOperationException: The null value cannot be assigned to a member with type System.Decimal which is a non-nullable value type.
Linq2Sql was creating the following SQL query:
SELECT SUM([t0].[Amount]) AS [value]
FROM [dbo].[OrderItem] AS [t0]
WHERE [t0].[UserId] = @p0which is fine but I really want this:
SELECT ISNULL(SUM([t0].[Amount]),0) AS [value]
FROM [dbo].[OrderItem] AS [t0]
WHERE [t0].[UserId] = @p0Notice the ISNULL in the statement above that will return 0 if there are no rows found for this UserId.
Eventually I was able to track it down to var q being an IQueryable in the Linq2Sql statement above. By using ToArray() like this:
var q = (from o in db.OrderItem
where o.UserId == UserId
select o.Amount).ToArray();
total = q.Sum();var q is now an IEnumerable (because ToArray() returns an IEnumerable<Decimal>). And instead of IQueryable.Sum() trying to apply an expression to the Null value, IEnumerable.Sum() will just loop through all of the items in the array and sum the values. In this case there are no items in the array so 0 is returned.
I could have also explicitly declared q as an IEnumerable<Decimal>:
IEnumerable<Decimal> q = from o in db.OrderItem
where o.UserId == UserId
select o.Amount;
total = q.Sum();Just to note, the SQL statement is still not using ISNULL() but I am getting the result I want from within C#.
UPDATE (2010-07-22): Another solution from RichardD:
var q = from o in db.OrderItem
where o.UserId == UserId
select o.Amount;
Decimal total = q.Sum(a => (Decimal?)a) ?? 0M;OR
IQueryable<Decimal?> q = from o in db.OrderItem
where o.UserId == UserId
select (Decimal?)o.Amount;
Decimal total = q.Sum() ?? 0; -
Great idea to stop wires from falling down behind desk
Found this picture here (by way of this Smashing Magazine post Showcase of Beautiful Photography) and thought it was a great and simple way to keep all of those laptop cables from slipping down behind the desk.
-
New Home Improvement StackExchange site coming soon
I am really excited about the new Home Improvement StackExchange site that is coming up on its beta release. This is a new site based off of the very popular StackOverflow site that will be targeted toward home improvement for contractors and (serious) DIY'ers. When I am not programming I am working on my house in some way so I am looking forward to learning a lot from other users but also maybe being able to help some people out.
If you haven’t seen the StackExchange Area 51 you should go check it out too. StackExchange was put together about 6 months ago as a way for people to pay for their own Question and Answer site just like StackOverflow. But a lot of the started StackExchange sites became stagnant. So Area 51 was developed to let people propose new sites they would like and then only allow them to be created when enough people have committed to the site.
Currently the Home Improvement site is in the commitment phase (up to 74% complete). As soon as enough people have committed to it to hit 100% then it will start the private beta and then the public beta. If you commit to the site, then you get to be part of the private beta.
So if you are interested in an awesome Home Improvement site just like StackOverflow then head over to the Area 51 Home Improvement proposal and commit to it.
-
SharePoint 2010 – SQL Server has an unsupported version 10.0.2531.0
I am trying to perform a database attach upgrade to SharePoint Foundation 2010.
At this point I am trying to attach the content database to a Web application by using Windows Powershell:
Mount-SPContentDatabase -Name <DatabaseName> -DatabaseServer <ServerName> -WebApplication <URL> [-Updateuserexperience]
I am following the directions from this TechNet article: Attach databases and upgrade to SharePoint Foundation 2010. When I go to mount the content database I am receiving this error:
Mount-SPContentDatabase : Could not connect to [DATABASE_SERVER] using integrated security: SQL server at [DATABASE_SERVER] has an unsupported version 10.0.2531.0. Please refer to “http://go.microsoft.com/fwlink/?LinkId=165761” for information on the minimum required SQL Server versions and how to download them.
At first this did not make sense because the default SharePoint Foundation 2010 website was running just fine. But then I realized that the default SharePoint Foundation site runs off of SQL Server Express and that I had just installed SQL Server Web Edition (since the database is greater than 4GB) and restored the database to this version of SQL Server.
Checking the documentation link above I see that SharePoint Server 2010 requires a 64-bit edition of SQL Server with the minimum required SQL Server versions as follows:
- SQL Server 2008 Express Edition Service Pack 1, version number 10.0.2531
- SQL Server 2005 Service Pack 3 cumulative update package 3, version number 9.00.4220.00
- SQL Server 2008 Service Pack 1 cumulative update package 2, version number 10.00.2714.00
The version of SQL Server 2008 Web Edition with Service Pack 1 (the version I installed on this machine) is 10.0.2531.0.
SELECT @@VERSION:
Microsoft SQL Server 2008 (SP1) - 10.0.2531.0 (X64) Mar 29 2009 10:11:52 Copyright (c) 1988-2008 Microsoft Corporation Web Edition (64-bit) on Windows NT 6.1 <X64> (Build 7600: ) (VM)But I had to read the article several times since the minimum version number for SQL Server Express is 10.0.2531.0. At first I thought I was good with the version of SQL Server 2008 Web that I had installed, also 10.0.2531.0. But then I read further to see that there is a cumulative update (hotfix) for SQL Server 2008 SP1 (NOT the Express edition) that is required for SharePoint 2010 and will bump the version number to 10.0.2714.00.
So the solution was to install the Cumulative update package 2 for SQL Server 2008 Service Pack 1 on my SQL Server 2008 Web Edition to allow SharePoint 2010 to work with SQL Server 2008 (other than the SQL Server 2008 Express version).
SELECT @@VERSION (After installing Cumulative update package 2):
Microsoft SQL Server 2008 (SP1) - 10.0.2714.0 (X64) May 14 2009 16:08:52 Copyright (c) 1988-2008 Microsoft Corporation Web Edition (64-bit) on Windows NT 6.1 <X64> (Build 7600: ) (VM) -
SQL Server 2008 Service Pack 1 and the Invoke or BeginInvoke cannot be called error message
When trying to install SQL Server 2008 Service Pack 1 to a SQL Server 2008 instance that is running on a virtual machine, the installer will start:
But then after about 20 seconds I receive the following error message:
TITLE: SQL Server Setup failure.
-----------------------------
SQL Server Setup has encountered the following error:
Invoke or BeginInvoke cannot be called on a control until the window handle has been created.
------------------------------
BUTTONS:
OK
------------------------------Searching for this issue I found that several people have the same problem and there is no clear solution. Some had success with closing windows or Internet Explorer but that didn’t work for me; what did work is to make sure the SQL Server 2008 “Please wait while SQL Server 2008 Setup processes the current operation.” dialog is selected and has the focus when it first shows up. Selected (with the current focus) it looks like this:
Without focus the dialog looks like this:
Add a comment if you find out any information about how to consistently get around this issue or why it is happening in the first place.
-
Visual Studio confused when there are multiple system.web sections in your web.config
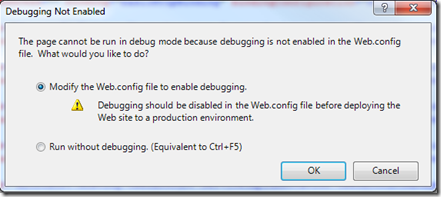
I am trying to start debugging in Visual Studio for the website I am currently working on but Visual Studio is telling me that I have to enable debugging in the web.config to continue:
But I clearly have debugging enabled:
At first I chose the option to Modify the Web.config file to enable debugging but then I started receiving the following exception on my site:
HTTP Error 500.19 - Internal Server Error
The requested page cannot be accessed because the related configuration data for the page is invalid.
Config section 'system.web/compilation' already defined. Sections must only appear once per config file. See the help topic <location> for exceptions
So what is going on here? I already have debug=”true”, Visual Studio tells me I do not, and then when I give Visual Studio permission to fix the problem, I get a configuration error.
Eventually I tracked it down to having two <system.web> sections.
I had defined customErrors higher in the web.config:
And then had a second system.web section with compilation debug=”true” further down in the web.config. This is valid in the web.config and my site was not complaining but I guess Visual Studio does not know how to handle it and sees the first system.web, does not see the debug=”true” and thinks your site is not set up for debugging.
To fix this so that Visual Studio was not going to complain, I removed the duplicate system.web declaration and moved the customErrors statement down.
-
Configuring SharePoint Foundation 2010 for SharePoint Workspace 2010
SharePoint Workspace 2010 is the new version of Groove that will give you an offline copy of a SharePoint website and also allow you to work with a SharePoint site outside of a browser. SharePoint Workspace 2010 is especially nice for editing documents in a SharePoint Document library. SharePoint Workspace makes the SharePoint Document Library work just like a folder on your computer and will handle the synchronization of the documents back to the SharePoint server for you.
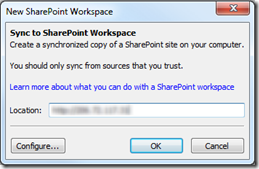
If you try connecting SharePoint Workspace 2010 to a default SharePoint Foundation 2010 installation you may get an error like this one:
---------------------------
Sync to SharePoint Workspace
---------------------------
SharePoint Workspace was unable to interpret the SharePoint location. Please check and ensure the location contains no typing errors.
---------------------------
OK Help
---------------------------This is because the default configuration of SharePoint Foundation 2010 requires two configuration changes to allow SharePoint Workspace 2010 to work.
The first is to enable the Remote Differential Compression feature on the server that is hosting SharePoint. This is used by SharePoint Workspace 2010 to send and receive the files for synchronization.
To enable Remote Differential Compression go to the Server Manager > Features and choose Add Features.
Check the box for the Remote Differential Compression feature and then click Install to enable this feature.
The second configuration change to allow SharePoint Workspace 2010 to work with your SharePoint Foundation 2010 server is to add an Alternate Access Mapping of the public facing DNS name (or IP address) to SharePoint using the SharePoint Central Admin. If you are connecting to your SharePoint site using the machine name then this is not necessary, but if you are connecting over the Internet through either an IP address or DNS name then you will need to add this alternate access mapping.
The reason is that when SharePoint is first installed, the only way it thinks users are connecting to the server is through the machine name: http://machine_name (as if on a local intranet). Since most likely SharePoint Workspace 2010 users will be connecting through a public facing DNS name (or IP address), you will need to add this DNS name (or IP address) as an alternate access mapping (indicating that this DNS name is the same as the machine_name and should map to the SharePoint site).
To add an Alternate Access Mapping to SharePoint Foundation 2010, visit the SharePoint Central Administration on the SharePoint Foundation 2010 server:
Once in the SharePoint Central Administration website, click on the Application Management link
Then under the Web Applications heading choose Configure alternate access mappings
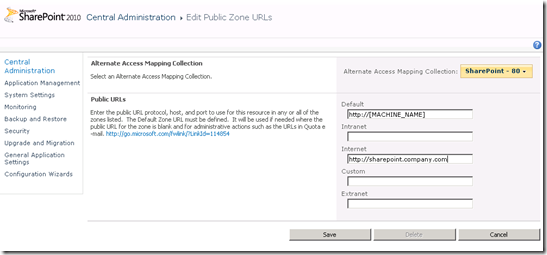
Choose Edit Public URLs
And then select the public facing SharePoint website that you want to add an access mapping to. You do this by changing the Alternate Access Mapping Collection (clicking on the “No selection” drop down button) to the website that is running on Port 80.
The default name of the public facing SharePoint site is “SharePoint – 80” but you may have changed that when you configured your SharePoint site.
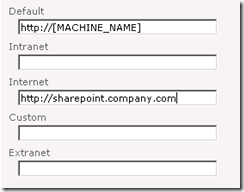
Once you have switched the Alternate Access Mapping Collection to the public SharePoint website (SharePoint – 80) then you can specify the Public URL by adding the publically accessible IP Address or DNS name to the Internet field:
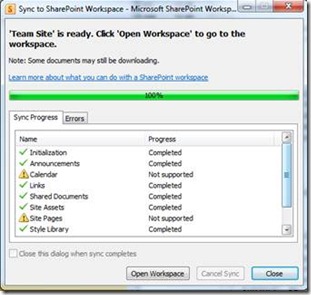
Click Save to apply the alternate access mapping and now you should be able to connect to your SharePoint Foundation 2010 site with SharePoint Workspace 2010:
SharePoint Foundation 2010 is the free version of SharePoint that installs on top of Windows Server 2008. With SharePoint Workspace 2010 you can get an offline copy of your SharePoint team site allowing you to add/edit your documents in any SharePoint document library easily and allow SharePoint Workspace 2010 to handle the file synchronization for you.
You can take a look at SharePoint Foundation 2010 quickly and easily by starting a preconfigured SharePoint Foundation 2010 Virtual Machine at Vaasnet.com. Vaasnet.com is a new Internet startup that provides preconfigured virtual machines (such as a virtual machine with SharePoint Foundation 2010 already installed) that are ready for you to start and begin using right away. Vaasnet.com takes the hassle out of downloading and installing the Windows Server 2008 operating system and SharePoint Foundation 2010 so that you can quickly log in and begin trying out the new features of SharePoint Foundation 2010.
-
How to view Outlook 2010 Internet headers for an email
In Outlook 2010 getting to the Internet headers for an email has been moved to the File Menu for a particular email message.
In Outlook 2007 (and previous versions) you used to be able to view the internet headers of an email message by right-clicking on any email message and choosing the “Options” menu option from the context menu that appeared. In Outlook 2010 this has moved to the File menu.
To get to the Internet Headers of an email in Outlook 2010:
Open the email message in its own window (by double clicking on the message).
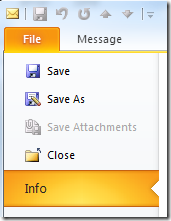
Then go to File > Info for that message:
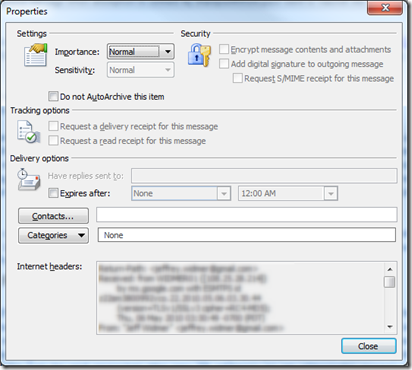
And then in the right-hand pane click on the Properties button
This will bring up the Properties dialog with the Internet headers located at the bottom:
-
Windows 7 User Account Control does not allow drag and drop
I recently upgraded my laptop to Windows 7 and my development desktop to Windows Server 2008 R2. While I was setting up my development environment, I ran into an issue where drag and drop in Component Services would not work on either machine. Normally I would just create my COM+ Application and then drag the DLLs into the components folder to have them registered, but this was not working on either machine.
I then tried to run some setup SQL scripts by dragging the .sql files into SQL Server Management Studio. Again nothing happened when I dragged the file over SQL Server Management Studio and let go of my mouse button.
Eventually I was able to track it down to User Account Control (UAC). I had decided to try and leave User Account Control enabled on both of these machines and up to this point I had not had many problems and everything was working as expected. But after turning User Account Control off (and rebooting), I was able to drag and drop in Component Services and SQL Server Management Studio again.
To be honest, with Windows Vista and Windows Server 2008, I immediately turned off User Access Control since it was too interfering, so I am not sure if drag and drop in these applications is a problem too. With Windows 7 and Windows Server 2008 R2 I was going to give UAC a try and leave it enabled. Maybe there is another way to enable drag and drop in these applications and still have User Account Control enabled, but at this point I have not been able to find it.
UPDATE (2010-06-21): Eric Murriguez found the solution to this problem of Windows 7 User Account Control not allowing drag and drop. There is a Local Security Policy called User Account Control: Run all administrators in Admin Approval Mode which controls this. Setting this to “Disabled” effectively means that Admin Approval Mode is no longer required for members of the local Administrators group… effectively disabling UAC entirely for those users. Which is about the same as turning off UAC entirely but still this setting allows you to control it just for administrators. The setting is found under: Security Settings > Local Policies > Security Options.

-
The best and most comfortable headset – Plantronics M110 Mobile Headband Headset
The Plantronics M110 Mobile Headband Headset is the best headset I have ever used and highly recommend it. I have tried others but none are as comfortable as this Plantronics model. It has a 2.5mm plug so you will need an adapter to connect it to phones that have a 3.5mm outlet.
-
Cannot connect to SQL Azure Database
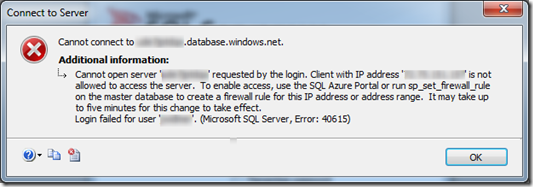
When connecting to a SQL Azure Database using SQL Server Enterprise Manager you will get a “Cannot connect” error if you have not configured the SQL Azure firewall to let your IP address through.
To configure the firewall, log into the Windows Azure portal at http://windows.azure.com and then select the SQL Azure tab on the left navigation:
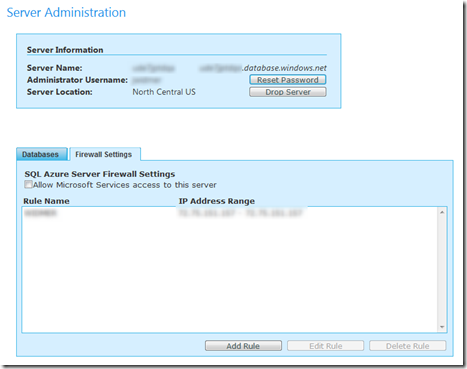
And then choose the project you are connecting to. This will bring you to the Server Administration panel where you can select the Firewall Settings tab.
Click the Add Rule button to add your IP address (or range) into the SQL Azure Firewall. A couple of minutes later you should be able to connect to your SQL Server Instance.
______________________________________________________________________
TITLE: Connect to Server
------------------------------
Cannot connect to XXXXXXX.database.windows.net.
------------------------------
ADDITIONAL INFORMATION:
Cannot open server 'XXXXXXX' requested by the login. Client with IP address 'XXX.XXX.XXX.XXX' is not allowed to access the server. To enable access, use the SQL Azure Portal or run sp_set_firewall_rule on the master database to create a firewall rule for this IP address or address range. It may take up to five minutes for this change to take effect.
Login failed for user 'XXXXXXX'. (Microsoft SQL Server, Error: 40615)
For help, click: http://go.microsoft.com/fwlink?ProdName=Microsoft+SQL+Server&EvtSrc=MSSQLServer&EvtID=40615&LinkId=20476 -
Screenpresso image editing not working after Windows 7 upgrade
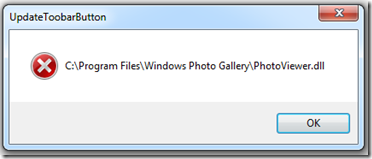
I upgraded my computer to Windows 7 and now my Screenpresso image editor is not working. After grabbing a screen capture I get an error dialog with just a path and the caption “UpdateToobarButton” (yes, there is a typo; Toobar instead of Toolbar):
And then the image editing buttons in the history panel are grayed out:
I browsed to the “C:\Program Files\Windows Photo Gallery” folder but it was empty which probably explains the error (most likely File Not Found).
I did find the PhotoViewer.dll at “C:\Program Files\Windows Photo Viewer\PhotoViewer.dll”. Copying this file to “C:\Program Files\Windows Photo Gallery\PhotoViewer.dll” resolved the issue for me.
---------------------------
UpdateToobarButton
---------------------------
C:\Program Files\Windows Photo Gallery\PhotoViewer.dll
---------------------------
OK
--------------------------- -
Getting Started with Windows Azure: Part 2 - Creating a Windows Azure Hello World Application
Follow along as I learn all about Windows Azure.
Part 0 – Where do I go to get started?
Part 1 - Setting up your development environment
Part 2 - Creating a Windows Azure Hello World Application <<<< YOU ARE HEREBelow are the steps to create a simple Windows Azure Hello World application. These steps assume that you have installed the Windows Azure Tools for Visual Studio. See Part 1 - Setting up your development environment for more information on setting up your development environment.
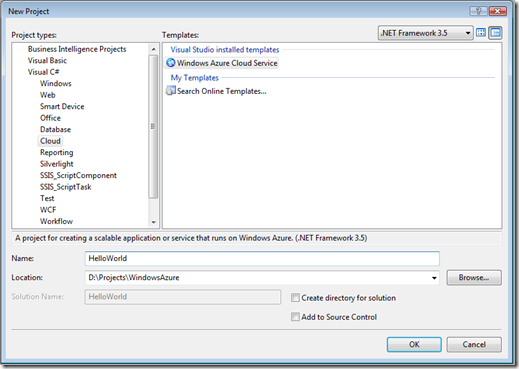
Open Visual Studio 2008 and choose New Project. Then expand the language of your choice and click on the “Cloud” category to find the Windows Azure Cloud Service project type.
Select the Windows Azure Cloud Service project type and then you will be presented with the Role selection dialog. Choose the ASP.NET Web Role and move it to the right-hand frame. You can edit the name of the role by clicking on the edit (pencil) icon for that role.
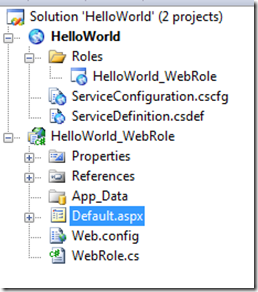
You will then have Visual Studio projects like the following:
Modify the Default.aspx page to include your “Hello World” text or anything else you would like and then hit F5 to test.
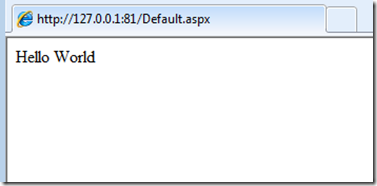
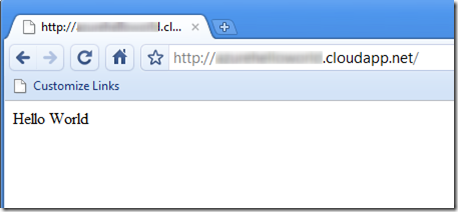
After Windows Azure finishes initializing the Development Storage, you will be presented with your Hello World page running on your local machine:
At this point you are ready to deploy to the cloud but first you need to sign up for the service. I will move on with how to sign up and create the Windows Azure Portal Account and then come back to publishing and deploying your Hello World project later….
Signing up for the Windows Azure Service
Next up is to sign up for the Windows Azure Service through Microsoft Online Services. Signing up for a Windows Azure account can be a little confusing since you don’t sign up for Windows Azure directly but sign up with Microsoft Online Services which manages all of your subscriptions to the Microsoft Online Services (Azure is one of them; there also is the hosted Exchange and SharePoint which you can sign up for too).
You can see the various Windows Azure offers from this page and here is a Windows Azure Comparison chart which shows that there is a free offer called “Introductory Special”. The Introductory Special offer says it lasts only until July so I guess at that point Microsoft Online Services will start charging your credit card for any services that are in use.
WARNING: The introductory offer only includes 25 hours of compute time. You can easily burn through that by just leaving your deployment running (faster if you have both a staging and production deployment running). Make sure you DELETE (not suspend; you must DELETE) your hosted service deployment (see below) when you have finished with this tutorial.
Clicking on the Buy button takes me to the Microsoft Online Services customer portal where you can sign in with your Windows Live account and sign up for the Windows Azure Service. NOTE: Signing up on the Microsoft Online Services site is a multi-step process where you first create your account, then checkout with the Windows Azure Introductory Special in your shopping cart, activate your service, and finally specify the service administrator.
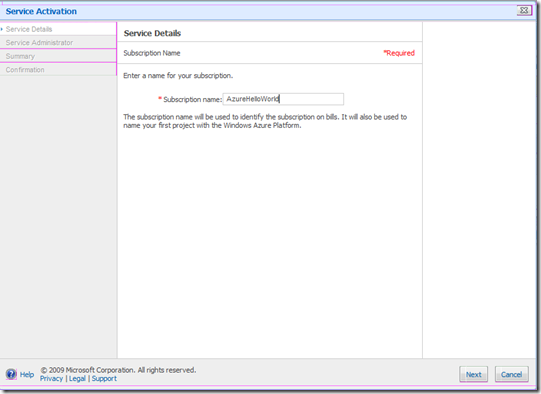
Here is the Service Activation Screen where I have specified the project name as “AzureHelloWorld”. This project name will be the project that is created in the Windows Azure Portal later on (what’s up with those purple borders around everything?!?).
Now you will have a subscription to Windows Azure and after a little bit the Microsoft Online Services Customer Portal will show that the Service is Active:
Now you can go to the Windows Azure Portal (http://windows.azure.com) and sign in with the same Windows Live account that you used to sign up for the subscription at Microsoft Online Services.
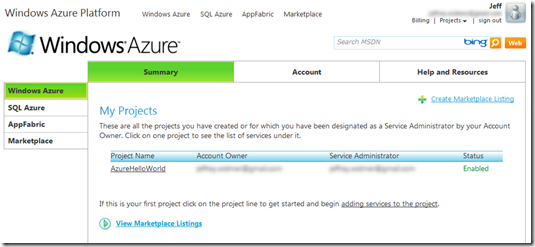
Now you will see the Windows Azure Portal home page with a single project named from when you activated the service (in my case, AzureHelloWorld).
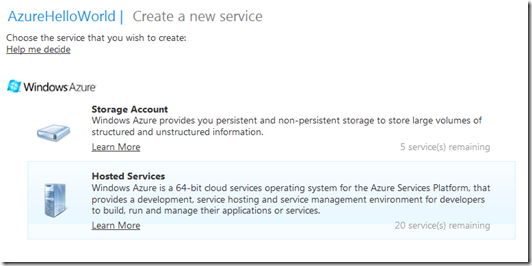
Select this project and choose New Service which is located to the right and just above the project name:

Choose the Hosted Services from the two Windows Azure services that are presented:
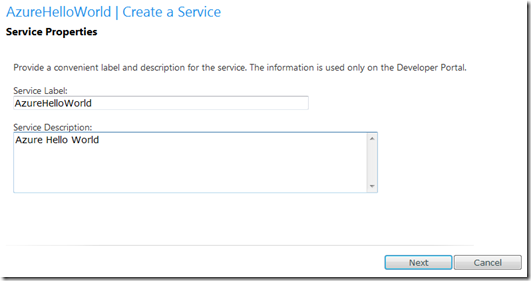
Then name the service:
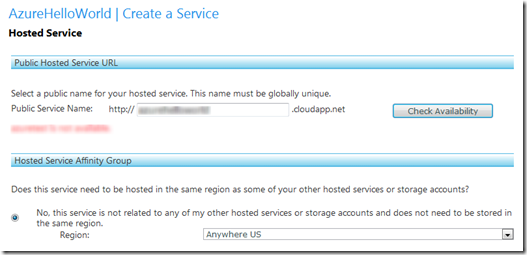
Then choose a url for your service and also the region where it will be running:
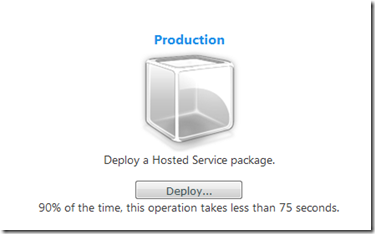
Clicking Next will get you to the Deployment page:
Now you are at the point where you can deploy your Hello World project that you created earlier, but first you have to use Visual Studio to Publish it.
Return to your Hello World Visual Studio Windows Azure project and right click on the HelloWorld Azure Project and click “Publish…”:
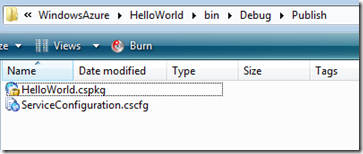
This will create the deployment package and the configuration package (and open Windows Explorer to their location too):
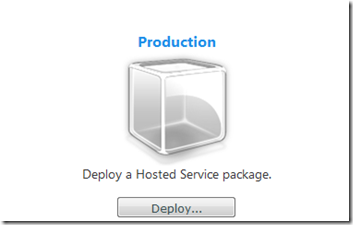
A new browser will be opened and you will be taken to the Windows Azure Portal but you can close that and return to the previous window where the Deploy cube was showing:
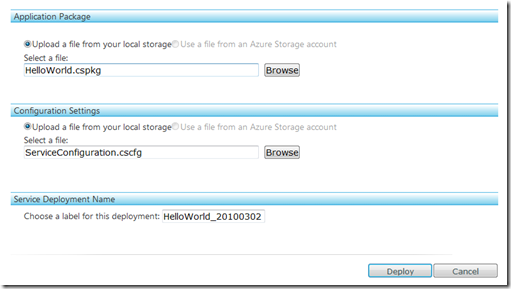
Click that “Deploy…” button and browse to the application package (*.cspkg) and configuration settings (*.cscfg) and then give a name for this deployment:
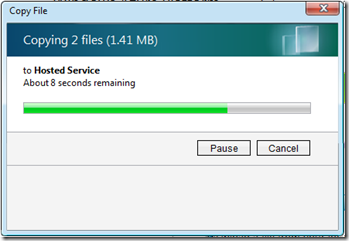
and finally click the Deploy button. Your files will begin copying:
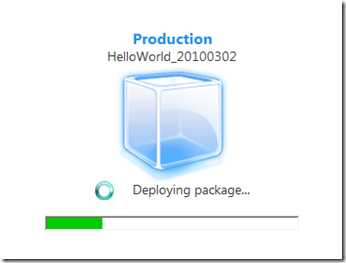
And then you will see your package getting deployed:
Then once it is deployed, you can click Run and your application will begin initializing:
This took a while for me but eventually it finished (I actually went to lunch so I am not sure how long it took but it was greater than 10 minutes).
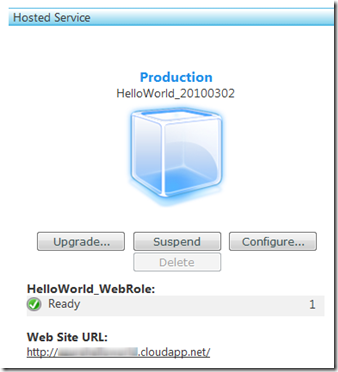
And now when you browse to the cloudapp.net web site url on your console you will get your Windows Azure Hello World:
And there you have it… a successfully created and deployed (and running) Windows Azure Hello World application from beginning to end.
DON'T FORGET: Make sure your DELETE your hosted service deployment when you are finished trying out Windows Azure. The introductory offer only includes 25 hours of compute time. You can easily burn through that by just leaving your deployment running (faster if you have both a staging and production deployment running). And only suspended it does not stop the hours from accumulating. You will need to DELETE the hosted service deployment to stop the compute hours from accumulating.
-
Getting Started with Windows Azure: Part 1 - Setting up your development environment
Follow along as I learn all about Windows Azure.
Part 0 - Where do I go to get started?
Part 1 - Setting up your development environment <<<< YOU ARE HERE
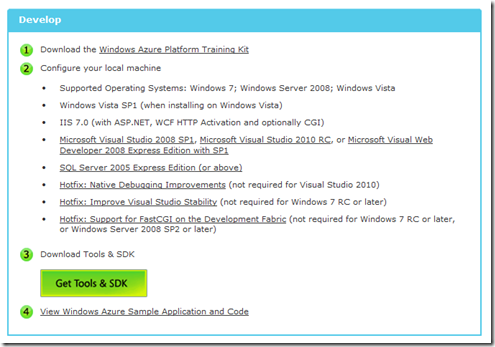
Part 2 - Creating a Windows Azure Hello World ApplicationFrom the Windows Azure Getting Started Roadmap there are some bullet points on how to get started with your development environment.
I did download the Windows Azure Platform Training Kit but it is a 122MB download with what looks like tons of great samples but feels a bit too overwhelming right now. I will move onto Step 2 - Configuring your machine and see if I need to come back to the Training Kit later.
I am running Windows Server 2008 and have Visual Studio 2008 SP1 and SQL Server 2008 installed. I did download and install the 3 hotfixes listed at the bottom. Some of them said they were not required after I ran them. I also confirmed that I had WCF Activation installed along with HTTP Activation.
Step 3 – Download Tools & SDK: I let the Web Platform Installer take care of this for me. It is possible that the Web Platform Installer would have done the other Step 2 items too but I am not sure.
Step 4 – Windows Azure Sample Application is an old application from August 2009 with comments from people that it does not work anymore. I skipped that.
So at this point I think my development environment is setup but I am not sure though since I don’t have a Hello World to try out. I will update this blog post as I learn more. My next post will show how to create that first Windows Azure Hello World Application.
Follow along as I learn all about Windows Azure… next up:
Part 2 – Creating a Windows Azure Hello World Application -
Getting Started with Windows Azure: Part 0 – Where do I go to get started?
I am trying to get started with Windows Azure for the first time so I am going to dive in and see how things go. Follow along as I learn all about Windows Azure.
Part 0 - Where do I go to get started? <<< YOU ARE HERE
Part 1 - Setting up your development environment
Part 2 - Creating a Windows Azure Hello World ApplicationThe first thing I did was go to the Windows Azure Platform home page. There are several different parts to the Windows Azure Platform (Windows Azure, SQL Azure, AppFabric) which I still have to learn about but I am not quite ready for what those are so I watched the high-level “What is Windows Azure” video. It is a great video by Steve Marx to get you oriented with Windows Azure and I highly recommend it.
http://www.microsoft.com/windowsazure/windowsazure/video/what_is_windowsazure.aspx
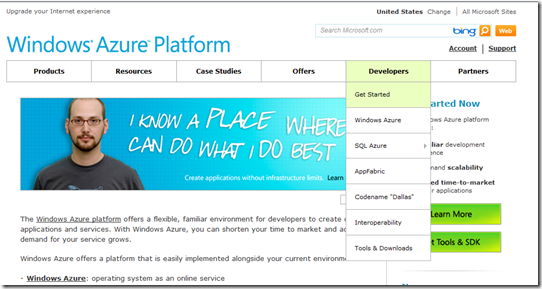
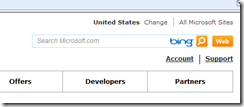
After watching the video, I pretty much wanted to know how to get started. Clicking on the Developer menu item and choosing Get Started:
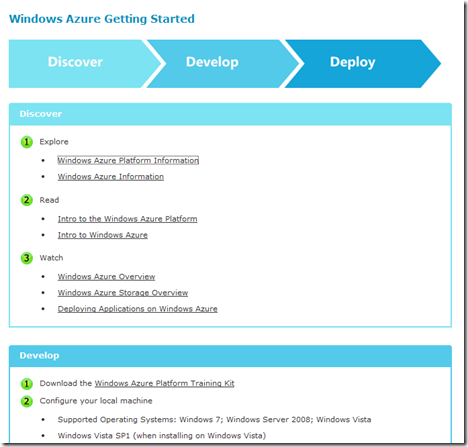
Gave a road map on where to go; the Windows Azure Getting Started Roadmap:
I will continue following this road map in my next post Getting Started with Windows Azure: Part 1 – Setting up your development environment.
Here are some first impression notes I took in case anyone is interested:
Exactly how to get started was not very intuitive; I couldn’t find a “Get Started” or “Sign Up Now” button. My eyes kept going to the bright orange “Web” button at the top and I think I read it multiple times really really wanting it to be a “Sign Up” bottom.
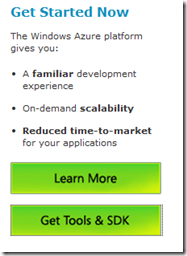
I did notice the “Learn More” and “Get Tools & SDK” but neither of those addressed what I really wanted. I think I had learned enough for now and “Get Tools & SDK” felt too deep for right now. I just wanted to “Get Started”.
Eventually I noticed the Developer menu item and the “Get Started” sub item and found the road map I wanted. The funny thing is… if I had actually clicked the “Learn More” button I would have ended up on the exact same Windows Azure Getting Started page as I had found under Developers > Get Started. Also I didn’t even notice the “Get Started Now” heading and text above the green Learn More button:
-
OneNote Feature I would love to see: Ctrl-Tab
I use Ctrl-Tab all the time in Visual Studio and SQL Server Management Studio to switch between the current file and the previous file (and then quickly back again).
I would love to see OneNote enable Ctrl-Tab to switch between the last OneNote page and current OneNote page. Currently Ctrl-Tab moves from Section to Section in your NoteBook (and hitting Ctrl-Tab and then releasing all keyboard buttons and then hitting Ctrl-Tab again just moves to the next section in your NoteBook when it really feels like it should move back to the previous section). You can get the Visual Studio Ctrl-Tab experience by using the Alt-Left Arrow and Alt-Right Arrow keyboard shortcut but this is the same shortcut as the browser back and forward buttons and is just not natural to the design of OneNote. (I do not think of each page in OneNote as a web page.)
I use Ctrl-Tab so much in Visual Studio and other applications and it would be really nice to have it working in OneNote.
Here is the Microsoft Connect feature request that I submitted: https://connect.microsoft.com/onenote/feedback/details/535310/ctrl-tab-works-just-like-visual-studio
-
Where is the QuickBooks SDK?
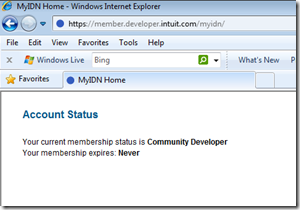
This post is for all of those developers out there that are trying to find the latest version of the QuickBooks SDK on developer.intuit.com. In the past you were able to log into the Intuit Developer Network MyIDN members site and then download the QuickBooks SDK from there. But currently, when you log into the MyIDN members section of the Intuit Developer Network site you get this:
There is no menu or any other information to let you browse around the MyIDN Members site. If you look at the page source everything is there but it is just not rendering in a browser.
So for anyone that needs to download the QuickBooks SDK here is how I did it:
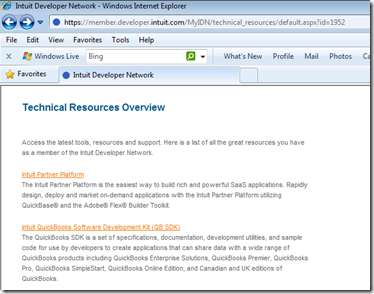
From the source of the MyIDN home page (the one pictured above) I found the url to the Technical Resources page:
https://member.developer.intuit.com/MyIDN/technical_resources/default.aspx?id=1952
This is probably the most important page since it will let you get to all of the SDKs and the other Technical Resources.
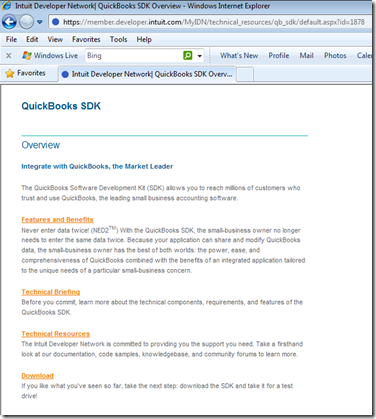
Second down on this page is the Intuit QuickBooks Software Development Kit (QB SDK) which will lead you to the QuickBooks SDK Information page:
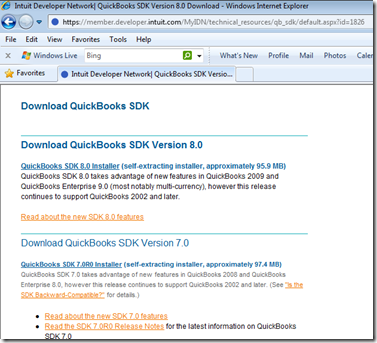
Clicking on the Download link at the bottom will get you to where you can download the QuickBooks SDK Version 8.0 (or the previous versions too).
And finally for those who just want the QuickBooks SDK Installer here is the direct link:
QuickBooks SDK 8.0 Installer (self-extracting installer, approximately 95.9 MB)
Technorati Tags: QuickBooks SDK 8.0 Installer -
How to change SQL Server login default database through SQL Script
I am moving a SQL Server database from one drive to another by detaching and then reattaching. I detached the database, moved the mdf and ldf files, and then went to attach it and was presented with this dialog:
TITLE: Microsoft SQL Server Management Studio
Cannot show requested dialog.ADDITIONAL INFORMATION:
Parameter name: nColIndex
Actual value was -1. (Microsoft.SqlServer.GridControl)This is because my login had the default database set to the database that I just detached. This causes all sorts of errors with SQL Server Management Studio but none of them are particularly helpful, they pretty much just keep telling you “access denied” but not why or what to do.
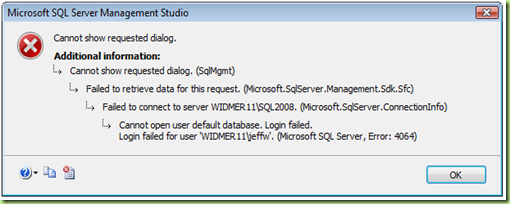
This is the dialog you would get if you try to click on the properties for your login:
TITLE: Microsoft SQL Server Management Studio
Cannot show requested dialog.ADDITIONAL INFORMATION:
Cannot show requested dialog. (SqlMgmt)
Failed to retrieve data for this request. (Microsoft.SqlServer.Management.Sdk.Sfc)
For help, click: http://go.microsoft.com/fwlink?ProdName=Microsoft+SQL+Server&LinkId=20476Failed to connect to server. (Microsoft.SqlServer.ConnectionInfo)
Cannot open user default database. Login failed.
Login failed for user 'login'. (Microsoft SQL Server, Error: 4064)
For help, click: http://go.microsoft.com/fwlink?ProdName=Microsoft+SQL+Server&EvtSrc=MSSQLServer&EvtID=4064&LinkId=20476And then even if you close and open SQL Server Management Studio you will get this dialog:
TITLE: Microsoft SQL Server Management Studio
Failed to connect to server. (Microsoft.SqlServer.ConnectionInfo)ADDITIONAL INFORMATION:
Cannot open user default database. Login failed.
Login failed for user 'login'. (Microsoft SQL Server, Error: 4064)
For help, click: http://go.microsoft.com/fwlink?ProdName=Microsoft+SQL+Server&EvtSrc=MSSQLServer&EvtID=4064&LinkId=20476What you can do to fix this is to change your login’s default database through SQL Script:
ALTER LOGIN [DOMAIN\login]
WITH DEFAULT_DATABASE = masterThis will set the default database to your master database and then you will be able to log in and continue from there.
Technorati Tags: SQL Server,SQL Server Management Studio -
Coming soon... Baby #4
Release to web around May 23, 2010. :)
-
Some pretty funny Verizon commercials
-
Format the email subject in the Elmah Error Logging Module
Elmah error logging modules and handlers for ASP.NET is a great module for logging asp.net errors to many different and configurable repositories. One of the repositories that Elmah works with is email. You can easily set up Elmah to send emails by changing the elmah configuration section in your web.config.
You can find a sample of all the different elmah web.config settings here. The email configuration settings are the following:
<errorMail
  from="elmah@example.com"
  to="admin@example.com"
  subject="..."
  async="true|false"
  smtpPort="25"
  smtpServer="smtp.example.com"
  userName="johndoe"
  password="secret"
  noYsod="true|false" />
Only the from and to settings are required. If you leave off the subject attribute you will get the default subject line which is something like this:
Error (System.Exception): This is a test exception
Which is made up of the type of exception followed by the exception message:
Error (Exception.Type): Exception.Message
But did you know you can configure the subject line with these pieces of information and also add something more specific for the application you are working on? For example, I always like the Exception Message in my error email prefixed by the application name and the environment. For example:
My Web Application (STAGING): This is a test exception
You can do that by specifying the String.Format parameters in the configuration section subject attribute like this:
<errorMail
  from="elmah@example.com"
  to="admin@example.com"
  subject="My Web Application (STAGING): {0}"
  />
Now the Exception Message will replace the {0} in the email subject and you can more easily filter the emails that appear in your inbox (hopefully though there will not be so many). You can also include the Exception Type by adding {1} to the subject anywhere you want.
Here is the line of code from the Elmah project:
mail.Subject = string.Format(subjectFormat, error.Message, error.Type).Replace('\r', ' ').Replace('\n', ' ');
Technorati Tags: Elmah -
WebConfigurationManager.OpenWebConfiguration() - Failed to resolve the site ID
I am writing a small administrative tool to read configuration settings from web.config files for various websites that are running on the same web server as the tool. Initially I thought the method WebConfigurationManager.OpenWebConfiguration(), and the various overloads, would have been able to help me out. The method signature is exactly what I am trying to do:
The WebConfigurationManager class (System.Web.Configuration.WebConfigurationManager) has a method named OpenWebConfiguration which can open a configuration file located at a specific virtual path and for a specified IIS site.
This sounded perfect and exactly what I was trying to do until I ran into this exception when I first tried it:
Failed to resolve the site ID for 'otherwebsite.local'.
After digging around a bunch and confirming I had the parameters spelled correctly I finally found this post: Thread: Unable to open web configuration on non default websites.
It turns out that because the adminwebsite.local is in an application pool named adminwebsite.local and otherwebsite.local is in a different application pool named otherwebsite.local, they can’t talk to each other. To prove this, I moved otherwebsite.local into the adminwebsite.local application pool and the OpenWebConfiguration method worked perfectly.
So if the two websites could live in the same application pool then the WebConfigurationManager.OpenWebConfiguration() method would have worked great for the tool I am writing.
But unfortunately this is not how the web server is setup and not the recommended best practice (to have all websites in the same application pool). So I switched to a more brute force method of reading and parsing the config file as an XML document (using a Dataset object to do the heavy lifting):
DataSet ds = new DataSet();
ds.ReadXml(path + \\web.config);
DataTable dt = ds.Tables["appSettings"];
DataRow[] appSettings= dt.Rows[0].GetChildRows("appSettings_add");
foreach (DataRow appSetting in appSettings)
{
String str = Convert.ToString(appSetting["key"]);
//Do other work here....
}
ds.Dispose();Technorati Tags: WebConfigurationManager,web.config -
Linq2Sql: How to join tables on more than one column
You can join two tables in Linq2Sql by using an anonymous type to specify the join.
var r =
from o in db.Orders
join p in db.Products on o.ProductId equals p.ProductId
join pu in db.ProductUsers on new { p.ProductId, o.UserId } equals new { pu.ProductId, pu.UserId }
select new {o, p, pu};This is equivalent to the following SQL:
SELECT * FROM Order o
JOIN Product p ON o.ProductId=p.ProductId
JOIN ProductUser pu ON p.ProductId=pu.ProductId AND o.UserId=pu.UserIdThe anonymous type { p.ProductId, o.UserId } is lined up with the second anonymous type { pu.ProductId, pu.UserId } to create the join on both columns.
But what if you are trying to join two tables where the column names do not match? For instance this SQL:
SELECT * FROM Order o
JOIN Product p ON o.ProductId=p.ProductId
JOIN ProductUser pu ON p.ProductId=pu.ProductId AND o.UserId=pu.CreatedByUserIdYou would think you could create two anonymous types just like above and line up the properties like this:
First anonymous type: { p.ProductId, o.UserId }
Second anonymous type: { pu.ProductId, pu.CreatedByUserId }But if you try that you will get a compilation error:
The type of one of the expressions in the join clause is incorrect. Type inference failed in the call to 'Join'.
What is going on here? Both o.UserId and pu.CreatedByUserId have the same data type so why is there a compilation error?
Because Linq2Sql lines up the two anonymous types by name and with the different names it cannot resolve the two column join. Both the order and the name need to match for this to work. To resolve this just specify an alias property name for one of the anonymous types that do not match like so:
First anonymous type: { p.ProductId, CreatedByUserId = o.UserId }
Second anonymous type: { pu.ProductId, pu.CreatedByUserId }Now Linq2Sql knows how to completely match up the two column join. Here is the full Linq2Sql statement for a join with two columns when the column names do not match:
var r =
from o in db.Orders
join p in db.Products on o.ProductId equals p.ProductId
join pu in db.ProductUsers on new { p.ProductId, CreatedByUserId = o.UserId } equals new { pu.ProductId, pu.CreatedByUserId}
select new {o, p, pu};Technorati Tags: Linq2Sql two column join -
How to 301 Permanent Redirect in ASP.NET
In the next release of the .NET Framework (.NET Framework 4.0) there is a new response method for permanently redirecting a request: Response.RedirectPermanent. You can see the Beta MSDN documentation for Response.RedirectPermanent here. This will automatically issue the 301 moved permanently status code and redirect to the target page. A permanent redirect status code tells a search engine to update their cache and reassign the old url to the new url.
But if you need to do this now (prior to .NET Framework 4.0) you will need to do it the manual way. To do so you will need to manually add the status and location headers to the response.
The pre .NET Framework 4.0 versions are:
Response.Status = "301 Moved Permanently";
Response.AddHeader("Location", "/");Response.Status = "301 Moved Permanently";
Response.AddHeader("Location", "/");
Response.End();There is also a RedirectToRoutePermanent method which will allow you to redirect to a new url using route parameters (and sends the 301 Moved Permanently status code).
UPDATE: See RichardD's comment below for a different method. I have not tried it that way but I will next time because it certainly does look much cleaner.
Technorati Tags: C#,Permanent Redirects -
How to get an indexed item of an IEnumerable object (Linq)
If you have an IEnumerable<T> collection of some objects T and you need to get a particular item out of that collection, you cannot use the standard indexing that you would normally use with brackets ([index]). If you try you will get an error such as:
Cannot apply indexing with [] to an expression of type ‘System.Collections.Generic.IEnumerable<T>
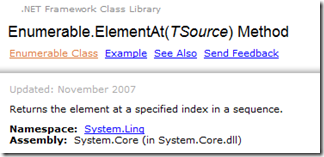
But there is the extension method ElementAt(index) (in the System.Linq namespace) for IEnumerable<T> that will allow you to get at that particular indexed item:
MyItem = MyIEnumerableExpression.ElementAt(index);
From the MSDN Documentation: http://msdn.microsoft.com/en-us/library/bb299233.aspx
-
Batch file that monitors the number of files in a directory
Sometimes the fastest and easiest way to complete a task is a good old MS-DOS batch (.bat) file. A friend recently needed to get a quick fix in place for their production machine.
“I need to whip up a batch file that monitors the number of files in a directory. Basically, I want to see if there are 100 files in a directory and then start and stop a service to do some quick cleanup.”
The For command can be used to loop through the files in a folder and get a count and then do something based on that number.
@ECHO OFF
SETLOCAL
SETLOCAL ENABLEDELAYEDEXPANSIONSET count=0
for %%o IN (D:\temp\*.*) DO (
echo %%o
SET /A count=count + 1
)echo %count%
IF "%count%"=="100" ECHO NET STOP MyApp
ENDLOCAL ENABLEDELAYEDEXPANSION
ENDLOCALTechnorati Tags: Batch Files,MS-DOS -
How to prevent scrollbar jump in Firefox and Chrome
On Firefox and Chrome if the content of a page is not longer than the window, then the right scrollbar is not displayed, and likewise if the content of the page is longer than the window then the right scrollbar is displayed. This makes perfect sense except that for websites that are center justified (which is most websites these days) then the center content will appear to jump to the left when switching from a page with content that is shorter than the window to a page with content that is longer than the window. This jump can be a bit annoying since the header shift makes your eyes think something may have changed in the header (at least it does for me) so a rescan of the header occurs.
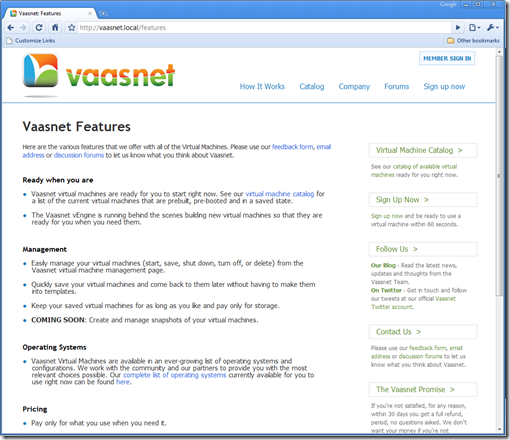
The best way to explain this is by an example. The Vaasnet home page is a short page with all of the content fitting within a single window (or above the fold):
Now switch to the Vaasnet Features page (which has content that is longer than the window or pushes below the fold) and the right scroll bar appears. This causes the entire page to shift to the left which looks somewhat not esthetically pleasing. It is hard to show in screen shots but it is much more apparent when browsing the site and the shift in the header and navigation is apparent and somewhat irritating.
There is a simple css fix to correct this problem. Just add the following style to your site:
html {overflow-y:scroll;}
Now the vertical scrollbar will always show on the right and you have eliminated the jump in the page content. (Notice the vertical scroll bar on the right hand side of the Vaasnet home page now.)
Technorati Tags: Scrollbar Jump in Firefox and Chrome,HTML Tips and Tricks -
HTML Tips and Tricks: Use div with border in place of hr
I am by no means an expert with html or css. Frequently I run into html or css issues that take me forever to get beyond. Recently I had an issue with a horizontal rule (<hr />) having extra padding in Internet Explorer. For some reason I could not figure out where the padding was coming from.
I don’t think this was an IE issue since a completely clean sample of html did not show the hr padding (or margin) problem in Internet Explorer. But for some reason the <hr> tag would not adhere to any padding or margin styling that I tried in Internet Explorer as it would in FireFox or Chrome.
After struggling with this for a while I realized I could use a <div> with a bottom border in place of the <hr>. It worked very nicely and gave me more control over the dividing line that I was trying to place in my user interface.
<div style="height:1px; width: 100%; border-bottom:solid 2px #ccc;" />
Maybe this will help any of the other HTML/CSS impaired developers out there.
Technorati Tags: HTML Tips and Tricks -
Excellent “What is Windows Azure?” Video
Technorati Tags: What is Windows Azure? -
Line-breaks and carriage returns (\r \n) are invalid in email subject
I received this exception when sending an email using System.Net.Mail.MailMessage:
"The specified string is not in the form required for a subject."
System.ArgumentException: The specified string is not in the form required for a subject.
at System.Net.Mail.Message.set_Subject(String value)
at System.Net.Mail.MailMessage.set_Subject(String value)The subject line of the email I was sending had a carriage return and line break in it so it made sense that this would be an invalid subject line.
And I was able to confirm that a check is made on the subject line to make sure there are not Carriage Returns or Line Feeds when the MailMessage.Subject property is set, but also that these are the only characters checked for.
To remove the line breaks and carriage returns I just did a simple find and replace:
subject= subject.Replace("\n", " ").Replace("\r", " ");
Technorati Tags: System.Net.Mail.MailMessage.Subject -
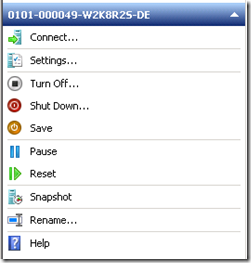
What is the difference between Hyper-V Manager Save and Pause?
The Hyper-V Management Console has several different actions you can take for a running virtual machine. Most are self-explanatory but I never quite new the difference between Save and Pause.
I always used Save to stop a virtual machine and save the current state of the virtual machine. But I did not understand how Pause would differ from Save. I finally went hunting for exactly what Pause does and found it in this Technet Article: Step 6 (Optional): Test Snapshots, Pausing, and Saving.
“You can also pause or save a virtual machine in a given state. When you pause or save a virtual machine, it stays in its current state for as long as you want.
Although pausing a virtual machine does not free up the memory that is allocated to that virtual machine, it frees up main processor resources. Saving a virtual machine frees up memory and main processor resources so that they can be used by other virtual machines or by the virtualization server.”So Pausing will hold the Virtual Machine in the current state in was in when you hit the Pause button and also keep it in RAM (continuing to use a valuable resource) but frees up the processor. Saving will also hold the virtual machine in the current state but it frees up the processor and RAM too.
So I think this would be true then:
Saving a virtual machine is to Hibernate as Pausing a virtual machine is to Sleep.
