Serge van den Oever [Macaw]
SharePoint RIP. Azure, Node.js, hybrid mobile apps
-
Is your code running in a SharePoint Sandbox?
You could execute a function call that is not allowed in the sandbox (for example call a static method on SPSecurity) and catch the exception. A better approach is to test the friendly name of you app domain:
AppDomain.CurrentDomain.FriendlyName returns "Sandboxed Code Execution Partially Trusted Asp.net AppDomain"
Because you can never be sure that this string changes in the future, a safer approach will be:
AppDomain.CurrentDomain.FriendlyName.Contains("Sandbox")
See http://www.sharepointoverflow.com/questions/2051/how-to-check-if-code-is-running-as-sandboxed-solution for a discussion on this topic.
-
Logging to SharePoint 2010 ULS log from sandbox
You can’t log directly from sandbox code to the SharePoint ULS log. Developing code without any form of logging is out of this time, so you need approaches for the two situations you can end up with when developing sandbox code:
You don’t have control over the server (BPOS scenario):
- You can log to comments in your HTML code, I know it’s terrible, don’t log sensitive information
- Write entries to a SharePoint “log” list (also take care of some form of clean up, for example if list longer that 1000 items, remove oldest item when writing new log message)
You have control over the server:
- You can develop a full-trust sandbox proxy (http://msdn.microsoft.com/en-us/library/ff798427.aspx) that provides you with functionality to do logging. Scot Hillier also provides a ready made WSP package containing such a proxy that must be deployed at farm level (http://sandbox.codeplex.com, SharePoint Logger)
-
Taming the VSX beast from PowerShell
Using VSX from PowerShell is not always a pleasant experience. Most stuff in VSX is still good old COM the System.__ComObject types are flying around. Everything can be casted to everything (for example EnvDTE to EnvDTE2) if you are in C#, but PowerShell can’t make spaghetti of it.
Enter Power Console. In Power Console there are some neat tricks available to help you out of VSX trouble. And most of the trouble solving is done in… PowerShell. You just need to know what to do.
To get out of trouble do the following:
- Head over to the Power Console site
- Right-click on the Download button, and save the PowerConsole.vsix file to your disk
- Rename PowerConsole.vsix to PowerConsole.zip and unzip
- Look in the Scripts folder for the file Profile.ps1 which is full of PowerShell/VSX magic
The PowerShell functions that perform the VSX magic are:
Extract from Profile.ps1- <#
- .SYNOPSIS
- Get an explict interface on an object so that you can invoke the interface members.
- .DESCRIPTION
- PowerShell object adapter does not provide explict interface members. For COM objects
- it only makes IDispatch members available.
- This function helps access interface members on an object through reflection. A new
- object is returned with the interface members as ScriptProperties and ScriptMethods.
- .EXAMPLE
- $dte2 = Get-Interface $dte ([EnvDTE80.DTE2])
- #>
- function Get-Interface
- {
- Param(
- $Object,
- [type]$InterfaceType
- )
- [Microsoft.VisualStudio.PowerConsole.Host.PowerShell.Implementation.PSTypeWrapper]::GetInterface($Object, $InterfaceType)
- }
- <#
- .SYNOPSIS
- Get a VS service.
- .EXAMPLE
- Get-VSService ([Microsoft.VisualStudio.Shell.Interop.SVsShell]) ([Microsoft.VisualStudio.Shell.Interop.IVsShell])
- #>
- function Get-VSService
- {
- Param(
- [type]$ServiceType,
- [type]$InterfaceType
- )
- $service = [Microsoft.VisualStudio.Shell.Package]::GetGlobalService($ServiceType)
- if ($service -and $InterfaceType) {
- $service = Get-Interface $service $InterfaceType
- }
- $service
- }
- <#
- .SYNOPSIS
- Get VS IComponentModel service to access VS MEF hosting.
- #>
- function Get-VSComponentModel
- {
- Get-VSService ([Microsoft.VisualStudio.ComponentModelHost.SComponentModel]) ([Microsoft.VisualStudio.ComponentModelHost.IComponentModel])
- }
The same Profile.ps1 file contains a nice example of how to use these functions:
A lot of other good samples can be found on the Power Console site at the home page.
Now there are two things you can do with respect to the Power Console specific function GetInterface() on line 22:
- Make sure that Power Console is installed and load the assembly Microsoft.VisualStudio.PowerConsole.Host.PowerShell.Implementation.dll
- Fire-up reflector and investigate the GetInterface() function to isolate the GetInterface code into your own library that only contains this functionality (I did this, it is a lot of work!)
For this post we use the first approach, the second approach is left for the reader as an exercise:-)
To try it out I want to present a maybe bit unusual case: I want to be able to access Visual Studio from a PowerShell script that is executed from the MSBuild script building a project.
In the .csproj of my project I added the following line:
<!-- Macaw Software Factory targets -->
<Import Project="..\..\..\..\tools\DotNet2\MsBuildTargets\Macaw.Mast.Targets" />The included targets file loads the PowerShell MSBuild Task (CodePlex) that is used to fire a PowerShell script on AfterBuild. Below a relevant excerpt from this targets file:
Macaw.Mast.Targets- <Project DefaultTargets="AfterBuild" xmlns="http://schemas.microsoft.com/developer/msbuild/2003">
- <UsingTask AssemblyFile="PowershellMSBuildTask.dll" TaskName="Powershell"/>
- <Target Name="AfterBuild" DependsOnTargets="$(AfterBuildDependsOn)">
- <!-- expand $(TargetDir) to _TargetDir, otherwise error on including in arguments list below -->
- <CreateProperty Value="$(TargetDir)">
- <Output TaskParameter="Value" PropertyName="_TargetDir" />
- </CreateProperty>
- <Message Text="OnBuildSuccess = $(@(IntermediateAssembly))"/>
- <Powershell Arguments="
- MastBuildAction=build;
- MastSolutionName=$(SolutionName);
- MastSolutionDir=$(SolutionDir);
- MastProjectName=$(ProjectName);
- MastConfigurationName=$(ConfigurationName);
- MastProjectDir=$(ProjectDir);
- MastTargetDir=$(_TargetDir);
- MastTargetName=$(TargetName);
- MastPackageForDeployment=$(MastPackageForDeployment);
- MastSingleProjectBuildAndPackage=$(MastSingleProjectBuildAndPackage)
- "
- VerbosePreference="Continue"
- Script="& (Join-Path -Path "$(SolutionDir)" -ChildPath "..\..\..\tools\MastDeployDispatcher.ps1")" />
- </Target>
- </Project>
The MastDeployDispatcher.ps1 script is a Macaw Solutions Factory specific script, but you get the idea. To test in which context the PowerShell script is running I added the following lines op PowerShell code to the executed PowerShell script:
$process = [System.Diagnostics.Process]::GetCurrentProcess()
Write-Host "Process name: $($a.ProcessName)"Which returns:
Process name: devenv
So we know our PowerShell script is running in the context of the Visual Studio process. I wonder if this is still the case if you set the maximum number of parallel projects builds to a value higher than 1 (Tools->Options->Projects and Solutions->Build and Run). I did put the value on 10, tried it, and it still worked, but I don’t know if there were more builds running at the same time.
My first step was to try one of the examples on the Power Console home page: show “Hello world” using the IVsUIShell.ShowMessageBox() function.
I added the following code to the PowerShell script:
PowerShell from MSBuild- [void][reflection.assembly]::LoadFrom("C:\Users\serge\Downloads\PowerConsole\Microsoft.VisualStudio.PowerConsole.Host.PowerShell.Implementation.dll")
- [void][reflection.assembly]::LoadWithPartialName("Microsoft.VisualStudio.Shell.Interop")
- function Get-Interface
- {
- Param(
- $Object,
- [type]$InterfaceType
- )
- [Microsoft.VisualStudio.PowerConsole.Host.PowerShell.Implementation.PSTypeWrapper]::GetInterface($Object, $InterfaceType)
- }
- function Get-VSService
- {
- Param(
- [type]$ServiceType,
- [type]$InterfaceType
- )
- $service = [Microsoft.VisualStudio.Shell.Package]::GetGlobalService($ServiceType)
- if ($service -and $InterfaceType) {
- $service = Get-Interface $service $InterfaceType
- }
- $service
- }
- $msg = "Hello world!"
- $shui = Get-VSService `
- ([Microsoft.VisualStudio.Shell.Interop.SVsUIShell]) `
- ([Microsoft.VisualStudio.Shell.Interop.IVsUIShell])
- [void]$shui.ShowMessageBox(0, [System.Guid]::Empty,"", $msg, "", 0, `
- [Microsoft.VisualStudio.Shell.Interop.OLEMSGBUTTON]::OLEMSGBUTTON_OK,
- [Microsoft.VisualStudio.Shell.Interop.OLEMSGDEFBUTTON]::OLEMSGDEFBUTTON_FIRST, `
- [Microsoft.VisualStudio.Shell.Interop.OLEMSGICON]::OLEMSGICON_INFO, 0)
When I build the project I get the following:

So we are in business! It is possible to access the Visual Studio object model from a PowerShell script that is fired from the MSBuild script used to build your project. What you can do with that is up to your imagination. Note that you should differentiate between a build done on your developer box, executed from Visual Studio, and a build executed by for example your build server, or executing from MSBuild directly.
-
Powershell: Finding items in a Visual Studio project
In the Macaw Solutions Factory we execute a lot of PowerShell code in the context of Visual Studio, meaning that we can access the Visual Studio object model directly from our PowerShell code.
There is a great add-in for Visual Studio that provides you with a PowerShell console within Visual Studio that also allows you to access the Visual Studio object model to play with VSX (Visual Studio Extensibility). This add-in is called Power Console.
If you paste the function below in this Power Console, you can find a (selection of) project items in a specified Visual Studio project.
For example:
FindProjectItems -SolutionRelativeProjectFile 'Business.ServiceInterfaces\Business.ServiceInterfaces.csproj' -Pattern '*.asmx' | select-object RelativeFileName
returns:
RelativeFileName ----------------
Internal\AnotherSoapService.asmx
SampleSoapService.asmxWhat I do is that I extend the standard Visual Studio ProjectItem objects with two fields: FileName (this is the full path to the item) and RelativeFileName (this is the path to the item relative to the project folder (line 53-55). I return a collection of Visual Studio project items, with these additional fields.
A great way of testing out this kind of code is by editing it in Visual Studio using the PowerGuiVSX add-in (which uses the unsurpassed PowerGui script editor), and copying over the code into the Power Console.
Find project items- function FindProjectItems
- {
- param
- (
- $SolutionRelativeProjectFile,
- $Pattern = '*'
- )
- function FindProjectItemsRecurse
- {
- param
- (
- $AbsolutePath,
- $RelativePath = '',
- $ProjectItem,
- $Pattern
- )
- $projItemFolder = '{6BB5F8EF-4483-11D3-8BCF-00C04F8EC28C}' # Visual Studio defined constant
- if ($ProjectItem.Kind -eq $projItemFolder)
- {
- if ($ProjectItem.ProjectItems -ne $null)
- {
- if ($RelativePath -eq '')
- {
- $relativeFolderPath = $ProjectItem.Name
- }
- else
- {
- $relativeFolderPath = Join-Path -Path $RelativePath -ChildPath $ProjectItem.Name
- }
- $ProjectItem.ProjectItems | ForEach-Object {
- FindProjectItemsRecurse -AbsolutePath $AbsolutePath -RelativePath $relativeFolderPath -ProjectItem $_ -Pattern $Pattern
- }
- }
- }
- else
- {
- if ($ProjectItem.Name -like $pattern)
- {
- if ($RelativePath -eq '')
- {
- $relativeFileName = $ProjectItem.Name
- }
- else
- {
- if ($RelativePath -eq $null) { Write-Host "Relative Path is NULL" }
- $relativeFileName = Join-Path -Path $RelativePath -ChildPath $ProjectItem.Name
- }
- $fileName = Join-Path -Path $AbsolutePath -ChildPath $relativeFileName;
- $ProjectItem |
- Add-Member -MemberType NoteProperty -Name RelativeFileName -Value $relativeFileName -PassThru |
- Add-Member -MemberType NoteProperty -Name FileName -Value $fileName -PassThru
- }
- }
- }
- $proj = $DTE.Solution.Projects.Item($SolutionRelativeProjectFile)
- $projPath = Split-Path -Path $proj.FileName -Parent
- if ($proj -eq $null) { throw "No project '$SolutionRelativeProjectFile' found in current solution" }
- $proj.ProjectItems | ForEach-Object {
- FindProjectItemsRecurse -AbsolutePath $projPath -ProjectItem $_ -Pattern $Pattern
- }
- }
-
PowerShell internal functions
Working with PowerShell for years already, never knew that this would work! Internal functions in PowerShell (they probably have a better name):
function x
{
function y
{
"function y"
}
y
}PS> x
function y
PS> y
ERROR!
-
Returning an exit code from a PowerShell script
Returning an exit code from a PowerShell script seems easy… but it isn’t that obvious. In this blog post I will show you an approach that works for PowerShell scripts that can be called from both PowerShell and batch scripts, where the command to be executed can be specified in a string, execute in its own context and always return the correct error code.
Below is a kind of transcript of the steps that I took to get to an approach that works for me. It is a transcript of the steps I took, for the conclusions just jump to the end.
In many blog posts you can read about calling a PowerShell script that you call from a batch script, and how to return an error code. This comes down to the following:
c:\temp\exit.ps1:
Write-Host "Exiting with code 12345"
exit 12345c:\temp\testexit.cmd:
@PowerShell -NonInteractive -NoProfile -Command "& {c:\temp\exit.ps1; exit $LastExitCode }"
@echo From Cmd.exe: Exit.ps1 exited with exit code %errorlevel%Executing c:\temp\testexit.cmd results in the following output:
Exiting with code 12345
From Cmd.exe: Exit.ps1 exited with exit code 12345But now we want to call it from another PowerShell script, by executing PowerShell:
c:\temp\testexit.ps1:
PowerShell -NonInteractive -NoProfile -Command c:\temp\exit.ps1
Write-Host "From PowerShell: Exit.ps1 exited with exit code $LastExitCode"Executing c:\temp\testexit.ps1 results in the following output:
Exiting with code 12345
From PowerShell: Exit.ps1 exited with exit code 1This is not what we expected… What happs? If the script just returns the exit code is 0, otherwise the exit code is 1, even if you exit with an exit code!?
But what if we call the script directly, instead of through the PowerShell command?
We change exit.ps1 to:
Write-Host "Global variable value: $globalvariable"
Write-Host "Exiting with code 12345"
exit 12345And we change testexit.ps1 to:
$global:globalvariable = "My global variable value"
& c:\temp\exit.ps1
Write-Host "From PowerShell: Exit.ps1 exited with exit code $LastExitCode"Executing c:\temp\testexit.ps1 results in the following output:
Global variable value: My global variable value
Exiting with code 12345
From PowerShell: Exit.ps1 exited with exit code 12345This is what we wanted! But now we are executing the script exit.ps1 in the context of the testexit.ps1 script, the globally defined variable $globalvariable is still known. This is not what we want. We want to execute it is isolation.
We change c:\temp\testexit.ps1 to:
$global:globalvariable = "My global variable value"
PowerShell -NonInteractive -NoProfile -Command c:\temp\exit.ps1
Write-Host "From PowerShell: Exit.ps1 exited with exit code $LastExitCode"Executing c:\temp\testexit.ps1 results in the following output:
Global variable value:
Exiting with code 12345
From PowerShell: Exit.ps1 exited with exit code 1We are not executing exit.ps1 in the context of testexit.ps1, which is good. But how can we reach the holy grail:
- Write a PowerShell script that can be executed from batch scripts an from PowerShell
- That return a specific error code
- That can specified as a string
- Can be executed both in the context of a calling PowerShell script AND (through a call to PowerShell) in it’s own execution space
We change c:\temp\testexit.ps1 to:
$global:globalvariable = "My global variable value"
PowerShell -NonInteractive -NoProfile -Command { c:\temp\exit.ps1 ; exit $LastExitCode }
Write-Host "From PowerShell: Exit.ps1 exited with exit code $LastExitCode"This is the same approach as when we called it from the batch script. Executing c:\temp\testexit.ps1 results in the following output:
Global variable value:
Exiting with code 12345
From PowerShell: Exit.ps1 exited with exit code 12345This is close. But we want to be able to specify the command to be executed as string, for example:
$command = "c:\temp\exit.ps1 -param1 x -param2 y"
We change c:\temp\exit.ps1 to: (support for variables, test if in its own context)
param( $param1, $param2)
Write-Host "param1=$param1; param2=$param2"
Write-Host "Global variable value: $globalvariable"
Write-Host "Exiting with code 12345"
exit 12345If we change c:\temp\testexit.ps1 to:
$global:globalvariable = "My global variable value"
$command = "c:\temp\exit.ps1 -param1 x -param2 y"
Invoke-Expression -Command $command
Write-Host "From PowerShell: Exit.ps1 exited with exit code $LastExitCode"We get a good exit code, but we are still executing in the context of testexit.ps1.
If we use the same trick as in calling from a batch script, that worked before?
We change c:\temp\testexit.ps1 to:
$global:globalvariable = "My global variable value"
$command = "c:\temp\exit.ps1 -param1 x -param2 y"
PowerShell -NonInteractive -NoProfile -Command { $command; exit $LastErrorLevel }
Write-Host "From PowerShell: Exit.ps1 exited with exit code $LastExitCode"Executing c:\temp\testexit.ps1 results in the following output:
From PowerShell: Exit.ps1 exited with exit code 0
Ok, lets use the Invoke-Expression again. We change c:\temp\testexit.ps1 to:
$global:globalvariable = "My global variable value"
$command = "c:\temp\exit.ps1 -param1 x -param2 y"
PowerShell -NonInteractive -NoProfile -Command { Invoke-Expression -Command $command; exit $LastErrorLevel }
Write-Host "From PowerShell: Exit.ps1 exited with exit code $LastExitCode"Executing c:\temp\testexit.ps1 results in the following output:
Cannot bind argument to parameter 'Command' because it is null.
At :line:3 char:10
+ PowerShell <<<< -NonInteractive -NoProfile -Command { Invoke-Expression -Command $command; exit $LastErrorLevel }From PowerShell: Exit.ps1 exited with exit code 1
We should go back to executing the command as a string, so not within brackets (in a script block). We change c:\temp\testexit.ps1 to:
$global:globalvariable = "My global variable value"
$command = "c:\temp\exit.ps1 -param1 x -param2 y"
PowerShell -NonInteractive -NoProfile -Command $command
Write-Host "From PowerShell: Exit.ps1 exited with exit code $LastExitCode"Executing c:\temp\testexit.ps1 results in the following output:
param1=x; param2=y
Global variable value:
Exiting with code 12345
From PowerShell: Exit.ps1 exited with exit code 1Ok, we can execute the specified command text as if it is a PowerShell command. But we still have the exit code problem, only 0 or 1 is returned.
Lets try something completely different. We change c:\temp\exit.ps1 to:
param( $param1, $param2)
function ExitWithCode
{
param
(
$exitcode
)$host.SetShouldExit($exitcode)
exit
}Write-Host "param1=$param1; param2=$param2"
Write-Host "Global variable value: $globalvariable"
Write-Host "Exiting with code 12345"
ExitWithCode -exitcode 12345
Write-Host "After exit"What we do is specify to the host the exit code we would like to use, and then just exit, all in the simplest utility function.
Executing c:\temp\testexit.ps1 results in the following output:
param1=x; param2=y
Global variable value:
Exiting with code 12345
From PowerShell: Exit.ps1 exited with exit code 12345Ok, this fulfills all our holy grail dreams! But couldn’t we make the call from the batch script also simpler?
Change c:\temp\testexit.cmd to:
@PowerShell -NonInteractive -NoProfile -Command "c:\temp\exit.ps1 -param1 x -param2 y"
@echo From Cmd.exe: Exit.ps1 exited with exit code %errorlevel%Executing c:\temp\testexit.cmd results in the following output:
param1=x; param2=y
Global variable value:
Exiting with code 12345
From Cmd.exe: Exit.ps1 exited with exit code 12345This is even simpler! We can now just call the PowerShell code, without the exit $LastExitCode trick!
========================= CONCLUSIONS ============================
And now the conclusions after this long long story, that took a lot of time to find out (and to read for you):
- Don’t use exit to return a value from PowerShell code, but use the following function:
- Call script from batch using:
PowerShell -NonInteractive -NoProfile -Command "c:\temp\exit.ps1 -param1 x -param2 y"
function ExitWithCode
{
param
(
$exitcode
)$host.SetShouldExit($exitcode)
exit
}- echo %errorlevel%
- Call from PowerShell with: (Command specified in string, execute in own context)$command = "c:\temp\exit.ps1 -param1 x -param2 y"
PowerShell -NonInteractive -NoProfile -Command $command
$LastExitCode contains the exit code - Call from PowerShell with: (Direct command, execute in own context)
PowerShell -NonInteractive -NoProfile -Command { c:\temp\exit.ps1 -param1 x -param2 y } $LastExitCode contains the exit code - Call from Powershell with: (Command specified in string, invoke in caller context)
Invoke-Expression -Command $command- $LastExitCode contains the exit code
- Call from PowerShell with: (Direct command, execute in caller context)
& c:\temp\exit.ps1 -param1 x -param2 y $LastExitCode contains the exit code
-
SharePoint 2010 Replaceable Parameter, some observations…
SharePoint Tools for Visual Studio 2010 provides a rudimentary mechanism for replaceable parameters that you can use in files that are not compiled, like ascx files and your project property settings. The basics on this can be found in the documentation at http://msdn.microsoft.com/en-us/library/ee231545.aspx.
There are some quirks however. For example:
My Package name is MacawMastSP2010Templates, as defined in my Package properties:

I want to use the $SharePoint.Package.Name$ replaceable parameter in my feature properties. But this parameter does not work in the “Deployment Path” property, while other parameters work there, while it works in the “Image Url” property. It just does not get expanded. So I had to resort to explicitly naming the first path of the deployment path:
 :
:You also see a special property for the “Receiver Class” in the format $SharePoint.Type.<GUID>.FullName$. The documentation gives the following description:The full name of the type matching the GUID in the token. The format of the GUID is lowercase and corresponds to the Guid.ToString(“D”) format (that is, xxxxxxxx-xxxx-xxxx-xxxx-xxxxxxxxxxxx).
Not very clear. After some searching it happened to be the guid as declared in my feature receiver code:

In other properties you see a different set of replaceable parameters:

We use a similar mechanism for replaceable parameter for years in our Macaw Solutions Factory for SharePoint 2007 development, where each replaceable parameter is a PowerShell function. This provides so much more power.
For example in a feature declaration we can say:
Code Snippet- <?xml version="1.0" encoding="utf-8" ?>
- <!-- Template expansion
- [[ProductDependency]] -> Wss3 or Moss2007
- [[FeatureReceiverAssemblySignature]] -> for example: Macaw.Mast.Wss3.Templates.SharePoint.Features, Version=1.0.0.0, Culture=neutral, PublicKeyToken=6e9d15db2e2a0be5
- [[FeatureReceiverClass]] -> for example: Macaw.Mast.Wss3.Templates.SharePoint.Features.SampleFeature.FeatureReceiver.SampleFeatureFeatureReceiver
- -->
- <Feature Id="[[$Feature.SampleFeature.ID]]"
- Title="MAST [[$MastSolutionName]] Sample Feature"
- Description="The MAST [[$MastSolutionName]] Sample Feature, where all possible elements in a feature are showcased"
- Version="1.0.0.0"
- Scope="Site"
- Hidden="FALSE"
- ImageUrl="[[FeatureImage]]"
- ReceiverAssembly="[[FeatureReceiverAssemblySignature]]"
- ReceiverClass="[[FeatureReceiverClass]]"
- xmlns="http://schemas.microsoft.com/sharepoint/">
- <ElementManifests>
- <ElementManifest Location="ExampleCustomActions.xml" />
- <ElementManifest Location="ExampleSiteColumns.xml" />
- <ElementManifest Location="ExampleContentTypes.xml" />
- <ElementManifest Location="ExampleDocLib.xml" />
- <ElementManifest Location="ExampleMasterPages.xml" />
- <!-- Element files -->
- [[GenerateXmlNodesForFiles -path 'ExampleDocLib\*.*' -node 'ElementFile' -attributes @{Location = { RelativePathToExpansionSourceFile -path $_ }}]]
- [[GenerateXmlNodesForFiles -path 'ExampleMasterPages\*.*' -node 'ElementFile' -attributes @{Location = { RelativePathToExpansionSourceFile -path $_ }}]]
- [[GenerateXmlNodesForFiles -path 'Resources\*.resx' -node 'ElementFile' -attributes @{Location = { RelativePathToExpansionSourceFile -path $_ }}]]
- </ElementManifests>
- </Feature>
We have a solution level PowerShell script file named TemplateExpansionConfiguration.ps1 where we declare our variables (starting with a $) and include helper functions:
Code Snippet- # ==============================================================================================
- # NAME: product:\src\Wss3\Templates\TemplateExpansionConfiguration.ps1
- #
- # AUTHOR: Serge van den Oever, Macaw
- # DATE : May 24, 2007
- #
- # COMMENT:
- # Nota bene: define variable and function definitions global to be visible during template expansion.
- #
- # ==============================================================================================
- Set-PSDebug -strict -trace 0 #variables must have value before usage
- $global:ErrorActionPreference = 'Stop' # Stop on errors
- $global:VerbosePreference = 'Continue' # set to SilentlyContinue to get no verbose output
- # Load template expansion utility functions
- . product:\tools\Wss3\MastDeploy\TemplateExpansionUtil.ps1
- # If exists add solution expansion utility functions
- $solutionTemplateExpansionUtilFile = $MastSolutionDir + "\TemplateExpansionUtil.ps1"
- if ((Test-Path -Path $solutionTemplateExpansionUtilFile))
- {
- . $solutionTemplateExpansionUtilFile
- }
- # ==============================================================================================
- # Expected: $Solution.ID; Unique GUID value identifying the solution (DON'T INCLUDE BRACKETS).
- # function: guid:UpperCaseWithoutCurlies -guid '{...}' ensures correct syntax
- $global:Solution = @{
- ID = GuidUpperCaseWithoutCurlies -guid '{d366ced4-0b98-4fa8-b256-c5a35bcbc98b}';
- }
- # DON'T INCLUDE BRACKETS for feature id's!!!
- # function: GuidUpperCaseWithoutCurlies -guid '{...}' ensures correct syntax
- $global:Feature = @{
- SampleFeature = @{
- ID = GuidUpperCaseWithoutCurlies -guid '{35de59f4-0c8e-405e-b760-15234fe6885c}';
- }
- }
- $global:SiteDefinition = @{
- TemplateBlankSite = @{
- ID = '12346';
- }
- }
- # To inherit from this content type add the delimiter (00) and then your own guid
- # ID: <base>00<newguid>
- $global:ContentType = @{
- ExampleContentType = @{
- ID = '0x01008e5e167ba2db4bfeb3810c4a7ff72913';
- }
- }
- # INCLUDE BRACKETS for column id's and make them LOWER CASE!!!
- # function: GuidLowerCaseWithCurlies -guid '{...}' ensures correct syntax
- $global:SiteColumn = @{
- ExampleChoiceField = @{
- ID = GuidLowerCaseWithCurlies -guid '{69d38ce4-2771-43b4-a861-f14247885fe9}';
- };
- ExampleBooleanField = @{
- ID = GuidLowerCaseWithCurlies -guid '{76f794e6-f7bd-490e-a53e-07efdf967169}';
- };
- ExampleDateTimeField = @{
- ID = GuidLowerCaseWithCurlies -guid '{6f176e6e-22d2-453a-8dad-8ab17ac12387}';
- };
- ExampleNumberField = @{
- ID = GuidLowerCaseWithCurlies -guid '{6026947f-f102-436b-abfd-fece49495788}';
- };
- ExampleTextField = @{
- ID = GuidLowerCaseWithCurlies -guid '{23ca1c29-5ef0-4b3d-93cd-0d1d2b6ddbde}';
- };
- ExampleUserField = @{
- ID = GuidLowerCaseWithCurlies -guid '{ee55b9f1-7b7c-4a7e-9892-3e35729bb1a5}';
- };
- ExampleNoteField = @{
- ID = GuidLowerCaseWithCurlies -guid '{f9aa8da3-1f30-48a6-a0af-aa0a643d9ed4}';
- };
- }
This gives so much more possibilities, like for example the elements file expansion where a PowerShell function iterates through a folder and generates the required XML nodes.
I think I will bring back this mechanism, so it can work together with the built-in replaceable parameters, there are hooks to define you custom replacements as described by Waldek in this blog post.
-
A great overview of the features of the different SharePoint 2010 editions
The following document gives a good overview of the features available in the different SharePoint editions: Foundation (free), Standard and Enterprise.
http://sharepoint.microsoft.com/en-us/buy/pages/editions-comparison.aspx
It is good to see the power that is available in the free SharePoint Foundation edition, so there is no reason to not use SharePoint as a foundation for you collaboration applications.
-
weblogs.asp.net no longer usable as a blogging platform?
I get swamped by spam on my weblogs.asp.net weblog. Both comments spam and spam through the contact form. It is getting so bad that I think the platform is becoming useless for me. Why o why are we bloggers from the first hour still in stone age without any protection against spam. Implementing Captcha shouldn’t be that hard… As far as I know this is the same blogging platform used by blogs.msdn.com. Aren’t all Microsoft bloggers getting sick from spam? In the past I tried to contact the maintainers of weblogs.asp.net, but never got a response. Who maintains the platform? Why are we still running on a Community Server Edition of 2007? Please help me out, or I’m out of here.
-
Powershell output capturing and text wrapping… again…
A while a go I wrote a post “Powershell output capturing and text wrapping: strange quirks... solved!” on preventing output wrapping in PowerShell when capturing the output. In this article I wrote that I used the following way to capture the output with less probability of wrapping:
PowerShell -Command "`$host.UI.RawUI.BufferSize = new-object System.Management.Automation.Host.Size(512,50); `"c:\temp\testoutputandcapture.ps1`" -argument `"A value`"" >c:\temp\out.txt 2>&1
In the above situation I start a PowerShell script, but before doing that I set the buffer size.
I had some issues with this lately that my values in setting the buffer size where wither to small or too large. The more defensive approach described in the StackOverflow question http://stackoverflow.com/questions/978777/powershell-output-column-width works better for me.
I use it as follows at the top of my PowerShell script file:
Prevent text wrapping- set-psdebug -strict -trace 0 #variables must have value before usage
- $global:ErrorActionPreference = "Continue" # Stop on errors
- $global:VerbosePreference = "Continue" # set to SilentlyContinue to get no verbose output
- # Reset the $LASTEXITCODE, so we assume no error occurs
- $LASTEXITCODE = 0
- # Update output buffer size to prevent output wrapping
- if( $Host -and $Host.UI -and $Host.UI.RawUI ) {
- $rawUI = $Host.UI.RawUI
- $oldSize = $rawUI.BufferSize
- $typeName = $oldSize.GetType( ).FullName
- $newSize = New-Object $typeName (512, $oldSize.Height)
- $rawUI.BufferSize = $newSize
- }
-
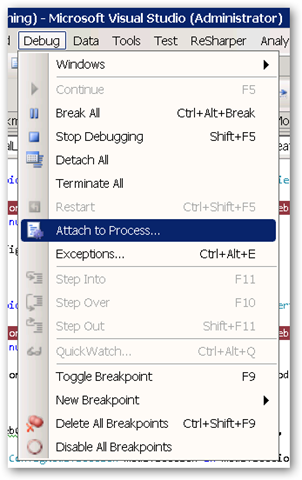
Debugging executing program from PowerShell using EchoArgs.exe
Sometimes you pull you hairs out because the execution of a command just does not seem to work the way you want from PowerShell.
A good example of this is the following case:
Given a folder on the filesystem, I want to determine if the folder is under TFS source control, and if it is, what is the server name of the TFS server and the path of folder in TFS.
If you don’t use integrated security (some development machines are not domain joined) you can determine this using the command tf.exe workfold c:\projects\myproject /login:domain\username,password
From PowerShell I execute this command as follows:
$tfExe = "C:\Program Files\Microsoft Visual Studio 9.0\Common7\IDE\Tf.exe"
$projectFolder = "D:\Projects\Macaw.SolutionsFactory\TEST\Macaw.TestTfs"
$username = "domain\username"
$password = "password"
& $tfExe workfold $projectFolder /login:$username,$passwordBut I got the the following error:
TF10125: The path 'D:\Projects\MyProject' must start with $/
I just couldn’t get it working, so I created a small batch file ExecTfWorkprodCommand.bat with the following content:
@echo off
rem This is a kind of strange batch file, needed because execution of this command in PowerShell gives an error.
rem This script retrieves TFS sourcecontrol information about a local folder using the following command:
rem tf workfold <localpath> /login:domain\user,password
rem %1 is path to the tf.exe executable
rem %2 is the local path
rem %3 is the domain\user
rem %4 is the password
rem Output is in format:
rem ===============================================================================
rem Workspace: MyProject@VS-D-SVDOMOSS-1 (Serge)
rem Server : tfs.yourcompany.nl
rem $/MyProject/trunk: C:\Projects\MyProjectif [%3]==[] goto integratedsecurity
%1 workfold "%2" /login:%3,%4
goto end:integratedsecurity
%1 workfold "%2":end
And called this script file from PowerShell as follows:
$helperScript = "ExecTfWorkprodCommand.bat"
$tfExe = "C:\Program Files\Microsoft Visual Studio 9.0\Common7\IDE\Tf.exe"
$projectFolder = "D:\Projects\Macaw.SolutionsFactory\TEST\Macaw.TestTfs"
$username = "domain\username"
$password = "password"
$helperScript $tfExe "`"$projectFolder`"" $username $passwordThis is way to much work, but I just couldn’t get it working.
Today I read a post that mentioned the tool EchoArgs.exe, available in the PowerShell Community Extensions (http://pscx.codeplex.com), which echo’s the arguments as the executed application receives them from PowerShell.
I changed my script code to:
$tfExe = "C:\Program Files\PowerShell Community Extensions\EchoArgs.exe"
$projectFolder = "D:\Projects\MyProject"
$username = "domain\username"
$password = "password"
& $tfExe workfold $projectFolder /login:$username,$passwordWhich resulted in:
Arg 0 is <workfold>
Arg 1 is <D:\Projects\MyProject>
Arg 2 is </login:domain\username>
Arg 3 is <password>And this directly resolved my issue! the “,” in “/login:$username,$password” did split the argument!
The issue was simple resolved by using the following command from PowerShell:
& $tfExe workfold $projectFolder /login:"$username,$password"
Which results in:
Arg 0 is <workfold>
Arg 1 is <D:\Projects\MyProject>
Arg 2 is </login:domain\username,password>Conclusion: issues with executing programs from PowerShell, check out EchoArgs.exe!
-
WPK – 2: Some thoughts, and my first really small databound app
My second article on using WPF from PowerShell. You can download WPK as part of the Windows 7 Resource Kit PowerShell Pack. When you can navigate to the folder <My Documents>\WindowsPowerShell\Modules you see the modules that are installed. The folder WPK contains the WPK module.
On the Modules level a few documents are installed:
- Readme1st.txt – information on installing, using, uninstalling the PowerShellPack
- About the Windows 7 Resource Kit PowerShell Pack.docx – an overview of the available modules
- Writing User Interfaces with WPK.docx - the first place to get started when working with WPK
Especially the Readme1st.txt contains two interesting pieces of information:
- The file starts with the following text:
Readme for the Windows 7 Resource Kit PowerShell Pack
by James Brundage
Copyright (c) 2009 by Microsoft Corporation
Portions copyright (c) 2009 James Brundage
All Rights Reserved
I thought James Brundage is an employee of Microsoft, why does he own portions of the copyright? - The disclaimer contains the following text:
The Windows 7 Resource Kit PowerShell Pack included on the companion CD is
unsupported by Microsoft and is provided to you as-is, with no warranty or
guarantee concerning its functionality. For the latest news and usage tips
concerning this PowerShell Pack, see the Windows PowerShell Team Blog at
http://blogs.msdn.com/powershell/.
So no support from Microsoft’s side. I wonder how issues will be resolved and new releases will be published.
Ok, and now on to some programming. In the document Writing User Interfaces with WPK.docx we find a nice example of a process viewer that updates the list of processes every 15 seconds.
A simple process viewer- New-ListView -Width 350 -Height 350 -DataBinding @{
- ItemsSource = New-Binding -IsAsync -UpdateSourceTrigger PropertyChanged -Path Output
- } -View {
- New-GridView -AllowsColumnReorder -Columns {
- New-GridViewColumn "Name"
- New-GridViewColumn "Id"
- }
- } -DataContext {
- Get-PowerShellDataSource -Script {
- Get-Process | ForEach-Object { $_ ; Start-Sleep -Milliseconds 25 }
- }
- } -On_Loaded {
- Register-PowerShellCommand -Run -In "0:0:15" -ScriptBlock {
- $window.Content.DataContext.Script = $window.Content.DataContext.Script
- }
- } -asjob
See the document for a great explanation on how it works.
When looking at this example I had a few questions:
- What if I don’t want to do a timed update, but just bind to some existing data?
- All examples do the data collection in the Get-PowerShellDataSource script block, is it possible to have the data already somewhere in a variable?
- Can I skip the binding stuff, I know its really powerful, but I want to start simple?
- Retrieve data in a background job is really cool, but what if we just want to load data and go?
My first simple try after a lot of testing and tweaking is the following:
Some names and ages- New-ListView -Show -DataBinding @{
- ItemsSource = New-Binding -Path Output
- } -View {
- New-GridView -Columns {
- New-GridViewColumn "Name"
- New-GridViewColumn "Age"
- }
- } -DataContext {
- Get-PowerShellDataSource -Script {
- $list = @()
- $list += New-Object Object |
- Add-Member NoteProperty Name "Serge" -passthru |
- Add-member NoteProperty Age "43" -passthru
- $list += New-Object Object |
- Add-Member NoteProperty Name "Dinah" -passthru |
- Add-member NoteProperty Age "42" -passthru
- $list += New-Object Object |
- Add-Member NoteProperty Name "Scott" -passthru |
- Add-member NoteProperty Age "8" -passthru
- $list += New-Object Object |
- Add-Member NoteProperty Name "Dean" -passthru |
- Add-member NoteProperty Age "4" -passthru
- $list += New-Object Object |
- Add-Member NoteProperty Name "Tahne" -passthru |
- Add-member NoteProperty Age "1" -passthru
- $list
- }
- }
I still use binding to the output, and in the datacontext script block I write the elements to bind to to the output. I still don’t bind to pre-calculated data in a variable.
After a lot more testing I came to the following code:
Names and ages from variable- $list = @()
- $list += New-Object Object |
- Add-Member NoteProperty Name "Serge" -passthru |
- Add-member NoteProperty Age "43" -passthru
- $list += New-Object Object |
- Add-Member NoteProperty Name "Dinah" -passthru |
- Add-member NoteProperty Age "42" -passthru
- $list += New-Object Object |
- Add-Member NoteProperty Name "Scott" -passthru |
- Add-member NoteProperty Age "8" -passthru
- $list += New-Object Object |
- Add-Member NoteProperty Name "Dean" -passthru |
- Add-member NoteProperty Age "4" -passthru
- $list += New-Object Object |
- Add-Member NoteProperty Name "Tahne" -passthru |
- Add-member NoteProperty Age "1" -passthru
- New-ListView -Name mylistview -Show -View {
- New-GridView -Columns {
- New-GridViewColumn "Name"
- New-GridViewColumn "Age"
- }
- } -On_Loaded {
- $mylistview = $window | Get-ChildControl mylistview
- $mylistview.ItemsSource = $list
- }
In the above code I create a variable with a list of objects with two properties, Name and Age, and bind the ItemsSource property of the ListView to this variable.
I bind the data in the Loaded event, the complete control tree is in place when this event fires.
I have named the ListView control ‘mylistview’, and with the code in line 24 I can find the control by name. The $window variable points to the implicitly created Window control surrounding the ListView, and is always available.
Note that if we add the –AsJob parameter to the New-ListView command, the creation and binding is done in a background job on another thread, and the $list variable is not visible, not even if it is defined as a global variable (as $global:list)
Diving into this simplification kept me busy for a while and gave me as a WPF nono some insights in how things are working in WPF when doing this from PowerShell.
One question I still have in this simple example: is there an easier way to fill the $list variable so its still useful for databinding.I tried $list = @{ Name="Serge"; Age="43" }, @{ Name="Dinah"; Age="42" } but that does not work:-(
Let me know if this is of any help to you.
Happy coding!
-
WPK - 1: Creating WPF applications using PowerShell
My first article on using WPF from PowerShell. What is WPK? Were can you get it? How to get started?
I have been programming in PowerShell since 2006. At Macaw we use PowerShell for most of the development on the Macaw Solutions Factory. I have written thousands and thousands of lines of code in PowerShell 1.0. Some of the GUI tools in the Macaw Solutions Factory are even written completely in PowerShell. We use PrimalForms for the generation of the PowerShell code to render the GUI.
PrimalForms: PrimalForms Community Edition is a free GUI builder tool for PowerShell users. It edits and stores Windows Forms in a native XML format and generates PowerShell code on demand. Sample forms included.
More complex GUI tools are written in standard C#/WinForms. I prefer to have the tools in the Macaw Solutions Factory to be written completely in PowerShell. The reason is that most innovations to the Macaw Solutions Factory are done in real world projects. Because the Macaw Solutions Factory almost completely consists of script code, it is possible to add new features on any development machine that checked out the Factory code together with the source code of the project. No special development environment is needed. Good innovations are merged into the trunk of the Factory. Also fixing issues or making project specific modifications is a breeze.
Writing WinForms applications using PowerShell never really worked well for us. Writing WinForms applications without designer is just terrible. PrimalForms makes life better, but still…
Enter WPF! I have been playing with WPF and PowerShell a few years ago. Problem was that PowerShell had to be executed in a Single Threaded Apartment (STA) instead of the default Multi Threaded Apartment (MTA). My first discussion on this with Bruce Payette never resulted into a good working solution.
A few days ago I ran across an interesting project at CodePlex: PowerBoots. This tooling provides WPF from both PowerShell 1.0 and PowerShell 2.0. I did some tests with it, and had some trouble, partly due to complete lack of knowledge of WPF. While searching the web I also stumbled upon WPK, the Windows Presentation Foundation PowerShell Kit. It is part of the just released Windows 7 Resource Kit PowerShell Pack (most things work on any OS with PowerShell 2.0 installed). WPK takes a very similar approach as PowerBoots. Check them both out!
It is Christmas time. This means: two weeks no real company work, a bit of free time to dive into something new. I have been running around the last three days in PowerBoots and WPK, and I must say: the demo’s look great and most of them work, but even the most simple baby steps completely fail on me, especially due to my complete ignorance of what happened in the WPF space for the last years. Yes, I am ashamed of myself. Time to catch up… baby steps at a time. There are actually two things to dive into: the new features of PowerShell 2.0 and WPK. So don’t expect much of the next posts, it is all really basic stuff, but I see on my blog that the baby step posts are the most popular posts. Posts like how to call a PowerShell function with arguments (fn –arg1 a –arg2 b instead of fn(a,b)). So expect some post at this level… is just write down the things I go through myself.
To get yourself started on the possibilities of WPK, have a look at the WPK video’s available on Channel 9. James Brundage, part of the Microsoft PowerShell Test team, does a good job on explaining WPK. There are a few videos there now, with more to come. For questions have a look at the discussion thread on the PowerShellPack site.
Happy WPK’ing..
-
Fun: Quoted on SharePoint 2010 Development with Visual Studio in InfoWorld Article
When I was at the SharePoint Conference 2009 in Vegas I was sitting in the hallway working on my little white Mac Book writing a blog post on SharePoint 2010 when a guy passed by. “Can I ask you some questions?” “Sure”, I said. “If I did anything with SharePoint?” he asked me… Ok, sitting with a Mac on a Microsoft conference can be strange, but hey: VMware Fusion did let me run the Technical Preview of SharePoint 2010 on my little Mac Book with 4GB, which couldn’t be said of my Dell running Windows XP at the time, not supporting 64 bits virtualization with Microsoft tools. We talked for a few minutes, he made some audio recordings, and off he was.
It resulted in a nice article in InfoWorld with some quotes by “van den Oever”. Never knew I said such smart things;-)
Read it at http://www.infoworld.com/d/developer-world/why-developers-sharepoint-2010-224
And…. when you want the just release public beta of SharePoint 2010, download it:
HERE!
This link is provided by Microsoft The Netherlands to a group of people called the “Wave 14” ambassadors. We have a small competition between the ambassadors: the one who gets the most clicks gets an XBox!! So help me out, click it… often! And I will make sure that I blog a lot about SharePoint 2010!
-
The bear goes loose: Office 2010 public beta link (includes SharePoint 2010!)
An old Dutch phrase… translated into bad English! But it is going to happen: the first public beta of the Office tools… including: SharePoint 2010!
And where can you download it… I know it… download it
HERE!
This link is provided by Microsoft The Netherlands to a group of people called the “Wave 14” ambassadors. We have a small competition between the ambassadors: the one who gets the most clicks gets an XBox!! So help me out, click it… often! And I will make sure that I blog a lot about SharePoint 2010!
-
SharePoint 2010: #SPC09 - SSP is dead, long live Service Applications!
Notes from the SharePoint Conference 2009 session "Introduction to Service Applications and Topology". This is my personal interpretation of what has been said during the presentation. Don't shoot me if I interpreted something wrong:-)
In SharePoint 2010 Shared Service Providers (SSP's) are replaced by Service Applications. Services are no longer combined into a SSP. Services are running independent as a service application.
So in MOSS 2007:
SSP: combines services like Search, Excel Services, User Profiles, ... into a shared service provider.
In SharePoint 2010:
Service Applications: services like Search, Managed Meta Data, .., your service (20 services in SharePoint Server) are running "unboxed" and independent.
So SharePoint 2010 provides a la carte unboxed services. You can configure which services are running on an application server. Per web application you can configure which services are consumed.
When migrating MOSS 2007 to SharePoint 2010 SSPs will upgrade into Service Applications.
SharePoint Foundation 2010 (WSS 4.0) provides the SharePoint Service Application Framework.
New products like Office Web Apps, Project Server, Gemini (PowerPivot) use this application framework, and this platform can also be used by third parties or you to create custom services.
You can plug your management UI for your service into the Service Management page.
A web application does not communicate directly to a service application, but does this through a proxy:
Web Application <-> Service Application Proxy <-> Service Application
So a general workflow can be:
Browser -> Web Front End ->(Request) Application Server ->(Result) Web Front End -> Browser
SharePoint 2010 does contain a fault tolerant round-robin software load balancer with support for hardware load balancing, so it is possible to have multiple application servers.
The Service Application infrastructure provides application isolation: each service application can use separate databases if needed and optionally run in separate app pool. There is support for multiple service apps for a service with different accounts and databases ==> Great for multi-tenancy (hosting for multiple customers on same platform)
Services are flexible, secure and provide cross-farm federation:- Trust based security between farms, claims based authorization within the farm
- Share to anyone, consume from anywhere
- WCF based web services for communication
- No direct DB Access
Administration:
You can manage which services are running on a server.
In Central Administration UI: list of services, indented under a service you see the proxy.
Through the wizards you get database names with guids at the end. Better to create manually form Central Administration, or create services through PowerShell.
Per web application you can configure which services apps you want to be available. By default all web applications use all service applications available. You can change this into a custom configuration. Use the Manage Service Associations page for this.
Service applications can be published to make them available outside the current farm. It allows you to select the connection type, for example https or net.tcp. Note that there must be a trust relationship with the farm that wants to consume your service. The service is published on a url. Through this url an other farm can find the published services. Url is in the following format: https://myfarm/Topology/topology.svc
The other farm can connect to your farm through a remote service connection.
Although manual adminstration and configuration of SharePoint 2010 can be done through Central Admin, the future of SharePoint administration is PowerShell.
With respect to Services:
Get-SPServiceApplication returns the set of service applications.
Do Get-SPServiceApplication-name yourservice to get the service object. Do Get-SPServiceApplication -name yourservice | fl to see all properties of the service object.
There are almost a hundred Cmdlets to manage your services.
Side note: It now really becomes time that all administrators learn PowerShell. In my company (Macaw) we use PowerShell extensively for our Macaw Solutions Factory. Everything from configuration, build and deploy through DTAP is done with PowerShell.
It is possible to delegate management of a particular service to someone, that person then has only access to that the management UI in Central Administration for that particular service.
Access security: specified claims principals have access to a service application. By default the "farm claim" has access, but this can be removed ad more detailed claims can be configured for more granular access rights, or example read versus read-write.
Service applications can spawn their own timer jobs.
Generally ISV's will build service applications on the SharePoint Service Application Framework, but for large organizations it could be interesting for SI's to create services to specialized functionality and farm-to-farm fedaration .
For repeatable configuration over your DTAP configuration, use PowerShell to create and manage the services.
You can create complex farm configurations where farms can share service applications. For example: two farms can share the user profile service.
- Trust based security between farms, claims based authorization within the farm
-
Visual Studio and having multiple startup projects
Never knew this: you can have multiple startup projects in a solution. Was there already in Visual Studio 2005!
See http://msdn.microsoft.com/en-us/library/ms165413%28VS.80%29.aspx for more info.
-
SharePoint 2010: Client side JavaScript Object Model Library written in Script#?
Note: this blog post is based on experiences with the SharePoint 2010 Technical Preview version.
SharePoint 2010 now extends the object model to the client. A remote object model proxy is available for C# development (including Silverlight) and a Javascript client library which can be found at C:\Program Files\Common Files\Microsoft Shared\Web Server Extensions\14\TEMPLATE\LAYOUTS\SP.js, accessible at /_layouts/SP.js.
I tried to understand what happens in the Javascript code, did some document formatting on it to get it readable. But not really a Javascript wizard myself I didn't really got the hang on it. But when I scrolled to the end of the SP.js file I found the following lines:
// ---- Do not remove this footer ----
// Generated using Script# v0.5.0.0 (http://projects.nikhilk.net)
// -----------------------------------
Now I understand why some of the code is not that readable: it is generated code. Script# is used for creating the client side object model API!
Have a look at http://projects.nikhilk.net/ScriptSharp for more info on Script#.
I never dared to use Script# i a real project going into production, especially because the last version came out in August 2008. But Microsoft does not seem to have a problem with it. The Microsoft team is even running an older version that available for download (version 0.5.1.0).
As far as I know the Office Web Applications (online Word, Access and PowerPoint) are written with Script# as well. See http://www.nikhilk.net/ScriptSharp-Large-Projects.aspx. So maybe it is time now to really dive into Script#! Anyone dare to it for production code in their projects already?
Disclaimer: All information in this blog post is based on my personal interpretation of information collected at the SharePoint Conference 2009 and experiences with SharePoint 2010 Technical Preview version provided to my company in the PEP program.
-
SharePoint 2010: Site exporting as WSP solution (Part 1)
Note: this blog post is based onexperiences with the SharePoint 2010 Technical Preview version.
In the good old days of SharePoint 2003 and 2007 it was possible to save a site as a template. These sites were saved as .stp files, I assume this acronym stands for SiteTemPlate, a non-documented closed format that did not allow for modification in the saved template files. so new sites could be created based on the template. SharePoint 2010 promises the possibility to save a site as a WSP package, the Windows SharePoint Services Package format that we all love in the development of our SharePoint solutions, because it promises seamless deployments through the farm.
In this series of blog posts I will investigate the power of this new functionality, and take you, the reader, along the way in trying to answer the following questions that directly pop up into my mind:
- Is the site really exported as a WSP? And how does it look like at the inside?
- If we create a new site based on the template, do changes to content types at the site collection level propagate to the content types in the new instance of the site template?
- In Moss2007 it was not possible to export a publishing site as a site template. Well, actually you could, but it was not supported. Probably because pages and content a site publishing site depends on, like master pages, pages layouts, the style library and site collection images are managed at the site collection level (in the root site of the site collection). Did this change in 2010, and how is it handled?
- What is exported. The complete configuration of the site, or only changes to the site with respect to the initial site definition?
- Can we learn some new stuff on authoring WSP’s from the generated WSP’s?
- Visual Studio SharePoint Support has a project type “Import SharePoint Solution Package”, what does that do? Can we use the WSP generated by a saved site template?
Ok, let get started. The first steps to execute are:
- Create a site based on the blank site definition
- Export the site
To showcase some of the new tools in the mean time I will use SharePoint Designer to create our new site:
- Connect to the portal, and select the Subsites tab

- Create a new site named wspexport based on the Blank Site template

- This brings us a blank site:

To inspect some of the export functionality we create a custom list MyList with a Title and Description field, and a document library MyDocuments. We put some entries in the custom list and add a document to the document library. I assume that everyone knowing something about SharePoint knows how to do this.
Adding a simple Dummy.txt document to the document library:
The home page after adding list view web parts for the MyDocuments and MyList:
- We go back to SharePoint Designer, set the site Title and Description of the site and save as template

- Selecting Save as template brings you to the web site where you can specify the template site settings

When save as template is done we get to the following screen:
- Following the user solution gallery will bring us to the Solution Gallery. This is a location where solutions can be uploaded and downloaded. These solutions can probably be solutions that can include code that will be run in a sandbox. More on this in an upcomming blog post.

- Right-click on the WspExportSite and select Save Target As… to save the WSP file to your location of choice.
- Note that the saved solution can be activated by selecting the arrow next to its name

This concludes the first post in this series. What do we have:
- A WSP file on disk based on Blank Site containing a list and a document library
- A solution in our solution gallery ready to be activated
Disclaimer: All information in this blog post is based on my personal interpretation of information collected at the SharePoint Conference 2009 and experiences with SharePoint 2010 Technical Preview version provided to my company in the PEP program.
-
SharePoint 2010: Getting Publishing template working
Note: this post is only relevant for people running the SharePoint 2010 Technology Preview.
When I create a new site based on the Publishing Portal template you get a .../Pages/Default.aspx page with an error on it. The error seems to be generated by a ContentByQuery web part (the only web part) on the page. Add ?contents=1 to the url (…/Pages/Default.aspx?contents=1):

Check Out the page, remove the web part (Delete, not Close), and your page starts working again.
Happy Publishing!

Disclaimer: All information in this blog post is based on my personal interpretation of information collected at the SharePoint Conference 2009 and experiences with SharePoint 2010 Technical Preview version provided to my company in the PEP program.
-
SharePoint 2010: When SQL memory usage keeps growing…
After a single machine SharePoint 2010 install using the built in SQL Server Express my machine became really sloooooooow. After checking the processes it became clear that SQL server was eating memory. This is the default behavior of SQL Server.
I tried to install the SQL Server 2008 Manager Express, but the installation failed. The SQL Server Express provided with SharePoint 2010 seems to be a newer version than the SQL Server 2008 Express version.
After a long search on the internet I finally found how to set the memory limits for a SQL Server instance through osql.exe.
First thing to do is to determine which instance you want to limit. One way of doing this is by finding the process ID using the built in Task Manager, and then use the Sysinternals Process Explorer to determining what instance is running under that process ID. On my machine .\SHAREPOINT was good enough for connecting to the SQL Server instance used by SharePoint.
- Launch a command prompt
- Start the SQL prompt, connecting to the desired instance (e.g. .\SHAREPOINT)
- osql -E -S SERVERNAME\<INSTANCENAME>
- Execute the following commands to enable setting of advance options:
USE master
EXEC sp_configure 'show advanced options',1
RECONFIGURE WITH OVERRIDE
GO - Execute the following commands to set the maximum memory in MB. Replace 200 with your desired setting (I use 200MB):
USE master
EXEC sp_configure 'max server memory (MB)',200
RECONFIGURE WITH OVERRIDE
GO - Execute the following commands to disable advanced settings, for safety’s sake:
USE master
EXEC sp_configure 'show advanced options',0
RECONFIGURE WITH OVERRIDE
GO - quit
Disclaimer: All information in this blog post is based on my personal interpretation of information collected at the SharePoint Conference 2009 and experiences with SharePoint 2010 Technical Preview version provided to my company in the PEP program.
-
SharePoint 2010: #SPC09 - Notes from the keynote
Some quick notes I took about things I found interesting from the two keynote speeches of the SharePoint Conference 2009.
Steve Ballmer keynote
- SharePoint 2010 Beta release: November 2009
- SharePoint 2010: RTM in First half 2010
- Visual Studio Beta 2 released today!!
- SharePoint Designer remains free in the 2010 version
Versions of SharePoint:
- SharePoint Foundation 2010 = WSS
- SharePoint 2010 for Intranet Standard
- SharePoint 2010 for Intranet Enterprise
- SharePoint 2010 for Internet Standard
- SharePoint 2010 for Internet Enterprise
- SharePoint Online (for Intranet)
- SharePoint Online for Internet facing sites (yes!)
Jeff Taper keynote
Code name Gemini becomes PowerPivot: 100.000.000 rows in Excel, publish to the server, powered by Analysis Services 2008 R2 (its FAST!!)
Product names for PowerPivot:
- Sql Server PowerPivot for Excel
- Sql Server PowerPivot for SharePoint
Disclaimer: All information in this blog post is based on my personal interpretation of information collected at the SharePoint Conference 2009 and experiences with SharePoint 2010 Technical Preview version provided to my company in the PEP program.
.
-
Visual Studio: alway run as administrator
I’m currently developing on a 64 bit Windows Server 2008 R2 that is domain joined, so I log in with my domain account and user access control is enabled. I need to run my Visual Studio as an administrator, because otherwise I get all kind of errors. I can do this by right-clicking on the Visual Studio Icon and select “Run as administrator”:

The problem is: I forget to do this all the time, and I ALWAYS want to run Visual Studio as an administrator.
You can enable this as follows:
- Right-click the Visual Studio icon and select properties
- On the Shortcut tab (the default tab) select Advanced

- Select Run as administrator

- Click OK
This will work on any program, and on any OS with user access control (Vista, Windows 7, …).
In order to be able to do this you must be added to the Administrators group on the local machine. If you don’t have the permissions to do this, login with an account that has enough permissions, or login with the local administrator account.
You can do this in the Edit local users and groups program (Start –> Search programs and files… type users):

When you start up Visual Studio you will always get a warning from User Access Control with the question if you want to allow the program to make changes to your computer. Don’t know if you can prevent this popup.
-
Microsoft Virtual labs - getting the lab notes directly
Microsoft has great virtual labs available, but it takes some time to get in there. If you just want the lab notes, type the following in Google: site:download.microsoftvirtuallabs.com filetype:pdf or just follow this link.
-
SharePoint, Features and web.config modifications using SPWebConfigModification
SharePoint has a great way for deploying content and functionality using Windows SharePoint Services Solution Packages (WSP's). While developing a powerful new feature for SharePoint Publishing sites I had to deploy a HttpModule "the SharePoint" way. Building a HttpModule , a corresponding feature and the resulting WSP package is easy with our Macaw Solutions Factory. The actual logic in the Http Module and the feature is the difficult part. One of the things I had to do was to create a feature that registers a HTTPModule on feature activation, and removes it from the web.config on the feature deactivation. You can do this using the SPWebConfigModification class.
A good article on this topic is http://www.crsw.com/mark/Lists/Posts/Post.aspx?ID=32. It contains links to other posts as well.
The Microsoft documentation can be found at SPWebConfigModification Class (Microsoft.SharePoint.Administration), I wished I scrolled down before, because a lot of valuable information can be found in the Community Content of this page (keep scrolling!).
Anyway, it took quite some time to get my HttpModule to register/unregister correctly on activation/deactivation of my web application level feature. I post the code below so you have a head-start if you have to do something similar yourself.
using System.Collections.Generic; using System.Collections.ObjectModel; using Microsoft.SharePoint; using Microsoft.SharePoint.Administration;
// namespace must be in the form <Company>.<Product>.<FunctionalArea>.SharePoint.Features.<FeatureName>.FeatureReceiver namespace Macaw.WcmRia.Moss2007.DualLayout.SharePoint.Features.DualLayoutSupport.FeatureReceiver { /// <summary> /// Add HttpModule registration to web.config of the web application /// </summary> class DualLayoutSupportFeatureReceiver : SPFeatureReceiver { private const string WebConfigModificationOwner = "Macaw.WcmRia.Moss2007.DualLayout"; private static readonly SPWebConfigModification[] Modifications = { // For not so obvious reasons web.config modifications inside collections // are added based on the value of the key attribute in alphabetic order. // Because we need to add the DualLayout module after the // PublishingHttpModule, we prefix the name with 'Q-'. new SPWebConfigModification() { // The owner of the web.config modification, useful for removing a // group of modifications Owner = WebConfigModificationOwner, // Make sure that the name is a unique XPath selector for the element // we are adding. This name is used for removing the element Name = "add[@name='Q-Macaw.WcmRia.Moss2007.DualLayout']", // We are going to add a new XML node to web.config Type = SPWebConfigModification.SPWebConfigModificationType.EnsureChildNode, // The XPath to the location of the parent node in web.config Path = "configuration/system.web/httpModules", // Sequence is important if there are multiple equal nodes that // can't be identified with an XPath expression Sequence = 0, // The XML to insert as child node, make sure that used names match the Name selector Value = "<add name='Q-Macaw.WcmRia.Moss2007.DualLayout' type='Macaw.WcmRia.Moss2007.DualLayout.Business.Components.HttpModule, Macaw.WcmRia.Moss2007.DualLayout.Business.Components, Version=1.0.0.0, Culture=neutral, PublicKeyToken=077f92bbf864a536' />" } };
<span style="color: blue">public override void </span>FeatureInstalled(<span style="color: #2b91af">SPFeatureReceiverProperties </span>properties) { } <span style="color: blue">public override void </span>FeatureUninstalling(<span style="color: #2b91af">SPFeatureReceiverProperties </span>properties) { } <span style="color: blue">public override void </span>FeatureActivated(<span style="color: #2b91af">SPFeatureReceiverProperties </span>properties) { <span style="color: #2b91af">SPWebApplication </span>webApp = properties.Feature.Parent <span style="color: blue">as </span><span style="color: #2b91af">SPWebApplication</span>; <span style="color: blue">if </span>(webApp != <span style="color: blue">null</span>) { AddWebConfigModifications(webApp, Modifications); } } <span style="color: blue">public override void </span>FeatureDeactivating(<span style="color: #2b91af">SPFeatureReceiverProperties </span>properties) { <span style="color: #2b91af">SPWebApplication </span>webApp = properties.Feature.Parent <span style="color: blue">as </span><span style="color: #2b91af">SPWebApplication</span>; <span style="color: blue">if </span>(webApp != <span style="color: blue">null</span>) { RemoveWebConfigModificationsByOwner(webApp, WebConfigModificationOwner); } } <span style="color: gray">/// <summary> /// </span><span style="color: green">Add a collection of web modifications to the web application </span><span style="color: gray">/// </summary> /// <param name="webApp"></span><span style="color: green">The web application to add the modifications to</span><span style="color: gray"></param> /// <param name="modifications"></span><span style="color: green">The collection of modifications</span><span style="color: gray"></param> </span><span style="color: blue">private void </span>AddWebConfigModifications(<span style="color: #2b91af">SPWebApplication </span>webApp, <span style="color: #2b91af">IEnumerable</span><<span style="color: #2b91af">SPWebConfigModification</span>> modifications) { <span style="color: blue">foreach </span>(<span style="color: #2b91af">SPWebConfigModification </span>modification <span style="color: blue">in </span>modifications) { webApp.WebConfigModifications.Add(modification); } <span style="color: green">// Commit modification additions to the specified web application </span>webApp.Update(); <span style="color: green">// Push modifications through the farm </span>webApp.WebService.ApplyWebConfigModifications(); } <span style="color: gray">/// <summary> /// </span><span style="color: green">Remove modifications from the web application </span><span style="color: gray">/// </summary> /// <param name="webApp"></span><span style="color: green">The web application to remove the modifications from</span><span style="color: gray"></param> /// <param name="owner"Remove all modifications that belong to the owner></param> </span><span style="color: blue">private void </span>RemoveWebConfigModificationsByOwner(<span style="color: #2b91af">SPWebApplication </span>webApp, <span style="color: blue">string </span>owner) { <span style="color: #2b91af">Collection</span><<span style="color: #2b91af">SPWebConfigModification</span>> modificationCollection = webApp.WebConfigModifications; <span style="color: #2b91af">Collection</span><<span style="color: #2b91af">SPWebConfigModification</span>> removeCollection = <span style="color: blue">new </span><span style="color: #2b91af">Collection</span><<span style="color: #2b91af">SPWebConfigModification</span>>(); <span style="color: blue">int </span>count = modificationCollection.Count; <span style="color: blue">for </span>(<span style="color: blue">int </span>i = 0; i < count; i++) { <span style="color: #2b91af">SPWebConfigModification </span>modification = modificationCollection[i]; <span style="color: blue">if </span>(modification.Owner == owner) { <span style="color: green">// collect modifications to delete </span>removeCollection.Add(modification); } } <span style="color: green">// now delete the modifications from the web application </span><span style="color: blue">if </span>(removeCollection.Count > 0) { <span style="color: blue">foreach </span>(<span style="color: #2b91af">SPWebConfigModification </span>modificationItem <span style="color: blue">in </span>removeCollection) { webApp.WebConfigModifications.Remove(modificationItem); } <span style="color: green">// Commit modification removals to the specified web application </span>webApp.Update(); <span style="color: green">// Push modifications through the farm </span>webApp.WebService.ApplyWebConfigModifications(); } } }}
-
SharePoint WCM: flushing publishing pages from the cache
SharePoint WCM does a lot of caching. One of the things that is cached are the publishing pages. These pages are cached in the object cache. Sometimes there is a situation where you want to flush a publishing page from the cache. In my case I had to flush a publishing page from the cache in a http module. The cache id for this page is the server relative url without any characters after the url. For example: /Pages/MyFirstLittleWCMPage.aspx. Therefore the path must be "normalized" so additional "stuff" is removed. The NormalizeUrl() function does this job.
What I want to do to flush the page from the cache was:
CacheManager contextCacheManager = CacheManager.GetManager(SPContext.Current.Site);
contextCacheManager.ObjectFactory.FlushItem(NormalizeUrl(HttpContext.Current.Request.Path);Sadly enough many interesting and powerful API classes are internal, and you need some reflection to be able to call them. Below the code I needed to write to accomplish the above. I can tell you it was a hell of a job to get to this code. That is why I share it, to give you some insight in the required magic called reflection.
Interesting components:
- I know that the assembly containing the required class is already loaded. I can do GetAssembly(typeof(PublishingPage)) to get the assembly. Will work on any class in the assembly.
- To invoke a member of a class you need the type of the class. Assembly.GetType("full.name.of.type") returns the type, also on internal classes.
- Given the type you can invoke members, where members can be static functions, properties or methods. You specify what to search for the member using BindingFlags. For example for a static public method specify BindingFlags.Static | BindingFlags.Public | BindingFlags.InvokeMethod.
- Arguments to methods must be passed in an object array.
I hope the code below will give some insight in how to make the impossible possible.
/// <summary> /// Flush the current publishing page from the object cache /// </summary> /// <remarks> /// Reflection is used to get access to internal classes of the SharePoint framework /// </remarks> private void FlushCurrentPublishingPageFromCache() { // We need to get access to the Microsoft.SharePoint.Publishing.dll assembly, PublisingPage is in there for sure Assembly microsoftSharePointPublishingAssembly = Assembly.GetAssembly(typeof(PublishingPage)); Type cacheManagerType = microsoftSharePointPublishingAssembly.GetType("Microsoft.SharePoint.Publishing.CacheManager", true); object contextCacheManager = cacheManagerType.InvokeMember("GetManager", BindingFlags.Static | BindingFlags.Public | BindingFlags.InvokeMethod, null, null, new object[] { SPContext.Current.Site });
<span style="color: blue">string </span>cacheId = NormalizeUrl(<span style="color: #2b91af">HttpContext</span>.Current.Request.Path); <span style="color: blue">if </span>(contextCacheManager != <span style="color: blue">null</span>) { <span style="color: blue">object </span>cachedObjectFactory = contextCacheManager.GetType().InvokeMember(<span style="color: #a31515">"ObjectFactory"</span>, <span style="color: #2b91af">BindingFlags</span>.Instance | <span style="color: #2b91af">BindingFlags</span>.Public | <span style="color: #2b91af">BindingFlags</span>.GetProperty, <span style="color: blue">null</span>, contextCacheManager, <span style="color: blue">new object</span>[] {}); cachedObjectFactory.GetType().InvokeMember(<span style="color: #a31515">"FlushItem"</span>, <span style="color: #2b91af">BindingFlags</span>.Instance | <span style="color: #2b91af">BindingFlags</span>.Public | <span style="color: #2b91af">BindingFlags</span>.InvokeMethod, <span style="color: blue">null</span>, cachedObjectFactory, <span style="color: blue">new object</span>[] { cacheId }); } <span style="color: blue">else </span>{ Microsoft.Office.Server.Diagnostics.<span style="color: #2b91af">PortalLog</span>.LogString(<span style="color: #a31515">"Unexpected error: DualLayout " +<br /> "FlushCurrentPublishingPageFromCache: No CacheManager for page {0}"</span>, cacheId); }}
/// <summary> /// Normalize url for cachId usage /// </summary> /// <remarks> /// This code is copied from: /// private static string NormalizeUrl(string url); /// Declaring Type: Microsoft.SharePoint.Publishing.CachedObjectFactory /// Assembly: Microsoft.SharePoint.Publishing, Version=12.0.0.0 /// </remarks> /// <param name="url">Url to normalize</param> /// <returns>The normalized url</returns> private static string NormalizeUrl(string url) { url = SPHttpUtility.UrlPathDecode(url, false); if (!string.IsNullOrEmpty(url)) { int length = url.IndexOf('?'); if (length >= 0) { url = url.Substring(0, length); } } else { return ""; } int index = url.IndexOf('#'); if (index >= 0) { url = url.Substring(0, index); } return url; }
-
Debugging SharePoint/ASP.NET code? Smart key-codes + disable timeout!
I'm currently running around in the Visual Studio debugger to debug some complex SharePoint code. There are two things really annoy me: all the mouse-clicks needed to attach to the Internet Information Server process and the time-out you get when you are exploring complex data-structures for too long.
First my favorite key-sequence for the last week: <ALT-D>PW3<ENTER><ENTER>. I will explain it:
<Alt-D> brings up the debugging menu in Visual Studio:
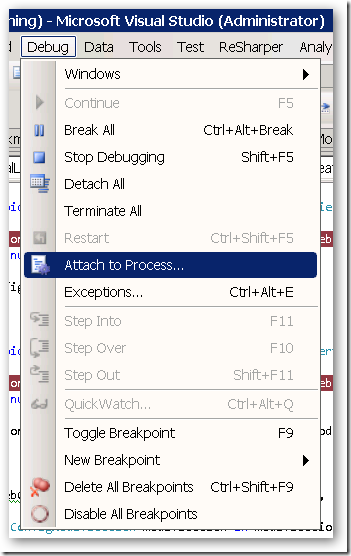
With P the action "Attach to Process..." is executed, which brings you to the following window:
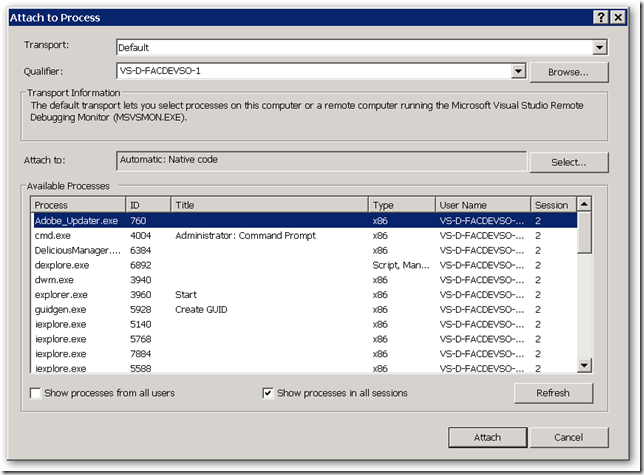
The list of available processes is already active. We nog need to select the Internet Information Server worker process. Each application pool has it's own worker process. These worker processes are named: w3wp.exe.
By typing W3 the first (and often only) w3wp.exe process is selected:
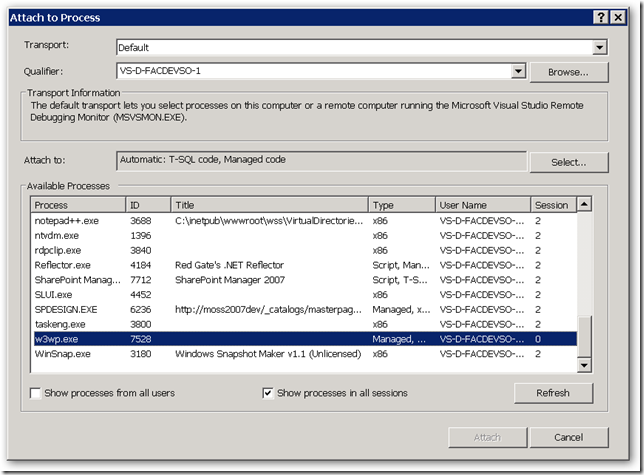
If there are multiple w3wp.exe processes you could select them all (SHIFT+ARROWDOWN). Now press the first time <ENTER>, which selects the w3wp.exe process(es). This results in the following window:
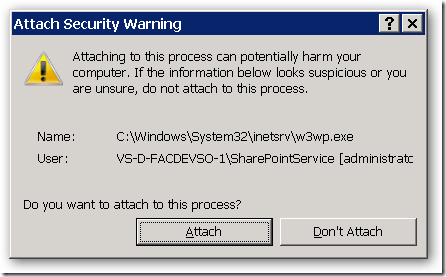
The "Attach" button is selected by default. This brings us to the latest <ENTER> to accept the default selection.
We are now attached to the correct Internet Information Server working process(es) and can start debugging.
Just try it a few times: <ALT-D>PW3<ENTER><ENTER>, it will become second nature in no time. Happy debugging....
... until you get the following popup window:
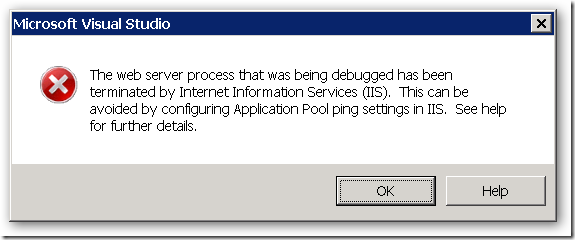
You have got a "ping" timeout. If you read the box well, it tells you exactly what happened, and it tells you to press the "Help" button for further details.
Most people don't read the box, and start over again. But it worth the effort to follow the described steps from the Microsoft documentation, they are a bit hard to follow:
To continue to debug, you must configure IIS to allow the worker process to continue.
To enable Terminal Services (?? Terminal Services ??)
-
Open the Administrative Tools window.
-
Click Start, and then choose Control Panel.
-
In Control Panel, choose Switch to Classic View, if necessary, and then double-click Administrative Tools.
-
In the Administrative Tools window, double-click Internet Information Services (IIS) Manager.
-
In the Internet Information Services (IIS) Manager window, expand the <computer name> node.
-
Under the <computer name> node, right-click Application Pools.
-
In the Application Pools list, right-click the name of the pool your application runs in, and then click Advanced Settings.
-
In the Advanced Settings dialog box, locate the Process Model section and choose one of the following actions:
-
Set Ping Enabled to False.
-or-
-
Set Ping Maximum Response Time to a value greater than 90 seconds.
Setting Ping Enabled to False stops IIS from checking whether the worker process is still running and keeps the worker process alive until you stop your debugged process. Setting Ping Maximum Response Time to a large value allows IIS to continue monitoring the worker process.
-
-
Click OK.
-
Under Services and Applications, click Services. -- Don't know what the rest of the steps if for... you are done!
A list of services appears in the right-side pane.
-
In the Services list, right-click Terminal Services, and then click Properties.
-
In the Terminal Services Properties window, locate the General tab and set Startup type to Manual.
-
Click OK to close the Advanced Settings dialog box.
-
Close the Internet Information Services (IIS) Manager window and the Administrative Tools window.
I'm running on Windows Server 2008, and below are the steps that I follow:
Just type iis in the Start Search box, this shows me two applications:
I take the top one (I'm not running under IIS 6) and get the following screen:
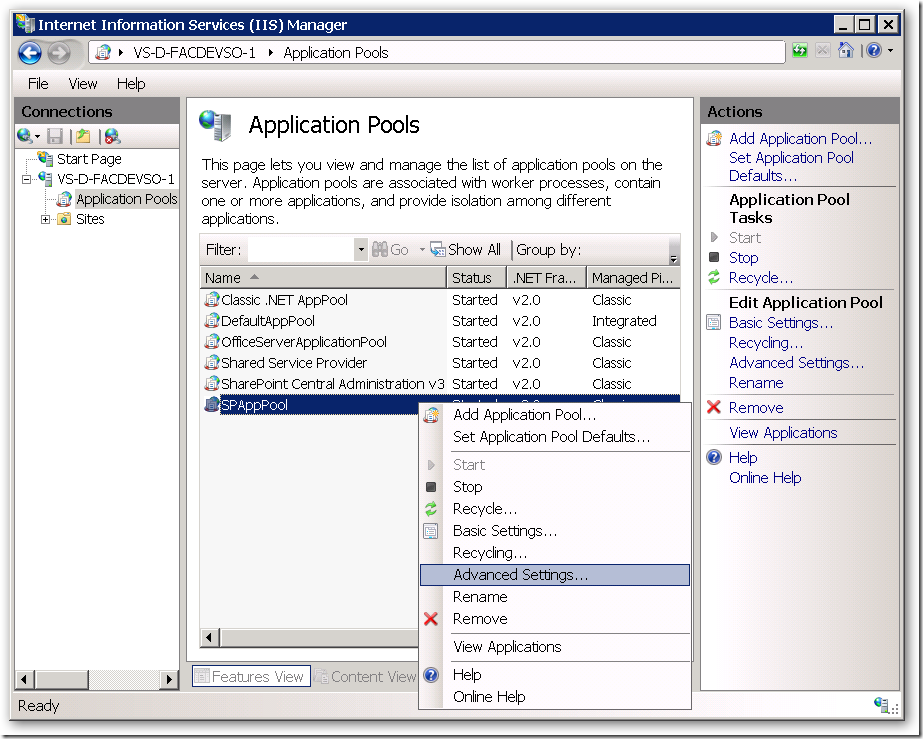
Right-click your application pool, advanced settings... and you get the following screen:
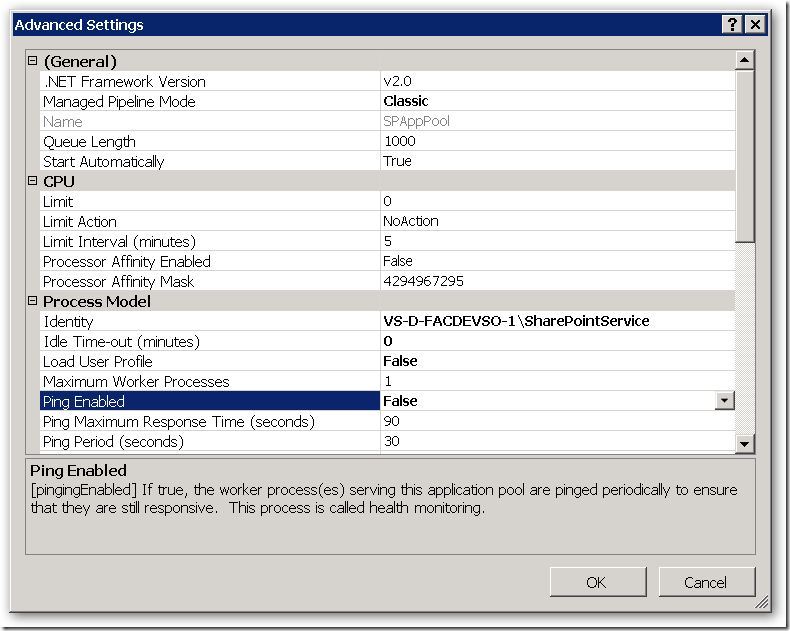
Set "Ping Enabled" to False, press OK, and you can drill through your data-structures in the debugger for as long as you want!
Again: "Happy debugging!"
-
-
SPDevExplorer 2.3 – Edit SharePoint content from within Visual Studio (4)
After a weekend of hard work I have a new version of SPDevExplorer ready with many new enhancements. Download at http://spdevexplorer.codeplex.com/WorkItem/View.aspx?WorkItemId=7799
See http://weblogs.asp.net/soever/archive/tags/SPDevExplorer/default.aspx for all myposts on SPDevExplorer.
Some screen shots to give an impression:
Connect to a SharePoint site:

Checkout and edit a page from SharePoint:

Actions on the context menu of a site:

Actions on the context menu of a folder:

Actions on the context menu of a file:

Add files from working folder to SharePoint:

Version 2.2:
- Added consistent keyboard shortcuts for all context menu entries
- Changed "Published by VS 2005" and Checked in by VS 2005" to "Published by SPDevExplorer" and Checked in by SPDevExplorer"
because add-in works with both VS 2005 and VS 2008.
- All file content communication between working folder and sharepoint is now binary. Was text before, with
conversion to UTF8. This allows for uploading modified binary files and editing in Visual Studio
of non-text files.
- Extended file information on files retrieved from SharePoint with last time modified for improving
test on overwrite of modified files.
- Added "Save" to file menu. If a file is opened in Visual Studio, it is saved and the contents is saved
to SharePoint. If it is not opened in Visual Studio, if it is saved from another application to
the working folder, the file is saved to SharePoint. Now images and other files can be opened from
the working folder and saved back to SharePoint.
- Refactoring and documentation of code (first steps)
- Added "Add file..." option on folder that allows you to add files that are in the working folder, but
are not in SharePoint. This makes it possible to create files with any application in the working folder
and add them to SharePoint using Visual Studio.
- Added "Explorer working folder..." to all folders, not only to site. Makes it easier to add new files.
- Changed menu action on site "SharePoint->Settings" to "SharePoint->Site Settings
- Added "SharePoint->Open site in browser", "SharePoint->Open folder in browser", "SharePoint->Open file in browser"
to open the site, folder or file in a browser window within Visual Studio
- Added "SharePoint->Web part page maintenance" on files, this opens the file url with ?contents=1 appended in a
browser window in Visual Studio. A special page is displayed where web parts can be deleted. Useful for pages that
don't work anymore due to a not working web part
- Added method "CurrentWebServiceVersion" to the SPDevExplorer web service so we can make sure that the client side tool
and the server side web service stay in syncVersion 2.1:
- Fixed a bug where subnodes where not rendered when enabling/disabling "Show all folders and files"
- When loading a site, the site node now directly expands
- Refresh on site gave "Not implemented", it now works
- Removed SharePoint Settings and SharePoint COntents options on folders. Gave a "Not implemented"
message, and I don't see a use for them
- Add New/File, New/Folder, Get/Files, Get/Files recursive also to the Site node, to be able to do this
on the root of the site as well
- Changed Checkin to Check In, and Checkout to Check Out to be consistent with SharePoint Designer
- Disable Publish if publishing not enabled on library
- Show Publish only if file is Checked In
- If Checked Out, show Check In with the user that has file currently checked out
- Added Rename on files and folders to folder and file context menu
- Added consistent short cuts for all context menu entries
- WSP install.bat script: added -force on deploysolution so it can be executed if solution already installed
- Removed Site & System, folder with log files and contente types. Do content types through WebUI, use other tool for log files
- Fixed "Check Out" visualization of files in root of siteVersion 2.0:
- Converted the project into a Visual Studio 2008 project
- Changed spelling error Domin into Domain
- Generated a strong key for the SPDevExplorer.Solution project. I got an error when installing the WSP rthat assembly was not strong-signed.
- Cookies were retrieved on an empty cookies object, this lead to a object not found exception
- Several changes to make sure that https is supported by changing the UI that full path is shown in tree.
You now see https://mysite instead of just mysite.
- Added "Explore working folder..." on site, so the cache on the local file system can be found. Want to turn
this into a feature to add files to the cache folders and be able to add these additional files.
- Added "Show info..." on files and folders, shows the cached xml info on the folder/file
- On delete file/folder, ask for confirmation
- On delete file/folder, refresh parent view to make sure it is correct again, make next node current, if not exist previous node
- Made keyboard interaction working, KeyPress was used, didn't work, now using KeyUp
- Del on keyboard now works correctly for deleting files/directories
- F5 on keyboard added for refresh. Parent folder is refreshed if on File, current folder is refreshed if on folder
- Removed (Beta) from name in window title
- Moved "SharePoint Explorer" from "View" menu to "Tools" menu, more appropriate place
- Option on site "Show all folders and files". Normally there is a list of hidden folders, but this also hides files you migh
want to edit like files in the forms folders of lists
- Removed adding list of webs to a site, gave an error and sites were never added. All sites must be added explicitly
using "connect...". I think it is also better this way.Note that the download version is named version 2.3, but internally this is version 2.2. I messed up with the numbering.
-
SPDevExplorer 2.1 – edit SharePoint content from within Visual studio (3)
I did a lot of additional bugfixing and enhancements on SPDevExplorer. Resulted in version 2.1 of SPDevExplorer. Download bin + sources at http://spdevexplorer.codeplex.com/WorkItem/View.aspx?WorkItemId=7799. Let me know if you find any issues.
See http://weblogs.asp.net/soever/archive/tags/SPDevExplorer/default.aspx for all myposts on SPDevExplorer.
Modifications by Serge van den Oever [Macaw]:
============================================Version 2.1:
- Fixed a bug where subnodes were not rendered when enabling/disabling "Show all folders and files"
- When loading a site, the site node now directly expands
- Refresh on site gave "Not implemented", it now works
- Removed SharePoint Settings and SharePoint COntents options on folders. Gave a "Not implemented"
message, and I don't see a use for them
- Add New/File, New/Folder, Get/Files, Get/Files recursive also to the Site node, to be able to do this
on the root of the site as well
- Changed Checkin to Check In, and Checkout to Check Out to be consistent with SharePoint Designer
- Disable Publish if publishing not enabled on library
- Show Publish only if file is Checked In
- If Checked Out, show Check In with the user that has file currently checked out
- Added Rename on files and folders to folder and file context menu
- Added consistent short cuts for all context menu entries
- WSP install.bat script: added -force on deploysolution so it can be executed if solution already installed
- Removed Site & System, folder with log files and contente types. Do content types through WebUI, use other tool for log files
- Fixed "Check Out" visualization of files in root of siteVersion 2.0:
- Converted the project into a Visual Studio 2008 project
- Changed spelling error Domin into Domain
- Generated a strong key for the SPDevExplorer.Solution project. I got an error when installing the WSP rthat assembly was not strong-signed.
- Cookies were retrieved on an empty cookies object, this lead to a object not found exception
- Several changes to make sure that https is supported by changing the UI that full path is shown in tree.
You now see https://mysite instead of just mysite.
- Added "Explore working folder..." on site, so the cache on the local file system can be found. Want to turn
this into a feature to add files to the cache folders and be able to add these additional files.
- Added "Show info..." on files and folders, shows the cached xml info on the folder/file
- On delete file/folder, ask for confirmation
- On delete file/folder, refresh parent view to make sure it is correct again, make next node current, if not exist previous node
- Made keyboard interaction working, KeyPress was used, didn't work, now using KeyUp
- Del on keyboard now works correctly for deleting files/directories
- F5 on keyboard added for refresh. Parent folder is refreshed if on File, current folder is refreshed if on folder
- Removed (Beta) from name in window title
- Moved "SharePoint Explorer" from "View" menu to "Tools" menu, more appropriate place
- Option on site "Show all folders and files". Normally there is a list of hidden folders, but this also hides files you migh
want to edit like files in the forms folders of lists
- Removed adding list of webs to a site, gave an error and sites were never added. All sites must be added explicitly
using "connect...". I think it is also better this way. -
SPDevExplorer – edit SharePoint content from within Visual studio (2)
I recorded a video on installing and using the SharePoint Developer Explorer. See my first post for information on location for download and last changes. If the video below does not show follow this link to the video file.
See http://weblogs.asp.net/soever/archive/tags/SPDevExplorer/default.aspx for all myposts on SPDevExplorer.