Using a VisualBrush for Slicing Content
In a recent blog post I mentioned my hobby of supporting the local Basketball team, the Telekom Baskets Bonn. This post is about what I’m currently working on, describing a use case for WPF’s VisualBrush along the way.
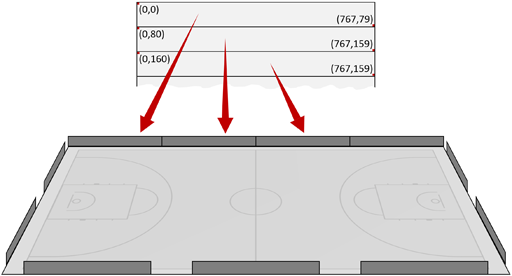
First a little background: For the upcoming 2013/2014 season, all first-division clubs are required by league regulations to use LED-based perimeter advertising systems in their arenas. The Telekom Baskets Bonn have decided on an LEDCON system consisting of 11 modules with a resolution of 768 by 80 pixels each (they are not delivered yet, so no photos to show at this time).
The system comes with ready-to-use software that allows both pre-rendered video and still images to be shown using multiple playlists. But of course, it would also be very interesting to display custom content that is generated dynamically.
Fortunately, accessing the modules is pretty simple: The hardware controller for the modules is connected to a PC via DVI, making Windows believe it is a regular monitor. In order to offer a flexible solution which allows modules to be stacked to form a large video wall, the “monitor” does not have a horizontal resolution of 11*768 = 8448 pixels (with a vertical resolution of 80 pixels). Instead, the hardware grabs the content displayed in an area of 768 by 880 pixels and distributes it to the modules: The pixels (0,0) to (767,79) are shown on the first module, the pixels (0,80) to (767,159) on the second module, and so on.
The program I’m developing right now is intended to complement, not replace, the existing software. The idea is to treat the pixels of all LED modules as one contiguous area of 8448 by 80 pixels internally, allowing easy creation of content spanning multiple modules.
For the UI I decided to use WPF; not only because I wanted to re-use components of my existing software LiveTexter, but also because the VisualBrush makes it almost trivial to split dynamic, live content into slices and rearrange it as needed.
The Basics
The VisualBrush is a brush that paints an area with a Visual (or a part of it), hence the name. For my use case, I wanted each slice to be represented by a rectangle that is painted with a specific part of the original content. It’s simply a matter of defining a VisualBrush for each slice, all with the same Visual, but different ViewBoxes:
The following code shows how easy this is:
slice.Fill = new VisualBrush
{
    ViewboxUnits = BrushMappingMode.Absolute,
    Viewbox = new Rect(index*width, 0, width, height),
    Visual = sourceVisual
};
sliceis a rectangle that will be added to a StackPanel,widthandheightspecify its size,indexis the index of the LED module.
And the best part is that changes to the content, e.g. animated elements, are handled automatically – the brush is really “live”.
The ContentSlicer Control
I wrote a custom control called “ContentSlicer” for my purposes; while I doubt that you will use it as-is, it may be useful as a starting point for your own controls.
You can download the source code here as a Visual Studio 2012 project, together with a simple demo that scrolls a Lorem Ipsum text over a static background:
Please note the included ReadMe.html file that explains the usage of the control.
Recommended Reading
The MSDN documentation on VisualBrush and its base class TileBrush is surprisingly good, if you piece the available information together.
I recommend reading the following articles for a better understanding:
- The TileBrush properties
- and last but not least the VisualBrush property Visual.


