Archives
-
Metro SharePoint Directory–Reading from Lists
As yet another follow-up to the various posts I made on building a Metro-style directory of sorts in SharePoint here and here, one thing that’s been asked a few times already is reading from a list.
In the original post we called the getSubWebsForCurrentUser method to fetch a list of sites. What if you wanted something more generic? Here’s a solution that will let you read from a list instead.
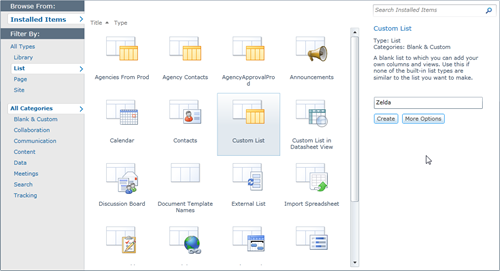
First we’re going to need a list. This part is easy. Create a new custom list through the Site Actions (Site Actions > More Options > List > Custom List, intuitive I know).
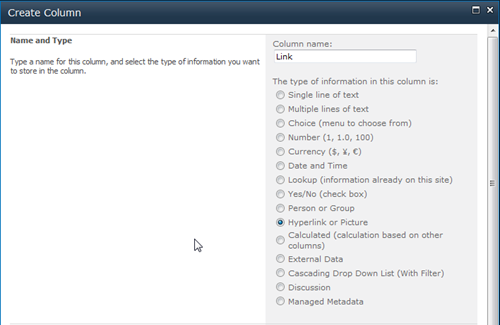
The custom list gives you a blank list with one column, Title. That will be our text to display. Next add a new column to the list of type Hyperlink. It can be called Url, Link, or Ganondorf if you’re feeling particularily Zelda-ish. This will be the link that will transport your users to magical places.
Now that we have our list we can use a modified version of the original script to iterate through the list items and build up our menu. I won’t get into the details of how everything works here (go back and read the first article in this series) but here’s the part that will create the menus. Replace your loadSites method with this one:
Line 8 is where things get different from the original implementation. Instead of getting the sites for the user, we get our custom list. Then we create a new CAML query. The SP.CamlQuery object has a method to get all items so we’ll use that (we could construct a custom query here but we want everything for now).
Line 11 we get all the list items based on the query and specify the fields we want to load.
Line 13 is the same as line 18 in the original code and submits our job to the server for execution.
Our onSuccess method is a little different now that we have to enumerate over list items instead of sites. Here’s the modified version:

A few things to note here on what happening.
Line 3 we fetch the list item enumerator.
Line 14 we step over each item in the list.
Line 16-19 we grab the individual item and fields we want.
Line 21-23 we setup the left hand menu navigation with the title and link to the site (from the custom list data)
Line 25-32 we populate the Metro tiles with the same information.
Finally we add it to our markup on the page using jQuery to replace our Loading tags.
That’s it. Now you have your custom menu driven from a SharePoint list. Go ahead and add items to the list and magic will happen.
Look for a more lengthy article on this entire series shortly where I pull it all together as well as adding a few more cool things like tracking and sorting the list based on popularity of clicks. I’m also going to present this whole thing at next weeks Calgary SharePoint User Group meeting if you’re in town so you can join us then.
Enjoy.
-
Goodbye Ribbon–Going Full Screen Metro Style with SharePoint
Having some fun with a previous post I did about generating a Metro-style menu from a Custom List in SharePoint for the purpose of building something like an Application Directory. It’s a great navigation system and by adding something like Live Tiles (that pulls information from each site) via JavaScript it can be an informative dashboard rather than a pretty menu. You can read the previous write-up I did on this here.
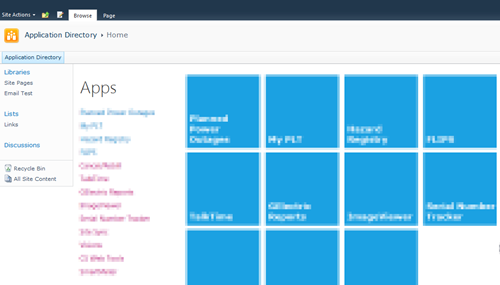
Here’s what my Application Directory looks like:
Nice, but all that SharePoint chrome isn’t needed for the purpose of navigating the directory.
The answer is simple. Just a few CSS styles you override to hide everything.
Here’s the CSS markup you need:
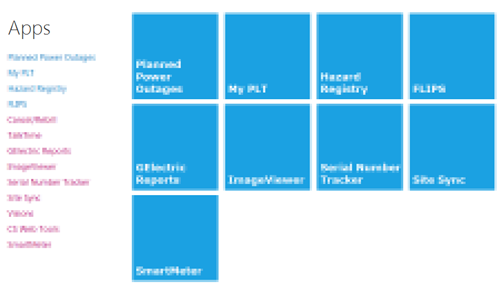
And here’s the result:

Nice and clean.
If your admins need to get to the underlying system pages just navigate to “/_layouts/viewlsts.aspx” and they can navigate around normally from there. You could also create a link on the main page for that, even wrap it in a security token so only admins can see it!
I have a blog post in the works on turning those pretty Metro icons into Live Tiles with data from the subsites, but that’s for another day.
Until then, enjoy!


