Archives
-
Day-to-day with Subversion
How many times have you said "What version is in production?" or "Can we rebuild production to fix a bug and release an update?"
Better yet my favourite:
"We're working on Feature Y so we can't fix the bug for Feature X. Doing so would mean we deploy part of Feature X and Y with the patch!"
These are typical problems with source control, patching, and keeping your working flowing. Often it's hard to keep track of what's being worked on vs. what was already deployed. Sometimes you end up deploying something not tested or "ready for primetime". For example, at one point I was deploying screens and we had to pass along explicit instructions to the QA folks to "not touch that button!" because we hadn't finished the backend or our own testing. Of course, they touched it and logged a bug. Still, we often run into the problem of working on one set of features while testing another.
Recently we've switched over (not fully yet, but most of the projects are going there) from TFS to Subversion. TFS is just a bloody nightmare when it comes to trying to keep the trunk revision stable while performing updates on branches and not getting into a merge from hell scenario, which is sometimes typical when you have branches.
In doing the switch, we landed on a solution around branching code for new features and keeping the trunk clean. Branching is a hot topic in source control circles and has been known to start holy wars. In my past life (like a month ago) I avoided branches like the plague. This is probably due to the fact that branching (and more importantly the merge back) in TFS and VSS was like a live enema. Not something you want to do every day.
However in working through the process in a few projects and experiencing the daily merge routine first-hand, it's become my friend and makes for building systems along a feature driven development stream much easier. Here's how the process goes and all the details on each step.
Revision 1
Code and screenshots are always the best way to work through a process. While the code here is trivial (just a WinForms app with a few custom forms and dialogs) the principles are the same no matter how big your project is.
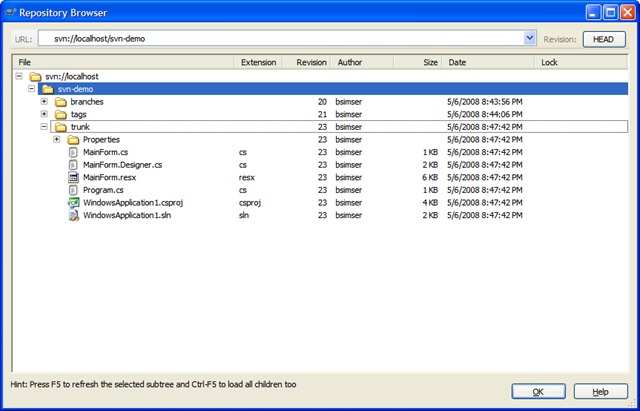
First we setup our subversion repository for the project. The typical setup is to create three folders in the repository; branches, tags, and trunk. Branches hold any branches you work on for new feature development; Tags contains named copies of revisions representing some point in time (perhaps a deployment); Trunk contains the main codebase and is always stable. These become vital to organizing your code and not clobbering other work going on as we'll see as go along.
Here's our sample repository in TortoiseSVN:
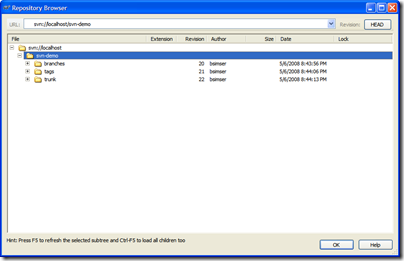
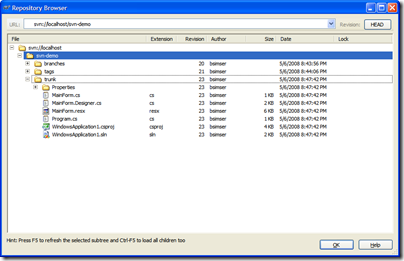
We'll start with revision 1, the basic application (the proverbial WinForms "Hello World!"). A single application with a single form. Check this in to Subversion into the trunk path. This gives us an updated repository:
Now your day to day work begins. The trunk revision is the most important (aka "The King"). Any other work being done will happen in branches and are known as servants. Servants are important but they take less priority than The King. The most important and highest priority work being done is the King (and there is only one king, viva Las Vegas baby!).
Fast forward to day 10 of our development cycle. We've been adding forms and code (all committed to the trunk by various people) and it's time to do a release. A release is cut (using whatever process you use here, the details are not important) and deployed. At that point we want to tag the release.
Tag and Deploy
Tagging is a way to identify a set of code, a snapshot, so you can retrieve it later. Once tagged, we can go back to the revision and all files from that point in time to rebuild the system. This is mainly a deployment thing. For example, you tag the release "1.0" and then continue on. At some point in the future you can check the code out using that tag, rebuild it, and it will be the same as the day you deployed it.
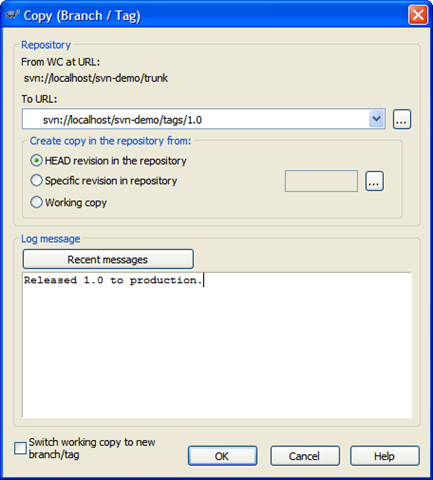
We'll tag our release as "1.0". This creates what looks like an entire copy of the code in the "tags" folder, but in reality it's all virtual. Unlike "other" source control systems, this doesn't actually make a copy and the magic of Subversion will let us pull this tag out and all the code associated with that later.
To tagging and creating branches is essentially the same act (it's the same dialog box) but will differ in where you put the tag. Subversion does not have special commands for branching or tagging, but uses so-called cheap copies instead. Cheap copies are similar to hard links in Unix, which means that instead of making a complete copy in the repository, an internal link is created, pointing to a specific tree/revision. As a result branches and tags are very quick to create, and take up almost no extra space in the repository.
So while the dialog box says "Copy" you're creating this cheap copy. Don't get miffed if you're project is huge, tagging takes next to nothing. Here's our tag ready to go:
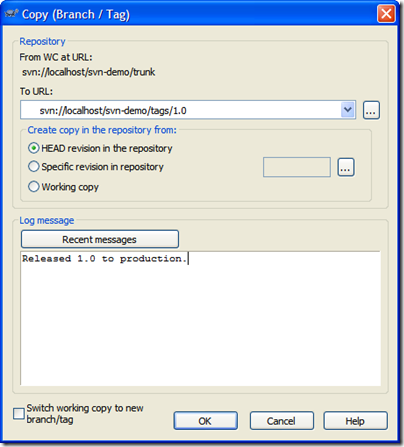
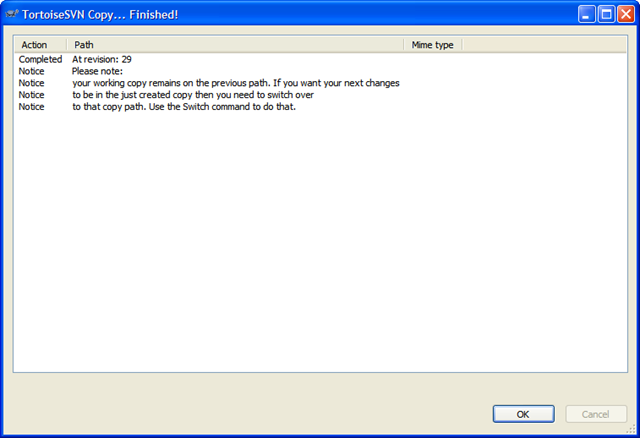
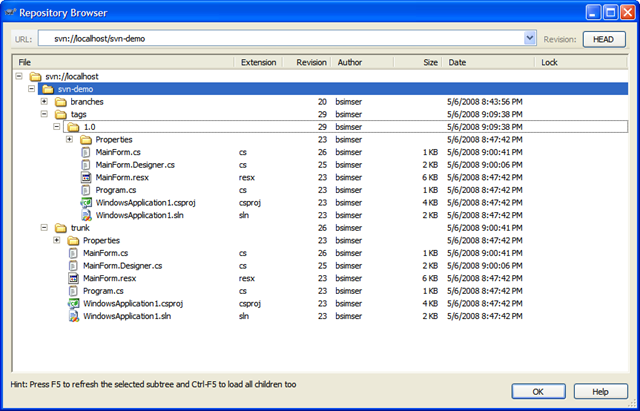
For tagging, you generally won't want to click on the "Switch working copy to new branch/tag" checkbox. Tags are just snapshots in time and you go along your merry way in the trunk. For branches we'll be doing something different. So after you create the tag, don't be alarmed when you see this message in TortoiseSVN:

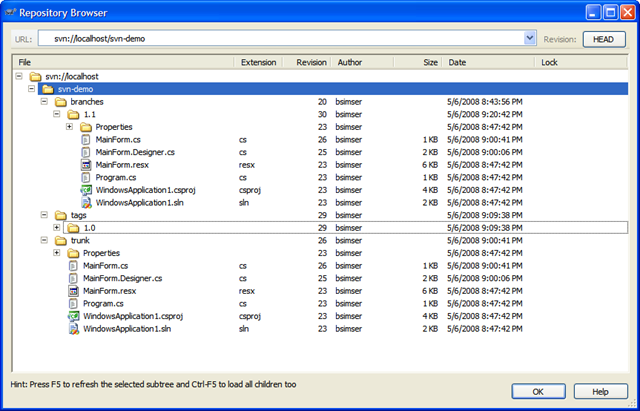
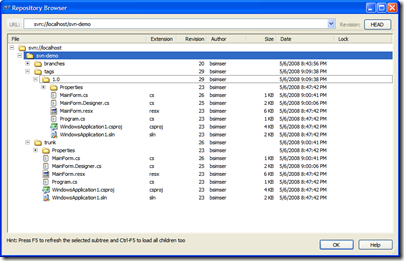
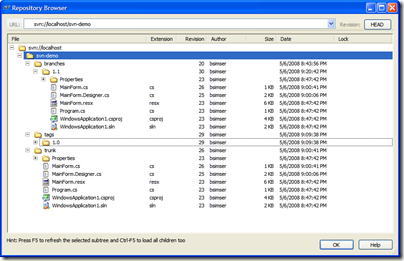
And here's the repository tree after the tag. Note the tags folder has a new entry, "1.0" which contains an exact copy of what's in the "trunk", our King.
Now comes the fun. We've tagged the work and deployed. At any point in time we can go back and redeploy this version by pulling out the "1.0" tag and building/deploying from there. At this point is where we branch. We want to work in a new feature set. This is going to involve new dialogs and new code.
Branching New Features
Why do we branch? Isn't branching bad?
No. Branching, when used this way keeps your trunk clean. Remember, there can only be one King (trunk). Any other work is a servant and will eventually go into the trunk.
Why again do we branch? Imagine if we didn't branch. So right after you apply the "1.0" tag start modifying trunk. Sure, we can go back to "1.0" but how are we going to get any changes merged together when we're on a single line? We're also violating the "One King" rule. Who's the King now? Our new branch becomes a servant. The King still takes priority (for example to fix bugs) but work will continue on in the servant branch.
Walk with me on this, by the end you'll see what the branch is for and why we want it.
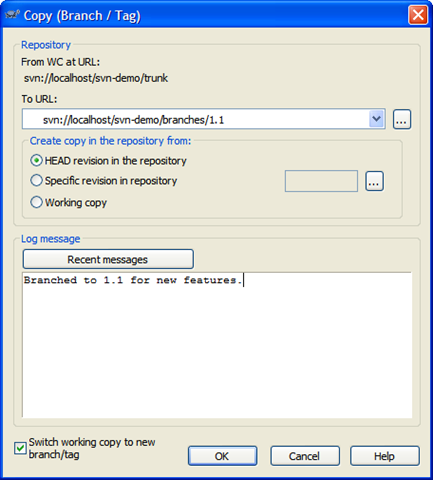
We'll create a new branch just like creating a tag. Call the branch "1.1" except in this case, we're going to switch to the branch as our working copy. Here's the branch dialog:
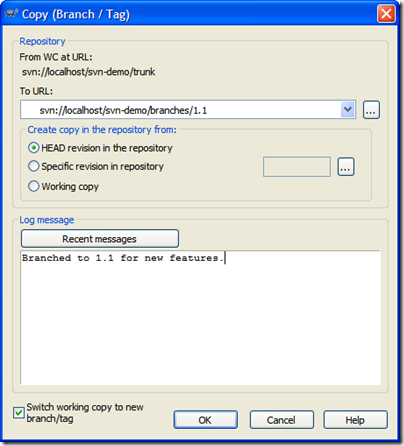
And here's the repository after the branch. Our work is now all going to be committed to the "svn-demo/branches/1.1" branch, keeping the trunk clean.
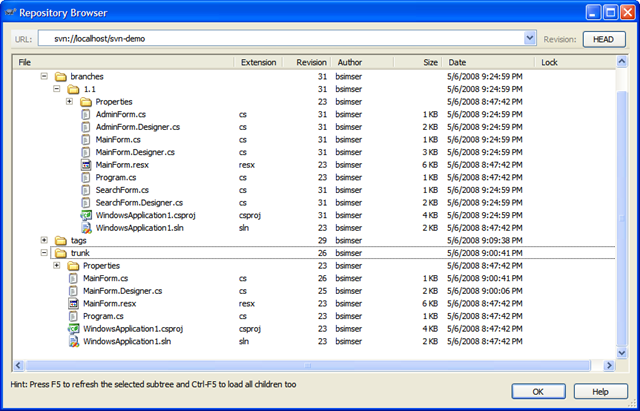
Work in the 1.1 branch is underway with new features being added. We've created a few new forms, modified the main form, and generally added new functionality. The 1.1 branch is quite different from the original trunk it came from now:

A couple of scenarios will arise out of this. For example, if there's a bug found in the 1.0 version we deployed what do you do? You don't want to dirty the 1.0 tag. That's why trunk is King (and there is only one King). "trunk" is still the most important thing being worked on (at this point its in testing or production or whatever). Until it's verified, everyone else is a servant. Any problems found in "trunk" can be resolved on trunk. So we'll explore that scenario.
Waiter, There's a Bug in my Trunk!
There's a problem with 1.0. The window title is wrong. It reads "Hello World!" but it should read "Hello World?".
Huge problem! Stop the presses. Halt the line. We need to fix this now!
You may be tempted to create a branch, fix it, then merge the branch back into trunk. This might be normal, but our trunk is clean so we can just work with it directly. Check out a copy of trunk to a local directory and we'll do the fix. Then commit it back. Now here's the updated repository:
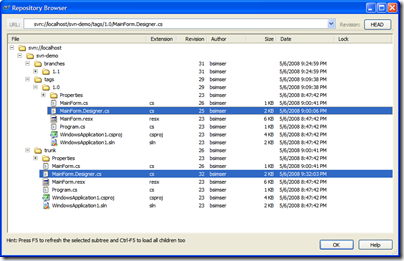
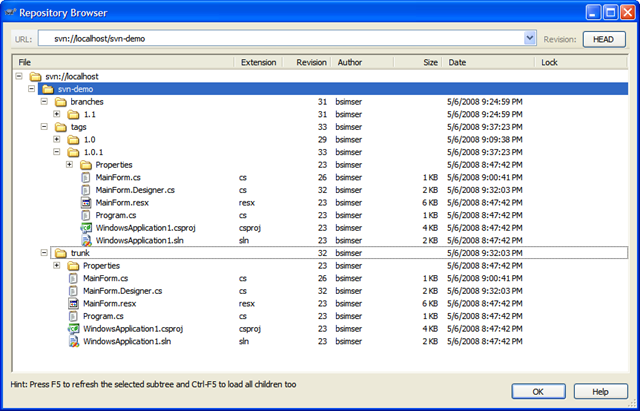
I've highlighted the file that changed in both versions. "/tags/1.0" is our deployed version (revision 25), "/trunk" is our bug fix update (revision 32). We can still, at any point, re-deploy "1.0" without any problems.
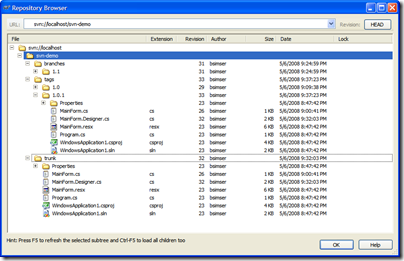
We'll do a deploy of our new trunk (which we'll call "1.0.1") and a series of exhaustive and intensive tests beings. Weeks pass testing our massive change and finally QA accepts the version and allows it be deployed to production. This will replace "1.0" in production with "1.0.1" and the updated title bar. Tag trunk as "1.0.1" like we did "1.0" above and we'll now have this in our repository:
The Graph is your Friend
TortoiseSVN has a wonderful feature called "Revision Graph" which gives you a visual tree of your branches and tags and revisions. You will live and die by this tool. Here's ours so far:
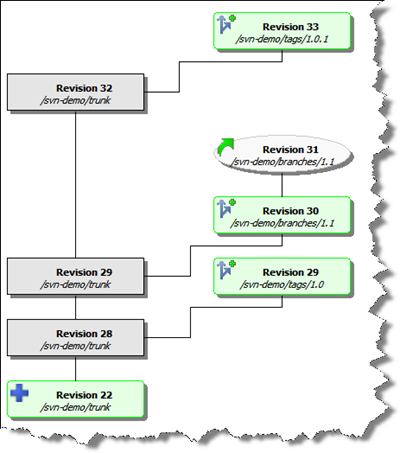
From this visual we can assess:
- A tag called "1.0" was created from the trunk at revision 28, creating revision 29
- A branch called "1.1" was created from the trunk at revision 29
- Work continues on the "1.1" branch with daily commits (so far at revision 31)
- A tag called "1.0.1" was created from the trunk (after a bug fix) at revision 32, creating revision 33
At this point I want to point out some major advantages with this approach:
- You can rebuild any deployed release easily (well, as long as you tagged it in the first place)
- Fixes can be done to the trunk and deployed quickly
- Work can continue on separate features without disturbing the main work
Day to Day Merges
So now we have a bit of a disconnect don't we? The trunk (revision 32) and the re-deployed tagged version (1.0.1, revision 33) contains the fix we need however we're working on Feature X in the 1.1 branch. We don't have that fix. If we were to merge our code back to the trunk (which we will have to do at some point) we might miss this fix, or worse yet clobber it.
To avoid this problem, anyone working in a branch follows one simple rule. Each day (say at the start of the day) you update your branch from the trunk. In other words, you pick up any changes that have been applied to the trunk into your little branched world. Doing this will avoid any merge issues when you commit your branch back to the trunk.
We do this with a merge. It's a simple merge but one that has to happen, and merges can get complicated and ugly. In your working directory where you're commits are happening on the branch, you won't see changes to trunk.
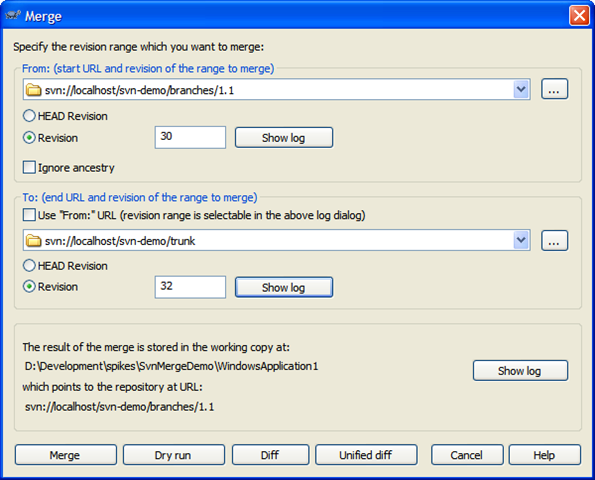
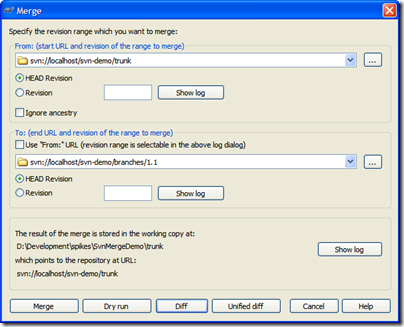
Here's the merge dialog that we perform on a daily basis. We'll merge changes from the trunk into the 1.1 branch:
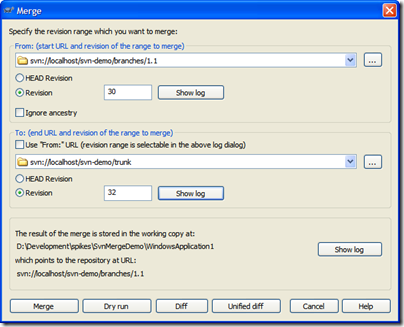
A few notes about this merge:
- We merge from the branch and specify the branch in the top section. This seems backwards but we're merging "from a point in time" which needs to be the last revision when the two trees (trunk and branch) were synchronized. Remember, we're looking for all the changes "from trunk to branch" since we branched. The revision graph is essential in determining this. In our case, this is our first sync and is when we created the branch (revision 30).
- By default the merge to uses the "From" value but we want to merge into our branch so uncheck this and pick the trunk in the "To" section. For the trunk we're going to pick the HEAD revision but this happens to be revision 32. Picking either HEAD or revision 32 here results in the same merge.
- Confirm the location and behaviour you expect in the bottom section. The working copy should be your current working folder, and it should end up pointing at your current branch
- Always (always) do a Dry run first and confirm the updates your going to do are correct.
So in this merge we expect to get the changes to MainForm.Designer.cs (that title change bug). If we had selected the HEAD revision for our branch version rather than the time where the branch split off from trunk, we would be comparing all the changes. This would result in the dry run telling us we have new forms. This is incorrect because a) we only want the changes from trunk and b) trunk doesn't know (or need to know) about any new forms we created. We're only interested in the changes made on trunk that we don't have yet.
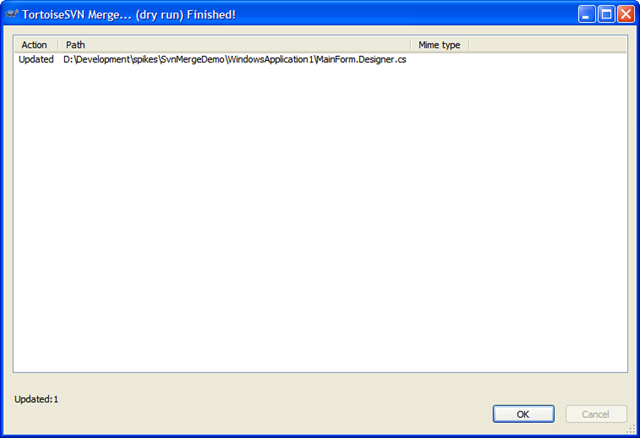
Here's the dry run dialog with the proper response (based on the last merge dialog):
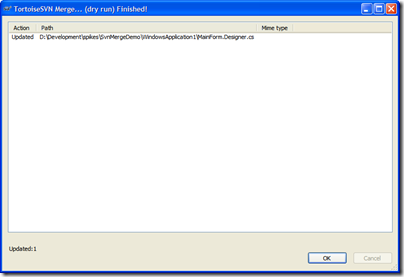
Perfect! We just want the changes to MainForm.Designer.cs (or whatever files changed since we last sync' d) and we got them. Execute this to get the new changes from trunk into your branch.
When you do a merge, you're merging those changes into your working copy but you're still one more step away. This will modify your working code but now you have to commit it back to the repository. If you check your updates you'll see that the MainForm.Designer.cs file has changed. Here's the unified diff of the changes:
Index: D:/Development/spikes/SvnMergeDemo/WindowsApplication1/MainForm.Designer.cs
===================================================================
--- D:/Development/spikes/SvnMergeDemo/WindowsApplication1/MainForm.Designer.cs (revision 31)
+++ D:/Development/spikes/SvnMergeDemo/WindowsApplication1/MainForm.Designer.cs (working copy)
@@ -61,7 +61,7 @@
this.Controls.Add(this.button1);
this.Name = "MainForm";
this.StartPosition = System.Windows.Forms.FormStartPosition.CenterScreen;
- this.Text = "Hello World!";
+ this.Text = "Hello World?";
this.Load += new System.EventHandler(this.MainForm_Load);
this.ResumeLayout(false);As you can see, the title bar change is here and replaces our old (buggy) version.
Commit this to the repository. Your branch now has the changes from trunk and you can continue on with your new feature work.
Remember, the key point of working in the branch is we don't pollute the trunk with our new dialogs or code, yet doing this daily merge (which will take all of 5 minutes on any codebase, trust me ;) keeps your branch up to date with any changes that may have happened.
Getting back to trunk
As we continue with our day to day work in the 1.1 branch, more changes might happen with trunk. More bug fixes, etc. However we don't introduce new features. We only add things on our branch. In the rare instance we're building a new feature while another feature is in play, we might create another branch with another team. I would however keep the number of active branches going on to a minimum. It'll just get ugly later in life.
In any case, we continue with our branch until we're ready to deploy. At this point we probably have a stable trunk (we should always have a stable trunk) with a number of tags. All changes in the trunk are in our branch and the team has decided it's time to deploy a new version to replace 1.0.1. This is our 1.1 branch and we need to merge all the new stuff in 1.1 back into trunk.
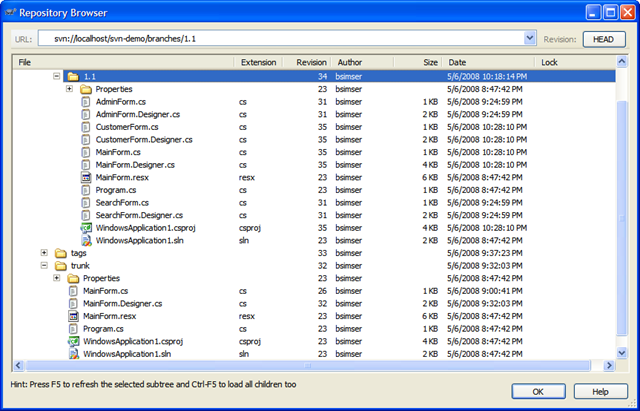
Here's our repository as it stands:
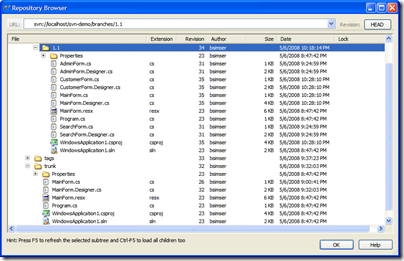
- The 1.1 branch contains all of our new work, 3 additional forms and some changes to the main form to invoke our new forms
- As a result of our daily "merge from trunk" routine, we have any bug fixes or changes that were done in trunk
- Our trunk is clean and the version that was deployed (with various tags in our tags folder)
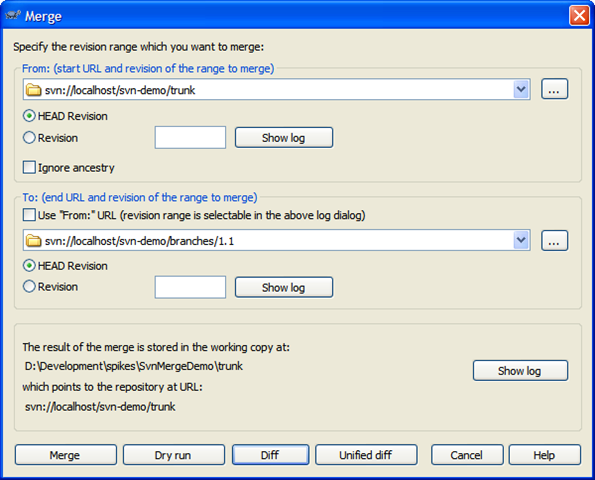
To merge back into the trunk it's the opposite of what we do on a daily basis. Rather than merging into the branch, we reverse it and merge into trunk. Also, you'll need a working copy of trunk to merge into. Check out trunk into a folder and invoke the merge. Again, the key point here is to pick the right revision. For the branch it'll be the HEAD revision. For trunk, it's the last point of synchronization which in this case is revision 32. Here's the merge dialog to commit our 1.1. features to the trunk.
In this case, we're committing to a working folder with a copy of trunk checked out to it. Click on Diff to see what changes are going to be applied:

Here we've added our new forms and there's changes to the MainForm.cs and MainForm.Designer.cs (we've added buttons to invoke the new dialogs). Here's the unified diff of MainForm.Designer.cs (with some lines removed for brevity):
Index: MainForm.Designer.cs
===================================================================
--- MainForm.Designer.cs (.../trunk) (revision 35)
+++ MainForm.Designer.cs (.../branches/1.1) (revision 35)
@@ -28,13 +28,49 @@
/// </summary>
private void InitializeComponent()
{
+ this.button1 = new System.Windows.Forms.Button();
+ this.button2 = new System.Windows.Forms.Button();
+ this.button3 = new System.Windows.Forms.Button();
this.SuspendLayout();
//
+ // button1
+ //
+ this.button1.Location = new System.Drawing.Point(12, 12);
+ this.button1.Text = "Search";
+ //
+ // button2
+ //
+ this.button2.Location = new System.Drawing.Point(12, 41);
+ this.button2.Text = "Admin";
+ //
+ // button3
+ //
+ this.button3.Location = new System.Drawing.Point(12, 70);
+ this.button3.Text = "Customers";
+ //
// MainForm
//
+ this.Controls.Add(this.button3);
+ this.Controls.Add(this.button2);
+ this.Controls.Add(this.button1);
this.Name = "MainForm";
this.StartPosition = System.Windows.Forms.FormStartPosition.CenterScreen;
this.Text = "Hello World?";
@@ -44,6 +80,10 @@
}
#endregion
+
+ private System.Windows.Forms.Button button1;
+ private System.Windows.Forms.Button button2;
+ private System.Windows.Forms.Button button3;
}
}Note towards the bottom of this diff, this.Text = "Hello World?". This was the result of our daily merge so there's nothing to be applied back to trunk. We're in sync here. Only the changes/additions/deletions are applied which will bring "trunk" up to par with the 1.1 branch work. Again, do your dry run. You should see only the new work done in the branch as being applied to trunk. If not; stop, drop, and roll and recheck your revisions.
Again, the trunk now is merged together with the 1.1 branch. At this point you'll want to load the solution up, build it, run unit tests, etc. and do a sanity check that everything works as expected. You would probably do your deployment and tag the new trunk as "1.1".
You can just simply ditch the branch folder or leave it there in the repository. After all, it's just a symbolic link and doesn't take up much space (we have a new tag created in our repository on every CruiseControl.NET build so there are hundreds of tags, no big deal).
Lather, Rinse, Repeat
Now you're back on the trunk. Trunk is King, there is only one King, and your day to day work continues with whatever feature you're working on. You have the option to "always live in the branch" which might be an idea but this requires that daily merge from trunk and could cause problems. There's no problem "running on trunk" and building from it. The point at which you branch should be when you do a release and want to continue on with new (different) work, otherwise daily commits to trunk by the entire team is fine.
When a new feature comes along, branch, move part of the team (or the entire team) to that branch and keep trunk clean, doing any bug fixes as they come up. Then merge back from the feature branch back into trunk at the appropriate time. Keep doing this as often as necessary, until you run out of money or the team quits. Sit back, relax, and enjoy the simplicity of life.
Conclusion
It may seem complicated but it's really pretty basic when you boil it down. Just follow a few simple rules:
- On a daily basis, developers in branches merge changes from the trunk into their branch
- Merge branch features back into trunk when you're ready to deploy
- Bug fixes are performed on the trunk then tagged and re-deployed
Give it a shot, email me if you're stuck or lost, or let me know what your experiences are.
Enjoy!
-
Can you small wht the code is craking?
D'Arcy posted a link to a new MSDN contest called Crack the Code. Basically use your uber sluething developer skillz to... oh I don't know. I guess it's a guess the numbers game or something. They post clues and you "crack" them with your amazing developer knowledge. Justice will probably struggle with filling out the registration form but if you can get past that, you're golden.
Hey, a $4000 Future Shop gift card isn't bad but the contest doesn't seem to work for me. For example, it told me I already solved puzzle #2 but won't let me into puzzle #3 nor did it give me the unlock code. And I actually don't remember solving puzzle #2 so I must have been sleeping during that period in my life. Nice.
However this error was the best. During the course of trying the quiz out, I'm not sure if this is someone's idea of a joke or just plain bad English?
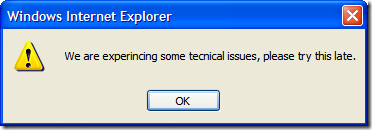
I believe this dialog belongs in the Interface Hall of Shame.
-
Invalid SharePoint URL Character Cheat Sheet
A few days ago I posted some code to clean out invalid characters in SharePoint URLs. Someone suggested using the SPEncode.IsLegalCharInUrl method to do this. While this might be easy if you're in SharePoint land, I don't like having a dependency on SharePoint assemblies for this sort of thing and want it in my own validation code (besides, the hoops SPEncode.IsLegalCharInUrl goes through, you can't unit test it, trust me).
After some digging I determined the list of valid and invalid characters. Only the first 128 characters in the ASCII character set are processed for validation so anything beyond that is considered invalid. It's fairly simple, pretty much everything from "@" through to "z" is valid (with a few exceptions). Here's the list as I couldn't find it posted anywhere and thought it would be useful as a cheat sheet.
Valid? Character Hex Value No [NULL] 0 No ☺ 1 No ☻ 2 No ♥ 3 No ♦ 4 No ♣ 5 No ♠ 6 No 7 No [BS] 8 No [TAB] 9 No [CR] A No ♂ B No ♀ C No [LF] D No ♫ E No ☼ F No ► 10 No ◄ 11 No ↕ 12 No ‼ 13 No ¶ 14 No § 15 No ▬ 16 No ↨ 17 No ↑ 18 No ↓ 19 No → 1A No ← 1B No ∟ 1C No ↔ 1D No ▲ 1E No ▼ 1F Yes [SPC] 20 Yes ! 21 No " 22 No # 23 Yes $ 24 No % 25 No & 26 Yes ' 27 Yes ( 28 Yes ) 29 No * 2A Yes + 2B Yes , 2C Yes - 2D Yes . 2E Yes / 2F Yes 0 30 Yes 1 31 Yes 2 32 Yes 3 33 Yes 4 34 Yes 5 35 Yes 6 36 Yes 7 37 Yes 8 38 Yes 9 39 No : 3A Yes ; 3B No < 3C Yes = 3D No > 3E No ? 3F Yes @ 40 Yes A 41 Yes B 42 Yes C 43 Yes D 44 Yes E 45 Yes F 46 Yes G 47 Yes H 48 Yes I 49 Yes J 4A Yes K 4B Yes L 4C Yes M 4D Yes N 4E Yes O 4F Yes P 50 Yes Q 51 Yes R 52 Yes S 53 Yes T 54 Yes U 55 Yes V 56 Yes W 57 Yes X 58 Yes Y 59 Yes Z 5A Yes [ 5B No \ 5C Yes ] 5D Yes ^ 5E Yes _ 5F Yes ` 60 Yes a 61 Yes b 62 Yes c 63 Yes d 64 Yes e 65 Yes f 66 Yes g 67 Yes h 68 Yes i 69 Yes j 6A Yes k 6B Yes l 6C Yes m 6D Yes n 6E Yes o 6F Yes p 70 Yes q 71 Yes r 72 Yes s 73 Yes t 74 Yes u 75 Yes v 76 Yes w 77 Yes x 78 Yes y 79 Yes z 7A No { 7B No | 7C No } 7D No ~ 7E No ⌂ 7F