Contents tagged with Game Development
-
Terrarium, Terrarium, Terrarium
I'm presenting a talk around Terrarium development at the Edmonton .NET User Group on September 25th. The talk is focused on upgrading a legacy app (1.1) to 2.0 (and beyond to 3.5 eventually), building and running your own Terrarium (complete with man-eating critters), and the future roadmap.

Here's the session abstract:
Terrarium was created by members of the .NET Framework team in the .NET Framework 1.0 timeframe and was used initially as an internal test application. In Terrarium, you can create herbivores, carnivores, or plants and then introduce them into a peer-to-peer, networked ecosystem where they complete for survival. Terrarium demonstrates some of the features of the .NET Framework, including Windows Forms integration with DirectX; XML Web services; support for peer-to-peer networking; support for multiple programming languages; the capability to update smart client, or Windows-based, applications via a remote Web server; and the evidence-based and code access security infrastructure. This session is to explore the newly open sourced tool and talk about aspects and challenges around porting the 1.1 code to 2.0, introducing new framework features, updating the architecture. As well, we’ll look at building new creatures to introduce to your terrarium; how the entire eco-system works from a developers perspective, and the future roadmap where the Terrarium community is going.
I'll also be presenting the same session to the Calgary .NET User Group, we're just finalizing a date. See you there!
Update: The Calgary .NET User Group presentation is confirmed for October 1st. Details can be found here on their site. The talk will be titled "The interaction of feeding and mating in the software development control of a Terrarium".
-
Public Terrarium Server Available
I’ve put my own server up and running for you to connect to with the new Terrarium Client and upload your critters to. It’s available at http://www.terrariumserver.com (and will be the default new server in the next build).

To configure your Terrarium Client to talk to the new server, on the main screen find the icon (2nd one in) that will take you to the settings screen:

Click on this and you’ll see this dialog:

Enter in the values you see above (http://www.terrariumserver.com) and you’ll be good to go. The server is running right now and waiting for creatures to be uploaded so good luck and please use it. Please don’t be abusive as this is a free service and I don’t want to have to spend a lot of time maintaining this guy.
I’m working on two additional sites. http://wiki.terrariumserver.com will host a public wiki that you can exchange design tips, ideas, and strategies with each other. http://creations.terrariumserver.com will become a Digg like community for creatures where you can showcase your work and vote on other peoples animals.
Watch for the new sites to come online in the next week or two (just trying to get the wiki setup before I leave for vaction but having site creation problems).
Enjoy!
-
Terrarium for Vista, whoops…
My bad. I don’t run Vista. Really. I don’t like it, it’s glacially slow, and doesn’t give me anything as a developer (except more flashy looking Explorer screens and maybe a Start menu I can search). So I’m an XP boy, however that was a bad mistake on my part with the release of Terrarium.
Vista users were getting an exception message and it was pretty quick to see that it was a DirectX problem. The problem was a) Vista doesn’t support DirectX 7 which Terrarium requires and b) Bil is an idiot for not thinking about this. Again, my bad and I apologize.
So first off there’s a quick fix (which I can’t test myself, but according to comments on Scott’s blog it works).
- Find an XP machine and grab the following older DirectX DLLs:
- Run regsvr32.exe against the dx7vb.dll and dx8vb.dll
- Drop everything in the %SYSDIR%\system32 folder
d3drm.dll
dx7vb.dll
dx8vb.dllThat should fix you up in the interim. Unfortunately I cannot redistribute the files to you as they’re MS property and all that jazz.
For longer term, I’m ripping out the DirectX COM calls (which are actually wrappers to wrappers) that are in the current codebase and calling the DirectX managed ones provided in DirectX 9. This will probably result in not only a more readable codebase (and one that works on Vista) but it might even gain a little performance along the way.
The managed DirectX classes Microsoft provides in DirectX 9 are pretty nice and rather than a bevy of cryptic constants, enums and ref objects everywhere they’re all wrapped up in a nice OO-like package for you.
For example here’s the old DX7 code (ugly COM and DirectX goo):
1: /// <summary>
2: /// Determines if the surface is in video memory
3: /// or system memory.
4: /// </summary>
5: public bool InVideo
6: {7: get8: {9: if (surface != null)
10: {11: DDSCAPS2 ddsc = new DDSCAPS2();
12: surface.GetCaps(ref ddsc);
13: if ((ddsc.lCaps & CONST_DDSURFACECAPSFLAGS.DDSCAPS_VIDEOMEMORY) > 0)
14: {15: return true;
16: }17: }18: return false;
19: }20: }As with most DirectX code you come across, it’s rather cryptic and ugly. Here’s what this method will look like after the conversion to use the DirectX managed classes:
1: public bool InVideo
2: {3: get4: {5: if (surface != null)
6: {7: SurfaceCaps ddsc = surface.SurfaceDescription.SurfaceCaps;8: return ddsc.VideoMemory;
9: }10: return false;
11: }12: }Much nicer and more readable (well, as readable as DirectX code can ever be).
In any case, this is a better place to be but it’ll be awhile before I can commit all this work (and I’m flying without unit tests which is killing me here). I’m now re-living my past life when I knew what DDSCAPS_VIDEOMEMORY was (and regretting it as it all comes flashing back to me now). This probably won’t get us much closer to an XNA implementation of Terrarium but it’ll cause me to pull out less of my hair when we do (I think).
This fix will be in a 2.1 release that I’ll pump out when I get back from vanishing into the backwoods of British Columbia next week (sorry, but we geeks do need our downtime once in awhile).
I really need to sit down with Kyle Baley and Donald Belcham at ALT.NET Canada and have a few beers over this Brownfield effort for sure.
-
Reintroducing Terrarium, now with 2.0 goodness!
 To skip to the chase… http://www.codeplex.com/terrarium2
Origins
A long time ago, on a development team far, far, away, some bright dude (or dudette) came up with the idea of Terrarium.
Terrarium was a .NET 1.x game/learning tool that was aimed at getting people interested in .NET and building cool stuff. In Terrarium, you can create herbivores, carnivores, or plants and then introduce them into a peer-to-peer, networked ecosystem where they complete for survival. Terrarium demonstrates some of the features of the .NET Framework, including Windows Forms integration with DirectX®; XML Web services; support for peer-to-peer networking; support for multiple programming languages; the capability to update smart client, or Windows-based, applications via a remote Web server; and the evidence-based and code access security infrastructure.
Terrarium was created by members of the .NET Framework team in the .NET Framework 1.0 timeframe and was used initially as an internal test application. At conferences and via online chats, Terrarium provided a great way for developers to learn about the new .NET programming model and languages as they developed creatures and introduced them into a peer-to-peer ecosystem.
The Windows SDK team evolved the game in the .NET Framework 2.0 timeframe, but it wasn’t worked on for over two years. As a result, the source code for Terrarium 2.0 doesn’t use the very latest .NET technologies.
Now here we are and it’s 2008, long past that 1.x product. A few months ago I got the bright idea to resurrect the project. After all, 1.x was long gone from the developers toolkit but the premise of building battle bugs and having them duke it out in a virtual eco-system was still just too plain cool to pass up. I thought it would make for an interesting project and get some renewed interest in .NET, and more specifically upgrade it to the latest framework and goodies out there. Hey, XNA is here and writing DirectX goo is a thing of the past.
The Long And Winding Road
So with my ambition and fearlessness of the Microsoft release monster, I trudged into the mouth of the beast. I hit up as many people I could find that were still around and pinged them about Terrarium.
Terrari-who?
That’s the general response I got for the most part. It’s been 6+ years and most of the original team has moved on. The challenge was to get anyone in Microsoft to find the unreleased source to this project, let alone even remember it.

I pictured a giant warehouse much like the last scene in Raiders of the Lost Ark. Boxes and boxes with cryptic product codes and license keys on them, all packaged up for someone to unearth someday. That someone was going to be me. Terrarium is my Lost Ark. So I persevered and continued to bug everyone I knew, finally ending up at Scott Guthrie who finally put me in touch with Lisa Supinski, Group Manager with the current Windows SDK team.
Lisa was instrumental at getting everything going and handling all the details of making this a reality. Without her, it wouldn’t have come to this point. From there the journey was fraught with danger, snakes, legal papers to read, source code to fix, and agreements to sign (did I mention the snakes?) and lots of emails, phone calls, and secret handshakes.
The fruit of our labour is upon us so now I proudly present…
Terrarium 2, Electric Boogaloo!

(okay, we’ll drop the Electric Boogaloo part)
Here We Go
The new Terrarium comes in two forms, the client and the server. The client consists of a few parts including a local Terrarium client executable (which also doubles as a screensaver), and SDK documentation and samples for building your own creations. The local Terrarium client and run your own critters but you’ll need a server to connect to if you want it to interact with other creations.
The client can run in two modes:
- Terrarium Mode – 1) The user may run alone, without peers. In this case, the ecosystem presented on the screen represents the whole of the ecosystem. This is good for creature testing purposes. 2) The user may also elect to join with a select group of peers, expanding the ecosystem across all of the participating peer computers. This is simple to do. Each participating user opts into a special, private network by entering an agreed upon character string in the “channel” textbox on the Terrarium console. Upon entering that string, the user’s computer is matched with only those computers which also entered that same string.
- Ecosystem Mode – This is the standard mode, in which the user’s computer runs just a small slice of an ecosystem which spans all of the participating peer computers, worldwide.
In both modes, you can develop your own creatures or you can watch as other developers’ creatures battle it out for survival by running Terrarium as a standalone application or as a screensaver.
The server is two parts. First there’s the web server part which consists of a single web server that provides a user interface for monitoring a Terrarium server (and all the critters uploaded to it) and there are web services that are consumed by the client (for uploading creatures, getting stats, interacting with peers, etc.). The server also includes some SQL scripts and installation instructions for setting up the database. Any flavour of SQL Server will work (2000, 2005, Express). 2008 is untested but should work fine. The scripts are pretty simple (the tables are pretty basic) and there are some stored procedures which could be ported to work with other servers (MySQL, Firebird, etc.) but that’s an exercise I’ll leave to the reader.
Custom Creatures
When creating a creature, you have control over everything from genetic traits (eyesight, speed, defensive power, attacking power, etc.) to behaviour (the algorithms for locating prey, moving, attacking, etc.) to reproduction (how often a creature will give birth and what “genetic information,” if any, will be passed on to its offspring). Upon completing the development process, the code is compiled into an assembly (dynamically linked library, or DLL) that can be loaded into the local ecosystem slice, viewable through the Terrarium console. When a creature is initially introduced in Ecosystem Mode, ten instances of it are scattered throughout the local ecosystem. No more instances of that creature may be introduced by that user or any other on the network until the creature has died off completely. By contrast, if running in Terrarium Mode, an infinite number of instances of a given creature may be entered into the environment.
Once the creature is loaded into Terrarium, it acts on the instructions supplied by its code. Each creature is granted between 2 and 5 milliseconds (depending on the speed of the machine) to act before it is destroyed. This prevents any one creature from hogging the processor and halting the game.
Within each peer in the network, a blue “teleporter” ball rolls randomly about. If the user is running with active peers logged in (either in Ecosystem Mode or using a private channel in Terrarium Mode), whenever this blue ball rolls over a creature, that creature is transported to a randomly selected peer machine.
In the SDK zip file there’s a help file and several samples to get you up and running instantly with a local Terrarium. Feel free to modify these or use them as a starter for your own new creations. Code samples are in both VB.NET and C#.
The Road Ahead

Putting Terrarium on CodePlex was intentional as it’s meant to be a collaborative piece. Getting the system out there is three fold and having it on CodePlex supports this:
- Get the code out there for all to see and dissect
- Get people setting up Terrarium servers and creating bugs (virtual ones for the game, not defects)
- Extending the game as a learning tool and introducing new features to breathe new life into this puppy
Like I said, the current build is for 2.0. I didn’t want to delay the release while I upgraded it to 3.5 since I wasn’t going to be adding any value (yet) to the codebase and there might be some challenges with 3.5 and the DirectX code (I haven’t tried an upgrade yet, so it could “just work”). The other challenge is driven by you, being the fact that not everyone is building in Visual Studio 2008 and targeting the 3.5 framework. So I didn’t want to exclude a large number of developers by forcing them to 3.5. I think time will tell (via the CodePlex forums and feedback on this project) when the right time to move to 3.5 will be (and how, for example will we maintain a 2.0 and 3.5 codebase?). I don’t have all the answers but I’m here to listen and juggle the kittens for everyone.
What’s planned? Here’s my product backlog that will probably make it’s way onto the Issues page on the CodePlex project. These are just seeds for ideas, I’m sure you guys can come up with better ones.
- 3.5 framework/Visual Studio 2008 upgrade (possibly split off and have dual solutions/project files?)
- Leverage 2.0 language features. Much of the code was 1.1 so generics and other goodness wasn’t there. The current codebase is compiled and built on Visual Studio 2005/2.0 Framework but not really making use of the features (yet). For example, all WinForms are 1.1 style (i.e. no partial classes). Same with the 3.5 upgrade where more cool stuff could be done all over the codebase.
- Extend the current system by adding new features. Not sure off the top of my head what those features would be but there’s plenty of room for improvement.
- Bug hunt. I don’t have a list from Microsoft of bugs that were there but no software is perfect. I’m sure things will crop up. We’ll log them in the Issue tracker, you guys should vote on them, and we’ll fix them up as they’re prioritized by popularity.
- ClickOnce install of the Terrarium Client from a Terrarium Server. This would be a nice-to-have since ClickOnce is a breeze to keep clients updated. However it would require some reshuffling of the current client as it requires additional files and ClickOnce has limitations on what it can put on a users machine.
- VSI project template add-ons so people can create new creatures in Visual Studio quickly and easily (this would be a value-added mod and pretty simple to do).
- XNA upgrade/port. This is pretty major as DirectX isn’t really all that abstracted away in the current system but the hope would be to bring Terrarium to the Xbox 360 (complete with networking support). This is probably a 4.0 release that could be a year or so away (but would kick the llamas’ butt)
- Documentation isn’t awesome yet. The SDK help file has been updated and is current (built with the latest release of Sandcastle) but some of the documentation files are a little out of date.
- The server project website is a bit of a mess (read:disaster). It was built in the 1.1 days and never updated. It contains a mixture of code behind files, raw class files, and aspx pages with embedded code. In short, it needs to be rewritten. The web services are okay, although with moving to 3.5 we should probably look at using WCF instead.
Jumping into the project is not for the casual developer. As this codebase came from Microsoft there are some guidelines and constraints we’re going to follow. The first being team members. Please understand this is neither the Blue Monster talking or me being an uber-control freak, it’s just how it is. So if you’re interested in joining the team and contributing there are a few things that have to happen:
- First off, you’ll need to submit a patch to me as a sample of what you’re planning to do or an example of how you’re looking to extend things. This would be something meaningful, but doesn’t have to be an epic contribution (like porting DirectX to XNA). The patch itself won’t go in by me, it’s your golden ticket into the world of the Terrarium team. You will have to modify the codebase with the changes once you gain access (below). I know, it’s rather convoluted and you can beat me up next time you catch me on the street. I don’t make up the rules, I just make sure everyone in the sandbox is playing by them.
- Second, you’ll need to be committed to development. The “submit a patch and run” technique won’t cut it here so we’re looking for some kind of commitment to the project. There’s a signup process involved (requiring you to digitally sign a Microsoft agreement, don’t worry it’s quick, painless, and pretty cool technology to boot) so becoming a team member is a bit more involved than your average open source project.
Like I said, it’s a little more tasking than a typical CodePlex project and there are constraints we can talk about via email or whatever if you’re really interested in enhancing or extending Terrarium and becoming a member of the team.

You can grab the various packages now from the release page on CodePlex here. There are packages in various formats:
- Client – This is the client installer. You can run a local terrarium for testing creations and connecting to remote servers.
- Server – This is the server installer and consists of a webserver along with some SQL server files (and instructions for installation). This allows you to setup a server for other people to upload their beasties to.
- SDK – This contains the documentation for building new animals along with some samples (in both VB and C#). You’ll need the client installed first in order to use this package.
- Source – This is the source code package for the entire system. Unzip this and load it up to do customizations. See the notes above for contributing back to the project.
Just a couple of final notes.
Client/Server versions are very sensitive. This is due to security and not allowing clients to “take over” the server or upload malicious code. So if you’ve decided to create your own fork of the code or are running a “custom” server, be aware that only clients that are keyed to your server (based on version) will work. Other clients may have issues connecting or interacting with your server.
The server setup is not fully automated (and probably could be via a MSBuild script or PowerShell script) so there’s some manual intervention needed. The website installs via an installer but you’ll need to create a database and run the scripts provided then do some manual editing of the web.config file to connect to the db. This is all documented in the server package. If you do spin a server up let us know (via the CodePlex project). Maybe we’ll have a dedicated wiki page with active servers people can connect to or something.
I’m also thinking of setting up a new domain and website for a creature exchange program. Upload your creatures, put them to battle, and show them off. Sort of a Digg for Terrarium. Let me know if you have ideas on this or want to help out (I always have 10x more ideas than I have time for). In any case, they’ll be more blog posts to come on building critters and the fine art of Terrarium A.I. (the “A” is for Artificial and the “I” is for intelligence. Wait, what’s the “A” for again?).
I do have a Terrarium 2.0 server up and running at http://terrariumserver.com that you can use for testing (which may or not be fully operational when you read this due to power outages in Vancouver). It’s a playground but can be used for checking out your battle bugs before you unleash them on other unsuspecting victims. This server will always be running the latest version of the server and have the most current (working) features available.
This is a “1.0” type release since it’s the first release of the source code. A few things (as you’ve read) have been done along the way and it’s by no means perfect or complete. It’s just the first step of the journey.
Differences from the Previous Version
For those that remember (or even still have copies of the old version of the program) I wanted to point out a few differences that you (or may not) notice in comparison.
- Several custom executable are missing from the 2.0 release, namely the custom skin tool and some other utilities. We’re working on finding these and/or rebuilding them.
- The custom charting component was removed from the server website and is not available. The project is trying to stay true to an out-of-the-box experience so the decision was not to clutter up the core project with 3rd party utilities and libraries. This functionality may return in some form, once there’s a way to do it with the core .NET framework
- Documentation you find may refer to items or concepts that are non-existent in the 2.0 version (this is mainly prevalent in the Client UI as that has changed quite a bit). The documentation is an on-going effort and will evolve over time.
- Some “features” in the Client are not working or wired up. For example the “Report a bug” button does nothing. They’ll be various bits and pieces that are like this which, again, will come with time.
Credit where credit is due
While this was my labour of love the past couple of months, I really want to thank everyone involved from the Microsoft side in getting this project going. Shout outs especially to Lisa from the Windows SDK team who’s become my best friend over the past couple of months and really got things moving on the MS side. Without her the Ark would still be boxed up somewhere in that warehouse.
Communities are not created, they’re grown and it takes time. I’m taking a chance on this project (as is Microsoft) in the hopes that it *will* spark some creativity and contribution. The discussion forums on CodePlex are there to talk about it and the Issue Tracker is to suggest features and report bugs. Who knows, given time to grow, we may be talking about this same time next year with a plethora of Terrarium resources out there. At least that would be a nice place to be and it can happen with you.
So there you go. Have at it. Build some creatures, learn some .NET and game programming, but above all… have fun!
-
Will the real Micropolis please stand up?
 This morning I stumbled across a project on SourceForge named Micropolis. Of course this got my attention and after realizing there was nothing there (no code, no web pages, nothing) I fired a note off to Don to see what was up? I knew his distaste of SourceForge and there was talk of setting up a Google code repository. Don visited the SourceForge site and left a nice happy-happy-joy-joy note for the to-be-named-at-a-later-date owner:
Would the person who started this Micropolis project on sourceforge please identify themselves and contact me?
I'm Don Hopkins, dhopkins@DonHopkins.com, who developed SimCity for Unix and Micropolis for the OLPC.
I did not start this sourceforge project myself, and I don't know who did.
This is not the official Micropolis project repository.I strongly want to avoid using sourceforge for hosting the Micropolis project, because I dislike sourceforge's baroque user interface and slow response time, and I absolutely do not want to use CVS.
Sourceforge requires far too many clicks and waits to simply download a file, and it takes far too long for all the heavy weight ads and pointlessly complex php, html and javascript pages to load.
There is never any reason for a web site to say "please wait for a while until your download begins, and if eventually nothing ever happens, then click this link just in case." I usually end up downloading two copies because it takes so long for the delayed download to start that I click the emergency link, and eventually a while later the other "automatic" one starts as well.I can't understand why web sites like sourceforge use this flakey "please wait" user interface for downloading, instead of simply presenting a link that you can click to download instantly. Sourceforge's bizarre approach to making what should be a simple download be so annoying and "automatic" never saves any time. The computer should never ask the user to "please wait for a while until your download begins" for no good reason, and it's ridiculous to have a javascript count down timer in the loop just to slow everything down, with no way to cancel it if you click the emergency download link. That is one of the most annoying things about sourceforge! My impression is that showing lots of ads is more important to Sourceforge than making it easy for developers to host and download code.
I would much rather use google code to host the project in subversion, so I have set up the official Micropolis project there:
http://code.google.com/p/micropolis/-Don Hopkins
I didn't have heart to tell Don that SF does support Subversion, the owner of the Micropolis project there just didn't set it up that way. However I agree with him on all other points. Too many clicks to get simple stuff. CodePlex suffers from this as well. You have to click and accept a license agreement for *every download* you make. Overkill IMHO.
In any case, there it is. The new "official" Micropolis code repository up on Google code, where it should be. This latest version includes changes to the initial release in the C++/Python project to enable callbacks into the Python code. This will enable the UI to respond to the engine rather than the other way around. My next blog post covers using this in extensive detail which should be done sometime this weekend.
Have fun!
-
Micropolis UI Sneak-a-Peek
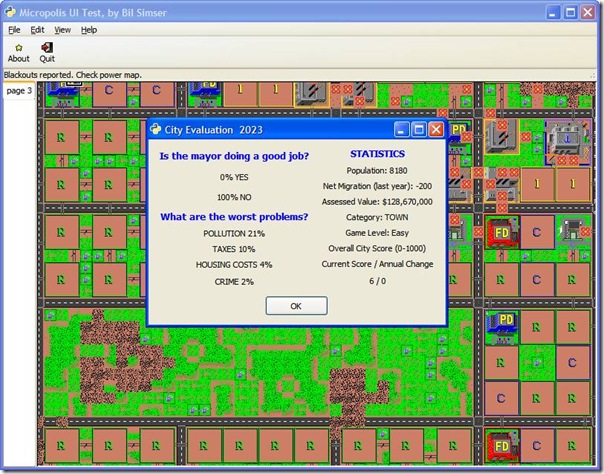
As you can tell, I really suck at running a city. By the year 2023 nobody likes me, power blackouts are everywhere and pollution has consumed the city creating a race of carbon dioxide breathing mutants. The UI is Python using Glade.
Yes, the numbers are real and being fed from the Micropolis game engine.
No, source is not available yet as we're still working building it out (and making it pretty, oh so pretty).
-
Building A City - The Series

As I spend more time with the SimCity Micropolis source code I'm digging the Python interface, trying to get used to Glade and GTK all over again (I haven't used it for years) and trying to build something useful from the excellent core C++ engine that Don Hopkins has provided us.
Out of this passion I'm starting to build several posts around exploring the code. So here's the plan for the series with links to the various entries I'll complete over the next while.
- Building A City - Part V - Cloning and Improving the SimCity UI
- Building A City - Part VI - Wiring Up Ideas Together
- Building A City - Part VII - Refactoring Towards a Managed View
- Building A City - Part VIII - Talking To Other Languages
- Building A City - Part IX - Introducing Micropolis.XNA
- Building A City - Part X - Networking, Multiplayer, and the Web
-
Building A City - Part III

Now you've got a runtime distribution running of the Micropolis demo. Doesn't do much does it? Sure you can spin around and navigate throughout the city. Perhaps you've changed the name of the city to load and checked out the other layouts. Otherwise, it's pretty bland and boring. Let's spend a little time building a new Python script to exercise two parts of the engine, terraforming and file access.
Catching Up
First let's catch up on what we need to get going here. To compile, please read Part I to get the required software installed and the C++ code compiled on Windows. Once you've done that, check out Part II where we get the additional files needed for runtime and launching the Python code. You can grab a binary release of the files if you don't want to build your own from here (note: You'll still need to install Python and the extensions listed in Part II to run the simulator).
Codebase Reflections
Just a side note about the codebase that I wanted to point out in order to try to clear up some confusion. The micropolis-activity-source package is the TCL/Tk version for x86 Linux (there's also a compiled version available here). This is the updated X11 version Don wrote and ported to use TCL/Tk for it's windowing system. This comes in C source form and can be compiled (with TCL/Tk) on a Linux system.
The C source was then cleaned up and "ported" to non-managed C++ and reborn into the MicropolisCore package, the focus of this series of blog entries. The code can be compiled on Linux but there's also Visual Studio 2005 project files for building on Windows. This version is ported from the original C code into a C++ class called Micropolis. That class is then processed by SWIG (as part of the Visual Studio compile) to generate export libraries and wrappers so the routines can be called by Python.
The "new" C++ code isn't complete but it is arguably better than the C code. The Micropolis project is fully devoid of any UI or Windowing libraries of any kind. At some point that means we can make the Micropolis project testable with unit tests (yeah, that'll come later). However it also means the new project is not just something you can plug in and run Micropolis as a full game on Windows. The TCL/Tk version is fully functional, this project isn't (yet). There are stubs for the calls and when you dig into the code you'll find that none of the routines that display screens or allow you to place tiles works yet. This is all coming so we'll grow into it.
Why Python? In lieu of TCL/Tk it's a godsend. At least it's a real object oriented language (even if it is a scripting language) and using SWIG allows you to expose C or C++ methods and classes to Python, which is what we're working with here. So why not take the original C code and run SWIG against it? Because the code is tied to the GUI toolkit and trying to get all that running on Windows is an exercise left for the bored. Sure, the Micropolis-mega class isn't the way I would have done it but the code is out there and able for blokes like me to break apart and make it, let's say, more testable and extensible. Stay tuned on that front.
More Tools
Yes, even more tools and downloads are needed. As we're going to be working (mostly) in Python we need a half decent editor. Notepad++ is fine for editing files, but you want some kind of debugging capabilities and perhaps some syntax checking or intellisense. I have a low tolerance for patience when it comes to tools. If I can't get something to work or figure out a tool within a few minutes I move on. It might be cruel but software has to be intuitive and make sense, just like a codebase. You should be able to work your way around a good codebase or a new tool without scratching your head saying "Huh?".
After combing the net I found a few reviews of Python IDEs. The pickings are not great but I settled on taking a look at Komodo, Wing IDE, and PyScripter.
Komodo was a bit of a mess. There was a free editor-only version which I tried, but gave up instantly with it. I switched gears to the professional version which I thought would help but it's like a bad episode of Hell's Kitchen. It bears no resemblance to any IDE I've worked with. Creating a "project" led to some folder that linked into the file system and there was no way to organize files (that I could see anyways). In the end, it seemed like nothing but bloatware so I gave up on that tool quick.
Wing IDE from Wingware is a pretty sophisticated set of tools and generally looks nice and performs well. If you're looking to do some serious Python work I highly recommend it. It has all the features you would want in an IDE and doesn't suffer from a confusing UI or bloated load times like Komodo was.
PyScripter was small but powerful and overall very nice. Both a project (file) explorer and a class explorer which was handy. Uncluttered interface and even detected when a new version was available (complete with a quick download, shutdown and restart) however it lacked any intellisense and would only launch the app the first time. First time it worked like a charm, any subsequent launch would produce an error that it couldn't find the gdk library (even though it launched fine the first time). Restart the app and it can launch it without error.
In the end I settled on the free version of Wing IDE (Wing IDE 101). First, it was free and that's a good thing. I don't do enough Python development to warrant the $129 price tag. There's a personal version for $30 but it doesn't give you much over the free editor version, so that's what I'm using. It has syntax highlighting and formatting (a must), can launch and debug a Python script, and even has intellisense. Unfortunately the class browser doesn't come with the free or even personal versions and I'm not that dedicated to the language to shell out for the professional version (not to mention the fact that I'm a cheap bastard) so it's the free version for us.
Whatever tool you use, launch it and let's go about cleaning up the initial script.
Starting Clean
We want to clean up the Python code a little and focus on the changes we'll make for this exercise. We'll build a new Python file (exercise-1.py) for this. Mainly we're just making things a little easier to maintain and read. In the code we mimic what the micropoliswindow.py file does (just with a few less lines). Now we're ready for our modifications.
Terraforming
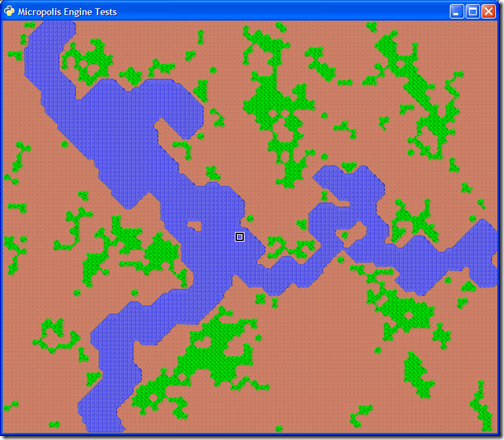
Terraforming is the process where the game engine creates a new blank landscape. It's called when you start a new blank city. We'll do this in the startup of our engine by calling the GenerateNewCity function. Here's the original Python code called to start the Micropolis engine:
1: def createEngine(self):<pre style="padding-right: 0px; padding-left: 0px; font-size: 8pt; padding-bottom: 0px; margin: 0em; overflow: visible; width: 100%; color: black; border-top-style: none; line-height: 12pt; padding-top: 0px; font-family: consolas, 'Courier New', courier, monospace; border-right-style: none; border-left-style: none; background-color: #f4f4f4; border-bottom-style: none"><span style="color: #606060"> 2:</span>  </pre> <pre style="padding-right: 0px; padding-left: 0px; font-size: 8pt; padding-bottom: 0px; margin: 0em; overflow: visible; width: 100%; color: black; border-top-style: none; line-height: 12pt; padding-top: 0px; font-family: consolas, 'Courier New', courier, monospace; border-right-style: none; border-left-style: none; background-color: white; border-bottom-style: none"><span style="color: #606060"> 3:</span> engine = micropolis.Micropolis()</pre> <pre style="padding-right: 0px; padding-left: 0px; font-size: 8pt; padding-bottom: 0px; margin: 0em; overflow: visible; width: 100%; color: black; border-top-style: none; line-height: 12pt; padding-top: 0px; font-family: consolas, 'Courier New', courier, monospace; border-right-style: none; border-left-style: none; background-color: #f4f4f4; border-bottom-style: none"><span style="color: #606060"> 4:</span> self.engine = engine</pre> <pre style="padding-right: 0px; padding-left: 0px; font-size: 8pt; padding-bottom: 0px; margin: 0em; overflow: visible; width: 100%; color: black; border-top-style: none; line-height: 12pt; padding-top: 0px; font-family: consolas, 'Courier New', courier, monospace; border-right-style: none; border-left-style: none; background-color: white; border-bottom-style: none"><span style="color: #606060"> 5:</span> print <span style="color: #006080">"Created Micropolis simulator engine:"</span>, engine</pre> <pre style="padding-right: 0px; padding-left: 0px; font-size: 8pt; padding-bottom: 0px; margin: 0em; overflow: visible; width: 100%; color: black; border-top-style: none; line-height: 12pt; padding-top: 0px; font-family: consolas, 'Courier New', courier, monospace; border-right-style: none; border-left-style: none; background-color: #f4f4f4; border-bottom-style: none"><span style="color: #606060"> 6:</span>  </pre> <pre style="padding-right: 0px; padding-left: 0px; font-size: 8pt; padding-bottom: 0px; margin: 0em; overflow: visible; width: 100%; color: black; border-top-style: none; line-height: 12pt; padding-top: 0px; font-family: consolas, 'Courier New', courier, monospace; border-right-style: none; border-left-style: none; background-color: white; border-bottom-style: none"><span style="color: #606060"> 7:</span> engine.ResourceDir = <span style="color: #006080">'res'</span></pre> <pre style="padding-right: 0px; padding-left: 0px; font-size: 8pt; padding-bottom: 0px; margin: 0em; overflow: visible; width: 100%; color: black; border-top-style: none; line-height: 12pt; padding-top: 0px; font-family: consolas, 'Courier New', courier, monospace; border-right-style: none; border-left-style: none; background-color: #f4f4f4; border-bottom-style: none"><span style="color: #606060"> 8:</span> engine.InitGame()</pre> <pre style="padding-right: 0px; padding-left: 0px; font-size: 8pt; padding-bottom: 0px; margin: 0em; overflow: visible; width: 100%; color: black; border-top-style: none; line-height: 12pt; padding-top: 0px; font-family: consolas, 'Courier New', courier, monospace; border-right-style: none; border-left-style: none; background-color: white; border-bottom-style: none"><span style="color: #606060"> 9:</span>  </pre> <pre style="padding-right: 0px; padding-left: 0px; font-size: 8pt; padding-bottom: 0px; margin: 0em; overflow: visible; width: 100%; color: black; border-top-style: none; line-height: 12pt; padding-top: 0px; font-family: consolas, 'Courier New', courier, monospace; border-right-style: none; border-left-style: none; background-color: #f4f4f4; border-bottom-style: none"><span style="color: #606060"> 10:</span> # Load a city file.</pre> <pre style="padding-right: 0px; padding-left: 0px; font-size: 8pt; padding-bottom: 0px; margin: 0em; overflow: visible; width: 100%; color: black; border-top-style: none; line-height: 12pt; padding-top: 0px; font-family: consolas, 'Courier New', courier, monospace; border-right-style: none; border-left-style: none; background-color: white; border-bottom-style: none"><span style="color: #606060"> 11:</span> cityFileName = <span style="color: #006080">'cities/deadwood.cty'</span></pre> <pre style="padding-right: 0px; padding-left: 0px; font-size: 8pt; padding-bottom: 0px; margin: 0em; overflow: visible; width: 100%; color: black; border-top-style: none; line-height: 12pt; padding-top: 0px; font-family: consolas, 'Courier New', courier, monospace; border-right-style: none; border-left-style: none; background-color: #f4f4f4; border-bottom-style: none"><span style="color: #606060"> 12:</span> print <span style="color: #006080">"Loading city file:"</span>, cityFileName</pre> <pre style="padding-right: 0px; padding-left: 0px; font-size: 8pt; padding-bottom: 0px; margin: 0em; overflow: visible; width: 100%; color: black; border-top-style: none; line-height: 12pt; padding-top: 0px; font-family: consolas, 'Courier New', courier, monospace; border-right-style: none; border-left-style: none; background-color: white; border-bottom-style: none"><span style="color: #606060"> 13:</span> engine.loadFile(cityFileName)</pre> <pre style="padding-right: 0px; padding-left: 0px; font-size: 8pt; padding-bottom: 0px; margin: 0em; overflow: visible; width: 100%; color: black; border-top-style: none; line-height: 12pt; padding-top: 0px; font-family: consolas, 'Courier New', courier, monospace; border-right-style: none; border-left-style: none; background-color: #f4f4f4; border-bottom-style: none"><span style="color: #606060"> 14:</span>  </pre> <pre style="padding-right: 0px; padding-left: 0px; font-size: 8pt; padding-bottom: 0px; margin: 0em; overflow: visible; width: 100%; color: black; border-top-style: none; line-height: 12pt; padding-top: 0px; font-family: consolas, 'Courier New', courier, monospace; border-right-style: none; border-left-style: none; background-color: white; border-bottom-style: none"><span style="color: #606060"> 15:</span> # Initialize the simulator engine.</pre> <pre style="padding-right: 0px; padding-left: 0px; font-size: 8pt; padding-bottom: 0px; margin: 0em; overflow: visible; width: 100%; color: black; border-top-style: none; line-height: 12pt; padding-top: 0px; font-family: consolas, 'Courier New', courier, monospace; border-right-style: none; border-left-style: none; background-color: #f4f4f4; border-bottom-style: none"><span style="color: #606060"> 16:</span>  </pre> <pre style="padding-right: 0px; padding-left: 0px; font-size: 8pt; padding-bottom: 0px; margin: 0em; overflow: visible; width: 100%; color: black; border-top-style: none; line-height: 12pt; padding-top: 0px; font-family: consolas, 'Courier New', courier, monospace; border-right-style: none; border-left-style: none; background-color: white; border-bottom-style: none"><span style="color: #606060"> 17:</span> engine.Resume()</pre> <pre style="padding-right: 0px; padding-left: 0px; font-size: 8pt; padding-bottom: 0px; margin: 0em; overflow: visible; width: 100%; color: black; border-top-style: none; line-height: 12pt; padding-top: 0px; font-family: consolas, 'Courier New', courier, monospace; border-right-style: none; border-left-style: none; background-color: #f4f4f4; border-bottom-style: none"><span style="color: #606060"> 18:</span> engine.setSpeed(2)</pre> <pre style="padding-right: 0px; padding-left: 0px; font-size: 8pt; padding-bottom: 0px; margin: 0em; overflow: visible; width: 100%; color: black; border-top-style: none; line-height: 12pt; padding-top: 0px; font-family: consolas, 'Courier New', courier, monospace; border-right-style: none; border-left-style: none; background-color: white; border-bottom-style: none"><span style="color: #606060"> 19:</span> engine.setSkips(100)</pre> <pre style="padding-right: 0px; padding-left: 0px; font-size: 8pt; padding-bottom: 0px; margin: 0em; overflow: visible; width: 100%; color: black; border-top-style: none; line-height: 12pt; padding-top: 0px; font-family: consolas, 'Courier New', courier, monospace; border-right-style: none; border-left-style: none; background-color: #f4f4f4; border-bottom-style: none"><span style="color: #606060"> 20:</span> engine.SetFunds(1000000000)</pre> <pre style="padding-right: 0px; padding-left: 0px; font-size: 8pt; padding-bottom: 0px; margin: 0em; overflow: visible; width: 100%; color: black; border-top-style: none; line-height: 12pt; padding-top: 0px; font-family: consolas, 'Courier New', courier, monospace; border-right-style: none; border-left-style: none; background-color: white; border-bottom-style: none"><span style="color: #606060"> 21:</span> engine.autoGo = 0</pre> <pre style="padding-right: 0px; padding-left: 0px; font-size: 8pt; padding-bottom: 0px; margin: 0em; overflow: visible; width: 100%; color: black; border-top-style: none; line-height: 12pt; padding-top: 0px; font-family: consolas, 'Courier New', courier, monospace; border-right-style: none; border-left-style: none; background-color: #f4f4f4; border-bottom-style: none"><span style="color: #606060"> 22:</span> engine.CityTax = 9</pre> <pre style="padding-right: 0px; padding-left: 0px; font-size: 8pt; padding-bottom: 0px; margin: 0em; overflow: visible; width: 100%; color: black; border-top-style: none; line-height: 12pt; padding-top: 0px; font-family: consolas, 'Courier New', courier, monospace; border-right-style: none; border-left-style: none; background-color: white; border-bottom-style: none"><span style="color: #606060"> 23:</span>  </pre> <pre style="padding-right: 0px; padding-left: 0px; font-size: 8pt; padding-bottom: 0px; margin: 0em; overflow: visible; width: 100%; color: black; border-top-style: none; line-height: 12pt; padding-top: 0px; font-family: consolas, 'Courier New', courier, monospace; border-right-style: none; border-left-style: none; background-color: #f4f4f4; border-bottom-style: none"><span style="color: #606060"> 24:</span> tilewindow.TileDrawingArea.createEngine(self)</pre>It loads the deadwood.cty file from the cities folder using the loadFile method of the engin. Here's the changes we'll make to generate the blank landscape:
1: def createEngine(self):<pre style="padding-right: 0px; padding-left: 0px; font-size: 8pt; padding-bottom: 0px; margin: 0em; overflow: visible; width: 100%; color: black; border-top-style: none; line-height: 12pt; padding-top: 0px; font-family: consolas, 'Courier New', courier, monospace; border-right-style: none; border-left-style: none; background-color: #f4f4f4; border-bottom-style: none"><span style="color: #606060"> 2:</span>  </pre> <pre style="padding-right: 0px; padding-left: 0px; font-size: 8pt; padding-bottom: 0px; margin: 0em; overflow: visible; width: 100%; color: black; border-top-style: none; line-height: 12pt; padding-top: 0px; font-family: consolas, 'Courier New', courier, monospace; border-right-style: none; border-left-style: none; background-color: white; border-bottom-style: none"><span style="color: #606060"> 3:</span> engine = micropolis.Micropolis()</pre> <pre style="padding-right: 0px; padding-left: 0px; font-size: 8pt; padding-bottom: 0px; margin: 0em; overflow: visible; width: 100%; color: black; border-top-style: none; line-height: 12pt; padding-top: 0px; font-family: consolas, 'Courier New', courier, monospace; border-right-style: none; border-left-style: none; background-color: #f4f4f4; border-bottom-style: none"><span style="color: #606060"> 4:</span> self.engine = engine</pre> <pre style="padding-right: 0px; padding-left: 0px; font-size: 8pt; padding-bottom: 0px; margin: 0em; overflow: visible; width: 100%; color: black; border-top-style: none; line-height: 12pt; padding-top: 0px; font-family: consolas, 'Courier New', courier, monospace; border-right-style: none; border-left-style: none; background-color: white; border-bottom-style: none"><span style="color: #606060"> 5:</span>  </pre> <pre style="padding-right: 0px; padding-left: 0px; font-size: 8pt; padding-bottom: 0px; margin: 0em; overflow: visible; width: 100%; color: black; border-top-style: none; line-height: 12pt; padding-top: 0px; font-family: consolas, 'Courier New', courier, monospace; border-right-style: none; border-left-style: none; background-color: #f4f4f4; border-bottom-style: none"><span style="color: #606060"> 6:</span> engine.ResourceDir = <span style="color: #008000">'res'</span></pre> <pre style="padding-right: 0px; padding-left: 0px; font-size: 8pt; padding-bottom: 0px; margin: 0em; overflow: visible; width: 100%; color: black; border-top-style: none; line-height: 12pt; padding-top: 0px; font-family: consolas, 'Courier New', courier, monospace; border-right-style: none; border-left-style: none; background-color: white; border-bottom-style: none"><span style="color: #606060"> 7:</span> engine.InitGame()</pre> <pre style="padding-right: 0px; padding-left: 0px; font-size: 8pt; padding-bottom: 0px; margin: 0em; overflow: visible; width: 100%; color: black; border-top-style: none; line-height: 12pt; padding-top: 0px; font-family: consolas, 'Courier New', courier, monospace; border-right-style: none; border-left-style: none; background-color: #f4f4f4; border-bottom-style: none"><span style="color: #606060"> 8:</span> engine.GenerateNewCity()</pre> <pre style="padding-right: 0px; padding-left: 0px; font-size: 8pt; padding-bottom: 0px; margin: 0em; overflow: visible; width: 100%; color: black; border-top-style: none; line-height: 12pt; padding-top: 0px; font-family: consolas, 'Courier New', courier, monospace; border-right-style: none; border-left-style: none; background-color: white; border-bottom-style: none"><span style="color: #606060"> 9:</span> </pre> <pre style="padding-right: 0px; padding-left: 0px; font-size: 8pt; padding-bottom: 0px; margin: 0em; overflow: visible; width: 100%; color: black; border-top-style: none; line-height: 12pt; padding-top: 0px; font-family: consolas, 'Courier New', courier, monospace; border-right-style: none; border-left-style: none; background-color: #f4f4f4; border-bottom-style: none"><span style="color: #606060"> 10:</span> engine.<span style="color: #0000ff">Resume</span>()</pre> <pre style="padding-right: 0px; padding-left: 0px; font-size: 8pt; padding-bottom: 0px; margin: 0em; overflow: visible; width: 100%; color: black; border-top-style: none; line-height: 12pt; padding-top: 0px; font-family: consolas, 'Courier New', courier, monospace; border-right-style: none; border-left-style: none; background-color: white; border-bottom-style: none"><span style="color: #606060"> 11:</span> engine.setSpeed(1) </pre> <pre style="padding-right: 0px; padding-left: 0px; font-size: 8pt; padding-bottom: 0px; margin: 0em; overflow: visible; width: 100%; color: black; border-top-style: none; line-height: 12pt; padding-top: 0px; font-family: consolas, 'Courier New', courier, monospace; border-right-style: none; border-left-style: none; background-color: #f4f4f4; border-bottom-style: none"><span style="color: #606060"> 12:</span> engine.SetFunds(1000000000)</pre> <pre style="padding-right: 0px; padding-left: 0px; font-size: 8pt; padding-bottom: 0px; margin: 0em; overflow: visible; width: 100%; color: black; border-top-style: none; line-height: 12pt; padding-top: 0px; font-family: consolas, 'Courier New', courier, monospace; border-right-style: none; border-left-style: none; background-color: white; border-bottom-style: none"><span style="color: #606060"> 13:</span> engine.autoGo = 0</pre> <pre style="padding-right: 0px; padding-left: 0px; font-size: 8pt; padding-bottom: 0px; margin: 0em; overflow: visible; width: 100%; color: black; border-top-style: none; line-height: 12pt; padding-top: 0px; font-family: consolas, 'Courier New', courier, monospace; border-right-style: none; border-left-style: none; background-color: #f4f4f4; border-bottom-style: none"><span style="color: #606060"> 14:</span> engine.CityTax = 9</pre> <pre style="padding-right: 0px; padding-left: 0px; font-size: 8pt; padding-bottom: 0px; margin: 0em; overflow: visible; width: 100%; color: black; border-top-style: none; line-height: 12pt; padding-top: 0px; font-family: consolas, 'Courier New', courier, monospace; border-right-style: none; border-left-style: none; background-color: white; border-bottom-style: none"><span style="color: #606060"> 15:</span> </pre> <pre style="padding-right: 0px; padding-left: 0px; font-size: 8pt; padding-bottom: 0px; margin: 0em; overflow: visible; width: 100%; color: black; border-top-style: none; line-height: 12pt; padding-top: 0px; font-family: consolas, 'Courier New', courier, monospace; border-right-style: none; border-left-style: none; background-color: #f4f4f4; border-bottom-style: none"><span style="color: #606060"> 16:</span> tilewindow.TileDrawingArea.createEngine(self)</pre>Rather than calling engine.loadFile, we'll call engine.GenerateNewCity. This is found in generate.cpp in the Micropolis project and exposed to us via SWIG (from the _micropolis.pyd file generated by the Visual Studio project). Launch the app ("Python.exe -i exercise-1.py" or from your IDE) and you'll get something like this:
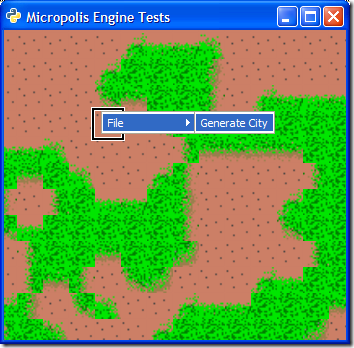
Here's the source file exercise-1.py so far. Now that we have a new, blank city to work with we can make it more interactive. First, let's create a popup menu and add it it our window. Start by adding a call to a method we'll create called createPopupMenu by modifying the constructor of the MicropolisDrawingArea class:
1: self.engine = engine<pre style="padding-right: 0px; padding-left: 0px; font-size: 8pt; padding-bottom: 0px; margin: 0em; overflow: visible; width: 100%; color: black; border-top-style: none; line-height: 12pt; padding-top: 0px; font-family: consolas, 'Courier New', courier, monospace; border-right-style: none; border-left-style: none; background-color: #f4f4f4; border-bottom-style: none"><span style="color: #606060"> 2:</span> self.createPopupMenu()</pre> <pre style="padding-right: 0px; padding-left: 0px; font-size: 8pt; padding-bottom: 0px; margin: 0em; overflow: visible; width: 100%; color: black; border-top-style: none; line-height: 12pt; padding-top: 0px; font-family: consolas, 'Courier New', courier, monospace; border-right-style: none; border-left-style: none; background-color: white; border-bottom-style: none"><span style="color: #606060"> 3:</span> tilewindow.TileDrawingArea.__init__(self, **args)</pre>Now we'll need to create the method. This is going to create a gtkMenu object, add the menu option to generate a new city, and setup our bindings. Add this method to the MicropolisDrawingArea class:1: def createPopupMenu(self):<pre style="padding-right: 0px; padding-left: 0px; font-size: 8pt; padding-bottom: 0px; margin: 0em; overflow: visible; width: 100%; color: black; border-top-style: none; line-height: 12pt; padding-top: 0px; font-family: consolas, 'Courier New', courier, monospace; border-right-style: none; border-left-style: none; background-color: #f4f4f4; border-bottom-style: none"><span style="color: #606060"> 2:</span> </pre> <pre style="padding-right: 0px; padding-left: 0px; font-size: 8pt; padding-bottom: 0px; margin: 0em; overflow: visible; width: 100%; color: black; border-top-style: none; line-height: 12pt; padding-top: 0px; font-family: consolas, 'Courier New', courier, monospace; border-right-style: none; border-left-style: none; background-color: white; border-bottom-style: none"><span style="color: #606060"> 3:</span> # main popup menu</pre> <pre style="padding-right: 0px; padding-left: 0px; font-size: 8pt; padding-bottom: 0px; margin: 0em; overflow: visible; width: 100%; color: black; border-top-style: none; line-height: 12pt; padding-top: 0px; font-family: consolas, 'Courier New', courier, monospace; border-right-style: none; border-left-style: none; background-color: #f4f4f4; border-bottom-style: none"><span style="color: #606060"> 4:</span> self.popup = gtk.Menu()</pre> <pre style="padding-right: 0px; padding-left: 0px; font-size: 8pt; padding-bottom: 0px; margin: 0em; overflow: visible; width: 100%; color: black; border-top-style: none; line-height: 12pt; padding-top: 0px; font-family: consolas, 'Courier New', courier, monospace; border-right-style: none; border-left-style: none; background-color: white; border-bottom-style: none"><span style="color: #606060"> 5:</span>  </pre> <pre style="padding-right: 0px; padding-left: 0px; font-size: 8pt; padding-bottom: 0px; margin: 0em; overflow: visible; width: 100%; color: black; border-top-style: none; line-height: 12pt; padding-top: 0px; font-family: consolas, 'Courier New', courier, monospace; border-right-style: none; border-left-style: none; background-color: #f4f4f4; border-bottom-style: none"><span style="color: #606060"> 6:</span> # file/system menu</pre> <pre style="padding-right: 0px; padding-left: 0px; font-size: 8pt; padding-bottom: 0px; margin: 0em; overflow: visible; width: 100%; color: black; border-top-style: none; line-height: 12pt; padding-top: 0px; font-family: consolas, 'Courier New', courier, monospace; border-right-style: none; border-left-style: none; background-color: white; border-bottom-style: none"><span style="color: #606060"> 7:</span> menu = gtk.MenuItem(<span style="color: #006080">"File"</span>)</pre> <pre style="padding-right: 0px; padding-left: 0px; font-size: 8pt; padding-bottom: 0px; margin: 0em; overflow: visible; width: 100%; color: black; border-top-style: none; line-height: 12pt; padding-top: 0px; font-family: consolas, 'Courier New', courier, monospace; border-right-style: none; border-left-style: none; background-color: #f4f4f4; border-bottom-style: none"><span style="color: #606060"> 8:</span> childMenu = gtk.Menu()</pre> <pre style="padding-right: 0px; padding-left: 0px; font-size: 8pt; padding-bottom: 0px; margin: 0em; overflow: visible; width: 100%; color: black; border-top-style: none; line-height: 12pt; padding-top: 0px; font-family: consolas, 'Courier New', courier, monospace; border-right-style: none; border-left-style: none; background-color: white; border-bottom-style: none"><span style="color: #606060"> 9:</span>  </pre> <pre style="padding-right: 0px; padding-left: 0px; font-size: 8pt; padding-bottom: 0px; margin: 0em; overflow: visible; width: 100%; color: black; border-top-style: none; line-height: 12pt; padding-top: 0px; font-family: consolas, 'Courier New', courier, monospace; border-right-style: none; border-left-style: none; background-color: #f4f4f4; border-bottom-style: none"><span style="color: #606060"> 10:</span> menuItem = gtk.MenuItem(<span style="color: #006080">"Generate City"</span>)</pre> <pre style="padding-right: 0px; padding-left: 0px; font-size: 8pt; padding-bottom: 0px; margin: 0em; overflow: visible; width: 100%; color: black; border-top-style: none; line-height: 12pt; padding-top: 0px; font-family: consolas, 'Courier New', courier, monospace; border-right-style: none; border-left-style: none; background-color: white; border-bottom-style: none"><span style="color: #606060"> 11:</span> menuItem.connect(<span style="color: #006080">"activate"</span>, self.GenerateNewCity)</pre> <pre style="padding-right: 0px; padding-left: 0px; font-size: 8pt; padding-bottom: 0px; margin: 0em; overflow: visible; width: 100%; color: black; border-top-style: none; line-height: 12pt; padding-top: 0px; font-family: consolas, 'Courier New', courier, monospace; border-right-style: none; border-left-style: none; background-color: #f4f4f4; border-bottom-style: none"><span style="color: #606060"> 12:</span> childMenu.append(menuItem)</pre> <pre style="padding-right: 0px; padding-left: 0px; font-size: 8pt; padding-bottom: 0px; margin: 0em; overflow: visible; width: 100%; color: black; border-top-style: none; line-height: 12pt; padding-top: 0px; font-family: consolas, 'Courier New', courier, monospace; border-right-style: none; border-left-style: none; background-color: white; border-bottom-style: none"><span style="color: #606060"> 13:</span>  </pre> <pre style="padding-right: 0px; padding-left: 0px; font-size: 8pt; padding-bottom: 0px; margin: 0em; overflow: visible; width: 100%; color: black; border-top-style: none; line-height: 12pt; padding-top: 0px; font-family: consolas, 'Courier New', courier, monospace; border-right-style: none; border-left-style: none; background-color: #f4f4f4; border-bottom-style: none"><span style="color: #606060"> 14:</span> menu.set_submenu(childMenu)</pre> <pre style="padding-right: 0px; padding-left: 0px; font-size: 8pt; padding-bottom: 0px; margin: 0em; overflow: visible; width: 100%; color: black; border-top-style: none; line-height: 12pt; padding-top: 0px; font-family: consolas, 'Courier New', courier, monospace; border-right-style: none; border-left-style: none; background-color: white; border-bottom-style: none"><span style="color: #606060"> 15:</span> self.popup.append(menu)</pre>The connect call will bind the activation of this menu item to a method called GenerateNewCity. Here's the method which calls the engines method of the same name:1: def GenerateNewCity(self, widget):<pre style="padding-right: 0px; padding-left: 0px; font-size: 8pt; padding-bottom: 0px; margin: 0em; overflow: visible; width: 100%; color: black; border-top-style: none; line-height: 12pt; padding-top: 0px; font-family: consolas, 'Courier New', courier, monospace; border-right-style: none; border-left-style: none; background-color: #f4f4f4; border-bottom-style: none"><span style="color: #606060"> 2:</span> self.engine.GenerateNewCity()</pre>Finally we need to invoke the popup menu. We'll do this from the right-click menu. The mouse handling is already dealt with in the tilewindow class (you can see this in tilewindow.py in the handleMousePress method) but we're going to intercept the call in our own class and pass it on if we don't handle it. Add this method to the MicropolisDrawingArea class:
1: def handleButtonPress(<pre style="padding-right: 0px; padding-left: 0px; font-size: 8pt; padding-bottom: 0px; margin: 0em; overflow: visible; width: 100%; color: black; border-top-style: none; line-height: 12pt; padding-top: 0px; font-family: consolas, 'Courier New', courier, monospace; border-right-style: none; border-left-style: none; background-color: #f4f4f4; border-bottom-style: none"><span style="color: #606060"> 2:</span> self,</pre> <pre style="padding-right: 0px; padding-left: 0px; font-size: 8pt; padding-bottom: 0px; margin: 0em; overflow: visible; width: 100%; color: black; border-top-style: none; line-height: 12pt; padding-top: 0px; font-family: consolas, 'Courier New', courier, monospace; border-right-style: none; border-left-style: none; background-color: white; border-bottom-style: none"><span style="color: #606060"> 3:</span> widget,</pre> <pre style="padding-right: 0px; padding-left: 0px; font-size: 8pt; padding-bottom: 0px; margin: 0em; overflow: visible; width: 100%; color: black; border-top-style: none; line-height: 12pt; padding-top: 0px; font-family: consolas, 'Courier New', courier, monospace; border-right-style: none; border-left-style: none; background-color: #f4f4f4; border-bottom-style: none"><span style="color: #606060"> 4:</span> <span style="color: #0000ff">event</span>):</pre> <pre style="padding-right: 0px; padding-left: 0px; font-size: 8pt; padding-bottom: 0px; margin: 0em; overflow: visible; width: 100%; color: black; border-top-style: none; line-height: 12pt; padding-top: 0px; font-family: consolas, 'Courier New', courier, monospace; border-right-style: none; border-left-style: none; background-color: white; border-bottom-style: none"><span style="color: #606060"> 5:</span>  </pre> <pre style="padding-right: 0px; padding-left: 0px; font-size: 8pt; padding-bottom: 0px; margin: 0em; overflow: visible; width: 100%; color: black; border-top-style: none; line-height: 12pt; padding-top: 0px; font-family: consolas, 'Courier New', courier, monospace; border-right-style: none; border-left-style: none; background-color: #f4f4f4; border-bottom-style: none"><span style="color: #606060"> 6:</span> <span style="color: #0000ff">if</span> <span style="color: #0000ff">event</span>.button == 3: # right-click</pre> <pre style="padding-right: 0px; padding-left: 0px; font-size: 8pt; padding-bottom: 0px; margin: 0em; overflow: visible; width: 100%; color: black; border-top-style: none; line-height: 12pt; padding-top: 0px; font-family: consolas, 'Courier New', courier, monospace; border-right-style: none; border-left-style: none; background-color: white; border-bottom-style: none"><span style="color: #606060"> 7:</span> self.popup.show_all()</pre> <pre style="padding-right: 0px; padding-left: 0px; font-size: 8pt; padding-bottom: 0px; margin: 0em; overflow: visible; width: 100%; color: black; border-top-style: none; line-height: 12pt; padding-top: 0px; font-family: consolas, 'Courier New', courier, monospace; border-right-style: none; border-left-style: none; background-color: #f4f4f4; border-bottom-style: none"><span style="color: #606060"> 8:</span> self.popup.popup(None, None, None, <span style="color: #0000ff">event</span>.button, <span style="color: #0000ff">event</span>.time)</pre> <pre style="padding-right: 0px; padding-left: 0px; font-size: 8pt; padding-bottom: 0px; margin: 0em; overflow: visible; width: 100%; color: black; border-top-style: none; line-height: 12pt; padding-top: 0px; font-family: consolas, 'Courier New', courier, monospace; border-right-style: none; border-left-style: none; background-color: white; border-bottom-style: none"><span style="color: #606060"> 9:</span> <span style="color: #0000ff">else</span>:</pre> <pre style="padding-right: 0px; padding-left: 0px; font-size: 8pt; padding-bottom: 0px; margin: 0em; overflow: visible; width: 100%; color: black; border-top-style: none; line-height: 12pt; padding-top: 0px; font-family: consolas, 'Courier New', courier, monospace; border-right-style: none; border-left-style: none; background-color: #f4f4f4; border-bottom-style: none"><span style="color: #606060"> 10:</span> tilewindow.TileDrawingArea.handleButtonPress(self, widget, <span style="color: #0000ff">event</span>)</pre>Now when we run the app and right-click on the drawing surface, we can use our new popup menu:
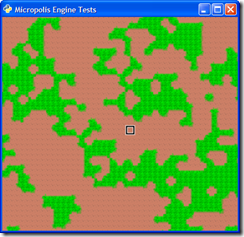
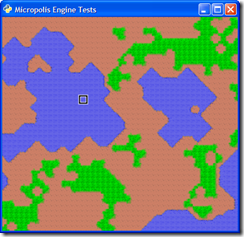
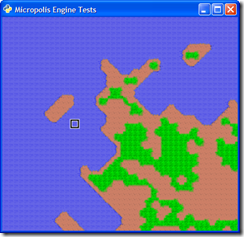
And when clicked it runs through the various routines creating a new landscape each time. You can check out the C++ code in the generate.cpp file for details on how it works. You can grab the Python script exercise-2.py with this new functionality. Here are some variations the engine produces:
Now that we have an interface to let the user interact with the system, we can extend this. Two features of the system are loading existing cities (from the cities folder) and loading scenarios. Let's wire these up to the new interface.
Loading Cities
Cities are kept as binary files in the cities folder. The engine loads them up via the LoadCity method that takes in a filename for a parameter. So first we'll add some code to our menu to allow the user to select a Load City option:
1: menuItem = gtk.MenuItem("Generate City")
<pre style="padding-right: 0px; padding-left: 0px; font-size: 8pt; padding-bottom: 0px; margin: 0em; overflow: visible; width: 100%; color: black; border-top-style: none; line-height: 12pt; padding-top: 0px; font-family: consolas, 'Courier New', courier, monospace; border-right-style: none; border-left-style: none; background-color: #f4f4f4; border-bottom-style: none"><span style="color: #606060"> 2:</span> menuItem.connect(<span style="color: #006080">"activate"</span>, self.GenerateNewCity)</pre> <pre style="padding-right: 0px; padding-left: 0px; font-size: 8pt; padding-bottom: 0px; margin: 0em; overflow: visible; width: 100%; color: black; border-top-style: none; line-height: 12pt; padding-top: 0px; font-family: consolas, 'Courier New', courier, monospace; border-right-style: none; border-left-style: none; background-color: white; border-bottom-style: none"><span style="color: #606060"> 3:</span> childMenu.append(menuItem)</pre> <pre style="padding-right: 0px; padding-left: 0px; font-size: 8pt; padding-bottom: 0px; margin: 0em; overflow: visible; width: 100%; color: black; border-top-style: none; line-height: 12pt; padding-top: 0px; font-family: consolas, 'Courier New', courier, monospace; border-right-style: none; border-left-style: none; background-color: #f4f4f4; border-bottom-style: none"><span style="color: #606060"> 4:</span>  </pre> <pre style="padding-right: 0px; padding-left: 0px; font-size: 8pt; padding-bottom: 0px; margin: 0em; overflow: visible; width: 100%; color: black; border-top-style: none; line-height: 12pt; padding-top: 0px; font-family: consolas, 'Courier New', courier, monospace; border-right-style: none; border-left-style: none; background-color: white; border-bottom-style: none"><span style="color: #606060"> 5:</span> # Start New Load City menu option</pre> <pre style="padding-right: 0px; padding-left: 0px; font-size: 8pt; padding-bottom: 0px; margin: 0em; overflow: visible; width: 100%; color: black; border-top-style: none; line-height: 12pt; padding-top: 0px; font-family: consolas, 'Courier New', courier, monospace; border-right-style: none; border-left-style: none; background-color: #f4f4f4; border-bottom-style: none"><span style="color: #606060"> 6:</span> menuItem = gtk.MenuItem(<span style="color: #006080">"Load City..."</span>)</pre> <pre style="padding-right: 0px; padding-left: 0px; font-size: 8pt; padding-bottom: 0px; margin: 0em; overflow: visible; width: 100%; color: black; border-top-style: none; line-height: 12pt; padding-top: 0px; font-family: consolas, 'Courier New', courier, monospace; border-right-style: none; border-left-style: none; background-color: white; border-bottom-style: none"><span style="color: #606060"> 7:</span> menuItem.connect(<span style="color: #006080">"activate"</span>, self.LoadCity)</pre> <pre style="padding-right: 0px; padding-left: 0px; font-size: 8pt; padding-bottom: 0px; margin: 0em; overflow: visible; width: 100%; color: black; border-top-style: none; line-height: 12pt; padding-top: 0px; font-family: consolas, 'Courier New', courier, monospace; border-right-style: none; border-left-style: none; background-color: #f4f4f4; border-bottom-style: none"><span style="color: #606060"> 8:</span> childMenu.append(menuItem)</pre> <pre style="padding-right: 0px; padding-left: 0px; font-size: 8pt; padding-bottom: 0px; margin: 0em; overflow: visible; width: 100%; color: black; border-top-style: none; line-height: 12pt; padding-top: 0px; font-family: consolas, 'Courier New', courier, monospace; border-right-style: none; border-left-style: none; background-color: white; border-bottom-style: none"><span style="color: #606060"> 9:</span> # End New Load City menu option</pre> <pre style="padding-right: 0px; padding-left: 0px; font-size: 8pt; padding-bottom: 0px; margin: 0em; overflow: visible; width: 100%; color: black; border-top-style: none; line-height: 12pt; padding-top: 0px; font-family: consolas, 'Courier New', courier, monospace; border-right-style: none; border-left-style: none; background-color: #f4f4f4; border-bottom-style: none"><span style="color: #606060"> 10:</span>  </pre> <pre style="padding-right: 0px; padding-left: 0px; font-size: 8pt; padding-bottom: 0px; margin: 0em; overflow: visible; width: 100%; color: black; border-top-style: none; line-height: 12pt; padding-top: 0px; font-family: consolas, 'Courier New', courier, monospace; border-right-style: none; border-left-style: none; background-color: white; border-bottom-style: none"><span style="color: #606060"> 11:</span> menu.set_submenu(childMenu)</pre> <pre style="padding-right: 0px; padding-left: 0px; font-size: 8pt; padding-bottom: 0px; margin: 0em; overflow: visible; width: 100%; color: black; border-top-style: none; line-height: 12pt; padding-top: 0px; font-family: consolas, 'Courier New', courier, monospace; border-right-style: none; border-left-style: none; background-color: #f4f4f4; border-bottom-style: none"><span style="color: #606060"> 12:</span> self.popup.append(menu)</pre>Now let's write the LoadCity method. This is going to use the gtk.FileChooserDialog which let's us pick a file from a directory. The Python version doesn't use the standard Windows File Open look and feel so it might look weird when you run it, but it does the job.
In the new LoadCity method we'll make a few modifications like only allowing to load local files; we'll set the working folder to the cities folder; and we'll add a filter to show *.cty files. Here's the new code snippet to add:
1: def LoadCity(self, widget):<pre style="padding-right: 0px; padding-left: 0px; font-size: 8pt; padding-bottom: 0px; margin: 0em; overflow: visible; width: 100%; color: black; border-top-style: none; line-height: 12pt; padding-top: 0px; font-family: consolas, 'Courier New', courier, monospace; border-right-style: none; border-left-style: none; background-color: #f4f4f4; border-bottom-style: none"><span style="color: #606060"> 2:</span> dialog = gtk.FileChooserDialog(<span style="color: #006080">"Open City.."</span>,</pre> <pre style="padding-right: 0px; padding-left: 0px; font-size: 8pt; padding-bottom: 0px; margin: 0em; overflow: visible; width: 100%; color: black; border-top-style: none; line-height: 12pt; padding-top: 0px; font-family: consolas, 'Courier New', courier, monospace; border-right-style: none; border-left-style: none; background-color: white; border-bottom-style: none"><span style="color: #606060"> 3:</span> None,</pre> <pre style="padding-right: 0px; padding-left: 0px; font-size: 8pt; padding-bottom: 0px; margin: 0em; overflow: visible; width: 100%; color: black; border-top-style: none; line-height: 12pt; padding-top: 0px; font-family: consolas, 'Courier New', courier, monospace; border-right-style: none; border-left-style: none; background-color: #f4f4f4; border-bottom-style: none"><span style="color: #606060"> 4:</span> gtk.FILE_CHOOSER_ACTION_OPEN,</pre> <pre style="padding-right: 0px; padding-left: 0px; font-size: 8pt; padding-bottom: 0px; margin: 0em; overflow: visible; width: 100%; color: black; border-top-style: none; line-height: 12pt; padding-top: 0px; font-family: consolas, 'Courier New', courier, monospace; border-right-style: none; border-left-style: none; background-color: white; border-bottom-style: none"><span style="color: #606060"> 5:</span> (gtk.STOCK_CANCEL, gtk.RESPONSE_CANCEL, gtk.STOCK_OPEN, gtk.RESPONSE_OK))</pre> <pre style="padding-right: 0px; padding-left: 0px; font-size: 8pt; padding-bottom: 0px; margin: 0em; overflow: visible; width: 100%; color: black; border-top-style: none; line-height: 12pt; padding-top: 0px; font-family: consolas, 'Courier New', courier, monospace; border-right-style: none; border-left-style: none; background-color: #f4f4f4; border-bottom-style: none"><span style="color: #606060"> 6:</span> dialog.set_local_only(True)</pre> <pre style="padding-right: 0px; padding-left: 0px; font-size: 8pt; padding-bottom: 0px; margin: 0em; overflow: visible; width: 100%; color: black; border-top-style: none; line-height: 12pt; padding-top: 0px; font-family: consolas, 'Courier New', courier, monospace; border-right-style: none; border-left-style: none; background-color: white; border-bottom-style: none"><span style="color: #606060"> 7:</span> dialog.set_select_multiple(False)</pre> <pre style="padding-right: 0px; padding-left: 0px; font-size: 8pt; padding-bottom: 0px; margin: 0em; overflow: visible; width: 100%; color: black; border-top-style: none; line-height: 12pt; padding-top: 0px; font-family: consolas, 'Courier New', courier, monospace; border-right-style: none; border-left-style: none; background-color: #f4f4f4; border-bottom-style: none"><span style="color: #606060"> 8:</span> cityFolder = os.getcwd() + <span style="color: #006080">"\\cities"</span></pre> <pre style="padding-right: 0px; padding-left: 0px; font-size: 8pt; padding-bottom: 0px; margin: 0em; overflow: visible; width: 100%; color: black; border-top-style: none; line-height: 12pt; padding-top: 0px; font-family: consolas, 'Courier New', courier, monospace; border-right-style: none; border-left-style: none; background-color: white; border-bottom-style: none"><span style="color: #606060"> 9:</span> dialog.set_current_folder(cityFolder)</pre> <pre style="padding-right: 0px; padding-left: 0px; font-size: 8pt; padding-bottom: 0px; margin: 0em; overflow: visible; width: 100%; color: black; border-top-style: none; line-height: 12pt; padding-top: 0px; font-family: consolas, 'Courier New', courier, monospace; border-right-style: none; border-left-style: none; background-color: #f4f4f4; border-bottom-style: none"><span style="color: #606060"> 10:</span> </pre> <pre style="padding-right: 0px; padding-left: 0px; font-size: 8pt; padding-bottom: 0px; margin: 0em; overflow: visible; width: 100%; color: black; border-top-style: none; line-height: 12pt; padding-top: 0px; font-family: consolas, 'Courier New', courier, monospace; border-right-style: none; border-left-style: none; background-color: white; border-bottom-style: none"><span style="color: #606060"> 11:</span> filter = gtk.FileFilter()</pre> <pre style="padding-right: 0px; padding-left: 0px; font-size: 8pt; padding-bottom: 0px; margin: 0em; overflow: visible; width: 100%; color: black; border-top-style: none; line-height: 12pt; padding-top: 0px; font-family: consolas, 'Courier New', courier, monospace; border-right-style: none; border-left-style: none; background-color: #f4f4f4; border-bottom-style: none"><span style="color: #606060"> 12:</span> filter.set_name(<span style="color: #006080">"All files"</span>)</pre> <pre style="padding-right: 0px; padding-left: 0px; font-size: 8pt; padding-bottom: 0px; margin: 0em; overflow: visible; width: 100%; color: black; border-top-style: none; line-height: 12pt; padding-top: 0px; font-family: consolas, 'Courier New', courier, monospace; border-right-style: none; border-left-style: none; background-color: white; border-bottom-style: none"><span style="color: #606060"> 13:</span> filter.add_pattern(<span style="color: #006080">"*"</span>)</pre> <pre style="padding-right: 0px; padding-left: 0px; font-size: 8pt; padding-bottom: 0px; margin: 0em; overflow: visible; width: 100%; color: black; border-top-style: none; line-height: 12pt; padding-top: 0px; font-family: consolas, 'Courier New', courier, monospace; border-right-style: none; border-left-style: none; background-color: #f4f4f4; border-bottom-style: none"><span style="color: #606060"> 14:</span> dialog.add_filter(filter)</pre> <pre style="padding-right: 0px; padding-left: 0px; font-size: 8pt; padding-bottom: 0px; margin: 0em; overflow: visible; width: 100%; color: black; border-top-style: none; line-height: 12pt; padding-top: 0px; font-family: consolas, 'Courier New', courier, monospace; border-right-style: none; border-left-style: none; background-color: white; border-bottom-style: none"><span style="color: #606060"> 15:</span> </pre> <pre style="padding-right: 0px; padding-left: 0px; font-size: 8pt; padding-bottom: 0px; margin: 0em; overflow: visible; width: 100%; color: black; border-top-style: none; line-height: 12pt; padding-top: 0px; font-family: consolas, 'Courier New', courier, monospace; border-right-style: none; border-left-style: none; background-color: #f4f4f4; border-bottom-style: none"><span style="color: #606060"> 16:</span> filter = gtk.FileFilter()</pre> <pre style="padding-right: 0px; padding-left: 0px; font-size: 8pt; padding-bottom: 0px; margin: 0em; overflow: visible; width: 100%; color: black; border-top-style: none; line-height: 12pt; padding-top: 0px; font-family: consolas, 'Courier New', courier, monospace; border-right-style: none; border-left-style: none; background-color: white; border-bottom-style: none"><span style="color: #606060"> 17:</span> filter.set_name(<span style="color: #006080">"Micropolis City Files"</span>)</pre> <pre style="padding-right: 0px; padding-left: 0px; font-size: 8pt; padding-bottom: 0px; margin: 0em; overflow: visible; width: 100%; color: black; border-top-style: none; line-height: 12pt; padding-top: 0px; font-family: consolas, 'Courier New', courier, monospace; border-right-style: none; border-left-style: none; background-color: #f4f4f4; border-bottom-style: none"><span style="color: #606060"> 18:</span> filter.add_pattern(<span style="color: #006080">"*.cty"</span>)</pre> <pre style="padding-right: 0px; padding-left: 0px; font-size: 8pt; padding-bottom: 0px; margin: 0em; overflow: visible; width: 100%; color: black; border-top-style: none; line-height: 12pt; padding-top: 0px; font-family: consolas, 'Courier New', courier, monospace; border-right-style: none; border-left-style: none; background-color: white; border-bottom-style: none"><span style="color: #606060"> 19:</span> dialog.add_filter(filter)</pre> <pre style="padding-right: 0px; padding-left: 0px; font-size: 8pt; padding-bottom: 0px; margin: 0em; overflow: visible; width: 100%; color: black; border-top-style: none; line-height: 12pt; padding-top: 0px; font-family: consolas, 'Courier New', courier, monospace; border-right-style: none; border-left-style: none; background-color: #f4f4f4; border-bottom-style: none"><span style="color: #606060"> 20:</span> </pre> <pre style="padding-right: 0px; padding-left: 0px; font-size: 8pt; padding-bottom: 0px; margin: 0em; overflow: visible; width: 100%; color: black; border-top-style: none; line-height: 12pt; padding-top: 0px; font-family: consolas, 'Courier New', courier, monospace; border-right-style: none; border-left-style: none; background-color: white; border-bottom-style: none"><span style="color: #606060"> 21:</span> response = dialog.run()</pre> <pre style="padding-right: 0px; padding-left: 0px; font-size: 8pt; padding-bottom: 0px; margin: 0em; overflow: visible; width: 100%; color: black; border-top-style: none; line-height: 12pt; padding-top: 0px; font-family: consolas, 'Courier New', courier, monospace; border-right-style: none; border-left-style: none; background-color: #f4f4f4; border-bottom-style: none"><span style="color: #606060"> 22:</span> <span style="color: #0000ff">if</span> response == gtk.RESPONSE_OK:</pre> <pre style="padding-right: 0px; padding-left: 0px; font-size: 8pt; padding-bottom: 0px; margin: 0em; overflow: visible; width: 100%; color: black; border-top-style: none; line-height: 12pt; padding-top: 0px; font-family: consolas, 'Courier New', courier, monospace; border-right-style: none; border-left-style: none; background-color: white; border-bottom-style: none"><span style="color: #606060"> 23:</span> filename = dialog.get_filename()</pre> <pre style="padding-right: 0px; padding-left: 0px; font-size: 8pt; padding-bottom: 0px; margin: 0em; overflow: visible; width: 100%; color: black; border-top-style: none; line-height: 12pt; padding-top: 0px; font-family: consolas, 'Courier New', courier, monospace; border-right-style: none; border-left-style: none; background-color: #f4f4f4; border-bottom-style: none"><span style="color: #606060"> 24:</span> self.engine.LoadCity(filename)</pre> <pre style="padding-right: 0px; padding-left: 0px; font-size: 8pt; padding-bottom: 0px; margin: 0em; overflow: visible; width: 100%; color: black; border-top-style: none; line-height: 12pt; padding-top: 0px; font-family: consolas, 'Courier New', courier, monospace; border-right-style: none; border-left-style: none; background-color: white; border-bottom-style: none"><span style="color: #606060"> 25:</span> dialog.destroy()</pre>Now run the app and select Open City from the popup menu and you'll see something like this:
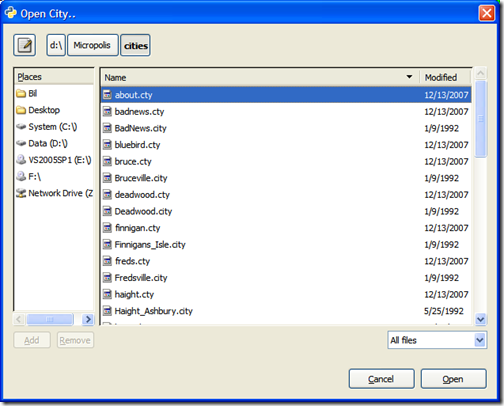
Click on a double-click on a city file or select one and click "Open". The new city will load in your window and you can move around the new landscape.
You can find the code up to this point in the exercise-3.py file.
Loading Scenarios
There are 8 "custom" scenarios pre-built for Micropolis. Think of a scenario as a situation composed of a map file, location, funds, and a timeline. While cities have their own timeline stored with them, scenarios are loaded and set to a certain point in time along with a set of fixed funds. Scenarios include the 1906 earthquake of San Francisco; Hamburg, Germany during the height of World War II in 1944; and and futuristic Boston in the year 2010.
The scenarios are hard coded inside fileio.cpp and can't be changed without modifications to the C++ source. There is an engine method called LoadScenario that takes in a number (1-8) for the scenario number to load. Again, like the Load City option with scenarios we'll build 8 menu items and hook them up to a callback. In this case, we can use a single call back and pass in (from the creation of the menu item) the number of the scenario to load.
Here's the new menu code for the scenarios:
1: playMenu = gtk.MenuItem("Play Scenario")
<pre style="padding-right: 0px; padding-left: 0px; font-size: 8pt; padding-bottom: 0px; margin: 0em; overflow: visible; width: 100%; color: black; border-top-style: none; line-height: 12pt; padding-top: 0px; font-family: consolas, 'Courier New', courier, monospace; border-right-style: none; border-left-style: none; background-color: #f4f4f4; border-bottom-style: none"><span style="color: #606060"> 2:</span> subMenu = gtk.Menu()</pre> <pre style="padding-right: 0px; padding-left: 0px; font-size: 8pt; padding-bottom: 0px; margin: 0em; overflow: visible; width: 100%; color: black; border-top-style: none; line-height: 12pt; padding-top: 0px; font-family: consolas, 'Courier New', courier, monospace; border-right-style: none; border-left-style: none; background-color: white; border-bottom-style: none"><span style="color: #606060"> 3:</span>  </pre> <pre style="padding-right: 0px; padding-left: 0px; font-size: 8pt; padding-bottom: 0px; margin: 0em; overflow: visible; width: 100%; color: black; border-top-style: none; line-height: 12pt; padding-top: 0px; font-family: consolas, 'Courier New', courier, monospace; border-right-style: none; border-left-style: none; background-color: #f4f4f4; border-bottom-style: none"><span style="color: #606060"> 4:</span> menuItem = gtk.MenuItem(<span style="color: #006080">"Dullsville"</span>)</pre> <pre style="padding-right: 0px; padding-left: 0px; font-size: 8pt; padding-bottom: 0px; margin: 0em; overflow: visible; width: 100%; color: black; border-top-style: none; line-height: 12pt; padding-top: 0px; font-family: consolas, 'Courier New', courier, monospace; border-right-style: none; border-left-style: none; background-color: white; border-bottom-style: none"><span style="color: #606060"> 5:</span> menuItem.connect(<span style="color: #006080">"activate"</span>, self.PlayScenario, 1)</pre> <pre style="padding-right: 0px; padding-left: 0px; font-size: 8pt; padding-bottom: 0px; margin: 0em; overflow: visible; width: 100%; color: black; border-top-style: none; line-height: 12pt; padding-top: 0px; font-family: consolas, 'Courier New', courier, monospace; border-right-style: none; border-left-style: none; background-color: #f4f4f4; border-bottom-style: none"><span style="color: #606060"> 6:</span> subMenu.append(menuItem)</pre> <pre style="padding-right: 0px; padding-left: 0px; font-size: 8pt; padding-bottom: 0px; margin: 0em; overflow: visible; width: 100%; color: black; border-top-style: none; line-height: 12pt; padding-top: 0px; font-family: consolas, 'Courier New', courier, monospace; border-right-style: none; border-left-style: none; background-color: white; border-bottom-style: none"><span style="color: #606060"> 7:</span>  </pre> <pre style="padding-right: 0px; padding-left: 0px; font-size: 8pt; padding-bottom: 0px; margin: 0em; overflow: visible; width: 100%; color: black; border-top-style: none; line-height: 12pt; padding-top: 0px; font-family: consolas, 'Courier New', courier, monospace; border-right-style: none; border-left-style: none; background-color: #f4f4f4; border-bottom-style: none"><span style="color: #606060"> 8:</span> menuItem = gtk.MenuItem(<span style="color: #006080">"San Francisco"</span>)</pre> <pre style="padding-right: 0px; padding-left: 0px; font-size: 8pt; padding-bottom: 0px; margin: 0em; overflow: visible; width: 100%; color: black; border-top-style: none; line-height: 12pt; padding-top: 0px; font-family: consolas, 'Courier New', courier, monospace; border-right-style: none; border-left-style: none; background-color: white; border-bottom-style: none"><span style="color: #606060"> 9:</span> menuItem.connect(<span style="color: #006080">"activate"</span>, self.PlayScenario, 2)</pre> <pre style="padding-right: 0px; padding-left: 0px; font-size: 8pt; padding-bottom: 0px; margin: 0em; overflow: visible; width: 100%; color: black; border-top-style: none; line-height: 12pt; padding-top: 0px; font-family: consolas, 'Courier New', courier, monospace; border-right-style: none; border-left-style: none; background-color: #f4f4f4; border-bottom-style: none"><span style="color: #606060"> 10:</span> subMenu.append(menuItem)</pre> <pre style="padding-right: 0px; padding-left: 0px; font-size: 8pt; padding-bottom: 0px; margin: 0em; overflow: visible; width: 100%; color: black; border-top-style: none; line-height: 12pt; padding-top: 0px; font-family: consolas, 'Courier New', courier, monospace; border-right-style: none; border-left-style: none; background-color: white; border-bottom-style: none"><span style="color: #606060"> 11:</span>  </pre> <pre style="padding-right: 0px; padding-left: 0px; font-size: 8pt; padding-bottom: 0px; margin: 0em; overflow: visible; width: 100%; color: black; border-top-style: none; line-height: 12pt; padding-top: 0px; font-family: consolas, 'Courier New', courier, monospace; border-right-style: none; border-left-style: none; background-color: #f4f4f4; border-bottom-style: none"><span style="color: #606060"> 12:</span> menuItem = gtk.MenuItem(<span style="color: #006080">"Hamburg"</span>)</pre> <pre style="padding-right: 0px; padding-left: 0px; font-size: 8pt; padding-bottom: 0px; margin: 0em; overflow: visible; width: 100%; color: black; border-top-style: none; line-height: 12pt; padding-top: 0px; font-family: consolas, 'Courier New', courier, monospace; border-right-style: none; border-left-style: none; background-color: white; border-bottom-style: none"><span style="color: #606060"> 13:</span> menuItem.connect(<span style="color: #006080">"activate"</span>, self.PlayScenario, 3)</pre> <pre style="padding-right: 0px; padding-left: 0px; font-size: 8pt; padding-bottom: 0px; margin: 0em; overflow: visible; width: 100%; color: black; border-top-style: none; line-height: 12pt; padding-top: 0px; font-family: consolas, 'Courier New', courier, monospace; border-right-style: none; border-left-style: none; background-color: #f4f4f4; border-bottom-style: none"><span style="color: #606060"> 14:</span> subMenu.append(menuItem)</pre> <pre style="padding-right: 0px; padding-left: 0px; font-size: 8pt; padding-bottom: 0px; margin: 0em; overflow: visible; width: 100%; color: black; border-top-style: none; line-height: 12pt; padding-top: 0px; font-family: consolas, 'Courier New', courier, monospace; border-right-style: none; border-left-style: none; background-color: white; border-bottom-style: none"><span style="color: #606060"> 15:</span>  </pre> <pre style="padding-right: 0px; padding-left: 0px; font-size: 8pt; padding-bottom: 0px; margin: 0em; overflow: visible; width: 100%; color: black; border-top-style: none; line-height: 12pt; padding-top: 0px; font-family: consolas, 'Courier New', courier, monospace; border-right-style: none; border-left-style: none; background-color: #f4f4f4; border-bottom-style: none"><span style="color: #606060"> 16:</span> menuItem = gtk.MenuItem(<span style="color: #006080">"Bern"</span>)</pre> <pre style="padding-right: 0px; padding-left: 0px; font-size: 8pt; padding-bottom: 0px; margin: 0em; overflow: visible; width: 100%; color: black; border-top-style: none; line-height: 12pt; padding-top: 0px; font-family: consolas, 'Courier New', courier, monospace; border-right-style: none; border-left-style: none; background-color: white; border-bottom-style: none"><span style="color: #606060"> 17:</span> menuItem.connect(<span style="color: #006080">"activate"</span>, self.PlayScenario, 4)</pre> <pre style="padding-right: 0px; padding-left: 0px; font-size: 8pt; padding-bottom: 0px; margin: 0em; overflow: visible; width: 100%; color: black; border-top-style: none; line-height: 12pt; padding-top: 0px; font-family: consolas, 'Courier New', courier, monospace; border-right-style: none; border-left-style: none; background-color: #f4f4f4; border-bottom-style: none"><span style="color: #606060"> 18:</span> subMenu.append(menuItem)</pre> <pre style="padding-right: 0px; padding-left: 0px; font-size: 8pt; padding-bottom: 0px; margin: 0em; overflow: visible; width: 100%; color: black; border-top-style: none; line-height: 12pt; padding-top: 0px; font-family: consolas, 'Courier New', courier, monospace; border-right-style: none; border-left-style: none; background-color: white; border-bottom-style: none"><span style="color: #606060"> 19:</span>  </pre> <pre style="padding-right: 0px; padding-left: 0px; font-size: 8pt; padding-bottom: 0px; margin: 0em; overflow: visible; width: 100%; color: black; border-top-style: none; line-height: 12pt; padding-top: 0px; font-family: consolas, 'Courier New', courier, monospace; border-right-style: none; border-left-style: none; background-color: #f4f4f4; border-bottom-style: none"><span style="color: #606060"> 20:</span> menuItem = gtk.MenuItem(<span style="color: #006080">"Tokyo"</span>)</pre> <pre style="padding-right: 0px; padding-left: 0px; font-size: 8pt; padding-bottom: 0px; margin: 0em; overflow: visible; width: 100%; color: black; border-top-style: none; line-height: 12pt; padding-top: 0px; font-family: consolas, 'Courier New', courier, monospace; border-right-style: none; border-left-style: none; background-color: white; border-bottom-style: none"><span style="color: #606060"> 21:</span> menuItem.connect(<span style="color: #006080">"activate"</span>, self.PlayScenario, 5)</pre> <pre style="padding-right: 0px; padding-left: 0px; font-size: 8pt; padding-bottom: 0px; margin: 0em; overflow: visible; width: 100%; color: black; border-top-style: none; line-height: 12pt; padding-top: 0px; font-family: consolas, 'Courier New', courier, monospace; border-right-style: none; border-left-style: none; background-color: #f4f4f4; border-bottom-style: none"><span style="color: #606060"> 22:</span> subMenu.append(menuItem)</pre> <pre style="padding-right: 0px; padding-left: 0px; font-size: 8pt; padding-bottom: 0px; margin: 0em; overflow: visible; width: 100%; color: black; border-top-style: none; line-height: 12pt; padding-top: 0px; font-family: consolas, 'Courier New', courier, monospace; border-right-style: none; border-left-style: none; background-color: white; border-bottom-style: none"><span style="color: #606060"> 23:</span>  </pre> <pre style="padding-right: 0px; padding-left: 0px; font-size: 8pt; padding-bottom: 0px; margin: 0em; overflow: visible; width: 100%; color: black; border-top-style: none; line-height: 12pt; padding-top: 0px; font-family: consolas, 'Courier New', courier, monospace; border-right-style: none; border-left-style: none; background-color: #f4f4f4; border-bottom-style: none"><span style="color: #606060"> 24:</span> menuItem = gtk.MenuItem(<span style="color: #006080">"Detroit"</span>)</pre> <pre style="padding-right: 0px; padding-left: 0px; font-size: 8pt; padding-bottom: 0px; margin: 0em; overflow: visible; width: 100%; color: black; border-top-style: none; line-height: 12pt; padding-top: 0px; font-family: consolas, 'Courier New', courier, monospace; border-right-style: none; border-left-style: none; background-color: white; border-bottom-style: none"><span style="color: #606060"> 25:</span> menuItem.connect(<span style="color: #006080">"activate"</span>, self.PlayScenario, 6)</pre> <pre style="padding-right: 0px; padding-left: 0px; font-size: 8pt; padding-bottom: 0px; margin: 0em; overflow: visible; width: 100%; color: black; border-top-style: none; line-height: 12pt; padding-top: 0px; font-family: consolas, 'Courier New', courier, monospace; border-right-style: none; border-left-style: none; background-color: #f4f4f4; border-bottom-style: none"><span style="color: #606060"> 26:</span> subMenu.append(menuItem)</pre> <pre style="padding-right: 0px; padding-left: 0px; font-size: 8pt; padding-bottom: 0px; margin: 0em; overflow: visible; width: 100%; color: black; border-top-style: none; line-height: 12pt; padding-top: 0px; font-family: consolas, 'Courier New', courier, monospace; border-right-style: none; border-left-style: none; background-color: white; border-bottom-style: none"><span style="color: #606060"> 27:</span>  </pre> <pre style="padding-right: 0px; padding-left: 0px; font-size: 8pt; padding-bottom: 0px; margin: 0em; overflow: visible; width: 100%; color: black; border-top-style: none; line-height: 12pt; padding-top: 0px; font-family: consolas, 'Courier New', courier, monospace; border-right-style: none; border-left-style: none; background-color: #f4f4f4; border-bottom-style: none"><span style="color: #606060"> 28:</span> menuItem = gtk.MenuItem(<span style="color: #006080">"Boston"</span>)</pre> <pre style="padding-right: 0px; padding-left: 0px; font-size: 8pt; padding-bottom: 0px; margin: 0em; overflow: visible; width: 100%; color: black; border-top-style: none; line-height: 12pt; padding-top: 0px; font-family: consolas, 'Courier New', courier, monospace; border-right-style: none; border-left-style: none; background-color: white; border-bottom-style: none"><span style="color: #606060"> 29:</span> menuItem.connect(<span style="color: #006080">"activate"</span>, self.PlayScenario, 7)</pre> <pre style="padding-right: 0px; padding-left: 0px; font-size: 8pt; padding-bottom: 0px; margin: 0em; overflow: visible; width: 100%; color: black; border-top-style: none; line-height: 12pt; padding-top: 0px; font-family: consolas, 'Courier New', courier, monospace; border-right-style: none; border-left-style: none; background-color: #f4f4f4; border-bottom-style: none"><span style="color: #606060"> 30:</span> subMenu.append(menuItem)</pre> <pre style="padding-right: 0px; padding-left: 0px; font-size: 8pt; padding-bottom: 0px; margin: 0em; overflow: visible; width: 100%; color: black; border-top-style: none; line-height: 12pt; padding-top: 0px; font-family: consolas, 'Courier New', courier, monospace; border-right-style: none; border-left-style: none; background-color: white; border-bottom-style: none"><span style="color: #606060"> 31:</span>  </pre> <pre style="padding-right: 0px; padding-left: 0px; font-size: 8pt; padding-bottom: 0px; margin: 0em; overflow: visible; width: 100%; color: black; border-top-style: none; line-height: 12pt; padding-top: 0px; font-family: consolas, 'Courier New', courier, monospace; border-right-style: none; border-left-style: none; background-color: #f4f4f4; border-bottom-style: none"><span style="color: #606060"> 32:</span> menuItem = gtk.MenuItem(<span style="color: #006080">"Rio de Janeiro"</span>)</pre> <pre style="padding-right: 0px; padding-left: 0px; font-size: 8pt; padding-bottom: 0px; margin: 0em; overflow: visible; width: 100%; color: black; border-top-style: none; line-height: 12pt; padding-top: 0px; font-family: consolas, 'Courier New', courier, monospace; border-right-style: none; border-left-style: none; background-color: white; border-bottom-style: none"><span style="color: #606060"> 33:</span> menuItem.connect(<span style="color: #006080">"activate"</span>, self.PlayScenario, 8)</pre> <pre style="padding-right: 0px; padding-left: 0px; font-size: 8pt; padding-bottom: 0px; margin: 0em; overflow: visible; width: 100%; color: black; border-top-style: none; line-height: 12pt; padding-top: 0px; font-family: consolas, 'Courier New', courier, monospace; border-right-style: none; border-left-style: none; background-color: #f4f4f4; border-bottom-style: none"><span style="color: #606060"> 34:</span> subMenu.append(menuItem)</pre> <pre style="padding-right: 0px; padding-left: 0px; font-size: 8pt; padding-bottom: 0px; margin: 0em; overflow: visible; width: 100%; color: black; border-top-style: none; line-height: 12pt; padding-top: 0px; font-family: consolas, 'Courier New', courier, monospace; border-right-style: none; border-left-style: none; background-color: white; border-bottom-style: none"><span style="color: #606060"> 35:</span>  </pre> <pre style="padding-right: 0px; padding-left: 0px; font-size: 8pt; padding-bottom: 0px; margin: 0em; overflow: visible; width: 100%; color: black; border-top-style: none; line-height: 12pt; padding-top: 0px; font-family: consolas, 'Courier New', courier, monospace; border-right-style: none; border-left-style: none; background-color: #f4f4f4; border-bottom-style: none"><span style="color: #606060"> 36:</span> playMenu.set_submenu(subMenu)</pre> <pre style="padding-right: 0px; padding-left: 0px; font-size: 8pt; padding-bottom: 0px; margin: 0em; overflow: visible; width: 100%; color: black; border-top-style: none; line-height: 12pt; padding-top: 0px; font-family: consolas, 'Courier New', courier, monospace; border-right-style: none; border-left-style: none; background-color: white; border-bottom-style: none"><span style="color: #606060"> 37:</span> childMenu.append(playMenu)</pre>And here's the PlayScenario method. Note we'll grab the scenario number as a parameter passed in and call the engine.LoadScenario method using it:
1: def PlayScenario(self, widget, scenario):<pre style="padding-right: 0px; padding-left: 0px; font-size: 8pt; padding-bottom: 0px; margin: 0em; overflow: visible; width: 100%; color: black; border-top-style: none; line-height: 12pt; padding-top: 0px; font-family: consolas, 'Courier New', courier, monospace; border-right-style: none; border-left-style: none; background-color: #f4f4f4; border-bottom-style: none"><span style="color: #606060"> 2:</span> self.engine.LoadScenario(scenario)</pre>Now with the modifications we've done we can load up scenario files, load up cities, and generate a new blank terrain all driven from a popup menu.
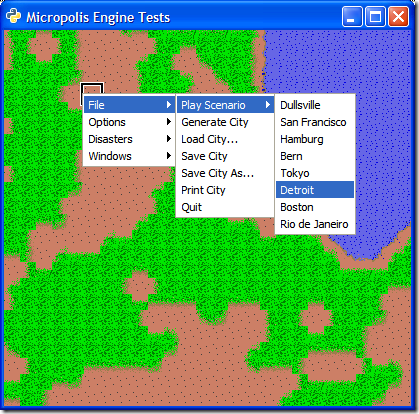
Finally we'll just add the remaining menu items that represent the ones in the game. We'll stub these out for now to call a placeholder method. You can grab the final exercise-final.py file from here. Just drop it in your distribution folder and you're ready to go.
Things you can do to extend these ideas:
-
Modify the fileio.cpp code to read in an XML file or something and retrieve the scenario information from there rather than having it hard coded in the source. This will allow you to add new scenarios without rebuilding the system.
-
Alternately build the loading of the scenarios in Python instead so it can be modified.
That's it for file access and getting started in the guts of the engine. If you have any questions so far, feel free to email me with them. Next up we'll continue to extend the UI and talk to more parts of the Metropolis engine.
This is a series of posts exploring and extending the Micropolis code. You can view the full list of posts here.
-
-
Building A City - Part II
 MicropolisCore is package put together that is a fairly clean port of the original C code into a C++ mega class (called Micropolis). The distribution is a set of three projects, but this post focuses on the main one Micropolis. This contains the core simulation code. One other project we need is the TileEngine which (via it's default implementation using Cairo built on top of GTK+) provides a UI so we can see our city.
The new MicropolisCore project is all C++ and Python code. There is no TCL required, however it still uses GTK for it's UI. You'll need to download PyGTK, a GTK+ wrapper in Python, from here and install it. It'll find Python and install it for you. Also grab PyGObject which are the Python bindings for GObject and PyCairo and install them (you can get them all from the same location).
Assuming you followed the last post and compiled the system, you'll have the Micropolis and TileEngine projects built, along with the generated Python files and other goodies that came along for the ride. You can run this from the MicropolisCore python folder, but I prefer to put everything together into a distribution folder to keep things clean.
I've created a binary distribution for you which you can download here. It contains all the assets along with Micropolis and TileEngine (CellEngine isn't needed for this demo) and is ready to go once you install the pre-requisite files listed here (see the end of this post for a list of all the files you need with links for downloading).
To create your own distribution, just copy the "python" folder from the Micropolis project. Add in the _micropolis.pyd file from the Release directory. Copy in the _tileengine.pyd file from the TileEngine release directory. Finally copy the *.py files from the TileEngine python directory. This is everything you need to run the demo.
Now for the final moment. Run the following command from where you have your distribution files:
C:\Python25\Python.exe -i micropoliswindow.py
If the stars align, you should see this:
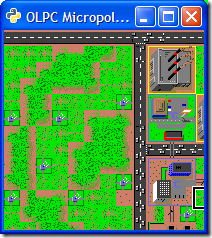
You now have Micropolis running on Windows! Well, at least a demo running the Micropolis engine from Python. Go ahead and explore your city. Everything is there that you'll remember from the original SimCity, complete with traffic running around.
There are a few keystrokes you can use while the demo is running. You can use the arrow keys to move the cursor box around. "O" will zoom in and allow you to see the demo city (the demo script loads up the "cities/haight.cty" file). Messing around with the zoom lets you get something like this displayed:
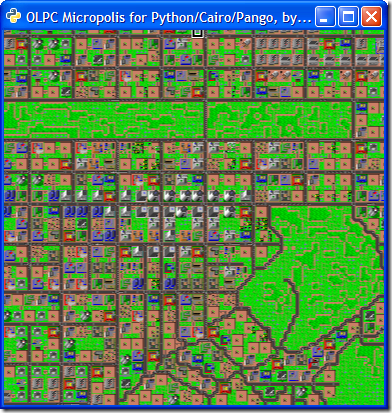
Other keystrokes:
- "R" resets the zoom
- "O" zooms out
- "I" zooms in
Go ahead and maximize the screen. Here's the full city in all it's Python/GTK glory:
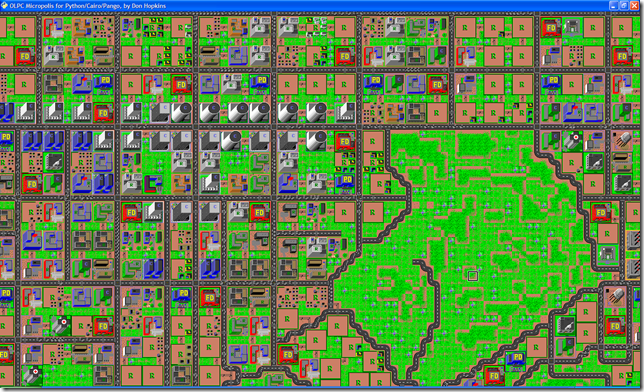
Running from the command line is fine and dandy, but how about debugging the program? Glad you asked.
First, you'll need to switch your configuration to ReleaseSymbols. This will output the export libraries for Python to find in the correct directory. If you want to change this, you'll need to edit a bunch of the *.py files in the python directory for each project. Just look and you'll see where it references the ReleaseSymbols folder right before it does the import.
After you switch to the ReleaseSymbols configuration, you'll need to set python.exe as your debugger and have it launch the micropoliswindow.py file. Right click on the Micropolis project and select Debugger from the tree. Then setup the debugger options like this:
Now you're ready to debug. Pick a file and set a breakpoint then hit F5. You'll see the GTK Window popup with the demo city loaded, and you can fully debug the C++ code at this point.
Small victories.
Next up is building some additional functionality into the system, writing a new Python front-end, and starting to build out a full blow Micropolis client on Windows. You might also notice that there's a sample micropoliswebserver.py file. Now that the system is compiled and can be driven from Python, thanks to SWIG, why not? I haven't looked at the webserver yet, but Python itself has the facilities to launch one. And now that Python is hooked into the Micropolis engine you can easily serve up the core to the web. Pretty slick.
Here's that list of additional files you'll need to install for running the system:
This is a series of posts exploring and extending the Micropolis code. You can view the full list of posts here.
-
Building A City - Part I
 Well. My last post was a little, ummm... popular? Slashdot, Boing Boing, BluesNews, and pretty much the rest of the planet have all linked to it. Glad everyone is happy about the source release.
 Anyways, there's been a lot of buzz about the code and the main questions that come up are "how do I get it to compile?". Let's go through this.
This is the first part of a series. In this post we'll go through the tools you need to install and the steps to get the Python and Windows code compiled. In part II, we'll hook up what we've built with a UI. Beyond that I'll dig into the various engines and ways to manipulate and change them.
Tools of the Trade
The Micropolis code isn't just C code. There is that (bascially the original code slightly retrofitted and updated for OLPC). There's also the python and TCL code. Python is an OO programming language that Don Hopkins chose to work with. Python itself is a pretty good language to work with but there's additional power using a tool called SWIG. SWIG let's you take your existing C/C++/etc. code and "pythonify" it. No, we don't mean to teach it how to lop off the Black Knight's arms and legs in battle. We mean expose your already existing property (in this case the SimCity code) to python. This will allow us to plug in scripting to Micropolis and make it do our bidding.
Anywho, here's the rundown of the tools you'll need to get started.
SWIG
SWIG is a software development tool that connects programs written in C and C++ with a variety of high-level programming languages. It's run by the projects to generate Python files from the C++ ones. Grab the latest version of SWIG for Windows from here and install to C:\SWIG.
GTK
GTK is a multi-platform graphical windowing library. Download and install the gtk++win32-devel package here. Use the default C:\GTK folder for installing. The GTK install includes Cairo, a 2D graphics library used by Micropolis so you don't have to install it separately.
Pycairo
While you get the Cairo libraries for free with the GTK install, you'll need the python bindings for Cairo. These are available through the pycairo project here. Install to C:\pycairo. This will enable you to build the TileEngine project.
Python 2.5
Python is an OO scripting language that has a lot of flexibility and power. Micropolis exposes its internals using SWIG to python so you can plug it in as an engine to drive the core functionality. Download Python 2.5 from here. You can install 2.5 just to get going although the site recommends 2.5.1. Install it to the default location (C:\Python25) and you're all set.
Compiling
The source code comes in two packages. The first one, micropolis-activity-source.tgz, is the TCL/Tk version for Linux with the (mostly) original C code. The second package, MicropolisCore.tgz, (the one we're going to build with Visual Studio) is a C++ version which has the following features:
- A Micropolis project containing cleaned up C++ code from the original C code for the main game engine
- The cellular automata engine pulled into a separate project of its own called CellEngine
- A TileEngine project (using Cairo by default) which displays Micropolis tiles and CellEngine cells.
Once you have all the pre-requisite tools listed above installed you're ready to go. Note that if you installed the tools in anywhere but the path mentioned, you'll have to modify the projects in Visual Studio so it can find them accordingly.
First, right click on the Micropolis project and build it. You should get output similar to this:
1>------ Build started: Project: Micropolis, Configuration: Release Win32 ------
1>Executing tool...
1>..\micropolis.h(1240): Warning(462): Unable to set dimensionless array variable
1>..\micropolis.h(1242): Warning(462): Unable to set dimensionless array variable
1>..\micropolis.h(2093): Warning(462): Unable to set dimensionless array variable
1>..\micropolis.h(2095): Warning(462): Unable to set dimensionless array variable
1>..\micropolis.h(2097): Warning(462): Unable to set dimensionless array variable
1>..\micropolis.h(2099): Warning(462): Unable to set dimensionless array variable
1>Compiling...
1>micropolis_wrap.cpp
1>Linking...
1> Creating library d:\Development\Projects\MicropolisCore\src\Micropolis\python\\Release\_micropolis.lib and object d:\Development\Projects\MicropolisCore\src\Micropolis\python\\Release\_micropolis.exp
1>Generating code
1>Finished generating code
1>Embedding manifest...
1>Build log was saved at "file://d:\Development\Projects\MicropolisCore\src\Micropolis\python\Release\BuildLog.htm"
1>Micropolis - 0 error(s), 0 warning(s)
========== Build: 1 succeeded, 0 failed, 0 up-to-date, 0 skipped ==========Once this is built in your Micropolis project you'll see that the SWIG folder is now populated. This contains all the python wrappers that talk to the C++ Micropolis code (generated by the SWIG tool).
Now build the CellEngine project. You should get output similar to this:
1>------ Build started: Project: CellEngine, Configuration: Release Win32 ------
1>Executing tool...
1>Build log was saved at "file://d:\Development\Projects\MicropolisCore\src\CellEngine\python\Release\BuildLog.htm"
1>CellEngine - 0 error(s), 0 warning(s)
========== Build: 1 succeeded, 0 failed, 0 up-to-date, 0 skipped ==========Finally build TileEngine project. You should get output similar to this:
1>------ Build started: Project: TileEngine, Configuration: Release Win32 ------
1>Executing tool...
1>..\tileengine.h(125): Warning(454): Setting a pointer/reference variable may leak memory.
1>Build log was saved at "file://d:\Development\Projects\MicropolisCore\src\TileEngine\python\Release\BuildLog.htm"
1>TileEngine - 0 error(s), 0 warning(s)
========== Build: 1 succeeded, 0 failed, 0 up-to-date, 0 skipped ==========Now that everything is built you've got yourself 3 import libraries that can be used by python. At this point you could drive the system purely from python. The Linux port uses Tcl/Tk as it's windowing system and we'll get into using this to interact with the python output we created here in the next blog post.
This is a series of posts exploring and extending the Micropolis code. You can view the full list of posts here.