Contents tagged with SharePoint 2010
-
Enhancing your SharePoint Team Site Homepage
A team site can be a boring place. Just a site with some documents, a list or two, maybe a calendar. Here’s a super simple way to make the page a little more interesting looking.
Your team site might look like this right now, with a calendar on the home page:

Simple and effective but bland. Also the title just blends into the background doesn’t it?
Edit the web part and under Advanced settings, set the Title Icon Image URL to the same value as the Calendar Icon Image URL:

Now the calendar shows a small icon next to the title and breaks up the page a little.

Simple but easy to do. By default, the Title icon is blank but IMHO it should be defaulted to the type of list that’s being shown (Calendar, Task List, Document Library, etc.). Like I said, it’s simple but it breaks up the page and also is a visual reminder of what you’re looking at. It also shows where the clickable title is for a list or library that’s been put on a page. When you have a page full of web parts, it’s not immediately obvious where the title is in a sea of text. A little graphic goes a long way for readability.
You can use any icon for any list but I like using the one suited to the task. Here’s a list of the icons to use for each list/library type:
List/Library Type Icon Custom List /_layouts/images/itgen.gif Calendar /_layouts/images/itevent.png Contact List /_layouts/images/itcontct.gif Site /_layouts/images/SharePointFoundation16.png Document Library /_layouts/images/itdl.png Announcements /_layouts/images/itann.png Discussion Board /_layouts/images/itann.png Issue Tracker /_layouts/images/itissue.png Picture Library /_layouts/images/itil.png Links /_layouts/images/itlink.png Tasks /_layouts/images/ittask.png Survey /_layouts/images/itsurvey.png Enjoy!
-
Defaulting Values in a Multi-Lookup Form in SharePoint
This was a question asked on the MSDN Forums but I thought it was worthy of a blog post as I could get more in depth with the explanation and show some pretty pictures (plus the fact I’ve never done it so thought it would be fun).
The problem was a user wanted to default multiple values in a lookup field in SharePoint. First problem, there are no defaults in a lookup field. Second problem, how do you do default multiple values?
First we’ll start with the setup. Create yourself a list which will hold the lookup values. In this case it’s a list of country names but it can be anything you want. Just a custom list with the Title field is enough.

Now we need a list with a lookup column to select our countries from. Create another custom list and add a column to it that looks something like this. Here’s the name and type:

And here’s the additional column settings where we get our information from (MultiLookupDefaultSpikeSource is the name of the list we created to hold our values)

Here’s what our form looks like when we add a new item:

Thinking about the problem I first though we could manipulate the form in SharePoint Designer but realized that the Form Web Part is going to retrieve all of our values from the list, defaults, etc. and really what we need to do is manipulate the list at runtime in the DOM.
It’s jQuery to the RESCUE!
First we take a look at the original state of the form to find our list boxes. Here’s the snippet we’re interested in, the first listbox:
 <select
 name="ctl00$m$g_478fe6d2_8fdb_48e8_be57_7739de1c3b8f$ctl00$ctl05$ctl01$ctl00$ctl00$ctl04$ctl00$ctl00$SelectCandidate"
 title="Country possible values"
 id="ctl00_m_g_478fe6d2_8fdb_48e8_be57_7739de1c3b8f_ctl00_ctl05_ctl01_ctl00_ctl00_ctl04_ctl00_ctl00_SelectCandidate"
 style="width: 143px; height: 125px; overflow: scroll;"
 ondblclick="GipAddSelectedItems(ctl00_m_g_478fe6d2_8fdb_48e8_be57_7739de1c3b8f_ctl00_ctl05_ctl01_ctl00_ctl00_ctl04_ctl00_ctl00_MultiLookupPicker_m); return false"
 onchange="GipSelectCandidateItems(ctl00_m_g_478fe6d2_8fdb_48e8_be57_7739de1c3b8f_ctl00_ctl05_ctl01_ctl00_ctl00_ctl04_ctl00_ctl00_MultiLookupPicker_m);"
 multiple="multiple">
 <OPTION title=Africa selected value=5>Africa</OPTION>
 <OPTION title=Asia value=1>Asia</OPTION>
 <OPTION title=Europe value=3>Europe</OPTION>
 <OPTION title=India value=4>India</OPTION>
 <OPTION title=Ireland value=6>Ireland</OPTION>
 <OPTION title=Singapore value=2>Singapore</OPTION>
 </select>
We can see that it has an ID that ends in “_SelectCandidate” so we’ll use this for selection.
Another part of the puzzle is a hidden set of fields that store the actual values used in the list. There are three of them and they’re well documented in a blog post here by Marc Anderson on SharePoint Magazine. In it he talks about multiselect columns and breaks down the three hidden fields used (the current set of values, the complete set of values, and the default values).
The second listbox looks like this:
 <select
 name="ctl00$m$g_478fe6d2_8fdb_48e8_be57_7739de1c3b8f$ctl00$ctl05$ctl01$ctl00$ctl00$ctl04$ctl00$ctl00$SelectResult"
 title="Country selected values"
 id="ctl00_m_g_478fe6d2_8fdb_48e8_be57_7739de1c3b8f_ctl00_ctl05_ctl01_ctl00_ctl00_ctl04_ctl00_ctl00_SelectResult"
 style="width: 143px; height: 125px; overflow: scroll;"
 ondblclick="GipRemoveSelectedItems(ctl00_m_g_478fe6d2_8fdb_48e8_be57_7739de1c3b8f_ctl00_ctl05_ctl01_ctl00_ctl00_ctl04_ctl00_ctl00_MultiLookupPicker_m); return false" \
 onchange="GipSelectResultItems(ctl00_m_g_478fe6d2_8fdb_48e8_be57_7739de1c3b8f_ctl00_ctl05_ctl01_ctl00_ctl00_ctl04_ctl00_ctl00_MultiLookupPicker_m);"
 multiple="multiple">
Easy enough. It has an ID that contains “_SelectResult”.
Now a quick jQuery primer when selecting items:
- $("[id='foo']"); // id equals 'foo'
- $("[id!='foo']") // id does not equal 'foo'
- $("[id^='foo']") // id starts with 'foo'
- $("[id$='foo']") // id ends with 'foo'
- $("[id*='foo']") // id contains 'foo'
Simple. We want to find the control that ends with “_SelectCandidate” and remove some items, then find the control that ends with “_SelectResult” and append our selected items.
So a few lines of heavily commented JavaScript:
 $(document).ready(function(){
   // define the items to add to the results (i.e already selected) this the visual part only
   var $resultOptions = "<OPTION title=Africa value=5>Africa</OPTION><OPTION title=India value=4>India</OPTION><OPTION title=Ireland value=6>Ireland</OPTION>";
   // this is the list of initial items (matching the ones above) that are used when the item is saved
   var $resultSpOptions = "5|tAfrica|t4|tIndia|t6|tIreland";
   // find the possible values control
   var possibleValues = $("[id$='_SelectCandidate']");
   // remove 1st option (Africa)
   $("[id$='_SelectCandidate'] option:eq(0)").remove();
   // remove 3rd option (India)
   $("[id$='_SelectCandidate'] option:eq(2)").remove();
   // remove 3rd option (Ireland)
   $("[id$='_SelectCandidate'] option:eq(2)").remove();
   // set selected value to asia (value 1)
   possibleValues.val(1)
   // append the new options to our results (this updates the display only of the second list box)
   $("[id$='_SelectResult']").append($resultOptions);
   // append the new options to our hidden field (this sets the values into the list item when saving)
   $("[id$='MultiLookupPicker']").val($resultSpOptions);
 });
SharePoint 2010 supports editing NewForm.aspx (and the other out-of-the-box forms) in the browser. One option is to modify the list and under advanced settings you can disable “Launch forms in a dialog”. This will launch the form like a regular web page. However that’s 3 or 4 steps and you have to go back and change it when you’re done.
Instead just visit the new form directly:
http://sitename/listname/NewForm.aspx
From this page select Site Actions | Edit Page. Now you can add a Content Editor Web Part to the page. When adding JavaScript I point the Content Link to the .js file (that I upload somewhere like Style Library or the Assets library if you have one) rather than trying to put JavaScript into the Content Editor Web Part. This way a) I can edit the JavaScript outside of the page by loading it up in SharePoint Designer or even upload a new .js file to the library and b) I can debug the JavaScript independently of the NewForm.aspx page (or whatever page I’m adding the .js file to)
The result:

When you save the record, the three default options are saved as well (this was set by the JavaScript).
Hope that helps!
-
PowerShell Tools - Removing Orphaned Users from SharePoint
Here’s a script that will walk through all Site Collections in all Web Applications (i.e. your entire farm) and delete any user from the Site Collection that isn’t in ActiveDirectory anymore.
Note this will not remove them from their user profiles, it just cleans up Site Collections. If you want some great info on how the User Profile service works and the My Site Cleanup Job then check out these resources:
Here’s the code:
[int]$GLOBAL:TotalUsersUpdated = 0;
function Check_User_In_ActiveDirectory([string]$LoginName, [string]$domaincnx){$returnValue = $false
$strFilter = "(&(|(objectCategory=user)(objectCategory=group))(samAccountName=$LoginName))"$objDomain = New-Object System.DirectoryServices.DirectoryEntry($domaincnx)
$objSearcher = New-Object System.DirectoryServices.DirectorySearcher
$objSearcher.SearchRoot = $objDomain
$objSearcher.PageSize = 1000
$objSearcher.Filter = $strFilter
$objSearcher.SearchScope = "Subtree"$colResults = $objSearcher.FindAll()
if($colResults.Count -gt 0)
{$returnValue = $true
}
return $returnValue}
function ListOrphanedUsers([string]$SiteCollectionURL, [string]$mydomaincnx){[System.Reflection.Assembly]::LoadWithPartialName("Microsoft.SharePoint") > $null$site = new-object Microsoft.SharePoint.SPSite($SiteCollectionURL)
$web = $site.openweb()
Write-Host "SiteCollectionURL:", $SiteCollectionURL$siteCollUsers = $web.SiteUsers
Write-host "SiteUsers:", $siteCollUsers.Count#Create array to hold non-existant users$usersToRemove = @()
foreach($MyUser in $siteCollUsers)
{if(($MyUser.LoginName.ToLower() -ne "sharepoint\system") -and
($MyUser.LoginName.ToLower() -ne "nt authority\authenticated users") -and
($MyUser.LoginName.ToLower() -ne "nt authority\local service"))
{$UserName = $MyUser.LoginName.ToLower()
$Tablename = $UserName.split("\")$returncheck = Check_User_In_ActiveDirectory $Tablename[1] $mydomaincnx
if($returncheck -eq $False)
{Write-Host "User does not exist", $MyUser.LoginName, "on domain"
$usersToRemove = $usersToRemove + $MyUser.LoginName
$GLOBAL:TotalUsersUpdated += 1;
}
}
}
foreach($u in $usersToRemove)
{Write-Host "Removing", $u, "from site collection", $SiteCollectionURL
$siteCollUsers.Remove($u)
}
$web.Dispose()
$site.Dispose()
}
function ListOrphanedUsersForAllColl([string]$WebAppURL, [string]$DomainCNX)
{[System.Reflection.Assembly]::LoadWithPartialName("Microsoft.SharePoint") > $null$Thesite = new-object Microsoft.SharePoint.SPSite($WebAppURL)
$oApp = $Thesite.WebApplication
Write-host "Total Site Collections:", $oApp.Sites.Count$i = 0
foreach ($Sites in $oApp.Sites)
{$i = $i + 1
Write-Host "---------------------------------------"Write-host "Collection Number", $i, "of", $oApp.Sites.Count
if($i -gt 0)
{$mySubweb = $Sites.RootWeb
$TempRelativeURL = $mySubweb.Url
ListOrphanedUsers $TempRelativeURL $DomainCNX
}
}
Write-Host "======================================="}
function EnumerateAllSiteColl()
{$farm = Get-SPWebApplication | select DisplayName
foreach($app in $farm)
{$webapp = Get-SPWebApplication | ? {$_.DisplayName -eq $app.DisplayName}Write-Host "Web Application:", $webapp.DisplayNameListOrphanedUsersForAllColl $webapp.Url "LDAP://DC=ca,DC=util"Write-Host
}
}
function StartProcess()
{cls
[System.Diagnostics.Stopwatch] $sw;
$sw = New-Object System.Diagnostics.StopWatch
$sw.Start()
EnumerateAllSiteColl
$sw.Stop()
write-host "***************************"write-host $GLOBAL:TotalUsersUpdated, "users removed in", $sw.Elapsed.ToString()
write-host "***************************"
}
StartProcess
Enjoy! -
VMWare performance with USB drives
As a SharePoint developer a wise choice is to run your Virtual Machines on a separate drive (separate from your OS drive). That way you gain some performance as two different operating systems are not contending for precious read/write times on the disk and, after all, the disk is the biggest bottleneck.
If you're using VMWare with an external USB drive and are plagued by the dreaded 5+ minute black screen as your guest OS shuts down, then here's a potential fix.
-
Locate the config.ini file for VMWare. On Windows 7 you should find it under C:\ProgramData\VMWare\VMWare Workstation
-
Edit the file and add the following lines to it:
-
prefvmx.minVmMemPct = "100"
-
mainMem.useNamedFile = "FALSE"
-
mainMem.partialLazySave = "FALSE"
-
mainMem.partialLazyRestore = "FALSE"
-
Save the file and restart your VM
-
Shut down and the home screen should come up in a matter of seconds instead of minutes
So what are these settings for? minVmMemPct = "100" tells VMWare to fit the memory in the VM into your system RAM (using 100 as 100%). Try to avoid anything other than 100% or else you'll have a lot of file swapping going on here. The useNamedFile property is intended to be set to FALSE for USB-disks or other slow disks. partialLazySave and partialLazyRestore are just that, taking and restoring snapshots in the background or not.
Hope that helps.
-
-
Metro SharePoint Directory–Reading from Lists
As yet another follow-up to the various posts I made on building a Metro-style directory of sorts in SharePoint here and here, one thing that’s been asked a few times already is reading from a list.
In the original post we called the getSubWebsForCurrentUser method to fetch a list of sites. What if you wanted something more generic? Here’s a solution that will let you read from a list instead.
First we’re going to need a list. This part is easy. Create a new custom list through the Site Actions (Site Actions > More Options > List > Custom List, intuitive I know).

The custom list gives you a blank list with one column, Title. That will be our text to display. Next add a new column to the list of type Hyperlink. It can be called Url, Link, or Ganondorf if you’re feeling particularily Zelda-ish. This will be the link that will transport your users to magical places.

Now that we have our list we can use a modified version of the original script to iterate through the list items and build up our menu. I won’t get into the details of how everything works here (go back and read the first article in this series) but here’s the part that will create the menus. Replace your loadSites method with this one:
Line 8 is where things get different from the original implementation. Instead of getting the sites for the user, we get our custom list. Then we create a new CAML query. The SP.CamlQuery object has a method to get all items so we’ll use that (we could construct a custom query here but we want everything for now).
Line 11 we get all the list items based on the query and specify the fields we want to load.
Line 13 is the same as line 18 in the original code and submits our job to the server for execution.
Our onSuccess method is a little different now that we have to enumerate over list items instead of sites. Here’s the modified version:

A few things to note here on what happening.
Line 3 we fetch the list item enumerator.
Line 14 we step over each item in the list.
Line 16-19 we grab the individual item and fields we want.
Line 21-23 we setup the left hand menu navigation with the title and link to the site (from the custom list data)
Line 25-32 we populate the Metro tiles with the same information.
Finally we add it to our markup on the page using jQuery to replace our Loading tags.
That’s it. Now you have your custom menu driven from a SharePoint list. Go ahead and add items to the list and magic will happen.
Look for a more lengthy article on this entire series shortly where I pull it all together as well as adding a few more cool things like tracking and sorting the list based on popularity of clicks. I’m also going to present this whole thing at next weeks Calgary SharePoint User Group meeting if you’re in town so you can join us then.
Enjoy.
-
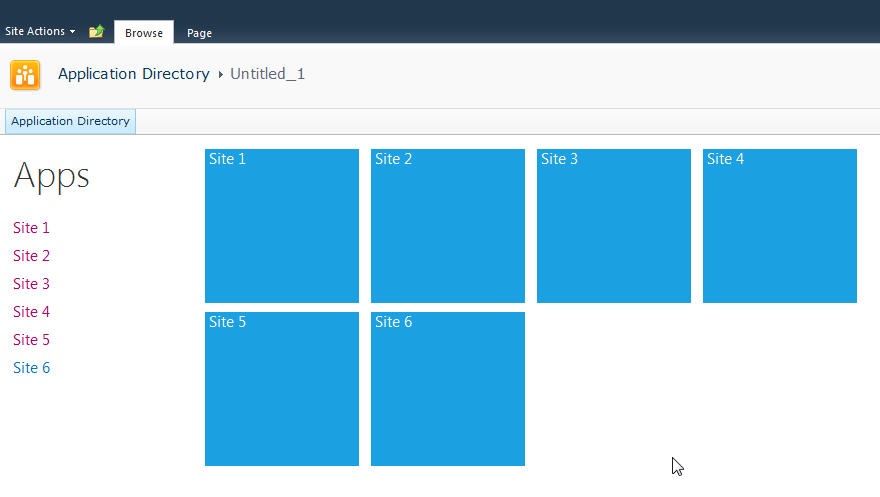
Goodbye Ribbon–Going Full Screen Metro Style with SharePoint
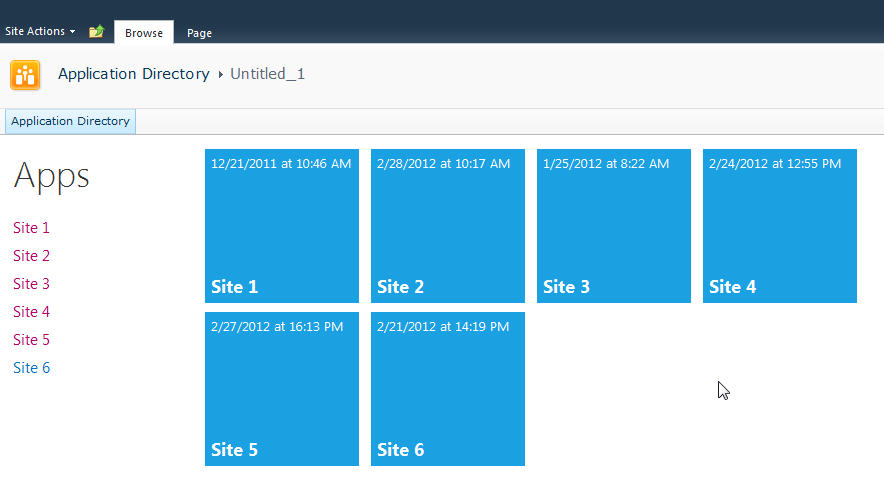
Having some fun with a previous post I did about generating a Metro-style menu from a Custom List in SharePoint for the purpose of building something like an Application Directory. It’s a great navigation system and by adding something like Live Tiles (that pulls information from each site) via JavaScript it can be an informative dashboard rather than a pretty menu. You can read the previous write-up I did on this here.
Here’s what my Application Directory looks like:

Nice, but all that SharePoint chrome isn’t needed for the purpose of navigating the directory.
The answer is simple. Just a few CSS styles you override to hide everything.
Here’s the CSS markup you need:
And here’s the result:

Nice and clean.
If your admins need to get to the underlying system pages just navigate to “/_layouts/viewlsts.aspx” and they can navigate around normally from there. You could also create a link on the main page for that, even wrap it in a security token so only admins can see it!
I have a blog post in the works on turning those pretty Metro icons into Live Tiles with data from the subsites, but that’s for another day.
Until then, enjoy!
-
PrairieDevCon 2012 Sessions
As a follow-up to yesterdays note about my Windows Phone Developer Workshop (there's still room for more peeps!) here's a list of regular sessions I'm presenting at PrairieDevCon 2012.
SharePoint Client Object Model: Accessing SharePoint Externally Using JavaScript

In SharePoint 2010 there are a number of object models that can be used by developers to access the server. The Client Object Model (Client OM) is a unified model which uses the same or similar programming concepts as the Server Object Model (Server OM). The Client OM can be accessed via web services, via a client (JavaScript) API, and via REST. Everything from enumerating sites and lists, displaying list items, adding and creating content, and getting user information can be done all from the Client Object Model. In this session we'll explore the Client Object Model and create examples accessing SharePoint data using JavaScript and jQuery.
Application Design for Windows Phone

In the past year, we’ve worked with hundreds of developers and designers interpreting the "Metro" design system for their own purposes. We’ve seen great interpretations, and others that aren’t so great. In this session, we’ll share with you the foundations of great Metro application design for Windows Phone, and how to use them to build outstanding applications that will stand out and get noticed… for good reasons. We will also be providing some general best practices for building great mobile experiences.
The Marketplace – What Makes a Successful App on Windows Phone?

If you are a developer and have even thought about developing Windows Phone lately, you likely already know that every app and game that is installed on consumer Windows Phone 7.5 devices comes from the Marketplace. This is new to the traditional Windows Phone ecosystem prior to version 7, and while in some cases this does introduce a change for developers and users, there is a lot of reasons why this change is a great one. In this session, we go through both the consumer and developer/publisher experience on the Marketplace and strategies for distributing your app and game both publicly and privately. We will also provide an overview of our Marketplace presence around the world and what new countries have been introduced with the release of the new 7.5 (formerly codenamed “Mango”) update. Finally, we will provide you with strategies on how to increase the popularity of your applications and games and (if you are charging a price for your masterpiece) how to make more money.
-
Get Juiced with me and 10,000 friends at Prairie Dev Con West
I”m happy to say that Prairie Dev Con West 2012 is almost upon us. In just over a week geeks from the five corners of the planet will get together and talk about D’Arcy Lussier’s hair and hope that the Mad Mexican doesn’t crash their session.
 For me there’s a few sessions I’m presenting including a day long workshop on Windows Phone Development. If you’re looking to learn hands-on development with a Jedi Master then you’ll need to find a different conference. If however you want to try your hand at learning with me and watch me stumble through trying to run Windows on a MacBook Pro, then bring it. Here’s a rundown of what we’ll be covering with the Windows Phone Developer Workshop.
Start your engines and we’ll go from 0-11 in 60 minutes with building more Hello World apps you’ve ever seen. They’ll be a Hello app, a World app, and even a Hello World app. Everything you need to know to get started with Windows Phone development. After a series of Hello World apps you’ll be ready to build anything (well, anything with the words Hello and World in them)
- Everyone talks about the Model-View-ViewModel (or as we experts say MVVM) pattern when it comes to data binding on the Windows Phone. We’ll explore every concievable angle to using the MVVM pattern, tools that make it less painful to implement the pattern, and different ways we can spell MVVM (like MVMV, MVCM, and the ever popular MCMXXVII)
- For me I’m all about the bling and love to criticize apps that make my eyes bleed. Help me make my eyes bleed less by learning the Metro design language. We’ll just randomly pick ones in the marketplace and rip them a new one. If you like watching Gordon Ramsay yell down at people that cook like donkeys then you’ll fit right into this part of day. I guarantee you’ll know the Metro ways after this or I’ll beat your with your own skull.
- Mango introduces about 800,000 new API features and we’ll look at every one of them in detail. There are some cool tools that will help you debug and work with apps in the emulator and we’ll go over the new and old stuff in Mango. This part of the session may extend the day so bring a sleeping bag and some Red Bull to keep you going through the night.
- Expression Blend is the most complex piece of software ever known to man. We’ll try to figure it out. Barring that, we’ll just sit around and sing Kumbaya and make jokes about people from Edmonton.
I’m also presenting a session on using the JavaScript Client Object Model with SharePoint 2010. We’ll build some funky stuff and learn how to iterate lists, sites, and build alternate UIs for SharePoint without writing a single line of C# code. There are also two additional sessions on Windows Phone that I’m planning on doing which is a deep dive into marketing and design. Oh yeah, there are other people doing sessions at the conference too.
The 10,000 friends? Okay, so I think the attendance for Prairie Dev Con West is only a few hundred, but I like to use my imagination and pretend I can see ten times more people than there really are. Same effect when I drink.
In any case, if you haven’t registered already please consider it. D’Arcy puts on a damn good show and the quality being presented here (sans me) is top notch and there’s a huge diversity of sessions to take in.
Also remember the pre-con day-long workshops are there. If all you want to take in is a workshop, that’s cool too and you’ll get a full day earful of Agile, Windows Phone Development, and TFS Build sessions. Still an absolute cheapskate like me? Then there’s a day long Windows Azure Boot Camp you can come out to that absolutely free (as in beer, but space is limited) and even includes breakfast and lunch (sorry, the Microsoft IT Virtualization Boot Camp is sold out).
Come on down and get smart(ish).
-
Metro Style Site Directory for SharePoint Using EMCAScript
I’ve always been trying to come up with a useful and clever way to allow users to navigate around SharePoint sites. Recently I put together an “Application Directory” which basically displayed a menu system to navigate around apps. Using the JavaScript Class Library for SharePoint to pull values out of SharePoint I quickly put together something that normally would be a lot of C# code and a web part.
The EMCAScript object model is powerful in that you can quickly pull data out of SharePoint sites and lists and make a pleasant user experience with just a little JavaScript, CSS, HTML, and jQuery. It still will make a call back to the server to fetch the data but it’s done asynchronously so the perception to the user is almost seamless.
This post walks you through building a site directory of sorts. It could be used as a landing page on a top level site collection or as a web part sitting on a team site (to show the contents below the site). It’s up to you but the net result is a nice navigation system (done with a little “Metro” styling) all done in a hundred lines of JavaScript.
Here’s what we’re building:
Let’s start with the simplest thing possible. A script that we’ll insert into the page using the Content Editor Web Part via a Content Link. This is my preferred way of doing lightweight adds to SharePoint (like JavaScript or even just raw HTML). The Content Link points to a file in my SiteAssets library in the site and since it’s a link it just gobbles up the content and serves it up. If you try adding HTML to a Content Editor Web Part you’ll find a nice message after saving “Your HTML may have been modified”.
WTF?
Yeah, SharePoint deliciously will go in after you save your nicely formatted content and do some neat things like rename your CSS entities. Oh yeah, it’ll also strip away your JavaScript if it doesn’t like it.
Trust me. Just include the file and you’ll be much better off in the end. Having the file located in the SiteAssets library also lets me just crack it open in SharePoint Designer and while the editor isn’t the greatest, it does give you some Intellisense but the real advantage is saving it in SPD then hitting refresh on your page to see the effect. The file will contain the CSS, JavaScript, and HTML markup. I like putting everything together so I don’t have to worry about files all over my system but you can just as easily use multiple files if you want.
Alright, back to business. Create a new file in your SiteAssets library (you get a SiteAssets library when you create a new site regardless of what template you use or what feature you activate, it’s always there and accessible through SharePoint Designer).
Name the file SiteDirectory.js or something. Doesn’t really matter and you can call it ISavedTheWorldUsingPork.HowAboutThat if you want, but leaving it with a .js extension will give you some semblance of Intellisense inside of SPD.
Drop a Content Editor Web Part on the home page of your site (or wherever you want to put this). This could be a Wiki Page (the Home.aspx page is a wiki page if you activate the Wiki Home Page Feature on a site) or a Web Part Page. There are a few small tweaks you should do depending on what type of page you put this on but just adjust the CSS we’ll be building as you see fit.
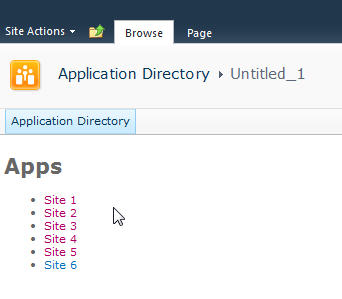
Starting simple we're going to just enumerate the child sites and display them in an unordered list. The list is easy to style and works well with jQuery later to be able to animate or attach plugins to.
Here’s the initial code that we’ll put into the SiteDirectory.js file:
Like I said, all this is doing is a) enumerating through the list of subsites then b) spitting them out into an unordered list. Here’s a breakdown of how this works:
Line 1-2: We’ll include some CSS styles here later
Line 4: We include jQuery so we can a) make it easy to replace elements on the page and b) support plugins later. You can choose to use pure JavaScript or omit this if your site already includes jQuery.
Line 8: We declare a variable we’re going to use to hold the list of sites
Line 10: We wait until the core JavaScript files are loaded by SharePoint. This ensures the ClientContext is setup for us when we need it.
Line 12-23: This is the function that calls the Client Object Model to get our web then get the subwebs for the current user. Finally on lines 19-21 we execute the call (which is where we talk to the server) and define the success and failed methods.
Line 25-46: We define the success function to call with our list of subwebs. Here we’re getting an enumerator to the web collection and iterating through them, grabbing the url and title of the site then creating our unordered list using regular HTML markup. Finally on line 45 we find the DIV tag we’re replacing and substitute the HTML we just created.
Line 55-57: This is the HTML markup we’re going to replace in our JavaScript. We initially set the text to “Loading…” so users will see this when the page loads then *magically* it’ll get replaced with our content.
Here’s the result:
Looks good and lets us know we’re on the right track. If there are any failures you’ll see them here because our failed function will get called and output the error message. This could be anything from a JavaScript error to not calling a known method. Also note that this is already security trimmed since we’re using the getSubwebsForCurrentUser method so we’ll only see sites the user has access to.
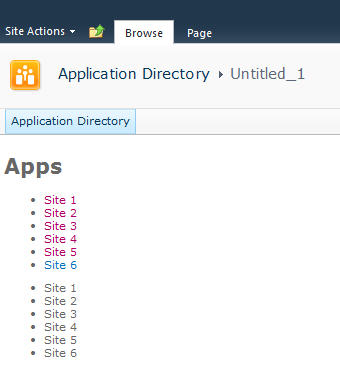
Let’s add another list and DIV tag so we have two lists to use:
Not much to explain here, just added a new DIV tag and built up the HTML just like the original. Now we have two unordered lists. We also wrapped up each list in its own DIV tag.
Now we’ll do some simple styling by floating the list of sites down the left hand side and the second list on the right and applying a little styling to the text.
Here’s the updated output:
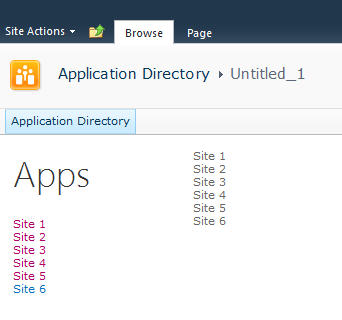
Now it’s starting to look like our target. Let’s style the menu list with a larger font. We’ll also just make one line of code change in our markup in the onSuccess method. Find the line that says menuNavContent += ‘<ul>’ and change it to read menuNavContent += ‘<ul class=”apps”>’. This will style just the unordered list of items on the left.
Here are the new styles to add to the CSS
Now that we have the list done lets focus on the second list which will form our tiles. They’re not as live and vibrant as they could be but they do show some metadata from the site so are at least a little more informative than just navigation boxes.
First we’ll apply some styles to the list to make them into boxes and space them apart. It’s just CSS markup here to add and a couple of small changes in the construction of the HTML for the second list.
We’re just adding some new styles here. There’s a class called theme_blue set to the Metro blue (#1ba1e2) which we set as the background colour for each tile. In addition we set the entire tile to be clickable to the same url as the site. This lets the user click anywhere on the tile (or the list one the left) to launch the site rather than having to click on the title.
Here’s the updated output.
Now that we have our tiles we can add some dynamic metadata to them. This will be pulled from the website itself and give us a navigation system that’s more information than just links.
We wrap the title in a DIV tag with a class of tileTitle which lets us style it to place it at the bottom of the tile and give it a larger font. You do need to be careful of the length of the titles of your sites as this doesn’t work for all scenarios but just adjust it to fit your needs.
We also pull the last modified item date from the web properties. Every site tracks whatever the last item that was modified is and holds onto the date for that item. So now users can see when some content on the site was last changed.
Also we parse out the date from SharePoint into a JavaScript Date object and build a formatted date to display on the tile.
The final image:
That’s it! You now have a single script that you can just drop onto any site to create a Metro style navigation to the subsites. New sites can be added and will automatically show up and users can see when the content on the site was last modified and be able to click on the site to visit it.
Here’s the full source code for the page for you play with.
Remember, this is just a start. There are some fun things you can do with this. For example create custom styles for different colours (for example blue for team sites, red for wikis, etc.) and style them accordingly. Other ideas are to pull other data from the site like description, etc. and put that on a bigger tile. Enumerate the number of subsites in a site and display that. There are other properties you can access off the Web object like if RSS is enabled, etc. so you might want to display different icons on the tile to reflect that. The list of properties on the SP.Web class can be found here.
If you’re following the “Metro” style then remember to keep the UI light and simple. Content over chrome. You don’t want to be dumping all kinds of information here, just enough that your users need to make it useful.
Enjoy!
-
The Big Dummies Guide to Building a SharePoint Internet Site
I'm about to embark on a new project, building a SharePoint based Internet site. This is new for me as all the SharePoint work I've done has been Intranet facing and I know there are some challenges with SharePoint and outward facing sites. So I called on a few MVP friends and people that have some real world experience configuring SharePoint for Internet to see if I could come up with a list of tips, tricks, and things to watch out for.

Search Engine Optimization
-
Out of the box URLs are not SEO friendly, you need a custom solution
-
Jie Li, a program manager on the SharePoint team, has a great collection of tips for optimzing your search engine face
-
For creating short urls (like bit.ly, tinyurl.com, etc.) Waldek Mastykarz has 4 ways to use short urls (which will help with the SEO)
HTML/HTML5
-
Out of the box HTML is somewhat horrible and not very optimized for Internet sites
-
If you want make SharePoint to output native HTML5 pages and get validated, then the answer is no. SharePoint 2010 is designed to output content in XHTML 1.0 natively.
-
I *always* start with Randy Drisgills master pages on new Web Apps. They're clean, optimized, and easy to use. Highly recommended.
-
Randy Drisgill has a post about HTML5 compatibility although it was for IE9 beta and hasn't been updated, but still contains some good info.
-
Kyle Schaeffer has a new "responsive" HTML5 master page for 2010 that seems to have a lot of popularity so might be a good place to start from (or combine it with Randy's master pages)
Multilingual Support
-
A good, detailed post by Serge Tremblay on setting up, configuring, and supporting multiple languages in SharePoint
-
The Planning for Multiple Language support series of articles from Microsoft which is a good starting point
-
An MSDN article on using MUI support with examples on changing and setting languages, good for writing custom JavaScript to let users toggle the language selection
Hardening
-
Use ViewFormPagesLockdown to prevent access to system pages. It's still used in 2010 and turned on by default with publishing sites. Here's a blog post from the support team with some information about it.
-
TechNet has an article about securing your farm for anonymous access. Unfortunately it's for SharePoint 2007 so some (most?) aspects might not apply to SharePoint 2010.
WCAG/508c
The Web Content Accessibility Guidelines 2.0 are the internationally accepted standard for web accessibility so you might want to look at providing this for your Internet facing site.
-
SharePoint 2010 is WCAG 2.0 AA compliant
-
Complete list of Web Accessiblity Compliance tools can be found here
Mobile Support
-
The out of the box mobile experience doesn't support anonymous users, which is the standard for Internet sites. Waldek has one workaround here.
SQL
-
A fairly in-depth blog post about optimizing the SQL side of things while making SharePoint peform better.
General
-
Mavention has a nice site checking tool that's specific for SharePoint 2010. Highly recommended.
-
Elizabeth Olson, a Program Manager for SharePoint, presented at MIX10 on designing an internet facing site in SharePoint. Here's the 45 minute video of that session.
-
As this is an Internet facing site you'll probably want to hook up some kind of tracking system so you can produce nice stats for the suits. Google Analytics is a good start but feel free to use any tool. They all hook in usually through a simple piece of JavaScript you can add into your master page.
Features
Performance
As far as SharePoint and Internet sites you could probably write an entire book on just performance. There are so many things to take into consideration, both on the SharePoint side (configuration wise of the site) and the IIS one. Watch out for content and customization issues though, as they're not directly SharePoint related but people will blame SharePoint for issues. Things like large articles, missized images, unoptimized JavaScript, long running scripts, etc. can all lead to performance issues that have nothing to do with SharePoint.
-
Some tips on how to Reduce page size
-
Fiddler is an invaluable tool to see your pages load times (and tracking down errors)
-
YSlow shows you where bottlenecks are in page loads and helps you optimize them
-
Custom caching to optimize your sites. Good information with pros and cons of the different types of caching.
-
Minifying custom JavaScript files. Nice article by Wictor. Use any tool you need to or the built in one in Visual Studio to do this. JavaScript compressor will do this for you.
-
Here's the article for optimizing the web content management site but it's for SharePoint 2007. Not sure how much is relevant in 2010.
-
Chris O'Brien has a nice checklist for optimizing SharePoint sites like this although much of it is written for SharePoint 2007, but some is universal and works for 2010
-
Joel Oleson did a great presentation on optimizing SharePoint 2010. Here's a PDF of that presentation.
This list is far from complete and should be an evolutionary thing as it's just what I've collected myself. Do you have experience building SharePoint sites on the Internet? What kind of issues did you come across? Feel free to leave comments with your experience, links to your blog, etc. I'll update this list with that information.
Enjoy!
-


