
End time: 6 hours
I'm ditching my PDA (currently a BlackBerry Curve) and my laptop for note taking and going retro.
For the past few years I've been taking notes in various digital media. Back when I had my Palm, I would do handwritten notes (sometimes trying to fight that silly PalmScript recognizer). When I had a tablet available, I would do the same in OneNote and recently I just fill up OneNote pages with notes and scribbles (all typed in). The biggest issue I have with digital note taking is, while it's fast on data entry, it's horrible in capturing intent and nuances of information.
Recently I got inspired by a concept Mike Rhodes seems to have earmarked back in 2007 called "sketchnotes". It's the idea of capturing hand-written notes in a book, much like how you would scribble notes in class if you were that sort of person, adding in images and enhancing the notes with fonts and flair. I remember those days as I would use my sketch book for pretty much all notes rather than a traditional lined book (I went to a Vocational Art School so 70% of my classes were art based and thus I had dozens of sketchbooks for use throughout the year).
Sketchnotes are just like those days of taking notes in art class, except now I use them in corporate meetings, conferences, and impromptu get togethers at user group sessions, code camps, etc. They're much easier to lug around than a laptop (although I usually always have my laptop handy) but the best thing is they're easier to get started (it's like having a solid-state drive) and require no batteries!
The best part of sketchnotes is that you tend to flow free with the information and really focus on what's being said as you translate it into something more meaningful than just words on a page. Changing fonts is much faster than on the computer (and I can invent fonts on the fly) along with bits of flair (borders, highlighting, shadows, etc.) that punch out a concept. It's a slower process than capturing brain dumps onto OneNote and typing in information, but it lets me be more creative (something I've been lacking in the last few decades) and helps me understand the concepts that were being presented or talked about. It's also like having a whiteboard hovering around with you all the time as I can quickly do a screen mockup as the customer might be describing his/her needs which I can then just turn around and show to them "Do you mean something like this?". Fast feedback cycle, I like that.
Here's an image from my current sketchnotebook (taken from the ALT.NET Open Spaces Conference in Calgary a few months ago):
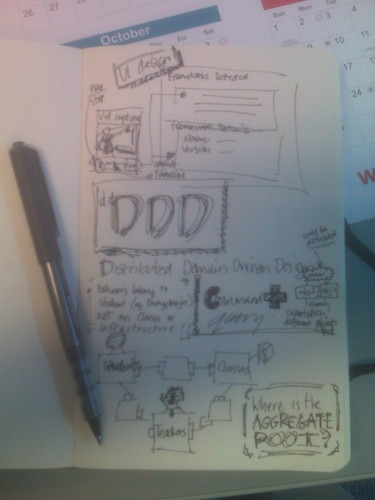
The image is from my CrackBerry so not very clear. I'll be creating a new Flickr pool and uploading higher quality images as I get them scanned.
My weapons of choice are the unlined large size (5"x9") Moleskin plain soft notebook and a black Uni-Ball Vision Micro Roller Pen. The Uni-Ball bleeds ever so slightly to get that "homemade" effect (something that's missed in digital) and lets me be free with the note taking, not worring about erasing (since you can't do it anyway). Moleskine rocks and while they're more pricier than other books, they hold up under stress (and come with a cardboard holder in case I have some handout to stash).
Yes kids, you can do something like this with OneNote and a tablet PC but a) I don't always have a tablet PC b) I find my OneNote notes turn into a graveyard of information that's always being sorted and never being used and c) I still need batteries to run OneNote (not to mention an OS that takes a few minutes to boot up). I'm not saying abandon your tablets and Moleskine is king (not that anyone would listen to me anywho). I use this as an alternative and like it, but YMMV.
Anyways while it might not be a new concept for you, it's something I've been trying to get into lately and now I'm comfortable doing on a regular basis. It took a few false starts and weeks of practice to get back to scribing (and my hand still cramps up from time to time as I have to switch back and forth between paper and keyboard). Sometimes the notes are pure chicken scratch and I have a hard time deciphering them but it's the imagery and little things that make it work for me. They say a picture is worth a thousand words and I believe it. I feel like a giddy school girl again, scribbling images madly that remind me of School House Rock (and we *all* know how cool SHR is).
So goodbye digital input, it's been nice. Hand writing is back for me and it's here to stay. Maybe give it a try yourself?
I'll come out of the closet for a moment as I become a little more jaded in life and bitter this holiday season. I'm an Anti-Architect. I'm all for software architecture as the alternative is let some guy who read "Teach Yourself SharePoint Programming in 24 Hours" unleash onto an Enterprise solution and then have some high priced consultant come in and clean up the mess (or the guy that created the mess *was* a high priced consultant and now you need an even higher one to fix the problem) but while I'm an Architmatech in some sense of the word, I'm also a developer at heart and a creator in essence. I'm a little bit Country, I'm a little bit Rock and Roll.
I was looking over some of the dated material on Microsoft's Architecture Certification Program and found their role definitions here. One of the issues with the IT world is that MSFT publishes some white paper, document, or scans a napkin and IT managers flock to it like flies on dung, spouting as the Gospel and Word and declaring that everyone follow it blindly. If Microsoft wrote it, it must be right. Right? Maybe. Some stuff they get right, others they're way off base.
Here are my top 10 reasons into what makes an Anti-Architect (for lack of a better term)
These are some ideas around being what I call an Anti-Architect. Use them as you see fit, YMMV.
Microsoft has put together another version (this is rev 4) of their WPF Application Quality Guide, a fairly complete set of tasks and ideas around writing good quality apps using the Windows Presentation Framework.
http://windowsclient.net/wpf/white-papers/wpf-app-quality-guide.aspx
A few things to note:
Overall it's a good place to start when looking for resources on writing WPF apps and has some great links on real "Best Practices" for designers and developers. Check it out.
(thanks to Greg and The Oren Machine for comments that I've incorporated into this post)
Where do I begin? There's so much stuff in my head I'm pretty much going to explode and leave little gray bits of matter all over my cubicle this morning.
Free Range
First off, I'm now a Free Range Chicken. As the economy slumps and oil hits a new low, living in an Oil and Gas city has it's merits but it also has it's drawbacks. With a whack of new projects being cut from Petro Canada's budget my major client right now has to let me go. They've given me by the end of the year to finish up work which is super cool of them, rather than being led out of the office last week. Of course the next couple of weeks I'm doing a massive brain dump to the internal developer wiki to make sure everyone is up to speed on where things are and how we've been doing things. It's been an awesome road here as I started a couple of years ago with them doing taxonomy and SharePoint setup but then the last couple of years it's been primarily focused on Agile (mostly Scrum with some Kanban lately) mentoring and setup. The teams are focused now with everyone writing unit tests and practicing TDD; projects being generated initially from TreeSurgeon; Subversion over TFS for a source control system; and a whack of other new stuff that I'm proud to have been a key initiator of. Looking back it's almost draconian in how things were being done (no tests, VSS; old-style code-behind web sites with [ack] SQL statements in code, etc.).
While I am a Scrum/Agile practitioner coach and mentor and all-around SharePoint guy I considered a few other ideas for a new career:
In any case, I'm out and about and hungry like a wolf. Ring me if you're interested.
TechDays
TechDays kicks off this week in Calgary at the Round-up Centre. I'll be doing two sessions on WPF with the details below. Hope to see you there!
Building Differentiated UI Applications Using WPF
The Patterns & Practices Smart Client Software Factory includes a set of guidance for developing composite smart client applications in WinForms. With the release of WPF, there is a need for bringing the Composite Client scenario to the framework. This includes supporting a new Differentiated UX experience. The "Acropolis" incubation project, which has now been folded into an upcoming platform release, is the future, but what is the answer for customers adopting WPF today? Come to this session and find out about new Composite WPF (CWPF) client guidance that Patterns & Practices are developing jointly with the UIFX team. We get in the driver’s seat and take CWPF out on the road to see what she's made of. We dive into demos, check out the new APIs, and talk about the features.
The Best of Both Worlds: WPF in WinForms and Vice Versa
While Windows Presentation Foundation (WPF) is a compelling new framework for building rich UI applications, a wholesale adoption of WPF is not always the best solution for current application development. You may have an existing investment in Windows Forms controls that you don't want to give up or a complex application that you just want to add some new visual features to. This session shows you how to leverage existing investments in capabilities in Windows Forms while taking maximum advantage of what WPF has to offer. Learn how to embed WPF controls in Windows Forms apps, Windows Forms controls in WPF apps, and see how the designer supports you for developing these hybrids. Also, learn how to best architect your UI applications to take advantage of these capabilities.
Terrarium
Terrarium is kicking up a few dozen notches. I had a great discussion with Eric Zinda last week on the phone about the origins of Terrarium and challenges the team had. Remember, this stuff was created back in the 1.x days (well, prior to the public release) so web services were new, code access security was virtually unknown (even to the Terrarium team) and here these guys were flinging .NET assemblies across the wire to run on a remote system. Overall, as I've said in presentations on Terrarium, it's a kick-butt demo app like no other. Web Services; Code Access Security; DirectX Client and WinForms integration; Peer to Peer networking. If you look at any n-tier LOB application today it probably doesn't contain half the features baked into Terrarium. Really. While it's connned a "game", it's a distributed n-tier application that has some pretty impressive stats on performance (at one point, most of Microsoft was running it internally as screen savers all slamming the server with little or no effect).
In any case, work has begun on WPF clients and new WinForms 2.0 clients. Web Services are being looked at to be overhauled to become WCF services (and eventually tie into the "cloud" via .NET 4.0 relay services). The 2.1 Vista and server fix is in QA. The user wiki is growing with new content on a regular basis (feel free to toss your own in, it's a wiki eh). There's a Facebook group to talk about it swap ideas, stories, or bugs (if you're into that social thing) and some other happenings that I can't go public with yet but you'll see them in the new year.
Overall it's picking up steam and I hope you'll give it a looksee and feel free to poke, prod, question, and contribute!
Tree Surgeon
No, I haven't abandoned my little Tree Surgeon buddy. In fact we're motoring ahead with 3.5 and looking at a few things to help aid in development. MEF is huge and I'm grateful we have awesome dudes out there like Glen Block pushing this stuff. The P&P group has been phenomenal the past couple of years (yes guys, I forgive you for Enterprise Library and the Database Application Block). Prism kicks butt and MEF is very cool. Not only the fact that it'll be included in the next framework release, but for a project like Tree Surgeon (where I've been toying with a Plugin architecture for awhile now) it fits like a glove. It took me watching Scott Hanselman's BabySmash for the Masses screencast from PDC08 to really "get" MEF but now that I do I'm looking at hooking it into Tree Surgeon. This should open up a lot of new possiblies for adding in or modifying how Tree Surgeon generates it's solutions. If you need more capabilties or even an entire directory structure change, it'll be just a plugin away.
SharePoint Forums and Knowledge Base Web Parts
The SharePoint monkey on my back that I can't seem to shake. I haven't done a proper release for over a year on my web parts and the SharePoint 2007 compatibility still isn't there. My bad. Need to get this done so trying to wrap up a nice Christmas package for all you little SharePoint geeks out there. Hopefully SantaBil will make the deadline of December 25th he's set for himself.

Stumbled across “Tiny Footprint” mode of the Task Manager today while I’m tracking down a nasty hijacker Smitfraud-C malware bot on my Jenn’s machine.
Thought for a minute I was in a different program or OS or something wrong was going on. Turns out if you double-click on the area outside the tabs on Task Manager it throws a hissy fit and jumps into what Microsoft dubs “Tiny Footprint” mode.
I don’t know what disturbs me more, the fact that this “mode” exists and is not very known, or that they have a KB article on it in case users “accidentally” get themselves into it.
What do 3 geeks do at 4AM in the parking lot of an IKEA in Calgary on a Saturday morning? Plot to overthrow Future Shop in the hopes of obtaining a rare shipment of WiiFits? Maybe. Test the cold-tolerance level of Dell laptops using Canadian Tire car batteries as their only source of power? Could be. Make cheap jokes about doing drag and drop presentations then have t-shirts made up to mock Microsoft employees?
Nah, they get together to drive to Edmonton and attend the Edmonton Code Camp silly.
That's what me and 2 of my very tired friends will be doing this Saturday (note, Tim Hortons will be our cuddly buddies come Saturday) as we head up to Edmonton, home of a hockey team that leaves their players quivering on the ice, questioning their sexuality.
I'll be presenting two fun-filled-uber-cool-extra-special-director-cut-edition-limited-time-only-before-they-go-back-into-the-vault sessions:
How to Win Friends and Influence People on Facebook, in .NET
Yes, building Facebook apps isn't only restricted to PHP and procedural code. We'll go through building apps using the newly released 2.0 Facebook Toolkit for .NET and talk about restrictions that social networking sites put on how much information you can (and cannot) farm out of their API. And yeah, we'll build some cool Facebook games too (in .NET).
Building Really Cool Apps with WPF
We'll do some cool stuff. It's a code camp. Bring yer laptops and fire up Visual Studio and we'll make XAML stand on it's head and do somersaults over any ORM anyday. jQuery? Bah. This is WPF baby and it your user experience doesn't get any richer than this.
My sessions are deemed a PowerPoint Free Zone to help make the planet a little nicer place to live in. Rock on big Al.
See you there!
I had to work on some code inside of a “real” *nix system recently so I though I would give everyone a visual walkthrough of setting up the operating system. I need to pave a new image so I figured I would just share with the rest of the class setting up a *nix system from scratch using Virtual PC. You can accomplish the same with VMWare, I just happen to be using Virtual PC for this.
For the OS I chose Debian. Actually I have several unix images for this type of work (Linux, NetBSD, etc.) but I’ve always liked Debian. It’s a slick text based install and works quite well, right down to the part of being able to select only what I need. I found the other Unixes to be cumbersome getting setup sometimes and not very visually appealing (installing NetBSD is like watching Justice Gray do his hair).
So here’s the visual walkthrough of creating your own Debian install using Virtual PC. This install was done with Debian 4.0R5.
Pre-Install
You’ll need a couple of things to get started. First your Virtual PC (or VMWare if you choose) to run the guest operating system. You’ll also need an ISO image of Debian. I used the 180mb netinst ISO image file to start. It’s larger than the 40mb version but the 40mb version doesn’t even include the base system so I saved the download by getting the larger image. You can get the image from this page here. Choose the i386 ISO from the first list of options on the page.
Once you’ve got the ISO ready you can setup your Virtual PC image and start. Here we go.
The Walkthrough
From Virtual PC, select the “New Virtual Machine Wizard” from the File Menu:

Click Next

Select “Create a virtual machine” from the options and click Next:

Give the virtual machine a name and optionally choose a location. I keep all my VMs on a portable USB drive:

Leave the operating system as “Other” and click Next:

You can adjust the ram if desired. I’m doing console development so 128mb of RAM is fine. If you want to install X-Windows or something then you might want to bump this up. It can be changed later so you can leave it for now and click Next:

Change the option to create a new virtual hard disk for you and click Next:

By default the new virtual hard disk is created where your virtual machine is created. This is fine and you can leave the default then click Next:

The confirmation screen will show you the options. Click Finish to create the new virtual machine. One more setting that you may need to change. Select the network adapter for the virtual machine to bridge to your host adapter. This allows Debian to obtain and IP and access the internet to download modules.

Your Virtual PC Console will show you the new virtual machine ready to start. Select it and click Start:

The new VM will boot but you need to capture the ISO image you downloaded earlier. Select CD from the menu and select Capture ISO Image:

Now browse to where your netimage ISO is located and select it then click Open:

From the Action menu in Virtual PC select Ctrl+Alt+Delete:

Debian will now boot. Press enter to continue:

A few hundred lines of gobbly-gook will flash by until you arrive at this screen. Pick your language and press enter:

Choose your country next and press enter:

Next choose a keyboard layout to use:

After a few minutes of loading screens you’ll be asked to provide a hostname for the system. Enter one and click continue:

By default the next screen will probably grab your ISP domain name but you can change it to whatever you want as this is going to be a local machine for testing. Enter a name and click continue:

More hardware detection and the disk partitioning starts. As this is a VM you can just select the first option and let Debian guide you through using the entire disk. Select that option and press enter:

Debian will find the 16gb hard drive the VM is showing (but it’s not really taking up 16gb on disk, well, not yet anyways). Select it and press enter:

The next option is how you configure the partitions. For *most* *nix installs I choose the 3rd option and split up my /home, /usr, and /var directories. However that’s usually on systems with multiple disks and again this is a test system right? Pick the first option to put all the files in a single partition and press enter:

You’ll be given one final chance to back out. Go ahead and press enter to write those changes:

Tee hee. Fooled ya. There’s one more confirmation. They *really* don’t want you to destroy data (like I did years ago and lost the contents of a book I was writing, tell you about that over beers one day). Select Yes and go for it.

Partitions get formatted, the world is a better place and we’re onto the next step. Congratulations! You’ve reformatted your hard drive (well, your virtual one). Select a time zone so Debian knows when to move clocks around on you:

Next is the all important “root” password. This is a test system so choose the uber-secure password of “password”.

And you’ll be asked to enter it again:

Next you’re asked to setup a real user (rather than using root). While this is a test system, it’s like logging into SQL Server using “sa” and kind of feels dirty. Besides in the unix world you can actually accomplish things as regular users without being nagged by a UAP dialog and a simple “su” command let’s you become “root” again. Enter the name of your real user here and press enter:

Next you’re asked for an account for the user. Give it a simple name (no spaces) that’s easy to remember. For the hackers reading this, I always use “bsimser”:

Enter a password for your new user. Again, I chose to use “password” feeling that nobody would be able to guess it (I also considered “love”, “sex”, “secret” and “god” but thought was too over the top):

Debian now installs the base system. Go for a coffee. It’ll be a few minutes. Go on. I’ll wait.
When you get back Debian will be asking you about mirrors. The netinst version has a base system, but it can (and should) leverage internet mirrors for files. It’ll do checks against the mirrors to get the latest versions and updated packages for you so it’s a good idea to say Yes to this option.

Once you’ve committed your soul to the installer, you’ll be asked to pick a mirror. Choose one in your own country to reduce the traffic sent around the world and press enter:

A list of mirror sites will come up based on your country choice (you did choose YOUR country right?). I’m not sure if the mirror list is sorted by access speed but whatever. Pick one as they’re all near you anyway. You might find a mirror doesn’t work during the install (nothing in life is guaranteed, including this walkthrough) so if you find it doesn’t work, Debian will bump you back to the mirror selection screen (this one). Pick another and try again. One of them is bound to work, eventually.

If you’re behind a firewall or proxy you need to let the package manager know this information in order for it to do your bidding. Enter it in the next screen:

Debian then downloads and configures the package selector. Next step is the dreaded “tasksel”. This is sort of Linux for Dummies where you tell it you want a desktop, or web server, or SQL server and it picks the packages for you. Frankly, I *always* avoid this step. I like to get a clean system up and running *then* decide what I need to install on it. Also, as this is a VM you can just copy your clean system and have lots of little VMs running around with different purposes. If you choose a configuration here you are on your own, I cannot follow you on that path. However I recommend deselecting everything here and pressing Continue. We can install packages later.

Next Debian will ask you if you want to install the GRUB boot loader. As this is the only OS on the system let GRUB do it’s thing and install to the master boot record.

That’s it for this part. Before you reboot, release the CD ISO image by choosing the option in the CD menu of Virtual PC. Now press Continue and hold your breath.

More gobbly-gook and you’ll be at your Debian login prompt. Login as your regular user you created previously:

If you’re really lonesome for that DOS feeling type ‘alias dir=”ls –l”’ at the command prompt after you login. You’ll be able to type “dir” now and it’ll look *kind of* like your old world.
Now we have a bare-bones system. You don’t have an ftp client or a telnet client or any developer tools! Let’s fix that.
All (most?) unix systems these days have some kind of packaging system that allows you to get all these extras. It’s like a big warehouse of software just waiting to install to your desktop. Debians is called APT. There’s an entire HOWTO here on it if you want to get all down and dirty with it. APT is your friend. Learn it, live it, love it.
For example type this at the command prompt:
su<ENTER>
Enter your root password
apt-get update<ENTER>
You should see something like this:

The contents will vary as these are from my mirror but basically it just updates the catalog of “stuff” you can get. Now (while still impersonating the root account) type this:
apt-get install ftp<ENTER>
You’ll see a result similar to this:

Remeber when Trinity needed a pilot program for a military M-109 helicopter and in a few seconds Tank downloaded it to her? Well, you can now type in “ftp my.favorite.porn.site” and get there instantly (or as fast as your internet connection will take you). Cool huh?
I prefer the APT command line but it takes some getting used to. There’s also a tool called “dselect”. While still running as root, type “dselect” and you’ll eventually get to a screen like this:

It let’s you pick a package to install, provides a description of it, and let’s you install it but just selecting it. Type it in using the apt tool or pick it using this one. Your choice.
That’s pretty much it kids. By now you have a fully working Debian image you can clone. Use the APT tool to install your favorite tools and get to work and hope this lengthy blog post filler helped.
Enjoy!
I'm a command line app junkie as I love working with it. I guess it's my DOS/Linux roots but I find things go faster when you're not dealing with a GUI and a mouse. Command line tools like NAnt and MSBuild have all sorts of options and syntax. Some of it discoverable, some of it not so much. NAnt for example will try to find a buildfile to run and execute it. It also will display the name and version of the app (which is useful in build logs so you know what's going on). There are other things like trying to find out how to run a command line tool. For example if you type "nant /?" you'll get this:
NAnt 0.86 (Build 0.86.3075.0; nightly; 02/06/2008)
Copyright (C) 2001-2008 Gerry Shaw
http://nant.sourceforge.netUnknown argument '/?'
Try 'nant -help' for more information
Entering the proper syntax of "nant -help" displays this:
NAnt 0.86 (Build 0.86.3075.0; nightly; 02/06/2008)
Copyright (C) 2001-2008 Gerry Shaw
http://nant.sourceforge.netNAnt comes with ABSOLUTELY NO WARRANTY.
This is free software, and you are welcome to redistribute it under certain
conditions set out by the GNU General Public License. A copy of the license
is available in the distribution package and from the NAnt web site.Usage : NAnt [options] <target> <target> ...
Options :-t[argetframework]:<text> Specifies the framework to target
-defaultframework:<text> Specifies the framework to target (Short format: /k)
-buildfile:<text> Use given buildfile (Short format: /f)
-v[erbose][+|-] Displays more information during build process
-debug[+|-] Displays debug information during build process-q[uiet][+|-] Displays only error or warning messages during
build process
-e[macs][+|-] Produce logging information without adornments
-find[+|-] Search parent directories for build file
-indent:<number> Indentation level of build output
-D:<name>=<value> Use value for given property
-logger:<text> Use given type as logger
-l[ogfile]:<filename> Use value as name of log output file
-listener:<text> Add an instance of class as a project listener
-ext[ension]:<text> Load NAnt extensions from the specified assembly
-projecthelp[+|-] Prints project help information
-nologo[+|-] Suppresses display of the logo banner
-h[elp][+|-] Prints this message
@<file> Insert command-line settings from a text file.A file ending in .build will be used if no buildfile is specified.
A lot of options there but pretty standard fare for a console application. And a lot of work to parse the options, validate them, display help messages, etc. I had a link to this thing called the Adaptive Console Framework sitting in my Action folder in Outlook and finally got around to looking at it. It's a library by Sunny Chen that takes the pain of command line junk by doing most of the heavy lifiting for you.
This is what the console framework provides for you. A nice, simple way of not having to write a lot of code to deal with complex command line options and something that gives you a few other benefits along the way like automatic help text generation and easy access to command line options. Notice that the syntax for displaying NAnt help was "nant -help" but it wouldn't allow variations like "nant /?" or "nant -?". The framework as we'll see let's us make it easy to just add variations to command line syntax without doing a lot of work.
The framework is a little gem of a library that I didn't think much about before but now after spending an entire hour of my hard earned time I think it's pretty slick. Here's a transformation of the console version of Tree Surgeon.
The old version of the Tree Surgeon console (betcha didn't even think there was one!) was a little boring and actually broken. If you ran it without any arguments you got this:
TreeSurgeon version 1.1
Copyright (C) 2007 - 2008 Bil Simser
Copyright (C) 2005 - 2006 Mike Roberts, ThoughtWorks, IncCreates a .NET Development tree
TreeSurgeon projectName
Please note - project name must not contain spaces. We recommend you use CamelCase for project names.
You could probably surmise you need to provide a project name at least. But what about those other options like version and what unit test framework to use? And frankly this is wrong since it's not version 1.1, this output was from the 2.0 version. Lots of little problems here.
Here's the source for the command line runner:
[STAThread]
private static int Main(string[] args)
{
try
{
return RunApp(args);
}
catch (Exception e)
{
Console.WriteLine("Unhandled Exception thrown. Details follow: ");
Console.WriteLine(e.Message);
Console.WriteLine(e.StackTrace);
return -1;
}
}
And here's the RunApp method:
private static int RunApp(string[] args)
{
Console.WriteLine("TreeSurgeon version 1.1");
Console.WriteLine("Copyright (C) 2007 - 2008 Bil Simser");
Console.WriteLine("Copyright (C) 2005 - 2006 Mike Roberts, ThoughtWorks, Inc");
Console.WriteLine();
if (args.Length != 2)
{
Usage();
return -1;
}
Console.WriteLine("Starting Tree Generation for " + args[0]);
Console.WriteLine();
string outputDirectory = new TreeSurgeonFrontEnd(
Path.GetDirectoryName(Assembly.GetExecutingAssembly().Location), args[1]).
GenerateDevelopmentTree(args[0], "NUnit");
Console.WriteLine("Tree Generation complete. Files can be found at " + outputDirectory);
return 0;
}
RunApp would output the logo and copyright info and give you the ugly Usage() message (which wasn't too useful) if you didn't pass in at least a project name. You could pass in a version to build (2003, 2005, or 2008) but the unit test framework was hard coded to NUnit. Like I said, not too useful.
After taking a quick glance at what the Adaptive Console Framework (ACF) could do I decided to transform the Tree Surgeon console runner using it and see what we could get.
The ACF basically has two steps to it (this is overly simplifying it but you'll see it's pretty easy). First you make a slight adjustment to your main console application method, then you get down and dirty by creating option contracts (via attributes, classes, and properties). This has a big bonus that I immediately saw which was to move the command line options into a separate assembly and class which meant I could test it without actualy having to run the application and secondly it would take care of most of the heavy lifting of dealing with command line syntax.
So the first thing I did was to ditch that RunApp method and replace the call to have the ConsoleApplicationManager class from the ACF do my work. Here's the updated Main method from the Tree Surgeon console app:
[STAThread]
private static void Main(string[] args)
{
try
{
ConsoleApplicationManager.RunApplication(args);
}
catch (Exception e)
{
Console.WriteLine("Unhandled Exception thrown. Details follow:");
Console.WriteLine(e.Message);
Console.WriteLine(e.StackTrace);
}
}
Next I created a new assembly (called TreeSurgeonConsoleApplication.dll) and added an app.config file to the console app so the ACF could find my option contracts and added a reference to the ACF assembly. Here's the newly added app.config file:
<?xml version="1.0" encoding="utf-8" ?>
<configuration>
<configSections>
<section name="AdaptiveConsole"
type="AdaptiveConsole.Config.AdaptiveConsoleConfigHandler, AdaptiveConsole"/>
</configSections>
<AdaptiveConsole provider="TreeSurgeonConsoleApplication.TreeSurgeon, TreeSurgeonConsoleApplication"
contractRepository="TreeSurgeonConsoleApplication"/>
</configuration>
The app.config file just tells the ACF two things. The name and location of my console provider and the assembly where to find the option contracts. That was all I had to do in my TreeSurgeonConsole project so after removing the reference to the Core project (where the actual Tree Generation would happen) I closed down the console app project. Thinking about it, with the app.config file you could really use a generic console application project for *any* console app since there's nothing specific in here anymore. Nice.
The console provider is a class derived from ConsoleApplicationBase in the ACF and has two string overrides you provide, a logo and a description. Here's the TreeSurgeon class that we just specified in our app.config file:
public class TreeSurgeon : ConsoleApplicationBase
{
public TreeSurgeon(string[] args) : base(args)
{
}
protected override string Logo
{
get
{
var sb = new StringBuilder();
sb.AppendFormat("TreeSurgeon version 2.0{0}", Environment.NewLine);
sb.AppendFormat("Copyright (C) 2007 - 2008 Bil Simser{0}", Environment.NewLine);
sb.Append("Copyright (C) 2005 - 2006 Mike Roberts, ThoughtWorks, Inc.");
return sb.ToString();
}
}
protected override string Description
{
get { return "Creates a .NET development tree"; }
}
}
We're emulating part of the old RunApp method here. When I run the console app now I get this:
TreeSurgeon version 2.0
Copyright (C) 2007 - 2008 Bil Simser
Copyright (C) 2005 - 2006 Mike Roberts, ThoughtWorks, Inc.Creates a .NET development tree
Looks pretty much the same however like I said, I can now test the TreeSurgeon class (for example make sure the logo is set correctly because I might decide down the road to make the property a little more dynamic like fetching values using Reflection). I'm also not actually running anything yet so if I was building my app using TDD this fits nicely with that approach.
That's it for this part of the conversion but like I said, I don't have it running my TreeSurgeonFrontEnd class yet or generating the development tree or verifying the command line or displaying help. That now comes with our options.
With the ACF you define your command line options through something called "Option Contracts". There are four types in the ACF: None, Exact, Patternized, and Free. For Tree Surgeon I want the user to be able to run the application using these options:
We'll only look at the None Contract and the Patternized contract types.
The None Contract is a class that you inherit from OptionContractBase. It will be executed if the user provides no command line arguments to the application. Create a class that derives from OptionContractBase in your contract assembly. Here's the None contract for Tree Surgeon:
[OptionContract(
Type = ContractType.None,
Description = "Prints the help information on the screen.")]
public class TreeSurgeonEmptyContract : OptionContractBase
{
public override void Execute(
ConsoleApplicationBase consoleApplication,
IList<ArgumentInfo> args)
{
consoleApplication.PrintHelpMessage();
}
}
The class is decorated with an OptionContractAttribute that let's you specify the type of contract (None, Exact, Free, Patternized) and a description. Note we haven't done anything anywhere else in the system (the app.config file is done, the console Main method is done, and the ConsoleApplicationBase class is baked). All we're doing is adding a new class to the assembly we specified as our contractRepository in our app.config file.
Here's the output of the app now when no arguments are passed to it:
TreeSurgeon version 2.0
Copyright (C) 2007 - 2008 Bil Simser
Copyright (C) 2005 - 2006 Mike Roberts, ThoughtWorks, Inc.Creates a .NET development tree
> Calling the application without arguments
Prints the help information on the screen.
Sweet. Now let's start adding our options for actually running the app.
We'll add a new class called TreeSurgeonCommandsContract (again derived from OptionContractBase). This time rather than specifying the type as "None" we'll use "Patternized". The Patternized type is a contract type where your console application requires a complex command line argument. You can define the options that are mandatory or not within the contract, you can define the options that carry a list of values and you can even define the switches in the patternized contracts. here's our TreeSurgeonCommandsContract class:
[OptionContract(
Type = ContractType.Patternized,
Description = "Generates a new .NET development tree for a given project name.")]
public class TreeSurgeonCommandsContract : OptionContractBase
The main thing we need to capture is the project name that we want to generate the tree for. We'll do this by creating a property (called ProjectName) and decorating it with the OptionAttribute:
[Option(
Type = OptionType.SingleValue,
Name = "/p;/project",
Required = true,
Description = "Specifies the project name.\r\n\t" +
"Please note - project name must not contain spaces.\r\n\t" +
"We recommend you use CamelCase for project names.")]
public string ProjectName { get; set; }
This tells the ACF that a) this option has a single value b) it's specified by either "/p:" or "/project:" and c) it's required. There's also a description we provide which will be displayed in our output that looks like this now:
TreeSurgeon version 2.0
Copyright (C) 2007 - 2008 Bil Simser
Copyright (C) 2005 - 2006 Mike Roberts, ThoughtWorks, Inc.Creates a .NET development tree
TreeSurgeonConsole.exe </p|/project:>
> Calling the application without arguments
Prints the help information on the screen.> Generates a new .NET development tree for a given project name.
/p|/project:value (required):
Specifies the project name.
Please note - project name must not contain spaces.
We recommend you use CamelCase for project names.
Notice that we now have the application name (TreeSurgeonConsole.exe) along with a required property. And the help is displayed for that property. Again, pretty damn simple so far. At this point we could actually implement the required Execute method on the TreeSurgeonCommandsContract class and call out to our TreeSurgeonFrontEnd, passing it the ProjectName property. We would generate a developement tree just like the original system and we're done. However we're only about 20 minutes into our conversion so we can do a lot more.
First we'll add a property to specify the version of the development tree we want to generate. This is again just a string property in our TreeSurgeonCommandsContract class decorated with the OptionAttribute. We'll make this optional and provide a default value for it along with instructions:
[Option(
Type = OptionType.SingleValue,
Name = "/v;/version",
Required = false,
Default = "2008",
Description = "Specifies the Visual Studio version to generate.\r\n\t" +
"Valid options are: \"2003\", \"2005\", or \"2008\"\r\n\t" +
"Default is \"2008\"")]
public string Version { get; set; }
Then we'll do the same for our UnitTestFramework we want to specify (NUnit or MbUnit):
[Option(
Type = OptionType.SingleValue,
Name = "/t;/test",
Required = false,
Default = "NUnit",
CaseSensitive = true,
Description = "Specifies the Unit Test framework to use when generating the tree.\r\n\t" +
"Valid options are: \"NUnit\", or \"MbUnit\"\r\n\t" +
"Default is \"NUnit\"")]
public string UnitTestFramework { get; set; }
Now we can run our app and see the help the ACF is providing:
TreeSurgeon version 2.0
Copyright (C) 2007 - 2008 Bil Simser
Copyright (C) 2005 - 2006 Mike Roberts, ThoughtWorks, Inc.Creates a .NET development tree
TreeSurgeonConsole.exe </p|/project:> [/v|/version:] [/t|/test:]
> Calling the application without arguments
Prints the help information on the screen.> Generates a new .NET development tree for a given project name.
/p|/project:value (required):
Specifies the project name.
Please note - project name must not contain spaces.
We recommend you use CamelCase for project names./v|/version:value :
Specifies the Visual Studio version to generate.
Valid options are: "2003", "2005", or "2008"
Default is "2008"/t|/test:value :
Specifies the Unit Test framework to use when generating the tree.
Valid options are: "NUnit", or "MbUnit"
Default is "NUnit"
Lots of great stuff here and all we've done was specify some attributes around a few properties. What I really like are a few things we got for free:
Now we'll actually implement the code to run our generator and use whatever values you pass along in the command line.
To get the framework to do our bidding, we implement the Execute method in our TreeSurgeonCommandsContract class. This method passes in a copy of the ConsoleApplicationBase class (we specified above as TreeSurgeon) and an IList of ArgumentInfo values which were passed into the application. This is more than just a string so we can get information from our arguments like what type of argument they are.
For Tree Surgeon, we need at least one option (the project name). We'll use a little LINQ to get the list of options from our passed in parameter and check to make sure that a) we have at least 1 option and b) we have a project name:
var options = from arg in args
where arg.Type == ArgumentType.Option
select arg;
if(options.Count() < 1 || string.IsNullOrEmpty(ProjectName))
{
consoleApplication.PrintHelpMessage();
return;
}
Now that we've got a valid command line we'll reproduce what our old RunApp method did, namely invoke the TreeSurgeonFrontEnd class which will generate our development tree for us. We'll make it a little more interesting than version 1.1 and print out a little more information on what options we're using to generate the tree. Here's our Execute method so far:
public override void Execute(ConsoleApplicationBase consoleApplication, IList<ArgumentInfo> args)
{
var options = from arg in args
where arg.Type == ArgumentType.Option
select arg;
if(options.Count() < 1 || string.IsNullOrEmpty(ProjectName))
{
consoleApplication.PrintHelpMessage();
return;
}
consoleApplication.PrintLogo();
Console.WriteLine("Starting Tree Generation{0}", Environment.NewLine);
Console.WriteLine(" Project Name: \"{0}\"", ProjectName);
Console.WriteLine(" Version: \"{0}\"", Version);
Console.WriteLine("Unit Test Framework: \"{0}\"", UnitTestFramework);
Console.WriteLine();
var frontEnd = new TreeSurgeonFrontEnd(Path.GetDirectoryName(Assembly.GetExecutingAssembly().Location), Version);
var outputDirectory = frontEnd.GenerateDevelopmentTree(ProjectName, UnitTestFramework);
Console.WriteLine("Tree Generation complete.{0}{0}Files can be found at:{0}\"{1}\"", Environment.NewLine, outputDirectory);
}
And here's the output using the command line "treesurgeonconsole.exe /p:test":
TreeSurgeon version 2.0
Copyright (C) 2007 - 2008 Bil Simser
Copyright (C) 2005 - 2006 Mike Roberts, ThoughtWorks, Inc.Creates a .NET development tree
Starting Tree Generation
Project Name: "test"
Version: "2008"
Unit Test Framework: "NUnit"Tree Generation complete.
Files can be found at:
"C:\Documents and Settings\simserb\My Documents\TreeSurgeon\test"
Wait! We're only 45 minutes into our conversion and there's more features we can take on. Most apps let you turn off the silly logo/copyright info (usually with a "/nologo" switch). The ACF has a nice feature to specify switches on properties. You just add a boolean property to your class and decorate accordingly. Here's our "/nologo" switch:
[Option(
Type = OptionType.Switch,
Name = "/nologo",
Description = "When turned on, the logo and description\r\n\t" +
"information will not be displayed.")]
public bool NoLogo { get; set; }
Now that we have a bool property if the user adds "/nologo" to the command line we should not print out the header info:
if(!NoLogo)
{
consoleApplication.PrintLogo();
}
Finally one last thing before we're done. A bug in the old system was that if you tried to generate a new tree over top of an existing directory, it would bomb out with something like this:
TreeSurgeon version 1.1
Copyright (C) 2007 - 2008 Bil Simser
Copyright (C) 2005 - 2006 Mike Roberts, ThoughtWorks, IncStarting Tree Generation for test
Unhandled Exception thrown. Details follow:
Can't generate directory [C:\Documents and Settings\simserb\My Documents\TreeSurgeon\test] since it already exists on disk. Wait until a later version, or delete the existing directory!
at ThoughtWorks.TreeSurgeon.Core.SimpleDirectoryBuilder.CreateDirectory(String directoryName) in C:\Development\TreeSurgeon-2_0_0_0.source\src\Core\SimpleDirectoryBuilder.cs:line 12
at ThoughtWorks.TreeSurgeon.Core.TreeSurgeonFrontEnd.GenerateDevelopmentTree(String projectName, String unitTestName) in C:\Development\TreeSurgeon-2_0_0_0.source\src\Core\TreeSurgeonFrontEnd.cs:line 42
at ThoughtWorks.TreeSurgeon.TreeSurgeonConsole.TreeSurgeonConsoleMain.RunApp(String[] args) in C:\Development\TreeSurgeon-2_0_0_0.source\src\TreeSurgeonConsole\TreeSurgeonConsoleMain.cs:line 44
at ThoughtWorks.TreeSurgeon.TreeSurgeonConsole.TreeSurgeonConsoleMain.Main(String[] args) in C:\Development\TreeSurgeon-2_0_0_0.source\src\TreeSurgeonConsole\TreeSurgeonConsoleMain.cs:line 15
Highly useful. Let's add a new feature to our command line, an "/overwrite" swtich. It'll be just like the "/nologo" switch except that if it's specified, we'll delete the directory before we generate the tree:
[Option(
Type = OptionType.Switch,
Name = "/overwrite",
Description = "When turned on, any project with the same name\r\n\t" +
"will be deleted.")]
public bool Overwrite { get; set; }
And here's the updated tree generation code with the check to see if we should delete the output directory first:
var frontEnd = new TreeSurgeonFrontEnd(Path.GetDirectoryName(Assembly.GetExecutingAssembly().Location), Version);
if (Overwrite)
{
Directory.Delete(frontEnd.GetOutputPath(ProjectName), true);
}
var outputDirectory = frontEnd.GenerateDevelopmentTree(ProjectName, UnitTestFramework);
Console.WriteLine("Tree Generation complete.{0}{0}Files can be found at:{0}\"{1}\"", Environment.NewLine, outputDirectory);
That's it! In under 60 minutes we were able to totally transform the command line tool into something a little more robust and testable (and even add a new feature to fix an old bug). Now when we run the Tree Surgeon console app we get a rich descriptive help screen:
TreeSurgeon version 2.0
Copyright (C) 2007 - 2008 Bil Simser
Copyright (C) 2005 - 2006 Mike Roberts, ThoughtWorks, Inc.Creates a .NET development tree
TreeSurgeonConsole.exe </p|/project:> [/v|/version:] [/nologo] [/overwrite] [/t|/test:]
> Calling the application without arguments
Prints the help information on the screen.> Generates a new .NET development tree for a given project name.
/p|/project:value (required):
Specifies the project name.
Please note - project name must not contain spaces.
We recommend you use CamelCase for project names./v|/version:value :
Specifies the Visual Studio version to generate.
Valid options are: "2003", "2005", or "2008"
Default is "2008"[/nologo]:
When turned on, the logo and description
information will not be displayed.[/overwrite]:
When turned on, any project with the same name
will be deleted./t|/test:value :
Specifies the Unit Test framework to use when generating the tree.
Valid options are: "NUnit", or "MbUnit"
Default is "NUnit"
A few benefits I got from this conversion:
So, if you've got a console application sitting around you might want to give the ACF a spin and try it out. Or if you're building a new app take a look at it. It was low impact and high value for my investment and gave me a better end result that's now testable and easy to extend. You might find it useful like I did. Many thanks to Sunny Chen for putting this library together, it's a great tool.
Enjoy!
Trying out a new look. Changed the theme on the blog and created a custom header. The header is an image captured from Wordle which is a pretty neat tool. Give it a bunch of text or point it at a feed and you get a jumble of words. I pointed it at my own feed as it seemed appropriate and it spit out this. Anyways, hope you like it. I think I needed a change from the Marvin3 theme I've had for the past few years.
Sometimes you need a column in your database to automatically increment (like an identity column) in order to provide back to a user say a confirmation number (when an item is added to that table). In NHibernate there's no way to specify this kind of behavior with normal mappings because the column in the Id tag has to be the primary key. Here's a technique we used to do this.
Let's say we have a ticketing system (like TicketMaster) and it's going to give back the user a confirmation number after adding their request. The TicketRequest table ID is keyed off of a Guid but we can't provide that back to the user so we need an additional property called ConfirmationNumber (plus we don't want to expose ID fields to the users).
Specify your table mappings like so:
<class name="TicketRequest" lazy="false">
<id name="Id" type="guid.comb">
<generator class="assigned"/>
</id>
<property name="ConfirmationNumber" generated="insert" insert="false" update="false">
</class>
Then in the same mapping file change the ConfirmationNumber column on creation to an identity column using the <database-object> tag:
<database-object>
<create>
ALTER TABLE TicketRequest DROP COLUMN ConfirmationNumber
ALTER TABLE TicketRequest ADD ConfirmationNumber INT IDENTITY
</create>
</database-object>
There you have it. When you insert your record, you'll be able to use a Guid ID field but provide back an auto-incrementing field to your users.
Hope that helps.
When you launch a XBAP application you can sometimes stumble over the XBAP error page which might look something like this:

Here's a WPF user control that you can drop into any application that simulates the error icon you see. It's a simple Canvas control with two Grids and uses Paths and Elipses to define the graphical look.
First create a new WPF User Control in your project or a library. Name it whatever you like, I called mine ErrorIcon. It'll be a type derived from UserControl so go into the XAML and change this to Canvas and also update the ErrorIcon.xaml.cs class to derive from Canvas instead of UserControl.
<Canvas x:Class="WpfApplication1.UserControl1"
xmlns="http://schemas.microsoft.com/winfx/2006/xaml/presentation"
xmlns:x="http://schemas.microsoft.com/winfx/2006/xaml"
Height="300" Width="300">
<Grid>
</Grid>
</Canvas>
namespace WpfApplication1
{
/// <summary>
/// Interaction logic for UserControl1.xaml
/// </summary>
public partial class UserControl1 : Canvas
{
public UserControl1()
{
InitializeComponent();
}
}
}
Now drop in the following XAML code into your newly created Canvas:
<Canvas x:Class="WpfApplication1.ErrorIcon" xmlns="http://schemas.microsoft.com/winfx/2006/xaml/presentation" xmlns:x="http://schemas.microsoft.com/winfx/2006/xaml" x:Uid="ErrorCanvas" Margin="0,3,0,0" Width="44">
<Grid Name="RedWarning" x:Uid="RedWarning" Width="44" Height="44" Visibility="Visible">
<Ellipse x:Uid="Ellipse_1">
<Ellipse.Fill>
<LinearGradientBrush x:Uid="LinearGradientBrush_14" StartPoint="0,0" EndPoint="0,1">
<LinearGradientBrush.GradientStops>
<GradientStopCollection x:Uid="GradientStopCollection_4">
<GradientStop x:Uid="GradientStop_32" Color="OrangeRed" Offset="0" />
<GradientStop x:Uid="GradientStop_33" Color="DarkRed" Offset="1" />
</GradientStopCollection>
</LinearGradientBrush.GradientStops>
</LinearGradientBrush>
</Ellipse.Fill>
<Ellipse.Stroke>
<LinearGradientBrush x:Uid="LinearGradientBrush_15" StartPoint="0,0" EndPoint="0,1">
<LinearGradientBrush.GradientStops>
<GradientStopCollection x:Uid="GradientStopCollection_5">
<GradientStop x:Uid="GradientStop_34" Color="transparent" Offset="0" />
<GradientStop x:Uid="GradientStop_35" Color="#44ffffff" Offset="1" />
</GradientStopCollection>
</LinearGradientBrush.GradientStops>
</LinearGradientBrush>
</Ellipse.Stroke>
</Ellipse>
<Ellipse x:Uid="Ellipse_2" Opacity="0.5" Stroke="Transparent" Margin="1">
<Ellipse.Fill>
<LinearGradientBrush x:Uid="LinearGradientBrush_16" StartPoint="0,0" EndPoint="0,1">
<LinearGradientBrush.GradientStops>
<GradientStopCollection x:Uid="GradientStopCollection_6">
<GradientStop x:Uid="GradientStop_36" Color="white" Offset="0" />
<GradientStop x:Uid="GradientStop_37" Color="transparent" Offset="1" />
</GradientStopCollection>
</LinearGradientBrush.GradientStops>
</LinearGradientBrush>
</Ellipse.Fill>
</Ellipse>
<Path x:Uid="Path_1" Stretch="Fill" Width="19.878" Height="19.878" StrokeThickness="5" Stroke="#FFFFFFFF" StrokeStartLineCap="Round" StrokeEndLineCap="Round" Data="M 200,0 L 0,200 M 0,0 L 200,200" />
</Grid>
<Grid x:Uid="RedReflection" Width="44" Height="44" Visibility="Visible" Canvas.Top="80" Canvas.Left="0">
<Grid.OpacityMask>
<LinearGradientBrush x:Uid="LinearGradientBrush_20" StartPoint="0,1" EndPoint="0,0">
<GradientStop x:Uid="GradientStop_44" Offset="0" Color="#3000" />
<GradientStop x:Uid="GradientStop_45" Offset="0.9" Color="Transparent" />
</LinearGradientBrush>
</Grid.OpacityMask>
<Grid.RenderTransform>
<ScaleTransform x:Uid="ScaleTransform_2" ScaleX="1" ScaleY="-0.85" />
</Grid.RenderTransform>
<Ellipse x:Uid="Ellipse_3">
<Ellipse.Fill>
<LinearGradientBrush x:Uid="LinearGradientBrush_17" StartPoint="0,0" EndPoint="0,1">
<LinearGradientBrush.GradientStops>
<GradientStopCollection x:Uid="GradientStopCollection_7">
<GradientStop x:Uid="GradientStop_38" Color="OrangeRed" Offset="0" />
<GradientStop x:Uid="GradientStop_39" Color="DarkRed" Offset="1" />
</GradientStopCollection>
</LinearGradientBrush.GradientStops>
</LinearGradientBrush>
</Ellipse.Fill>
<Ellipse.Stroke>
<LinearGradientBrush x:Uid="LinearGradientBrush_18" StartPoint="0,0" EndPoint="0,1">
<LinearGradientBrush.GradientStops>
<GradientStopCollection x:Uid="GradientStopCollection_8">
<GradientStop x:Uid="GradientStop_40" Color="transparent" Offset="0" />
<GradientStop x:Uid="GradientStop_41" Color="#44ffffff" Offset="1" />
</GradientStopCollection>
</LinearGradientBrush.GradientStops>
</LinearGradientBrush>
</Ellipse.Stroke>
</Ellipse>
<Ellipse x:Uid="Ellipse_4" Opacity="0.5" Stroke="Transparent" Margin="1">
<Ellipse.Fill>
<LinearGradientBrush x:Uid="LinearGradientBrush_19" StartPoint="0,0" EndPoint="0,1">
<LinearGradientBrush.GradientStops>
<GradientStopCollection x:Uid="GradientStopCollection_9">
<GradientStop x:Uid="GradientStop_42" Color="white" Offset="0" />
<GradientStop x:Uid="GradientStop_43" Color="transparent" Offset="1" />
</GradientStopCollection>
</LinearGradientBrush.GradientStops>
</LinearGradientBrush>
</Ellipse.Fill>
</Ellipse>
<Path x:Uid="Path_2" Stretch="Fill" Width="19.878" Height="19.878" StrokeThickness="5" Stroke="#FFFFFFFF" StrokeStartLineCap="Round" StrokeEndLineCap="Round" Data="M 200,0 L 0,200 M 0,0 L 200,200" />
</Grid>
</Canvas>
Bam! You've got an error icon that looks like this:

To use it, just take any surface and add in a reference to the custom Canvas. Here it is in a pseudo-MessageBox like window:

Enjoy!
In your own applications you'll generally want a "catch-all" handler that will take care of unhandled exceptions. In WinForms apps this is done by creating an unhandled exception delegate and (optionally) creating an AppDomain unhandled exception handler. Peter Bromberg has a good article on all of this here and I wrote about the various options for WinForms apps here.
With XBAP (XAML Browser Applications) the rules are slightly different so here's one way to do it.
Take your existing XBAP app (or create a new one) and in the App.xaml.cs file you'll want to create a new event handler for unhandled exceptions. You can do this in the Startup method like so:
protected override void OnStartup(StartupEventArgs e)
{
DispatcherUnhandledException += App_DispatcherUnhandledException;
base.OnStartup(e);
}
In our exception handler, we'll do two things. First we'll set the exception to be handled and then we'll set the content of the MainWindow (a property of the Application class) to be a new exception handler page.
private void App_DispatcherUnhandledException(object sender, DispatcherUnhandledExceptionEventArgs e)
{
e.Handled = true;
MainWindow.Content = new ExceptionHandlerPage();
}
That's really the basics and works. However you don't have the exception information passing onto the new page. We can do something simple for now. Here's the XAML for a simple error handling page:
<Page x:Class="XbapExceptionHandlerSpike.ExceptionHandlerPage"
xmlns="http://schemas.microsoft.com/winfx/2006/xaml/presentation"
xmlns:x="http://schemas.microsoft.com/winfx/2006/xaml"
Width="300" Height="300"
Title="ExceptionHandlerPage">
<Grid>
<Grid.RowDefinitions>
<RowDefinition Height="23" />
<RowDefinition />
</Grid.RowDefinitions>
<TextBlock Margin="10,0,0,0" VerticalAlignment="Center" Grid.Row="0" Text="An exception has occured. Here are the details:" />
<TextBlock Margin="10,0,0,0" Grid.Row="1" x:Name="ErrorInformation" Foreground="Red" FontFamily="Consolas" TextWrapping="Wrap" />
</Grid>
</Page>
I gave a name to the TextBlock in the second row in the grid. This is the control that will display our error message. I've also styled it and set the font to be a mono-spaced font.
We can update our creation of the ExceptionHandlerPage class to include the exception details like so:
private void App_DispatcherUnhandledException(object sender, DispatcherUnhandledExceptionEventArgs e)
{
e.Handled = true;
var page = new ExceptionHandlerPage
{
ErrorInformation = {Text = e.Exception.Message}
};
MainWindow.Content = page;
}
Now our page displays the error with the details provided:

Again, this is really simple and bare-bones. You can get creative with it with things like fancy fonts, dancing bears, floating borders, etc. and passing along the entire Exception (so you might walk through the inner exceptions and details) and even log the exception to your bug tracking system. Jeff Atwood has a great article on creating friendly custom Exception Handlers (one for WinForms here, one for ASP.NET here). A WPF version might be useful.
As with WPF apps, there are a lot of ways to skin this cat. This is just my take on it. Feel free to offer your own twist.
James Kovacs and I had the pleasure of presenting to a well fed crowd of about 150 crazed developers and IT folk at Shaw here in Calgary last night. We did a drive by discussion of Prism. I say drive by because we really just scratched the surface of what Composite Applications are all about (you can only do so much in 40 minutes on the subject) but we crammed in what we could. I hope it was a good intro to everyone and encourage you to head out and get Prism'd and see what the Patterns and Practices group has put together, it's a really great framework for building WPF based composite apps.

Thanks again to everyone who came out (even if it was for the food) and I had a blast presenting the content with James to you guys. Here's a copy of the slide deck if you're interested and here are a few key links from it:
Thanks!
You know there are things in life that you never notice or worry about. This is one of them.
The MessageBox API in Windows Forms allows you to specify message box icons to display along side your all-important message you're communicating to the user (System Error, Hard Drive Full, Your Cat is Pregnant, that sort of thing). Icons can help add a little punch to an otherwise drab afternoon staring at rows and rows of spreadsheets and overdue time cards.
The 9 options you can select from to kick your otherwise drab battleship gray business application up are: Asterix, Error, Exclamation, Hand, Information, Question, Stop, Warning, and None. None of course presents no icon. The others provide you with an icon that matches the description. Or does it?
Here's the Asterix option:
And here's the Information option:
![clip_image002[5]](https://aspblogs.blob.core.windows.net/media/bsimser/WindowsLiveWriter/9Options4Icons1MessageBox_14B8B/clip_image002%255B5%255D.jpg)
Hmmm... something isn't right here. Am I seeing double? No, both options use the same icon.
Onto the Exclamation icon:
![clip_image002[7]](https://aspblogs.blob.core.windows.net/media/bsimser/WindowsLiveWriter/9Options4Icons1MessageBox_14B8B/clip_image002%255B7%255D.jpg)
And the Warning one:
![clip_image002[9]](https://aspblogs.blob.core.windows.net/media/bsimser/WindowsLiveWriter/9Options4Icons1MessageBox_14B8B/clip_image002%255B9%255D.jpg)
Hey! You're copying and pasting the same image!
No friends, I really did write a program to do all this (contact me for licensing and source code rights) and they really are different.
Finally here's the Error, Hand, and Stop icons (all conveniently wrapped up in one picture):
![clip_image002[11]](https://aspblogs.blob.core.windows.net/media/bsimser/WindowsLiveWriter/9Options4Icons1MessageBox_14B8B/clip_image002%255B11%255D.jpg)
Yup. All three use the red 'X' icon. You would think, oh I don't know, the Hand would display a Hand icon and Stop might, oh what the heck I'll take a stab at this, display a Stop sign. Now I'm all for saving on resources. After all, icons cost money to make; take up valuable bytes in the CLR; and lord knows how many hours of debate over the right shade of yellow for the Warning icon was spent. However if you're going to provide a programmer 9 different options (which all seem reasonable and unique) then why would you only provide 4 icons (I neglected to show the Question icon which is indeed a question mark). Did the MessageBox team have their budget cut or something?
In any case, this seemingly random blog entry has been brought to you by the letters M, M, and M and the number M.
Today they launch the National Do Not Call list in Canada, a bill that was passed 3 years ago but it's taken this long to build the service (guess they don't practice Agile in their software delivery process). From the looks of the service you might be jumping for joy thinking all those annoying calls at dinner time will stop. Think again.

I went to register my number with the National Do Not Call list but I’m pretty skeptical that it’s of any value. There are a whack of exclusions:
Hmmm. Doesn't leave much left does it?
In addition, apparently it costs money for the telemarketers to subscribe to the list. It’s not clear that if they don’t subscribe to the list they can/cannot call you. All it says in the rules are that “Telemarketers and Clients of Telemarketers must subscribe to the National DNCL and pay any applicable application fees”.
I suppose it will reduce the number of “cold call” telemarketers that will call you, but I’m suspicious that it’ll really reduce much. Looking at the exclusion list, basically there’s very few organizations that will fit into the non-exclusion list and are open to interrupt your dinner time (or quality Halo 3 time).
For the most part, I get called by my own bank and credit card companies (offering me extra insurance or whatever the flavor of the day is). According to the rules since I do business with them, unless I tell them to put me on their internal DNC list, they’ll still continue to call me with their offers I can’t be bothered with. That’s if they even have an internal DNC list and there’s no legislation that requires them to.
Some people are welcoming the list, I just have doubts that it'll do much good. I agree that it's a good thing but there are too many restrictions, rules, and loopholes to make it really value-add to the consumer. True, you get off those cold-call lists from unknown telemarketers but in my experience I get more calls from business that I work with (banks, etc.) than unknown telemarketers and they're excluded (as is newspaper/magazine subscription calls which I get a lot of those too).
BTW, I tried to register my number but it took me to a page that simply said:
The service is not available. Please try again later.
I guess they didn’t figure anyone would actually use it or maybe the webserver just fell over and nobody cares.
Brilliant.
I'm presenting a talk around Terrarium development at the Edmonton .NET User Group on September 25th. The talk is focused on upgrading a legacy app (1.1) to 2.0 (and beyond to 3.5 eventually), building and running your own Terrarium (complete with man-eating critters), and the future roadmap.

Here's the session abstract:
Terrarium was created by members of the .NET Framework team in the .NET Framework 1.0 timeframe and was used initially as an internal test application. In Terrarium, you can create herbivores, carnivores, or plants and then introduce them into a peer-to-peer, networked ecosystem where they complete for survival. Terrarium demonstrates some of the features of the .NET Framework, including Windows Forms integration with DirectX; XML Web services; support for peer-to-peer networking; support for multiple programming languages; the capability to update smart client, or Windows-based, applications via a remote Web server; and the evidence-based and code access security infrastructure. This session is to explore the newly open sourced tool and talk about aspects and challenges around porting the 1.1 code to 2.0, introducing new framework features, updating the architecture. As well, we’ll look at building new creatures to introduce to your terrarium; how the entire eco-system works from a developers perspective, and the future roadmap where the Terrarium community is going.
I'll also be presenting the same session to the Calgary .NET User Group, we're just finalizing a date. See you there!
Update: The Calgary .NET User Group presentation is confirmed for October 1st. Details can be found here on their site. The talk will be titled "The interaction of feeding and mating in the software development control of a Terrarium".
Great news for Canadians! No, we haven't discovered a new source of unlimited clean-burning fuel and Stephen Harper is still our Prime Minister (for now).
Microsoft Canada has put together an awesome road show and it's coming soon. This is very much a mini-TechEd style conference but with a few twists. First off, it's Canadian based and will be hitting the major cities over the next couple of months. Second, some of the content is delivered by local freaks (such as myself) rather than the same old canned presentations by MSFT speakers. Don't get me wrong, the Canadian Developer support team (John Bristowe, Jean-Luc David, et. al.) are great but hey everyone has seen and heard them over and over again (and frankly Bristowes drag-n-drop sessions make me want to hurl). Now we can grab some premium air time and talk from the hip.
Unlike the previous road show launches and sessions, this is a paid event. Wait, stick around. Okay, I understand and hear ya. Why buy the milk when I can get the cow for free? Here's some factoids to make your want to rush out and buy your Donald Belcham Secret Decoder Ring (and optional Justice Gray Hair Tonic Revitalizer). Rather than a single day, the event is spread out over 2 days (you can choose to attend a single day or both, your choice). In addition, there are over 30 technical sessions all on new technology (nothing old and crappy here, well maybe some old-ish stuff but not crappy) including Windows and Web development, Virtualization, and Infrastructure. There are also "birds-of-a-feather" type sessions and some after party geek fests going on. All in all, a pretty slick way to kill off two days in cold, cold winter (and that means you Winnipeg!).
The two day conference is happening in the larger cities (Toronto, Montreal, Calgary, and Vancouver) with the one day conference happening in the less fortunate ones (Winnipeg, Halifax and Ottawa). The early bird price (before October 15) for one day is $124.99 or $249.99 for both days. After October 15th the price goes up to double at $249.99 and $499.99 respectively (so obviously if money is a concern I suggest you get in before October 15th). Space *is* limited to 5000 people so don't wait to sit out on this one.
Swag? Did I mention the swag? Any conference worth it's salt needs swag and this one is no exception. Each attendee gets the following goodies:
More? Oh yeah, I mentioned the presentations. I'm planning on presenting a whack of talks on WPF covering (Databinding, WinForms integration, CompositeWPF, LOB apps, etc.) so that should be fun. This is tentative as I haven't got the final word yet to take the stage (and after reading this blog post I may not be allowed to show up), but whatever happens I promise a) lots of code, no fluff b) flying monkeys c) Terrarium, Terrarium, Terrarium d) no concealed lizards or logging chains of any kind e) comic book cross-overs and f) did I mention the code? Beat those promise Mr. Harper!
The TechDays website will be online soon with more details and registration info. You can find that here. You can also check out D'Arcys twisted take on this here, and Miguel's more calmer preview here.
See you there!
I was trying to deploy a new WPF app via XBAP today and we were experiencing an odd deployment error.
When we deployed and launched the app we were getting this error:
Startup URI: http://localhost/XbapNHibernateDeploymentSpike/XbapNHibernateDeploymentSpike.xbap
Application Identity: http://localhost/XbapNHibernateDeploymentSpike/XbapNHibernateDeploymentSpike.xbap#XbapNHibernateDeploymentSpike.xbap, Version=1.0.0.5, Culture=neutral, PublicKeyToken=8c4ee06d2506bc6f, processorArchitecture=msil/XbapNHibernateDeploymentSpike.exe, Version=1.0.0.5, Culture=neutral, PublicKeyToken=8c4ee06d2506bc6f, processorArchitecture=msil, type=win32
System.Runtime.Serialization.SerializationException: Unable to find assembly 'NHibernate, Version=2.0.0.4000, Culture=neutral, PublicKeyToken=aa95f207798dfdb4'.
This was odd because I knew that NHibernate.dll was being distributed with the app. I confirmed. There it was in the manifest file and in the deployment directory. Checking the Application Files settings inside of Visual Studio (this was just a test deployment, please don't deploy apps from inside Visual Studio) it was there and included:

The generated manifest file showed it was included as well:
<dependency>
<dependentAssembly dependencyType="install" allowDelayedBinding="true" codebase="NHibernate.dll" size="1638400">
<assemblyIdentity name="NHibernate" version="2.0.0.4000" publicKeyToken="AA95F207798DFDB4" language="neutral" processorArchitecture="msil" />
<hash>
<dsig:Transforms>
<dsig:Transform Algorithm="urn:schemas-microsoft-com:HashTransforms.Identity" />
</dsig:Transforms>
<dsig:DigestMethod Algorithm="http://www.w3.org/2000/09/xmldsig#sha1" />
<dsig:DigestValue>hUljboZ3kBAzBFbanjzLCJCMua0=</dsig:DigestValue>
</hash>
</dependentAssembly>
</dependency>
This didn’t make any sense. It was in the manifest, in the published directory, and everything looked like it should work. Google wasn’t much help here as I was in uncharted territory so I just starting poking around.
Finally I came to the problem and a solution. The hibernate.cfg.xml file was being included as a data file and spec’d out in the manifest like this:
<file name="hibernate.cfg.xml" size="604" writeableType="applicationData">
<hash>
<dsig:Transforms>
<dsig:Transform Algorithm="urn:schemas-microsoft-com:HashTransforms.Identity" />
</dsig:Transforms>
<dsig:DigestMethod Algorithm="http://www.w3.org/2000/09/xmldsig#sha1" />
<dsig:DigestValue>eICryxpUlz1ZHRpxHt+P2z8kBJo=</dsig:DigestValue>
</hash>
</file>
Changing it from “Data File” to “Include” solved the problem.
In the working version of the manifest file, the NHibernate config file is spec’d out as this:
<file name="hibernate.cfg.xml" size="604">
<hash>
<dsig:Transforms>
<dsig:Transform Algorithm="urn:schemas-microsoft-com:HashTransforms.Identity" />
</dsig:Transforms>
<dsig:DigestMethod Algorithm="http://www.w3.org/2000/09/xmldsig#sha1" />
<dsig:DigestValue>eICryxpUlz1ZHRpxHt+P2z8kBJo=</dsig:DigestValue>
</hash>
</file>
Note the difference in the file declaration. The non-working one includes an attribute: writeableType="applicationData"
This is pretty obscure and maybe I’m just a simple guy, but telling me that you can’t find NHibernate.dll when you were really looking for a different isn’t very intuitive. Yes, I checked the stack trace, thinking that maybe the config file wasn’t there and it was an NHibernate exception being thrown or gobbled up, no such luck. The error was being reported out of PresentationHost.exe long before NHibernate was even being called.
Don’t ask me why changing the Publish Status from Data File to Include fixes the issue, I just work here.
Update: Sure enough, after you publish something on the internet along comes the information you were looking for. Buried somewhere on the web I found this tidbit:
If you set the 'Publish Status' of the xml data file to "Data File", this file will reside in the Data directory in the end user's Local Settings folder after installation. If you set the 'Publish Status' of the xml data file to "Include", the file will be output to the Application directory.
For xbap applications, the "Application directory" is the IE cache but when the Publish Status was set to "Data File" rather than "Include" it was going to nowhere land.
The SharePoint world is one less today.

It's with sad news that I have to say but Patrick Tisseghem, a SharePoint MVP that I've known for years, suddenly passed away on Wednesday September 3. He died due to heart failure in Gothenburg, Sweden.
I only met Patrick once at the first Summit I attended but he was an awesome and always interesting character. He was a talented guy and was always telling us about his beer trips throughout Europe while he was delivering SharePoint training.
He was a wonderful teacher, diligent author, and great guy to hang out with and talk to. He will be sorely missed.
Patrick is survived by his wife and two daughters. Our thoughts and prayers are with them.
We're starting a new project and naturally we looked at leveraging the latest .NET framework features (auto properties, extension methods, lamdas, LINQ, etc.). The question of user interface came up and we had some decisions to make.
This specific project we looked at building one client web front-end (for the majority of the users) and a SmartClient for a smaller contigent that requires a little more real-time feel along with more rich features the web client might not be able to do (without a lot of heavy lifting). As we were looking to start things, the notion of WPF vs. WinForms came up. This led us down a path to look at Prism (the Composite WPF project from the Patterns and Practices group) which has a lot to offer in frameworks and being able to do more with WPF (Prism is WPF only). WPF also has some benefits to automation (there are some new products that are tying into the automation frameworks) and testing. The pretty UI is just an afterthought and not the focus since we're building what would be considered a "traditional" business application (forms and maybe grids and reports).
WPF also has the advantage that we could deliver the application using xbap which kicks ClickOnce up a notch. The Prism framework is based on modules loading into XAML regions so we were even looking at re-using XAML user controls and plugging them into different clients.
This has kicked off a bit of a controversy and discussion. Is WPF really suited to business applications? Of course the answer is (as always) it depends. If you're business application requires a rich UI and a visual paradigm, then the obvious answer is yes. It's more intuitive for a user to drag a part from one component to another (say in a room designer) than to pick items from a grid and enter values in a form.
However for the larger business applications (the meat and potatoes of the corporate world) we don't deal with "rich UIs" so where does that leave you? WinForms is not dead and according to Glenn Block is the "recommended breadth solution for LOB application development in the foreseeable future". The trade off is that if you're building SmartClients you might look toward a framework that provides a lot of OOTB features that you don't have to do. I'm not a big fan of NIH syndrome and the idea of having to rewrite loggers, event handlers, aggregators, presentation models and everything else you build into a SmartClient. Frankly, I don't get paid to build frameworks or re-invent the wheel for every application my client wants.
Prism provides a nice framework (IMHO CAB done right) that you can leverage and pull it out in piecemeal to what you need. Unfortunately, it's WPF only. While some of the principles can be carried over to WinForms I think you'll end up doing more work to say try to get DataBinding working the same way (if at all). There are other aspects to WPF (ignoring the pretty UI) that don't carry over to WinForms (routed events, event aggregation, etc.) all of which you have to build yourself (or use CAB which is the overbloated bazooka edition of WinForm programming).
The word from my twitter folks is somewhat slighted toward WPF:
Other questions that come up:
I’m on the fence on WPF. From an automation and programming model, I think it’s fathoms above WinForms. I don’t mind the crafting of a good looking UI as I’m used to it in Blend and can whip off a UI just as fast as I can with WinForms. However I’m not sure its worth the extra effort (is there extra effort) in building business applications with it, but I’m torn with xbap where we can deliver a rich user experience without having to install a client.
For WinForms you generally have to either harvest what you have from existing applications or RYO when it comes to the application framework. Re-writing presenter base classes, validation strategies, various implementations of patterns like repository and specification, and building a service layer over things like NHibernate can be fairly straight forward but still might take a few weeks, weeks of cost that the customer doesn't want to pay for to see nothing out the other end.
There is the build as you go model, which works for any technology however you do want to keep consistency when you're building 5+ large applications a year and there's turnaround in the IT department. Re-inventing the wheel for every application isn't an option for anyone.
Feel free to chime in with your thoughts, experiences, and ideas. Thanks!
ALT.NET Canada wrapped up in the grand ballroom at the University Sunday afternoon. It was a great end to an awesome weekend. As with Open Spaces Technology there's a closing, and Doc introduced the Sharing Circle to everyone (some of Open Spaces Technology is rooted in Native American traditions). Everyone had something to say about the experience (you're not obligated to say anything) so it's a great way to see how our little gathering affected everyone. Enjoy!
We had a lively discussion with everyone on day 3 around what frameworks you would use (Microsoft or otherwise) and how to decide. Some of the converstations get a little heated thanks to various individuals and the original fishbowl morphs as more chairs are added in the middle (as opposed to being taken away). Should be an enjoyable watch.
BTW, I screwed up editing this thing (thanks Windows Movie Maker, you know how I feel about you) so the beginning starts about halfway through (around the 25 minute mark) then it jumps back to the beginning. Sorry about that.
Here we are at day 3 at ALT.NET Canada. This session was hosted by Donald Belcham and focused around discussing techniques and designs to decouple your solutions. As with most of the sessions this weekend, the conversation went to other places like deployment tools and techniques, coding to interfaces, and talks around how to introduce these techniques to your teams. Enjoy the vid:
Saturday at ALT.NET Canada kicked off with a talk on the build process. The discussion was centered around build files and asks the question if NAnt has outlived it's usefulness, or are we putting too much into our build files? Lots of discussions of alternatives (Boo, Ruby, etc.) and products. The second half of the conversation shifted more to the deploy side, but as you'll see it's all related. Great stuff to start off the day. Here's the vid:
Tomorrow is the last day of ALT.NET Canada and there are some great topics lined up. So I thought I would throw it out there for you guys to pick what sessions I video capture. What do you want to see? I can only be at one in each time slot, let me know what you think would be a good one to capture.

Here are the choices:
10:00
11:30
Please leave your choices in the comments on this post. If there are any votes I'll video capture the ones with the most, otherwise I'll flip a coin or something and pick one randomly.
Thanks!
Today was DDD day at ALT.NET Canada as we had several sessions on Domain Driven Design. There was a chalk talk hosted by Greg Young, a talk on Distributed Domain Driven Design (DDDD) that I initiated, and a Birds of a Feather style chat towards the end of the day (including the topic of "where the f**k do you put business logic"). It was a healthy discussion that went to a lot of great places. Here's the video for the chalk talk:
Here's the schedule of sessions for this weekend at ALT.NET Canada that the group came up with Friday night (aka The Marketplace)
Saturday
| 10:00 | 11:30 | 2:30 | 4:00 |
|---|---|---|---|
| Which Presentation Technology do you use? What are web technologies going to be in 2012? | Telecommuting - Who wants to wear pants to work? | What approaches to use for occasionally connected applications? | Volunteering our software development skills to more than just open source software. |
| Building extensible frameworks leveraging framework consumer selectable IoC containers. | Source Code Best Practices | Behavior Driven Development - Tools, Practices and introducing BDD to a team | WCF |
| Build Files - Time to give XML a break. Deployment tools, approaches, ideas. How to minimize deployment pain. | Domain Driven Design chalk talk | How do we design/build DDD systems across the Enterprise. Command/Query separation patterns and best practices. | Domain Driven Design Birds of a Feather. Business Logic - Where the fsck do you put it? |
| Skills, practices, platforms, and interest in mobile apps. | How can I introduce messaging to my team? | Educating business about investing in sound long term software development lifecycle management. How do we bridge the IT-Business gap? | WPF. Experiences, learnings, advice. |
Sunday
| 10:00 | 11:30 |
|---|---|
| No session scheduled yet. | What can we as ALT.NET do to enhance and foster the Canadian Developer Community. |
| Is convention over configuration important to .NET developers? | What did Microsoft do wrong in 2007-2008? |
| Introducing good decoupling practices to a team. | How to choose frameworks? Is the Microsoft one always right or wrong? |
| SOA. Are people still heading in this direction? | Why choose Agile and how to do Agile without failing? |
Some really awesome topics here and should make for some amazing discussions this weekend!
It's the first day in Calgary and the launch of our first (and hopefully not last) Open Spaces event on ALT.NET (Canada style!). We're pleased as punch to have Steven "Doc" List up here facilitating the weekend and generally keeping us nerds in check. It was a great turnout tonight with a full house and lots of great participation, questions, and discussions.
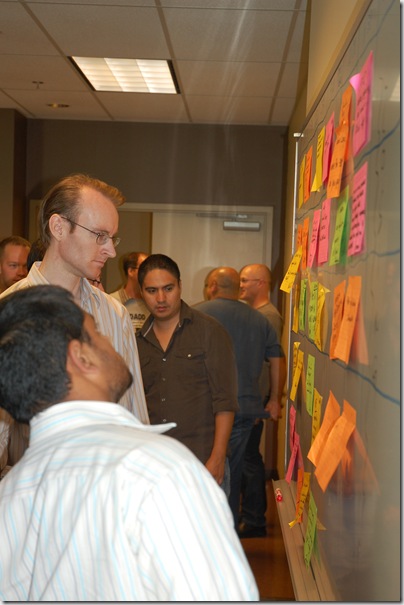
I didn't get a chance to write down this weekends sessions but they were pretty cool, ranging from DDD to build files, who needs them? I'll post the session list tomorrow morning when I get back to the University.
It was no Beijing launch events (and we didn't even have a single protester) but it was fun and friendly and it worked. I captured the opening kickoff by Doc and will continue to fill up my hard drive for some of the sessions this weekend (and then posting them online here) so you can get a sense of what Open Spaces is all about and how our little version of ALT.NET goes.
So here's my very first video capture and mini-production. Maybe future ones will have a little more polish to them. Hope you enjoy it!
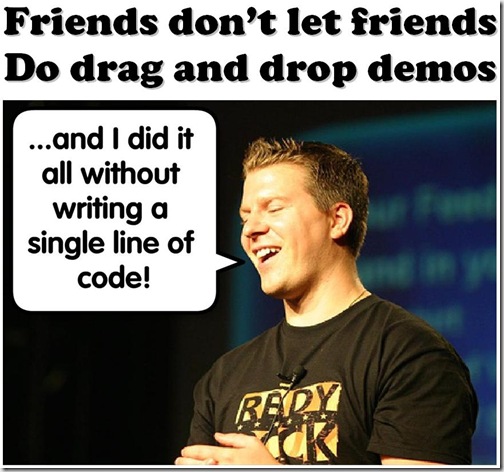
(image courtesy of Greg Young, laughter courtesy of John Bristowe).
I’m taking a bit of some downtime in the British Columbia for the next week so no blog or project updates. I’ll be on email/twitter/facebook intermittently via my CrackBerry (wherever there’s reception) otherwise I’ll be back sometime next week with new and exciting adventures in the digital land.

I’ve put my own server up and running for you to connect to with the new Terrarium Client and upload your critters to. It’s available at http://www.terrariumserver.com (and will be the default new server in the next build).

To configure your Terrarium Client to talk to the new server, on the main screen find the icon (2nd one in) that will take you to the settings screen:

Click on this and you’ll see this dialog:

Enter in the values you see above (http://www.terrariumserver.com) and you’ll be good to go. The server is running right now and waiting for creatures to be uploaded so good luck and please use it. Please don’t be abusive as this is a free service and I don’t want to have to spend a lot of time maintaining this guy.
I’m working on two additional sites. http://wiki.terrariumserver.com will host a public wiki that you can exchange design tips, ideas, and strategies with each other. http://creations.terrariumserver.com will become a Digg like community for creatures where you can showcase your work and vote on other peoples animals.
Watch for the new sites to come online in the next week or two (just trying to get the wiki setup before I leave for vaction but having site creation problems).
Enjoy!
My bad. I don’t run Vista. Really. I don’t like it, it’s glacially slow, and doesn’t give me anything as a developer (except more flashy looking Explorer screens and maybe a Start menu I can search). So I’m an XP boy, however that was a bad mistake on my part with the release of Terrarium.
Vista users were getting an exception message and it was pretty quick to see that it was a DirectX problem. The problem was a) Vista doesn’t support DirectX 7 which Terrarium requires and b) Bil is an idiot for not thinking about this. Again, my bad and I apologize.
So first off there’s a quick fix (which I can’t test myself, but according to comments on Scott’s blog it works).
d3drm.dll
dx7vb.dll
dx8vb.dll
That should fix you up in the interim. Unfortunately I cannot redistribute the files to you as they’re MS property and all that jazz.
For longer term, I’m ripping out the DirectX COM calls (which are actually wrappers to wrappers) that are in the current codebase and calling the DirectX managed ones provided in DirectX 9. This will probably result in not only a more readable codebase (and one that works on Vista) but it might even gain a little performance along the way.
The managed DirectX classes Microsoft provides in DirectX 9 are pretty nice and rather than a bevy of cryptic constants, enums and ref objects everywhere they’re all wrapped up in a nice OO-like package for you.
For example here’s the old DX7 code (ugly COM and DirectX goo):
1: /// <summary>
2: /// Determines if the surface is in video memory
3: /// or system memory.
4: /// </summary>
5: public bool InVideo
6: { 7: get 8: {9: if (surface != null)
10: {11: DDSCAPS2 ddsc = new DDSCAPS2();
12: surface.GetCaps(ref ddsc);
13: if ((ddsc.lCaps & CONST_DDSURFACECAPSFLAGS.DDSCAPS_VIDEOMEMORY) > 0)
14: {15: return true;
16: } 17: }18: return false;
19: } 20: }As with most DirectX code you come across, it’s rather cryptic and ugly. Here’s what this method will look like after the conversion to use the DirectX managed classes:
1: public bool InVideo
2: { 3: get 4: {5: if (surface != null)
6: { 7: SurfaceCaps ddsc = surface.SurfaceDescription.SurfaceCaps;8: return ddsc.VideoMemory;
9: }10: return false;
11: } 12: }Much nicer and more readable (well, as readable as DirectX code can ever be).
In any case, this is a better place to be but it’ll be awhile before I can commit all this work (and I’m flying without unit tests which is killing me here). I’m now re-living my past life when I knew what DDSCAPS_VIDEOMEMORY was (and regretting it as it all comes flashing back to me now). This probably won’t get us much closer to an XNA implementation of Terrarium but it’ll cause me to pull out less of my hair when we do (I think).
This fix will be in a 2.1 release that I’ll pump out when I get back from vanishing into the backwoods of British Columbia next week (sorry, but we geeks do need our downtime once in awhile).
I really need to sit down with Kyle Baley and Donald Belcham at ALT.NET Canada and have a few beers over this Brownfield effort for sure.
 To skip to the chase… http://www.codeplex.com/terrarium2
Origins
A long time ago, on a development team far, far, away, some bright dude (or dudette) came up with the idea of Terrarium.
Terrarium was a .NET 1.x game/learning tool that was aimed at getting people interested in .NET and building cool stuff. In Terrarium, you can create herbivores, carnivores, or plants and then introduce them into a peer-to-peer, networked ecosystem where they complete for survival. Terrarium demonstrates some of the features of the .NET Framework, including Windows Forms integration with DirectX®; XML Web services; support for peer-to-peer networking; support for multiple programming languages; the capability to update smart client, or Windows-based, applications via a remote Web server; and the evidence-based and code access security infrastructure.
Terrarium was created by members of the .NET Framework team in the .NET Framework 1.0 timeframe and was used initially as an internal test application. At conferences and via online chats, Terrarium provided a great way for developers to learn about the new .NET programming model and languages as they developed creatures and introduced them into a peer-to-peer ecosystem.
The Windows SDK team evolved the game in the .NET Framework 2.0 timeframe, but it wasn’t worked on for over two years. As a result, the source code for Terrarium 2.0 doesn’t use the very latest .NET technologies.
Now here we are and it’s 2008, long past that 1.x product. A few months ago I got the bright idea to resurrect the project. After all, 1.x was long gone from the developers toolkit but the premise of building battle bugs and having them duke it out in a virtual eco-system was still just too plain cool to pass up. I thought it would make for an interesting project and get some renewed interest in .NET, and more specifically upgrade it to the latest framework and goodies out there. Hey, XNA is here and writing DirectX goo is a thing of the past.
The Long And Winding Road
So with my ambition and fearlessness of the Microsoft release monster, I trudged into the mouth of the beast. I hit up as many people I could find that were still around and pinged them about Terrarium.
Terrari-who?
That’s the general response I got for the most part. It’s been 6+ years and most of the original team has moved on. The challenge was to get anyone in Microsoft to find the unreleased source to this project, let alone even remember it.

I pictured a giant warehouse much like the last scene in Raiders of the Lost Ark. Boxes and boxes with cryptic product codes and license keys on them, all packaged up for someone to unearth someday. That someone was going to be me. Terrarium is my Lost Ark. So I persevered and continued to bug everyone I knew, finally ending up at Scott Guthrie who finally put me in touch with Lisa Supinski, Group Manager with the current Windows SDK team.
Lisa was instrumental at getting everything going and handling all the details of making this a reality. Without her, it wouldn’t have come to this point. From there the journey was fraught with danger, snakes, legal papers to read, source code to fix, and agreements to sign (did I mention the snakes?) and lots of emails, phone calls, and secret handshakes.
The fruit of our labour is upon us so now I proudly present…
Terrarium 2, Electric Boogaloo!

(okay, we’ll drop the Electric Boogaloo part)
Here We Go
The new Terrarium comes in two forms, the client and the server. The client consists of a few parts including a local Terrarium client executable (which also doubles as a screensaver), and SDK documentation and samples for building your own creations. The local Terrarium client and run your own critters but you’ll need a server to connect to if you want it to interact with other creations.
The client can run in two modes:
In both modes, you can develop your own creatures or you can watch as other developers’ creatures battle it out for survival by running Terrarium as a standalone application or as a screensaver.
The server is two parts. First there’s the web server part which consists of a single web server that provides a user interface for monitoring a Terrarium server (and all the critters uploaded to it) and there are web services that are consumed by the client (for uploading creatures, getting stats, interacting with peers, etc.). The server also includes some SQL scripts and installation instructions for setting up the database. Any flavour of SQL Server will work (2000, 2005, Express). 2008 is untested but should work fine. The scripts are pretty simple (the tables are pretty basic) and there are some stored procedures which could be ported to work with other servers (MySQL, Firebird, etc.) but that’s an exercise I’ll leave to the reader.
Custom Creatures
When creating a creature, you have control over everything from genetic traits (eyesight, speed, defensive power, attacking power, etc.) to behaviour (the algorithms for locating prey, moving, attacking, etc.) to reproduction (how often a creature will give birth and what “genetic information,” if any, will be passed on to its offspring). Upon completing the development process, the code is compiled into an assembly (dynamically linked library, or DLL) that can be loaded into the local ecosystem slice, viewable through the Terrarium console. When a creature is initially introduced in Ecosystem Mode, ten instances of it are scattered throughout the local ecosystem. No more instances of that creature may be introduced by that user or any other on the network until the creature has died off completely. By contrast, if running in Terrarium Mode, an infinite number of instances of a given creature may be entered into the environment.
Once the creature is loaded into Terrarium, it acts on the instructions supplied by its code. Each creature is granted between 2 and 5 milliseconds (depending on the speed of the machine) to act before it is destroyed. This prevents any one creature from hogging the processor and halting the game.
Within each peer in the network, a blue “teleporter” ball rolls randomly about. If the user is running with active peers logged in (either in Ecosystem Mode or using a private channel in Terrarium Mode), whenever this blue ball rolls over a creature, that creature is transported to a randomly selected peer machine.
In the SDK zip file there’s a help file and several samples to get you up and running instantly with a local Terrarium. Feel free to modify these or use them as a starter for your own new creations. Code samples are in both VB.NET and C#.
The Road Ahead

Putting Terrarium on CodePlex was intentional as it’s meant to be a collaborative piece. Getting the system out there is three fold and having it on CodePlex supports this:
Like I said, the current build is for 2.0. I didn’t want to delay the release while I upgraded it to 3.5 since I wasn’t going to be adding any value (yet) to the codebase and there might be some challenges with 3.5 and the DirectX code (I haven’t tried an upgrade yet, so it could “just work”). The other challenge is driven by you, being the fact that not everyone is building in Visual Studio 2008 and targeting the 3.5 framework. So I didn’t want to exclude a large number of developers by forcing them to 3.5. I think time will tell (via the CodePlex forums and feedback on this project) when the right time to move to 3.5 will be (and how, for example will we maintain a 2.0 and 3.5 codebase?). I don’t have all the answers but I’m here to listen and juggle the kittens for everyone.
What’s planned? Here’s my product backlog that will probably make it’s way onto the Issues page on the CodePlex project. These are just seeds for ideas, I’m sure you guys can come up with better ones.
Jumping into the project is not for the casual developer. As this codebase came from Microsoft there are some guidelines and constraints we’re going to follow. The first being team members. Please understand this is neither the Blue Monster talking or me being an uber-control freak, it’s just how it is. So if you’re interested in joining the team and contributing there are a few things that have to happen:
Like I said, it’s a little more tasking than a typical CodePlex project and there are constraints we can talk about via email or whatever if you’re really interested in enhancing or extending Terrarium and becoming a member of the team.

You can grab the various packages now from the release page on CodePlex here. There are packages in various formats:
Just a couple of final notes.
Client/Server versions are very sensitive. This is due to security and not allowing clients to “take over” the server or upload malicious code. So if you’ve decided to create your own fork of the code or are running a “custom” server, be aware that only clients that are keyed to your server (based on version) will work. Other clients may have issues connecting or interacting with your server.
The server setup is not fully automated (and probably could be via a MSBuild script or PowerShell script) so there’s some manual intervention needed. The website installs via an installer but you’ll need to create a database and run the scripts provided then do some manual editing of the web.config file to connect to the db. This is all documented in the server package. If you do spin a server up let us know (via the CodePlex project). Maybe we’ll have a dedicated wiki page with active servers people can connect to or something.
I’m also thinking of setting up a new domain and website for a creature exchange program. Upload your creatures, put them to battle, and show them off. Sort of a Digg for Terrarium. Let me know if you have ideas on this or want to help out (I always have 10x more ideas than I have time for). In any case, they’ll be more blog posts to come on building critters and the fine art of Terrarium A.I. (the “A” is for Artificial and the “I” is for intelligence. Wait, what’s the “A” for again?).
I do have a Terrarium 2.0 server up and running at http://terrariumserver.com that you can use for testing (which may or not be fully operational when you read this due to power outages in Vancouver). It’s a playground but can be used for checking out your battle bugs before you unleash them on other unsuspecting victims. This server will always be running the latest version of the server and have the most current (working) features available.
This is a “1.0” type release since it’s the first release of the source code. A few things (as you’ve read) have been done along the way and it’s by no means perfect or complete. It’s just the first step of the journey.
Differences from the Previous Version
For those that remember (or even still have copies of the old version of the program) I wanted to point out a few differences that you (or may not) notice in comparison.
Credit where credit is due
While this was my labour of love the past couple of months, I really want to thank everyone involved from the Microsoft side in getting this project going. Shout outs especially to Lisa from the Windows SDK team who’s become my best friend over the past couple of months and really got things moving on the MS side. Without her the Ark would still be boxed up somewhere in that warehouse.
Communities are not created, they’re grown and it takes time. I’m taking a chance on this project (as is Microsoft) in the hopes that it *will* spark some creativity and contribution. The discussion forums on CodePlex are there to talk about it and the Issue Tracker is to suggest features and report bugs. Who knows, given time to grow, we may be talking about this same time next year with a plethora of Terrarium resources out there. At least that would be a nice place to be and it can happen with you.
So there you go. Have at it. Build some creatures, learn some .NET and game programming, but above all… have fun!
It's a great game, but don't let it take over your life

I got turned onto a fairly new tool by a friend and was interested in checking it out. It's called Microsoft StyleCop and done in the style of FxCop but rather than analyzing assemblies it looks at code for formatting and style rules.
The original use was within Microsoft for keeping code across all teams consistent. Imagine having to deal with hundreds of developers moving around an organization like Microsoft where there are dozens of major teams (Windows, Office, Visual Studio, Games, etc.) and millions of lines of code. It helps if the code is consistent in style so people moving between teams don't have to re-learn how the "style" of that new team works. Makes sense and I can see where there's benefit, even in smaller organizations.
As an example, here's a small User Interface utility class for long(ish) running operations. It's simple but works and is easy to use:
using System;
using System.Windows.Forms;
namespace UserInterface.Common
{/// <summary>
/// Utility class used to display a wait cursor
/// while a long operation takes place and
/// guarantee that it will be removed on exit.
/// </summary>
/// <example>
/// using(new WaitCursor())
/// {
/// // long running operation goes here...
/// }
/// </example>
internal class WaitCursor : IDisposable
{private readonly Cursor _cursor;
public WaitCursor()
{_cursor = Cursor.Current;
Cursor.Current = Cursors.WaitCursor;
}
public void Dispose()
{Cursor.Current = _cursor;
}
}
}
One could even argue here that the class documentation header is somewhat excessive, but this is meant to be a framework class that any application could use and maybe deserves the <example/> tag.
Maybe it's my formatting style but I like using the underscore prefix for class fields. This is for two reasons. First, I don't have to use "this." all over the place (so the compile can tell between a parameter variable, local variable, and class variable. Secondly, I can immediately recognize that "_cursor" is a class wide variable. Sometimes we have a policy of only referencing variables via Properties so for example I could tell if this was a problem if I saw a method other than a getter/setter use this variable. The debate on underscore readability can be fought some other time, but for me it works.
After running StyleCop on this single file (I wasn't about to deal with all the voilations in the entire solution) it created this list of violations:
Hmmm, that's a lot of problems for such a little file. Now grant you, when you run FxCop against any assembly (even Microsoft ones) you get a whack of "violations". They range from actual, real, critical errors that should be fixed, to annoyances like not enough members in a namespace. Any team using FxCop generally has to sift through all the violations and decide, as a team, what makes sense to enforce and what to ignore. StyleCop has similar capabilities through it's SourceAnalysisSettingsEditor program (buried in the Program Files directory where the tool is installed or via right-click on the Project you're performing analysis on). It allows rules to be ignored but it's pretty simplistic.
I think one of the biggest issues with the tool is the fact that it goes all Chef Ramsey on your ass, even if its code created by Microsoft in the first place. For example create a new WinForms project and run source analysis on it. You'll get 20+ errors (even if you ignore the .Designer generated file). You can exclude designer files and generated files through the settings of the tool, but still its extra work and more friction to use the tool this way. It might be debated that the boilerplate code Visual Studio generates for new files (which you can modify but again, more work) should conform to the StyleCop guidelines. After all Microsoft produced both tools. However this would probably anger the universe as the "new" boilerplate code would look different from the "old".
There are other niggly bits like the tool insisting on documenting private variables so pretty much every property, method, and variable (public, private, or otherwise) will all have at least an extra 3 lines added to it should you enforce this rule. More work, more noise.
I'm somewhat torn on the formatting issues here. What it suggests doesn't completely jive with me, but that might be style. After all, the tool is designed to provide consistency of code formatting across multiple disparate sources. However unless you're a company with *no* code and start with this tool, you'll probably be ignoring certain rules (or groups of rules) or doing a lot of work to try to bring your code to match the violations you'll stumble on. It's like writing unit tests after the fact. Unit tests are good, but writing them after the code is done (and even shipped) has a somewhat diminished cost to benefit ratio.
In getting this simple class up to snuff I had to not have the urge to hit Ctrl+Alt+F in ReSharper (ReSharper's default formatting totally blows the violations) and hold my nose on a few things (like scattering the code with "this." prefixes and seemingly redundant documentation headers). Documentation is a good thing but my spidey-sense has taught me that comments mean something might be wrong with the code (not descriptive enough, should have been refactored into a well-named method, etc.). It only took a few minutes to shuffle things around, but I look at large codebases that you could point this tool at and think of weeks of code reformatting and what a cost that would be.
In any case, here's the final class with the changes to "conform" to StyleCop's way of life:
//-----------------------------------------------------------------------// <copyright file="WaitCursor.cs" company="MyCompany">// Copyright MyCompany. All rights reserved.// </copyright>//-----------------------------------------------------------------------namespace UserInterface.Common
{using System;
using System.Windows.Forms;
/// <summary>
/// Utility class used to display a wait cursor
/// while a long operation takes place and
/// guarantee that it will be removed on exit.
/// </summary>
/// <example>
/// using(new WaitCursor())
/// {
/// // long running operation goes here...
/// }
/// </example>
internal class WaitCursor : IDisposable
{/// <summary>
/// Holds the cursor so it can be set on Dispose
/// </summary>
private readonly Cursor cursor;
/// <summary>
/// Default constructor
/// </summary>
public WaitCursor()
{this.cursor = Cursor.Current;
Cursor.Current = Cursors.WaitCursor;
}
/// <summary>
/// Resets the cursor back to it's previous state
/// </summary>
public void Dispose()
{Cursor.Current = this.cursor;
}
}
}
I feel this is a lot of noise. Sure, it could be consistent if all files were like this but readability is a funny thing. You want code to be readable and to me this last version (after StyleCop) is less readable than the first. Documenting default constructors? Pretty useless in any system. What more can you say except "Create an instance of <T>". Documenting private variables? Another nitpick but why should I? In this class you could probably rename it be _previousCursorStyle or something to be more descriptive and then what is documentation going to give me. Have I got anything extra from the tool as a result? I don't think so.
If it's all about consistency something we've done is to share a ReSharper reformatting file which tells R# how to format code (when you press Ctrl+Alt+F or choose Reformat Code from the ReSharper menu). It has let us do things like not wrap interface implementations in regions (regions are evil) and decide how our code should be formatted like curly braces, spacing, etc. However it completely doesn't match StyleCop in style or form. You could probably tweak ReSharper to match StyleCop "to a certain extent" but I disagree on certain rules that are baked into the tool.
For example take "this." having to prefix a variable. To me a file full of "this" prefixes is just more noise. ReSharper agrees with me because it flags "this.PropertyName" as redundant. Maybe the debate whether it's a parameter or a field is probably a non-issue. If a method is short, one can immediately identify the local variables and distinguish them from member fields and properties with a glance. If it is long, then there is probably a bigger issue than the code style: the method simply should be refactored. For whatever reason, Microsoft thinks "this." is important and more readable. Go figure.
Rules can be excluded but it's a binary operation. Currently StyleCop doesn't have any facility on differentiating between "errors" and "warnings" or "suggestions". Maybe it should but then with all the exclusions and errors->warnings you could configure, the value of the tool quickly diminishes. Enough errors being turned into warnings and you would have to argue the value of the tool at all, versus a ReSharper template.
In any case, feel free to try the tool out yourself. If you're starting with a brand new codebase and are willing to change your style to match a tool then this might work for you. For me, even with public frameworks I'm working on, the tool seems to be more regiment and rules than being fit for purpose. I suppose if you buy into the "All your StyleCop are belong to us" mentality, it'll go far for you.
For me it's just lots of extra noise that seems to provide little value but YMMV.
It’s Canada Day, and what better way to celebrate geekdom with a 100% All-Beef Canadian announcement.
We’re very proud to present the first major Canadian Open Spaces ALT.NET event, hosted right here in my hometown of Calgary August 15-17, 2008. The event follows the same principals and format as the previous ALT.NET Open Spaces hosted in Seattle and Austin.

We’ll be hosting it at the local University and they’ll be tons’o’fun as with any of the ALT.NET events. Lots of cool local Canadian guys will be there. Vancouver or Bust Greg Young, the Bahama Connection with Kyle Baley, the regular NHibernate Mafia gang headed up by James Kovacs, the Edmonton Contingent with Donald Belcham, Justice Gray will be doing hair product demos, and a host of others will be there.
Don’t miss out on this once in a lifetime event!
Registration is open now and space is limited to the first 100 participants. You can visit the site here and get in on the coolest event in Western Canada (besides that Stampede thing).
We’ve released version 2.0 of Tree Surgeon. This is the first major release since I took the project over from Mike Roberts.

This release adds the following features:
Please download the latest project files here. Source code, zip file, and installer are all available.
A new release of Tree Surgeon is forthcoming and I’m looking to the community to see if someone with some time and artistic skills on their hands would be interested in putting together a logo to kick things up a notch. Tree Surgeon is a .NET development tree generator. Just give it the name of your project, and it will set up a development tree for you in seconds.
The UI for Tree Surgeon is pretty simple and it doesn’t need to be extravagant (you run it once to create a new solution tree and you’re done, this generally doesn’t happen dozens of times a day unless you’re someone like me). However it would be nice to have something snappy as a splash screen and give the product a little branding.

The image will be used in the product itself (probably as a splash or something) and on the website (to replace the icky picture of logs I put there so long ago) so please size it accordingly.
Get your crayons out and thinking caps on and let’s see what you can come up with. The rewards? My undying gratitude, exposure on the blog (for the 10 readers that I have), and 15 minutes of fame (and I’ll toss in some XBox 360 games or something cool that I can dig up, Microsoft or .NET related of course; no Java swag here).
Any ideas are welcome and I’ll post the entries here on the blog (please provide your name, email (if desired), and a link to your website (if desired)). Please submit your entries to me via email.
Thanks!
In my original post on testing Windsor Container mappings, I posted a spec to run whenever you are using Castle Windsor in your project. It basically ran through your configuration file and ensured all the mappings worked. This was meant to be a safety net to catch a rename or namespace move in the domain (which wouldn't update the configuration file).
It worked pretty good and has helped us catch silly errors but we were getting pain with mappings on classes like this:
public partial class FinderGrid<T> : UserControl, IFinderGrid<T> where T : Entity
{}
Generics were a funny thing so you get an error like this:
System.ArgumentException: GenericArguments[0], 'T',
on 'UserInterface.FinderGrid`1[T]' violates the constraint of type 'T'.
---> System.TypeLoadException: GenericArguments[0], 'T',
on 'UserInterface.FinderGrid`1[T]' violates the constraint of type parameter 'T'.
at System.RuntimeTypeHandle._Instantiate(RuntimeTypeHandle[] inst)
at System.RuntimeTypeHandle.Instantiate(RuntimeTypeHandle[] inst)
at System.RuntimeType.MakeGenericType(Type[] instantiation)
--- End of inner exception stack trace ---
at System.RuntimeType.ValidateGenericArguments(MemberInfo definition, Type[] genericArguments, Exception e)
at System.RuntimeType.MakeGenericType(Type[] instantiation)
at Castle.MicroKernel.Handlers.DefaultGenericHandler.Resolve(CreationContext context)
We put an exception handler around the test, but it was butt ugly. After some posting on the Castle mailing list and discussion with a few people I came up with a way to handle any generic mapping you have. Here's the updated spec that will deal with (hopefully) any mapping:
[TestFixture]public class When_starting_the_application : Spec
{ [Test]public void Verify_Windsor_Container_mapping_configuration_is_correct()
{IWindsorContainer container = new WindsorContainer("castle.xml");
foreach (IHandler handler in container.Kernel.GetAssignableHandlers(typeof (object)))
{if (handler is DefaultGenericHandler)
{Type[] genericArguments = handler
.ComponentModel .Service .GetGenericArguments();foreach (Type genericArgument in genericArguments)
{Type[] genericParameterConstraints =
genericArgument.GetGenericParameterConstraints();
foreach (Type genericParameterConstraint in genericParameterConstraints)
{container.Resolve(
handler .ComponentModel .Service.MakeGenericType(genericParameterConstraint));
}
}
}
else {container.Resolve(handler.ComponentModel.Service);
}
}
}
}
This will handle any mapping with constraints and the name isn't tied to your test (originally I found one that worked but I had to specify the generic type when trying to set the constraint). This is a 2.0 solution and not as pretty as it could be with LINQ and 3.5 but it works.
Hope this helps!
P.S. Here's a silly creepy version for those that dig anonymous delegates to the extreme. Lamdbas would just make most of this syntax sugar go away:
[Test]public void Verify_Windsor_Container_mapping_configuration_is_correct()
{IWindsorContainer container = new WindsorContainer("castle.xml");
foreach (IHandler handler in container.Kernel.GetAssignableHandlers(typeof (object)))
{if (handler is DefaultGenericHandler)
{new List<Type>(handler
.ComponentModel .Service .GetGenericArguments()) .ForEach(delegate(Type argument)
{new List<Type>(argument.GetGenericParameterConstraints())
.ForEach(delegate(Type constraint)
{ container .Resolve( handler .ComponentModel .Service.MakeGenericType(constraint));
}
);
}
);
}
else {container.Resolve(handler.ComponentModel.Service);
}
}
 Over the past year or two, I've been a casual observer into the Entity Framework coming out of Microsoft. Being an ALT.NET guy, the world tends to revolve around NHibernate for me so I've already got an excellent OR/M tool in my toolset. One of the big issues with EF that we've recognized is the general direction Microsoft has taken with it, following a data centric model rather than an object one. One of the first principles I picked up when I started doing OO programming (back in the SmallTalk days in the 80s) was that objects are defined by behavior, not their properties. Yes it's true that objects are pretty thin without data, but data is not my centre of the universe.
What we see on the horizon is a new breed of VB6 drag-n-drop programmers embracing EF as the next Messiah. We see a new generation of developers focused on mapping their data models and missing the target of architecting and constructing well designed systems. As a result, the community has put together an open letter to Microsoft outlining these concerns. The letter outlines the deficiencies in the EF specifically related to the values we see as solid working practices. It's late to the game and Microsoft probably isn't going to make any sweeping changes so close to the release so don't expect any big short-term changes however as Dave Laribee says, it's good to be explicit and professional about criticisms so this is one of those.
What's interesting too is that Microsoft has put tgoether what they call the Data Programmability Advisory Council, a team of notable people including Eric Evans, Martin Fowler, and Jimmy Nilsson (all very non-data centric guys in their own right). I'm not quite sure what they will do or how they fit into the entire fray but it might be a step in the right direction (whatever that direction may be).
You can view the entire letter here where you can sign at the bottom to show your support and you can view the list of signatories here.
Splash screens are all the rage. They’re cool, they’re fun, and they can be a pain to program right.
I though I would share a native Win32 splash solution with you on this rainy night in June (well, it is June here and it is raining from where I am, YMMV). This is slightly different from your typical splash screen as it’s done using the Win32 API calls and it’s fired off before the .NET Forms engine even gets started. As a result it’s quick and snappy and doesn’t intrude on your normal WinForms programming.
First off, let’s look at how we’re going to invoke it. Here’s the Program class that will call our normal splash screen:
1: [STAThread]
<pre style="border-style: none; margin: 0em; padding: 0px; overflow: visible; font-size: 8pt; width: 100%; color: black; line-height: 12pt; font-family: consolas,'Courier New',courier,monospace; background-color: rgb(244, 244, 244);"><span style="color: rgb(96, 96, 96);"> 2:</span> <span style="color: rgb(0, 0, 255);">private</span> <span style="color: rgb(0, 0, 255);">static</span> <span style="color: rgb(0, 0, 255);">void</span> Main()</pre>
<pre style="border-style: none; margin: 0em; padding: 0px; overflow: visible; font-size: 8pt; width: 100%; color: black; line-height: 12pt; font-family: consolas,'Courier New',courier,monospace; background-color: white;"><span style="color: rgb(96, 96, 96);"> 3:</span> {</pre>
<pre style="border-style: none; margin: 0em; padding: 0px; overflow: visible; font-size: 8pt; width: 100%; color: black; line-height: 12pt; font-family: consolas,'Courier New',courier,monospace; background-color: rgb(244, 244, 244);"><span style="color: rgb(96, 96, 96);"> 4:</span> SplashWindow.Current.Image = <span style="color: rgb(0, 0, 255);">new</span> Bitmap(<span style="color: rgb(0, 0, 255);">typeof</span>(Form1), <span style="color: rgb(0, 96, 128);">"splash.jpg"</span>);</pre>
<pre style="border-style: none; margin: 0em; padding: 0px; overflow: visible; font-size: 8pt; width: 100%; color: black; line-height: 12pt; font-family: consolas,'Courier New',courier,monospace; background-color: white;"><span style="color: rgb(96, 96, 96);"> 5:</span> SplashWindow.Current.ShowShadow = <span style="color: rgb(0, 0, 255);">true</span>;</pre>
<pre style="border-style: none; margin: 0em; padding: 0px; overflow: visible; font-size: 8pt; width: 100%; color: black; line-height: 12pt; font-family: consolas,'Courier New',courier,monospace; background-color: rgb(244, 244, 244);"><span style="color: rgb(96, 96, 96);"> 6:</span> SplashWindow.Current.MinimumDuration = 3000;</pre>
<pre style="border-style: none; margin: 0em; padding: 0px; overflow: visible; font-size: 8pt; width: 100%; color: black; line-height: 12pt; font-family: consolas,'Courier New',courier,monospace; background-color: white;"><span style="color: rgb(96, 96, 96);"> 7:</span> SplashWindow.Current.Show();</pre>
<pre style="border-style: none; margin: 0em; padding: 0px; overflow: visible; font-size: 8pt; width: 100%; color: black; line-height: 12pt; font-family: consolas,'Courier New',courier,monospace; background-color: rgb(244, 244, 244);"><span style="color: rgb(96, 96, 96);"> 8:</span> </pre>
<pre style="border-style: none; margin: 0em; padding: 0px; overflow: visible; font-size: 8pt; width: 100%; color: black; line-height: 12pt; font-family: consolas,'Courier New',courier,monospace; background-color: white;"><span style="color: rgb(96, 96, 96);"> 9:</span> Application.EnableVisualStyles();</pre>
<pre style="border-style: none; margin: 0em; padding: 0px; overflow: visible; font-size: 8pt; width: 100%; color: black; line-height: 12pt; font-family: consolas,'Courier New',courier,monospace; background-color: rgb(244, 244, 244);"><span style="color: rgb(96, 96, 96);"> 10:</span> Application.SetCompatibleTextRenderingDefault(<span style="color: rgb(0, 0, 255);">false</span>);</pre>
<pre style="border-style: none; margin: 0em; padding: 0px; overflow: visible; font-size: 8pt; width: 100%; color: black; line-height: 12pt; font-family: consolas,'Courier New',courier,monospace; background-color: white;"><span style="color: rgb(96, 96, 96);"> 11:</span> Application.Run(<span style="color: rgb(0, 0, 255);">new</span> Form1());</pre>
<pre style="border-style: none; margin: 0em; padding: 0px; overflow: visible; font-size: 8pt; width: 100%; color: black; line-height: 12pt; font-family: consolas,'Courier New',courier,monospace; background-color: rgb(244, 244, 244);"><span style="color: rgb(96, 96, 96);"> 12:</span> }</pre>
Note that it’s the first thing called (even before we do Application calls or create the main form). We’re launching it using a JPG image but any embedded or external resource file will do (JPEG, PNG, BMP, etc.). There are a couple of options we turn on here like showing a shadow (if the OS supports it) and setting a duration.
The duration is the minimum number of milliseconds to display the splash screen for. For example you can set this to 5000 (5 seconds) and no matter how much or how little your app is doing, the splash screen will stay around for at least this long. This is handy to keep it up even though your app may find a burst of speed and be ready before you know it.
Now that we’ve launched the splash screen, we just go about our normal business and at the right time launch the main window and tell the splash screen to go away. We’ll do this in our Main form class by overriding the OnActivate event:
protected override void OnActivated(EventArgs e)
{
base.OnActivated(e);
if (_firstActivated)
{
_firstActivated = false;
SplashWindow.Current.Hide(this);
}
}
The call here to SplashWindow.Current.Hide passes in the Form derived class of our window. The SplashWindow will keep a reference to this Form object so later in the splash thread it can invoke Activate on the Form class to pop it up after destroying itself. The “_firstActivated” variable is just a boolean set on the Form class and set to true at creation. This prevents us from hiding the splash screen if the main form is activated more than once (can happen).
And that’s it for using the SplashWindow. Simple huh? Here’s our splash in action over top of our important business application (another Bil Simser UI Special):
Splash Window:

Main Window with Splash in Front:

Ready to work!

One of the other options you can do with this class is to provide it a custom event handler. This is called during the WM_PAINT event and will allow you to get a copy of the Graphics object that the SplashWindow owns (the surface holding the bitmap image you provide) and a Rectangle class of the boundaries of the splash window. This is really handy for doing fancy stuff to your splash screen without having to fuss around with the image itself.
For example here’s the call to our SplashWindow again but using a custom handler:
1: [STAThread]
<pre style="border-style: none; margin: 0em; padding: 0px; overflow: visible; font-size: 8pt; width: 100%; color: black; line-height: 12pt; font-family: consolas,'Courier New',courier,monospace; background-color: rgb(244, 244, 244);"><span style="color: rgb(96, 96, 96);"> 2:</span> <span style="color: rgb(0, 0, 255);">private</span> <span style="color: rgb(0, 0, 255);">static</span> <span style="color: rgb(0, 0, 255);">void</span> Main()</pre>
<pre style="border-style: none; margin: 0em; padding: 0px; overflow: visible; font-size: 8pt; width: 100%; color: black; line-height: 12pt; font-family: consolas,'Courier New',courier,monospace; background-color: white;"><span style="color: rgb(96, 96, 96);"> 3:</span> {</pre>
<pre style="border-style: none; margin: 0em; padding: 0px; overflow: visible; font-size: 8pt; width: 100%; color: black; line-height: 12pt; font-family: consolas,'Courier New',courier,monospace; background-color: rgb(244, 244, 244);"><span style="color: rgb(96, 96, 96);"> 4:</span> SplashWindow.Current.Image = <span style="color: rgb(0, 0, 255);">new</span> Bitmap(<span style="color: rgb(0, 0, 255);">typeof</span>(Form1), <span style="color: rgb(0, 96, 128);">"splash.jpg"</span>);</pre>
<pre style="border-style: none; margin: 0em; padding: 0px; overflow: visible; font-size: 8pt; width: 100%; color: black; line-height: 12pt; font-family: consolas,'Courier New',courier,monospace; background-color: white;"><span style="color: rgb(96, 96, 96);"> 5:</span> SplashWindow.Current.ShowShadow = <span style="color: rgb(0, 0, 255);">true</span>;</pre>
<pre style="border-style: none; margin: 0em; padding: 0px; overflow: visible; font-size: 8pt; width: 100%; color: black; line-height: 12pt; font-family: consolas,'Courier New',courier,monospace; background-color: rgb(244, 244, 244);"><span style="color: rgb(96, 96, 96);"> 6:</span> SplashWindow.Current.MinimumDuration = 3000;</pre>
<pre style="border-style: none; margin: 0em; padding: 0px; overflow: visible; font-size: 8pt; width: 100%; color: black; line-height: 12pt; font-family: consolas,'Courier New',courier,monospace; background-color: white;"><span style="color: rgb(96, 96, 96);"> 7:</span> SplashWindow.Current.SetCustomizer(CustomEventHandler);</pre>
<pre style="border-style: none; margin: 0em; padding: 0px; overflow: visible; font-size: 8pt; width: 100%; color: black; line-height: 12pt; font-family: consolas,'Courier New',courier,monospace; background-color: rgb(244, 244, 244);"><span style="color: rgb(96, 96, 96);"> 8:</span> SplashWindow.Current.Show();</pre>
<pre style="border-style: none; margin: 0em; padding: 0px; overflow: visible; font-size: 8pt; width: 100%; color: black; line-height: 12pt; font-family: consolas,'Courier New',courier,monospace; background-color: white;"><span style="color: rgb(96, 96, 96);"> 9:</span> </pre>
<pre style="border-style: none; margin: 0em; padding: 0px; overflow: visible; font-size: 8pt; width: 100%; color: black; line-height: 12pt; font-family: consolas,'Courier New',courier,monospace; background-color: rgb(244, 244, 244);"><span style="color: rgb(96, 96, 96);"> 10:</span> Application.EnableVisualStyles();</pre>
<pre style="border-style: none; margin: 0em; padding: 0px; overflow: visible; font-size: 8pt; width: 100%; color: black; line-height: 12pt; font-family: consolas,'Courier New',courier,monospace; background-color: white;"><span style="color: rgb(96, 96, 96);"> 11:</span> Application.SetCompatibleTextRenderingDefault(<span style="color: rgb(0, 0, 255);">false</span>);</pre>
<pre style="border-style: none; margin: 0em; padding: 0px; overflow: visible; font-size: 8pt; width: 100%; color: black; line-height: 12pt; font-family: consolas,'Courier New',courier,monospace; background-color: rgb(244, 244, 244);"><span style="color: rgb(96, 96, 96);"> 12:</span> Application.Run(<span style="color: rgb(0, 0, 255);">new</span> Form1());</pre>
<pre style="border-style: none; margin: 0em; padding: 0px; overflow: visible; font-size: 8pt; width: 100%; color: black; line-height: 12pt; font-family: consolas,'Courier New',courier,monospace; background-color: white;"><span style="color: rgb(96, 96, 96);"> 13:</span> }</pre>
And here’s the custom handler. This simply uses the GDI+ function of drawing a string on the Graphics surface. You could use this to display version information from your app, progress messages, etc. without having to build a form and adding labels to it.
1: private static void CustomEventHandler(SplashScreenSurface surface)
<pre style="border-style: none; margin: 0em; padding: 0px; overflow: visible; font-size: 8pt; width: 100%; color: black; line-height: 12pt; font-family: consolas,'Courier New',courier,monospace; background-color: rgb(244, 244, 244);"><span style="color: rgb(96, 96, 96);"> 2:</span> {</pre>
<pre style="border-style: none; margin: 0em; padding: 0px; overflow: visible; font-size: 8pt; width: 100%; color: black; line-height: 12pt; font-family: consolas,'Courier New',courier,monospace; background-color: white;"><span style="color: rgb(96, 96, 96);"> 3:</span> Graphics graphics = surface.Graphics;</pre>
<pre style="border-style: none; margin: 0em; padding: 0px; overflow: visible; font-size: 8pt; width: 100%; color: black; line-height: 12pt; font-family: consolas,'Courier New',courier,monospace; background-color: rgb(244, 244, 244);"><span style="color: rgb(96, 96, 96);"> 4:</span> Rectangle bounds = surface.Bounds;</pre>
<pre style="border-style: none; margin: 0em; padding: 0px; overflow: visible; font-size: 8pt; width: 100%; color: black; line-height: 12pt; font-family: consolas,'Courier New',courier,monospace; background-color: white;"><span style="color: rgb(96, 96, 96);"> 5:</span> </pre>
<pre style="border-style: none; margin: 0em; padding: 0px; overflow: visible; font-size: 8pt; width: 100%; color: black; line-height: 12pt; font-family: consolas,'Courier New',courier,monospace; background-color: rgb(244, 244, 244);"><span style="color: rgb(96, 96, 96);"> 6:</span> graphics.DrawString(<span style="color: rgb(0, 96, 128);">"Welcome to the Application!"</span>,</pre>
<pre style="border-style: none; margin: 0em; padding: 0px; overflow: visible; font-size: 8pt; width: 100%; color: black; line-height: 12pt; font-family: consolas,'Courier New',courier,monospace; background-color: white;"><span style="color: rgb(96, 96, 96);"> 7:</span> <span style="color: rgb(0, 0, 255);">new</span> Font(<span style="color: rgb(0, 96, 128);">"Impact"</span>, 32),</pre>
<pre style="border-style: none; margin: 0em; padding: 0px; overflow: visible; font-size: 8pt; width: 100%; color: black; line-height: 12pt; font-family: consolas,'Courier New',courier,monospace; background-color: rgb(244, 244, 244);"><span style="color: rgb(96, 96, 96);"> 8:</span> <span style="color: rgb(0, 0, 255);">new</span> SolidBrush(Color.Red),</pre>
<pre style="border-style: none; margin: 0em; padding: 0px; overflow: visible; font-size: 8pt; width: 100%; color: black; line-height: 12pt; font-family: consolas,'Courier New',courier,monospace; background-color: white;"><span style="color: rgb(96, 96, 96);"> 9:</span> <span style="color: rgb(0, 0, 255);">new</span> PointF(bounds.Left + 20, bounds.Top + 150));</pre>
<pre style="border-style: none; margin: 0em; padding: 0px; overflow: visible; font-size: 8pt; width: 100%; color: black; line-height: 12pt; font-family: consolas,'Courier New',courier,monospace; background-color: rgb(244, 244, 244);"><span style="color: rgb(96, 96, 96);"> 10:</span> }</pre>
And here’s the result:

Of course this is pretty simplistic. I would love to see some creative geniuses out there do something cool with this. Since your have the Graphics object (already loaded with the splash screen image) and the GDI+ at your disposal, the sky is the limit. Let me know what you come up with.
Like I said, this is simple and easy. A few lines of code in your main program to launch it, one line to hide it, and the initialization is just providing it an image to display. All of the code is available for download below in source and binary form. You can just add the SplashLib.dll to your projects and go. Or feel free to enhance it, the code is released under the Creative Commons Attribution-Share Alike 3.0 Unported License. You can share and adapt it (even in commercial work) but please give back to the community.
One side note, .NET doesn’t provide an interface to winuser.h and other Win32 headers so the structures and constants that are needed by SplashWindow to work are in the class. If you’re a ReSharper junkie you’ll notice that R# complains that the file has a lot of dead code. Don’t for the love of all that is holy remove the unused structure members as the SplashWindow will fall down and go boom.
Of course there’s room for improvement so feel free to send me your changes or enhancements!
Enjoy!
This has got to be one of the dumbest posts I've done but for the life of me and my co-horts we can't figure it out.
We have a TextBox sitting on a UserControl sitting on a Panel sitting in a Form.
$10 to the first person to tell me how to set the focus to the TextBox.
We've tried:
Nothing works. WTF? This has *got* to be a simple thing right?
Thought this might be useful. On a new project where you're using the Castle Windsor container for Dependency Injection, this is a handy spec to have:
[TestFixture]public class When_starting_the_application : Spec
{ [Test]public void verify_Castle_Windsor_mappings_are_correct()
{IWindsorContainer container = new WindsorContainer("castle.xml");
foreach (IHandler handler in container.Kernel.GetAssignableHandlers(typeof(object)))
{container.Resolve(handler.ComponentModel.Service);
}
}
}
It doesn't guarantee that someone missed adding something to your configuration, but this way anytime someone adds a type to the configuration this will verify the mapping is right. Very often I move things around in the domain into different namespaces and forget to update Castle. I supposed you *could* use reflection on your assembly as another test and verify the mapping is there, but not every type in the system is going to be dependency injected so that's probably not feasible.
Thanks to the Castle guys for helping me get the simplest syntax going for this.
James "The Godfather" Kovacs has been a busy beaver. We've been recording our podcast show, Plumbers @ Work, but post-editing the show has been dreadfully slow. James has pulled his rabbit out of his hat and posted not 1, not 2, but 3 podcasts online!
So if you're looking to catch up with the plumbers then this is your chance. It was James and myself for the first episode, then James and John for the second two shows.
The last podcast was a bit of an experiment with ooVoo, a multi-user video chat tool. James and John tried it out (I was MIA for some reason, probably drunk and passed out in the basement or something) and it looks pretty good. There's an audio only MP3 version here and you can view the video podcast via Silverlight here.
Hopefully I'll get my act together for the next taping (we generally tape the show on Sundays) and we'll have a 3-way video conference going.
Talk to you soon!
How many times have you said "What version is in production?" or "Can we rebuild production to fix a bug and release an update?"
Better yet my favourite:
"We're working on Feature Y so we can't fix the bug for Feature X. Doing so would mean we deploy part of Feature X and Y with the patch!"
These are typical problems with source control, patching, and keeping your working flowing. Often it's hard to keep track of what's being worked on vs. what was already deployed. Sometimes you end up deploying something not tested or "ready for primetime". For example, at one point I was deploying screens and we had to pass along explicit instructions to the QA folks to "not touch that button!" because we hadn't finished the backend or our own testing. Of course, they touched it and logged a bug. Still, we often run into the problem of working on one set of features while testing another.
Recently we've switched over (not fully yet, but most of the projects are going there) from TFS to Subversion. TFS is just a bloody nightmare when it comes to trying to keep the trunk revision stable while performing updates on branches and not getting into a merge from hell scenario, which is sometimes typical when you have branches.
In doing the switch, we landed on a solution around branching code for new features and keeping the trunk clean. Branching is a hot topic in source control circles and has been known to start holy wars. In my past life (like a month ago) I avoided branches like the plague. This is probably due to the fact that branching (and more importantly the merge back) in TFS and VSS was like a live enema. Not something you want to do every day.
However in working through the process in a few projects and experiencing the daily merge routine first-hand, it's become my friend and makes for building systems along a feature driven development stream much easier. Here's how the process goes and all the details on each step.
Revision 1
Code and screenshots are always the best way to work through a process. While the code here is trivial (just a WinForms app with a few custom forms and dialogs) the principles are the same no matter how big your project is.
First we setup our subversion repository for the project. The typical setup is to create three folders in the repository; branches, tags, and trunk. Branches hold any branches you work on for new feature development; Tags contains named copies of revisions representing some point in time (perhaps a deployment); Trunk contains the main codebase and is always stable. These become vital to organizing your code and not clobbering other work going on as we'll see as go along.
Here's our sample repository in TortoiseSVN:
We'll start with revision 1, the basic application (the proverbial WinForms "Hello World!"). A single application with a single form. Check this in to Subversion into the trunk path. This gives us an updated repository:
Now your day to day work begins. The trunk revision is the most important (aka "The King"). Any other work being done will happen in branches and are known as servants. Servants are important but they take less priority than The King. The most important and highest priority work being done is the King (and there is only one king, viva Las Vegas baby!).
Fast forward to day 10 of our development cycle. We've been adding forms and code (all committed to the trunk by various people) and it's time to do a release. A release is cut (using whatever process you use here, the details are not important) and deployed. At that point we want to tag the release.
Tag and Deploy
Tagging is a way to identify a set of code, a snapshot, so you can retrieve it later. Once tagged, we can go back to the revision and all files from that point in time to rebuild the system. This is mainly a deployment thing. For example, you tag the release "1.0" and then continue on. At some point in the future you can check the code out using that tag, rebuild it, and it will be the same as the day you deployed it.
We'll tag our release as "1.0". This creates what looks like an entire copy of the code in the "tags" folder, but in reality it's all virtual. Unlike "other" source control systems, this doesn't actually make a copy and the magic of Subversion will let us pull this tag out and all the code associated with that later.
To tagging and creating branches is essentially the same act (it's the same dialog box) but will differ in where you put the tag. Subversion does not have special commands for branching or tagging, but uses so-called cheap copies instead. Cheap copies are similar to hard links in Unix, which means that instead of making a complete copy in the repository, an internal link is created, pointing to a specific tree/revision. As a result branches and tags are very quick to create, and take up almost no extra space in the repository.
So while the dialog box says "Copy" you're creating this cheap copy. Don't get miffed if you're project is huge, tagging takes next to nothing. Here's our tag ready to go:
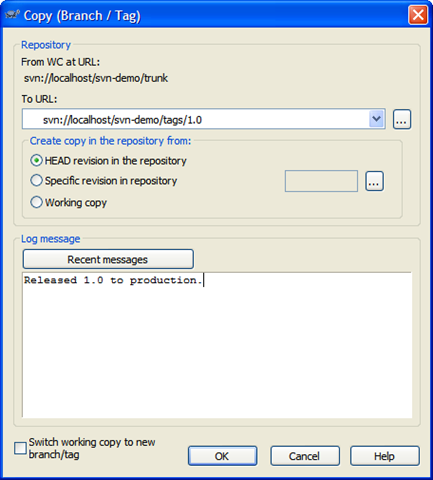
For tagging, you generally won't want to click on the "Switch working copy to new branch/tag" checkbox. Tags are just snapshots in time and you go along your merry way in the trunk. For branches we'll be doing something different. So after you create the tag, don't be alarmed when you see this message in TortoiseSVN:
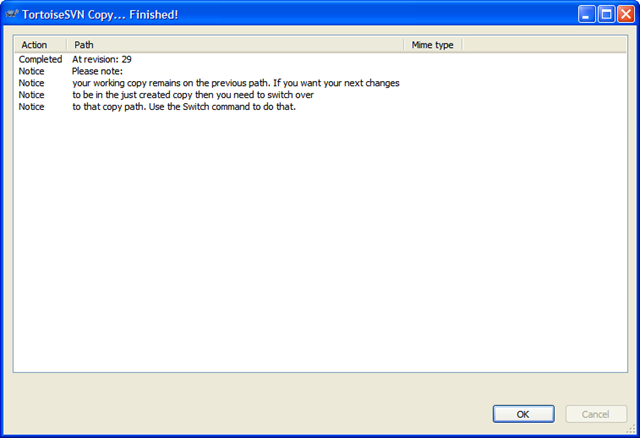
And here's the repository tree after the tag. Note the tags folder has a new entry, "1.0" which contains an exact copy of what's in the "trunk", our King.
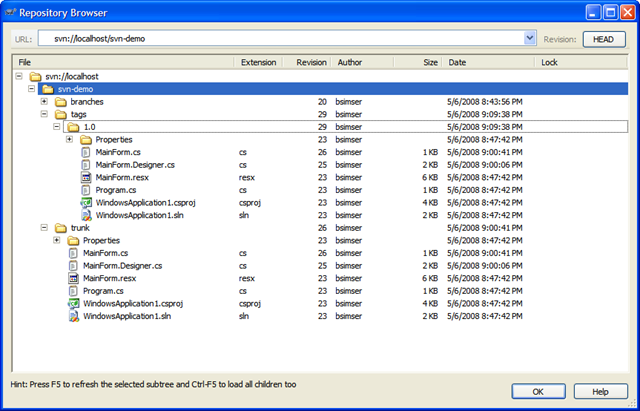
Now comes the fun. We've tagged the work and deployed. At any point in time we can go back and redeploy this version by pulling out the "1.0" tag and building/deploying from there. At this point is where we branch. We want to work in a new feature set. This is going to involve new dialogs and new code.
Branching New Features
Why do we branch? Isn't branching bad?
No. Branching, when used this way keeps your trunk clean. Remember, there can only be one King (trunk). Any other work is a servant and will eventually go into the trunk.
Why again do we branch? Imagine if we didn't branch. So right after you apply the "1.0" tag start modifying trunk. Sure, we can go back to "1.0" but how are we going to get any changes merged together when we're on a single line? We're also violating the "One King" rule. Who's the King now? Our new branch becomes a servant. The King still takes priority (for example to fix bugs) but work will continue on in the servant branch.
Walk with me on this, by the end you'll see what the branch is for and why we want it.
We'll create a new branch just like creating a tag. Call the branch "1.1" except in this case, we're going to switch to the branch as our working copy. Here's the branch dialog:
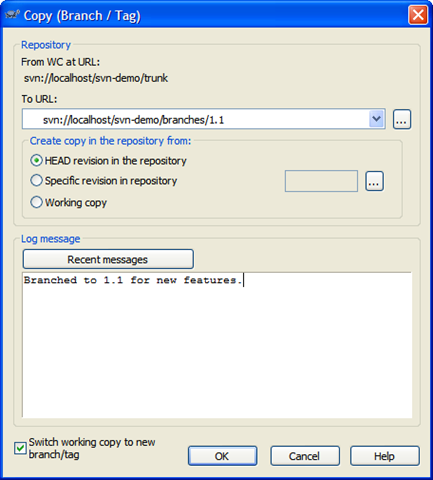
And here's the repository after the branch. Our work is now all going to be committed to the "svn-demo/branches/1.1" branch, keeping the trunk clean.
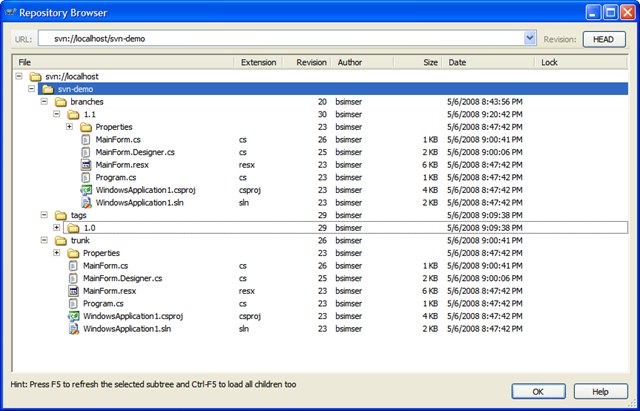
Work in the 1.1 branch is underway with new features being added. We've created a few new forms, modified the main form, and generally added new functionality. The 1.1 branch is quite different from the original trunk it came from now:

A couple of scenarios will arise out of this. For example, if there's a bug found in the 1.0 version we deployed what do you do? You don't want to dirty the 1.0 tag. That's why trunk is King (and there is only one King). "trunk" is still the most important thing being worked on (at this point its in testing or production or whatever). Until it's verified, everyone else is a servant. Any problems found in "trunk" can be resolved on trunk. So we'll explore that scenario.
Waiter, There's a Bug in my Trunk!
There's a problem with 1.0. The window title is wrong. It reads "Hello World!" but it should read "Hello World?".
Huge problem! Stop the presses. Halt the line. We need to fix this now!
You may be tempted to create a branch, fix it, then merge the branch back into trunk. This might be normal, but our trunk is clean so we can just work with it directly. Check out a copy of trunk to a local directory and we'll do the fix. Then commit it back. Now here's the updated repository:
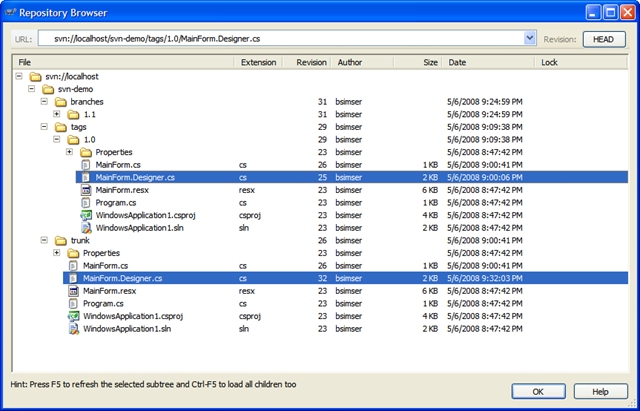
I've highlighted the file that changed in both versions. "/tags/1.0" is our deployed version (revision 25), "/trunk" is our bug fix update (revision 32). We can still, at any point, re-deploy "1.0" without any problems.
We'll do a deploy of our new trunk (which we'll call "1.0.1") and a series of exhaustive and intensive tests beings. Weeks pass testing our massive change and finally QA accepts the version and allows it be deployed to production. This will replace "1.0" in production with "1.0.1" and the updated title bar. Tag trunk as "1.0.1" like we did "1.0" above and we'll now have this in our repository:
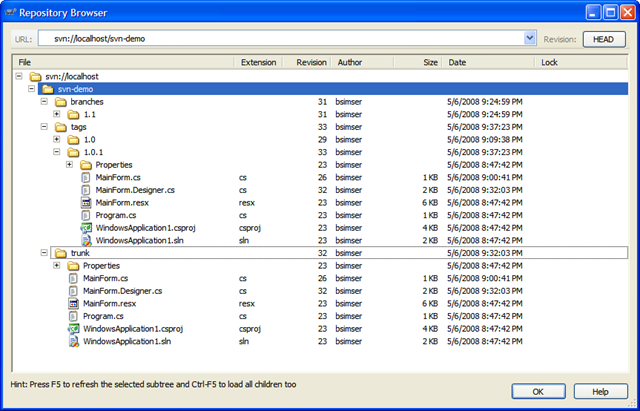
The Graph is your Friend
TortoiseSVN has a wonderful feature called "Revision Graph" which gives you a visual tree of your branches and tags and revisions. You will live and die by this tool. Here's ours so far:

From this visual we can assess:
At this point I want to point out some major advantages with this approach:
Day to Day Merges
So now we have a bit of a disconnect don't we? The trunk (revision 32) and the re-deployed tagged version (1.0.1, revision 33) contains the fix we need however we're working on Feature X in the 1.1 branch. We don't have that fix. If we were to merge our code back to the trunk (which we will have to do at some point) we might miss this fix, or worse yet clobber it.
To avoid this problem, anyone working in a branch follows one simple rule. Each day (say at the start of the day) you update your branch from the trunk. In other words, you pick up any changes that have been applied to the trunk into your little branched world. Doing this will avoid any merge issues when you commit your branch back to the trunk.
We do this with a merge. It's a simple merge but one that has to happen, and merges can get complicated and ugly. In your working directory where you're commits are happening on the branch, you won't see changes to trunk.
Here's the merge dialog that we perform on a daily basis. We'll merge changes from the trunk into the 1.1 branch:
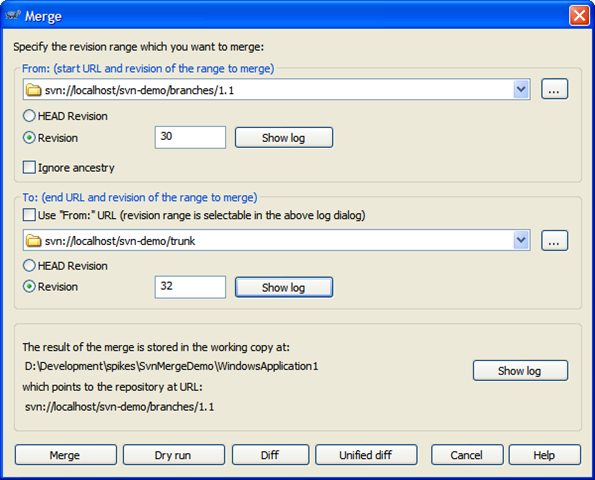
A few notes about this merge:
So in this merge we expect to get the changes to MainForm.Designer.cs (that title change bug). If we had selected the HEAD revision for our branch version rather than the time where the branch split off from trunk, we would be comparing all the changes. This would result in the dry run telling us we have new forms. This is incorrect because a) we only want the changes from trunk and b) trunk doesn't know (or need to know) about any new forms we created. We're only interested in the changes made on trunk that we don't have yet.
Here's the dry run dialog with the proper response (based on the last merge dialog):
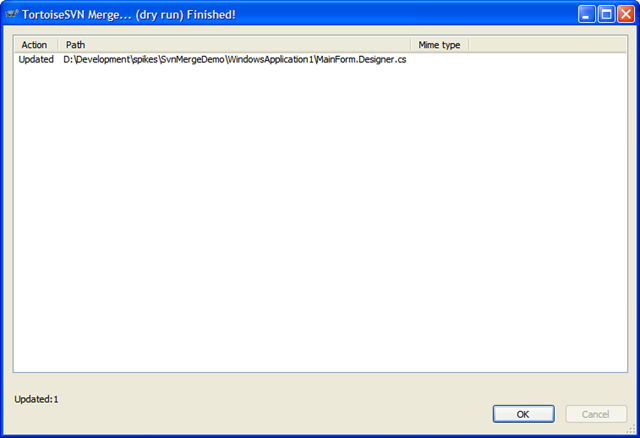
Perfect! We just want the changes to MainForm.Designer.cs (or whatever files changed since we last sync' d) and we got them. Execute this to get the new changes from trunk into your branch.
When you do a merge, you're merging those changes into your working copy but you're still one more step away. This will modify your working code but now you have to commit it back to the repository. If you check your updates you'll see that the MainForm.Designer.cs file has changed. Here's the unified diff of the changes:
Index: D:/Development/spikes/SvnMergeDemo/WindowsApplication1/MainForm.Designer.cs
===================================================================
--- D:/Development/spikes/SvnMergeDemo/WindowsApplication1/MainForm.Designer.cs (revision 31)
+++ D:/Development/spikes/SvnMergeDemo/WindowsApplication1/MainForm.Designer.cs (working copy)
@@ -61,7 +61,7 @@
this.Controls.Add(this.button1);
this.Name = "MainForm";
this.StartPosition = System.Windows.Forms.FormStartPosition.CenterScreen;
- this.Text = "Hello World!";
+ this.Text = "Hello World?";
this.Load += new System.EventHandler(this.MainForm_Load);
this.ResumeLayout(false);
As you can see, the title bar change is here and replaces our old (buggy) version.
Commit this to the repository. Your branch now has the changes from trunk and you can continue on with your new feature work.
Remember, the key point of working in the branch is we don't pollute the trunk with our new dialogs or code, yet doing this daily merge (which will take all of 5 minutes on any codebase, trust me ;) keeps your branch up to date with any changes that may have happened.
Getting back to trunk
As we continue with our day to day work in the 1.1 branch, more changes might happen with trunk. More bug fixes, etc. However we don't introduce new features. We only add things on our branch. In the rare instance we're building a new feature while another feature is in play, we might create another branch with another team. I would however keep the number of active branches going on to a minimum. It'll just get ugly later in life.
In any case, we continue with our branch until we're ready to deploy. At this point we probably have a stable trunk (we should always have a stable trunk) with a number of tags. All changes in the trunk are in our branch and the team has decided it's time to deploy a new version to replace 1.0.1. This is our 1.1 branch and we need to merge all the new stuff in 1.1 back into trunk.
Here's our repository as it stands:
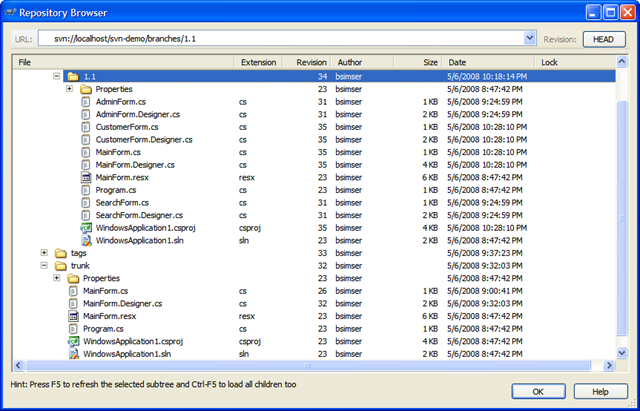
To merge back into the trunk it's the opposite of what we do on a daily basis. Rather than merging into the branch, we reverse it and merge into trunk. Also, you'll need a working copy of trunk to merge into. Check out trunk into a folder and invoke the merge. Again, the key point here is to pick the right revision. For the branch it'll be the HEAD revision. For trunk, it's the last point of synchronization which in this case is revision 32. Here's the merge dialog to commit our 1.1. features to the trunk.
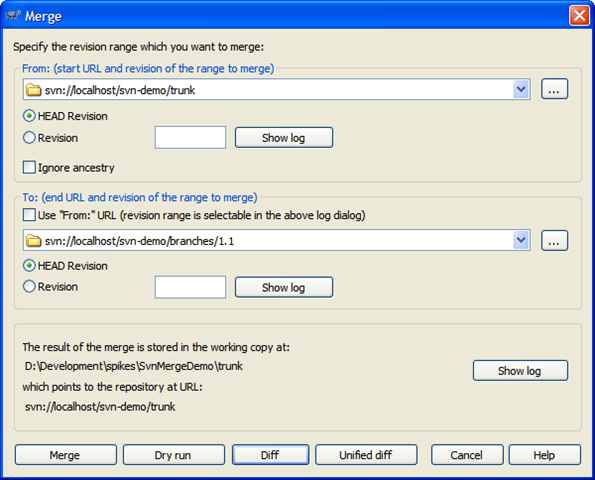
In this case, we're committing to a working folder with a copy of trunk checked out to it. Click on Diff to see what changes are going to be applied:
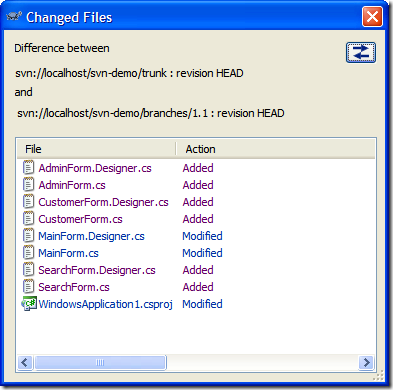
Here we've added our new forms and there's changes to the MainForm.cs and MainForm.Designer.cs (we've added buttons to invoke the new dialogs). Here's the unified diff of MainForm.Designer.cs (with some lines removed for brevity):
Index: MainForm.Designer.cs
===================================================================
--- MainForm.Designer.cs (.../trunk) (revision 35)
+++ MainForm.Designer.cs (.../branches/1.1) (revision 35)
@@ -28,13 +28,49 @@
/// </summary>
private void InitializeComponent()
{
+ this.button1 = new System.Windows.Forms.Button();
+ this.button2 = new System.Windows.Forms.Button();
+ this.button3 = new System.Windows.Forms.Button();
this.SuspendLayout();
//
+ // button1
+ //
+ this.button1.Location = new System.Drawing.Point(12, 12);
+ this.button1.Text = "Search";
+ //
+ // button2
+ //
+ this.button2.Location = new System.Drawing.Point(12, 41);
+ this.button2.Text = "Admin";
+ //
+ // button3
+ //
+ this.button3.Location = new System.Drawing.Point(12, 70);
+ this.button3.Text = "Customers";
+ //
// MainForm
//
+ this.Controls.Add(this.button3);
+ this.Controls.Add(this.button2);
+ this.Controls.Add(this.button1);
this.Name = "MainForm";
this.StartPosition = System.Windows.Forms.FormStartPosition.CenterScreen;
this.Text = "Hello World?";
@@ -44,6 +80,10 @@
}
#endregion
+
+ private System.Windows.Forms.Button button1;
+ private System.Windows.Forms.Button button2;
+ private System.Windows.Forms.Button button3;
}
}
Note towards the bottom of this diff, this.Text = "Hello World?". This was the result of our daily merge so there's nothing to be applied back to trunk. We're in sync here. Only the changes/additions/deletions are applied which will bring "trunk" up to par with the 1.1 branch work. Again, do your dry run. You should see only the new work done in the branch as being applied to trunk. If not; stop, drop, and roll and recheck your revisions.
Again, the trunk now is merged together with the 1.1 branch. At this point you'll want to load the solution up, build it, run unit tests, etc. and do a sanity check that everything works as expected. You would probably do your deployment and tag the new trunk as "1.1".
You can just simply ditch the branch folder or leave it there in the repository. After all, it's just a symbolic link and doesn't take up much space (we have a new tag created in our repository on every CruiseControl.NET build so there are hundreds of tags, no big deal).
Lather, Rinse, Repeat
Now you're back on the trunk. Trunk is King, there is only one King, and your day to day work continues with whatever feature you're working on. You have the option to "always live in the branch" which might be an idea but this requires that daily merge from trunk and could cause problems. There's no problem "running on trunk" and building from it. The point at which you branch should be when you do a release and want to continue on with new (different) work, otherwise daily commits to trunk by the entire team is fine.
When a new feature comes along, branch, move part of the team (or the entire team) to that branch and keep trunk clean, doing any bug fixes as they come up. Then merge back from the feature branch back into trunk at the appropriate time. Keep doing this as often as necessary, until you run out of money or the team quits. Sit back, relax, and enjoy the simplicity of life.
Conclusion
It may seem complicated but it's really pretty basic when you boil it down. Just follow a few simple rules:
Give it a shot, email me if you're stuck or lost, or let me know what your experiences are.
Enjoy!
D'Arcy posted a link to a new MSDN contest called Crack the Code. Basically use your uber sluething developer skillz to... oh I don't know. I guess it's a guess the numbers game or something. They post clues and you "crack" them with your amazing developer knowledge. Justice will probably struggle with filling out the registration form but if you can get past that, you're golden.
Hey, a $4000 Future Shop gift card isn't bad but the contest doesn't seem to work for me. For example, it told me I already solved puzzle #2 but won't let me into puzzle #3 nor did it give me the unlock code. And I actually don't remember solving puzzle #2 so I must have been sleeping during that period in my life. Nice.
However this error was the best. During the course of trying the quiz out, I'm not sure if this is someone's idea of a joke or just plain bad English?

I believe this dialog belongs in the Interface Hall of Shame.
A few days ago I posted some code to clean out invalid characters in SharePoint URLs. Someone suggested using the SPEncode.IsLegalCharInUrl method to do this. While this might be easy if you're in SharePoint land, I don't like having a dependency on SharePoint assemblies for this sort of thing and want it in my own validation code (besides, the hoops SPEncode.IsLegalCharInUrl goes through, you can't unit test it, trust me).
After some digging I determined the list of valid and invalid characters. Only the first 128 characters in the ASCII character set are processed for validation so anything beyond that is considered invalid. It's fairly simple, pretty much everything from "@" through to "z" is valid (with a few exceptions). Here's the list as I couldn't find it posted anywhere and thought it would be useful as a cheat sheet.
| Valid? | Character | Hex Value |
|---|---|---|
| No | [NULL] | 0 |
| No | ☺ | 1 |
| No | ☻ | 2 |
| No | ♥ | 3 |
| No | ♦ | 4 |
| No | ♣ | 5 |
| No | ♠ | 6 |
| No | 7 | |
| No | [BS] | 8 |
| No | [TAB] | 9 |
| No | [CR] | A |
| No | ♂ | B |
| No | ♀ | C |
| No | [LF] | D |
| No | ♫ | E |
| No | ☼ | F |
| No | ► | 10 |
| No | ◄ | 11 |
| No | ↕ | 12 |
| No | ‼ | 13 |
| No | ¶ | 14 |
| No | § | 15 |
| No | ▬ | 16 |
| No | ↨ | 17 |
| No | ↑ | 18 |
| No | ↓ | 19 |
| No | → | 1A |
| No | ← | 1B |
| No | ∟ | 1C |
| No | ↔ | 1D |
| No | ▲ | 1E |
| No | ▼ | 1F |
| Yes | [SPC] | 20 |
| Yes | ! | 21 |
| No | " | 22 |
| No | # | 23 |
| Yes | $ | 24 |
| No | % | 25 |
| No | & | 26 |
| Yes | ' | 27 |
| Yes | ( | 28 |
| Yes | ) | 29 |
| No | * | 2A |
| Yes | + | 2B |
| Yes | , | 2C |
| Yes | - | 2D |
| Yes | . | 2E |
| Yes | / | 2F |
| Yes | 0 | 30 |
| Yes | 1 | 31 |
| Yes | 2 | 32 |
| Yes | 3 | 33 |
| Yes | 4 | 34 |
| Yes | 5 | 35 |
| Yes | 6 | 36 |
| Yes | 7 | 37 |
| Yes | 8 | 38 |
| Yes | 9 | 39 |
| No | : | 3A |
| Yes | ; | 3B |
| No | < | 3C |
| Yes | = | 3D |
| No | > | 3E |
| No | ? | 3F |
| Yes | @ | 40 |
| Yes | A | 41 |
| Yes | B | 42 |
| Yes | C | 43 |
| Yes | D | 44 |
| Yes | E | 45 |
| Yes | F | 46 |
| Yes | G | 47 |
| Yes | H | 48 |
| Yes | I | 49 |
| Yes | J | 4A |
| Yes | K | 4B |
| Yes | L | 4C |
| Yes | M | 4D |
| Yes | N | 4E |
| Yes | O | 4F |
| Yes | P | 50 |
| Yes | Q | 51 |
| Yes | R | 52 |
| Yes | S | 53 |
| Yes | T | 54 |
| Yes | U | 55 |
| Yes | V | 56 |
| Yes | W | 57 |
| Yes | X | 58 |
| Yes | Y | 59 |
| Yes | Z | 5A |
| Yes | [ | 5B |
| No | \ | 5C |
| Yes | ] | 5D |
| Yes | ^ | 5E |
| Yes | _ | 5F |
| Yes | ` | 60 |
| Yes | a | 61 |
| Yes | b | 62 |
| Yes | c | 63 |
| Yes | d | 64 |
| Yes | e | 65 |
| Yes | f | 66 |
| Yes | g | 67 |
| Yes | h | 68 |
| Yes | i | 69 |
| Yes | j | 6A |
| Yes | k | 6B |
| Yes | l | 6C |
| Yes | m | 6D |
| Yes | n | 6E |
| Yes | o | 6F |
| Yes | p | 70 |
| Yes | q | 71 |
| Yes | r | 72 |
| Yes | s | 73 |
| Yes | t | 74 |
| Yes | u | 75 |
| Yes | v | 76 |
| Yes | w | 77 |
| Yes | x | 78 |
| Yes | y | 79 |
| Yes | z | 7A |
| No | { | 7B |
| No | | | 7C |
| No | } | 7D |
| No | ~ | 7E |
| No | ⌂ | 7F |
Got an interesting problem today. A client was using an application in a test environment. Problem was that he didn't realize it was test and entered production data values. Sometime later, the QA group needed to flush the environment. So whammy, there goes production data (we don't back up test data for obvious reasons). This created a problem with the user who claimed they didn't realize they were in a test environment.
In fact, we distinctively set the caption on the application to include the environment:

And the Production version just includes the name and version:

This was actually done for two reasons. First, we needed the testers to run both QA and Production versions side-by-side so they had to be unique as far as ClickOnce was concerned. The application used a mutex to ensure only one copy of the application was running and if it was already running, it would just switch to it. The only way we found to create that mutex was by title (although on reflection there might be another) so creating a different caption would allow QA and Production to run side-by-side. In addition, the caption would include the version number and environment for quickly logging bugs and notes without having to go to an about dialog or something. The user had both versions installed (QA and Production) as they were one of the testers.
Of course this now proves to be a problem.
A solution we're pursuing is to pop up a confirmation dialog similar to the one below when the user was running in a non-production environment.
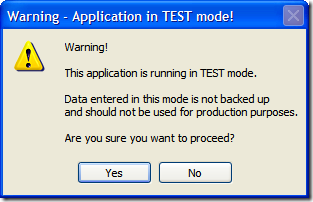
This would ensure that a) they knew they were running in a test environment and b) the confirmed they want to proceed which did a little CYA for us in case they forgot they were running this and entered in production data 4 hours later.
If the user answers "Yes" then they proceed as normal. If they answer "No" then the application shuts down. Fairly straight forward right?
Of course, I decided that one confirmation just wasn't nearly descriptive enough or sufficient for the terrible wrath that the user may be incurring upon themselves and after all, it's all about the user experience isn't it?
Sit back, relax. Imagine you're the user and you're going through these dialogs in order. I present to you a series of confirmations and messages I cal the "Test Detector Dialog From Hell".
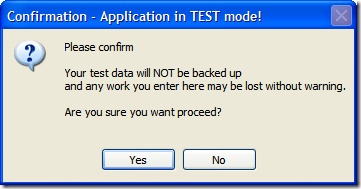
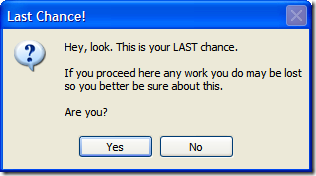
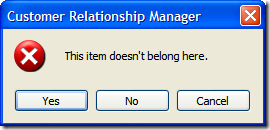
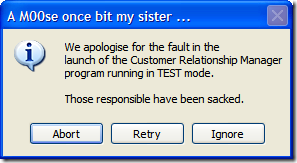
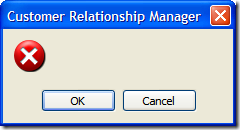
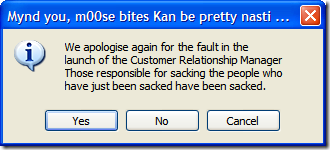
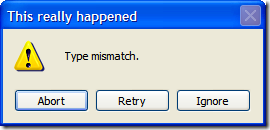
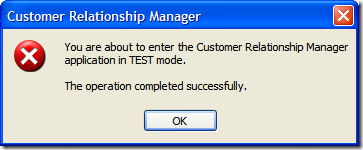
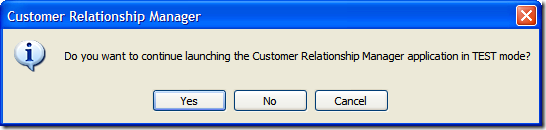
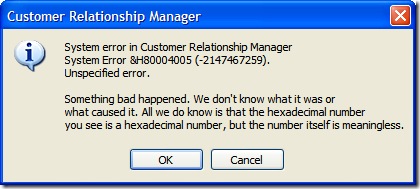
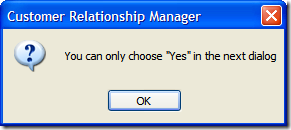
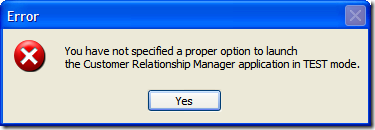
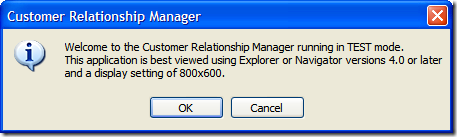
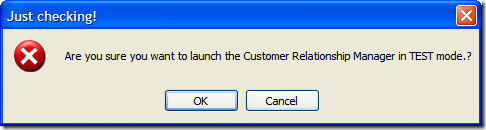
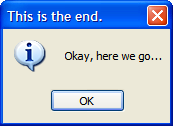
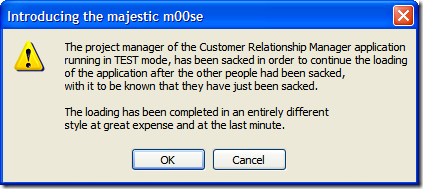
Of course, this is fine if they select "Yes", but what if they selected "No"? Well, we can't let them just quit the application. After all, maybe they didn't want to exit (or didn't even know that selecting "No" would terminate the application). So here's the first of a series of dialogs to confirm the user really wants to leave.
It's only a prototype at the moment, not sure if I'll put it into the application but I think it gets the point across, don't you?
P.S. An interesting side note I stumbled over as I was working on this. I was messing around with *all* of the options in MessageBox.Show and came across this dialog during testing:
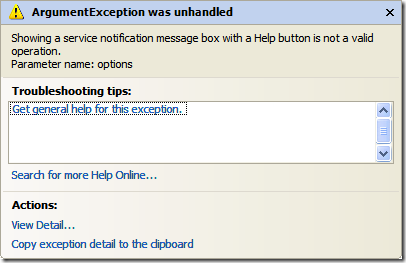
The ServiceNotification is an enumerated value from MessageBoxOptions, one of the parameters of the MessageBox.Show method. If you pass the next value in (to show a help button) as true and you pass in MessageBoxOptions.ServiceNotification in, you get this error. My question to MS, if this isn't a valid operation why let me code it! Surely you could throw a compile time error for this instead of a runtime error? Grant you, I didn't read the documentation for this (and frankly have never gone this far into the MessageBox.Show method) but still...
I stumbled onto one of those "gotchas" you get with SharePoint. We were creating new document libraries based on user names in a domain. A change came in and we had to support multiple domains so a document library name would need a domain identifier (since you could have two of the same user names in two different domains). During acceptance testing we found that document libraries created with dashes in the names (as we were creating them using [domain]-[username] pattern) would strip the dash out (without telling you of course). This caused a bit of a headache with the email we send out with a link since the URL was invalid.
I remember this from a million years ago (as I'm replacing a few SharePoint brain cells with Ruby ones lately) so after a bit of Googling I found a great article by Eric Legault here on the matter.
Here's a small method with a unit test class to handle this cleansing of names.
public static string CleanInvalidCharacters(string name)
{ string cleanName = name; // remove invalid characterscleanName = cleanName.Replace(@"#", string.Empty);
cleanName = cleanName.Replace(@"%", string.Empty);
cleanName = cleanName.Replace(@"&", string.Empty);
cleanName = cleanName.Replace(@"*", string.Empty);
cleanName = cleanName.Replace(@":", string.Empty);
cleanName = cleanName.Replace(@"<", string.Empty);
cleanName = cleanName.Replace(@">", string.Empty);
cleanName = cleanName.Replace(@"?", string.Empty);
cleanName = cleanName.Replace(@"\", string.Empty);
cleanName = cleanName.Replace(@"/", string.Empty);
cleanName = cleanName.Replace(@"{", string.Empty);
cleanName = cleanName.Replace(@"}", string.Empty);
cleanName = cleanName.Replace(@"|", string.Empty);
cleanName = cleanName.Replace(@"~", string.Empty);
cleanName = cleanName.Replace(@"+", string.Empty);
cleanName = cleanName.Replace(@"-", string.Empty);
cleanName = cleanName.Replace(@",", string.Empty);
cleanName = cleanName.Replace(@"(", string.Empty);
cleanName = cleanName.Replace(@")", string.Empty);
// remove periodswhile (cleanName.Contains("."))
cleanName = cleanName.Remove(cleanName.IndexOf("."), 1); // remove invalid start characterif (cleanName.StartsWith("_"))
{cleanName = cleanName.Substring(1);
}
// trim length if(cleanName.Length > 50)cleanName = cleanName.Substring(1, 50);
// Remove leading and trailing spacescleanName = cleanName.Trim();
// Replace spaces with %20cleanName = cleanName.Replace(" ", "%20");
return cleanName;}
[TestFixture]public class When_composing_a_document_library_name
{ [Test]public void Spaces_should_be_converted_to_a_canonicalized_string()
{string invalidName = "Cookie Monster";
Assert.AreEqual("Cookie%20Monster", SharePointHelper.CleanInvalidCharacters(invalidName));
}
[Test]public void Remove_invalid_characters()
{string invalidName = @"#%&*:<>?\/{|}~+-,().";
Assert.AreEqual(string.Empty, SharePointHelper.CleanInvalidCharacters(invalidName));
}
[Test]public void Remove_invalid_underscore_start_character()
{string invalidName = "_CookieMonster";
Assert.AreEqual("CookieMonster", SharePointHelper.CleanInvalidCharacters(invalidName));
}
[Test]public void Remove_any_number_of_periods()
{string invalidName = ".Co..okie...Mon....st.er.";
Assert.AreEqual("CookieMonster", SharePointHelper.CleanInvalidCharacters(invalidName));
}
[Test]public void Names_cannot_be_longer_than_50_characters()
{string invalidName = "CookieMonster".PadRight(51, 'C');
Assert.AreEqual(50, SharePointHelper.CleanInvalidCharacters(invalidName).Length);
}
[Test]public void Leading_and_trailing_spaces_should_be_removed()
{string invalidName = " CookieMonster ";
Assert.AreEqual("CookieMonster", SharePointHelper.CleanInvalidCharacters(invalidName));
}
}
I'm not 100% happy with the method as that whole "remove invalid characters" block is repetetive and I know it's creating a new string object with each call. I started to look at how to do this in a regular expression, but frankly RegEx just frightens me. I cannot for the life of me figure out the gobbly-gook syntax and if I do need it, I'll Google for an example and then cry and curl up into a fetal position. I even tried firing up Roy's Regulazy but that didn't help me. I'm just stumbling in the dark on this. If some kind soul wants to convert this into a regular expression for me I'll buy you a beer or small marsupial for your effort.
BTW, this would make for a nice 3.5 string extension method (string.ToSharePointName), but alas I'm stuck in 2.0 land for this project.
Enjoy!
Dave Laribee would be Bishop.
Ayende Rahien would be the bad ass Powerloader Ripley uses at the end of the movie to kick the Alien Queen's butt!
Scott Bellware would be a male version of Vasquez.
The strangest things spew forth from Twitter. Idea by Chad Myers. Feel free to continue in comments or whatever...
Looks like pr0n spam bots have airlifted in and wreaked havoc on the altnetpedia site. Our highly trained monkeys are looking to restore things back to normal so please chill in the lounge for awhile as we startup the silo. Thanks.
Update: Thanks to the uber-super-sleuthing skills of James "the Enforcer" Kovacs, the site is back online. We now return you to your regularily scheduled programming.
What happens when you get Jeff Atwood together with Joel Splosky and give them a microphone? You get a podcast where two guys chatter about life, the universe, and computers. The inaugural episode of the new podcast is alive and kicking on a new site and covers pretty much everything. Vista; Mac; FogBuz; Microsoft is evil (really? I didn't know); 9600 baud modems; iPhone; MSN; Google; Browsers; Coke vs. Pepsi; Vista; Wikis; Hardware; The Origin of the Species. You name it, it's there and delivered in style from top guys in the industry. Poor Jeff had to fish out his credit card and install Apple software to get the podcast published on iTunes, but it's there for the world to enjoy. Just listening to the first episode on the train ride in this morning. Great stuff! Check out the site here and you can grab the first episode (direct download) here.
I'm embarking on a series of blog posts on SharePoint, that wonderful and whacky platform by Microsoft we all love to hate. In the series, I'll grab a single feature, tool, technology, or concept aligned to a letter in the alphabet (hence the SharePoint A To Z titles) and write a post on it.
Each post will be anywhere from 5-10 pages long and they'll be a whopping 26 of them, one for every letter in the English alphabet. Not sure how long it'll take to finish the series but bookmark this page as it's the landing page for the entire series and will be updated as each post comes out (a PDF will be available once they're all done).
All posts are generally developer related (with some tools thrown in for good measure) and should cover almost the entire SharePoint developer spectrum (at least that's the goal). Also these posts are strictly WSS 3.0/MOSS 2007 stuff as I won't be covering past or future versions (hey, there's only so many hours in a day!).
Depending on comments from you, some of the topics in the list might change (as my initial choices may be lame and boring) based on demand so feel free to drive this in whatever direction you want.
Okay, here's the list (updated with more catchy and descriptive titles and links to the posts as they become available):
| A | AJAX and SharePoint |
| B | BLOB Storage |
| C | CAML |
| D | DataSources and DataTables |
| E | Event Handlers |
| F | Features |
| G | Groups |
| H | Helper Classes |
| I | ICellProvider and ICellConsumer, Making Web Parts Talk |
| J | Jobs and Timers |
| K | Keywords, Queries, and Search |
| L | Lists |
| M | Mobile Development |
| N | Navigation |
| O | Optimizing Your Code |
| P | Permissions |
| Q | QuickLaunch |
| R | Records Repository |
| S | Sites and Meeting Workspaces |
| T | Test Driven Development and SharePoint |
| U | Updating and Upgrading |
| V | Views |
| W | Web Parts, Workflows, and Web Services |
| X | XML is here to stay |
| Y | Your Information - Social Networking with SharePoint |
| Z | Zones |
This is just a post to direct people to the CI Feature Matrix that ThoughtWorks maintains. If you're up in the air about choosing a CI system, then this is the page for you. They maintain an unbiased view (their words, not mine) of all the CI systems out there (and there are a lot of them). So if you're wondering or looking for something, check it out.
Note: TW says the page is unbiased and I believe them, however when anyone puts together a matrix like this sometimes they tend to include features that only *your* system has (so you can create a checkmark in that column) that no other system can measure up to. I don't feel TW did this here, but I do want to point out this for making your own unbiased comparison.
If anything, the matrix can be used as an idea generator. Wherever you see a red ![]() and the project is open source, maybe it's time to sit down and write a plugin/patch/add-on and contribute! Think about it and give it some consideration, it would only make these projects even better with more capabilities.
and the project is open source, maybe it's time to sit down and write a plugin/patch/add-on and contribute! Think about it and give it some consideration, it would only make these projects even better with more capabilities.
I'm building an uber-exception handling system for all of our apps at work (basically handle unexpected exceptions and post them to out bug tracker, JIRA) and wanted to clear up some confusion on the differences between unhandled exceptions. As an FYI, this information is just for WinForm apps.
By default if you create a new WinForm app any unhandled exceptions are tossed into a dialog box like this:
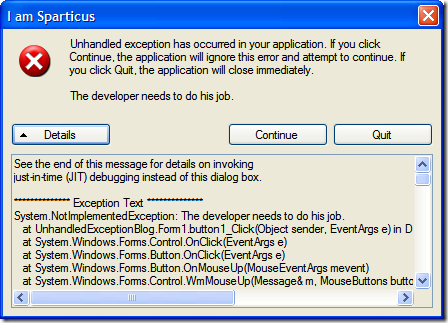
Perhaps while you're debugging you've seen this:
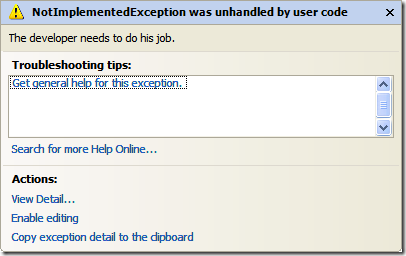
That's the built-in exception assistant Visual Studio provides. It kicks in when running your app from inside the IDE and lets you inspect your system. At this point you're basically screwed and something terrible has happened, so this is your last chance to maybe see what went wrong.
The exception assistant is useful as you can edit your code on the fly, crack open the exception (and investigate other values), or just continue along your merry way. If the exception assistant really irks you, you can go into the Debugger options for visual studio and disable it. When you do this, you'll get a dialog that looks like this:
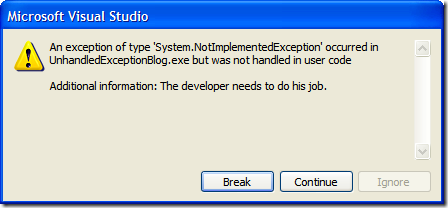
Not as descriptive as the exception assistant, but more intuitive if you just want to motor along (say to your own handler which is what we'll do).
Let's setup an unhandled exception catcher. Here's our main code before we add the handler:
[STAThread]
static void Main()
{
    Application.EnableVisualStyles();
    Application.SetCompatibleTextRenderingDefault(false);
    Application.Run(new Form1());
}
Now my kung-fu design skillz kick in and we'll build a highly sophisticated UI to drive our exception handler. Behold the mighty user interface to end all user interfaces:
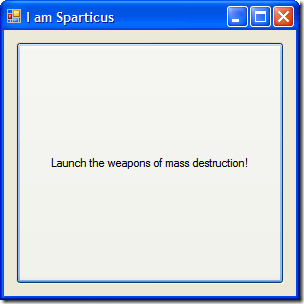
To create a handler we create a method and attach it to the ThreadException event handler. In our app we'll throw some exception and let the system handle it. Here's the updated code:
[STAThread]
static void Main()
{
    Application.EnableVisualStyles();
    Application.SetCompatibleTextRenderingDefault(false);
    Application.ThreadException += Application_ThreadException;
    Application.Run(new Form1());
}

static void Application_ThreadException(object sender, ThreadExceptionEventArgs e)
{
    MessageBox.Show("Something terrible has happened.");
}
We've tied into the ThreadException handler on the Application class with our own method that will dump the exception to a simple dialog box:
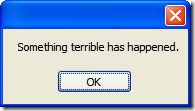
However in the AppDomain class there's an UnhandledException handler that you can tie into, just like we did with the ThreadException on the Application class above. The ThreadException is for dealing with exceptions thrown on that thread (and in this case, its our main form) but the AppDomain handler is for *any* unhandled exception thrown (for example, a SOAP call to a web service). So we should hook into that one as well like so:
[STAThread]
static void Main()
{
    ...
    AppDomain.CurrentDomain.UnhandledException += CurrentDomain_UnhandledException;
    ...
}

static void CurrentDomain_UnhandledException(object sender, UnhandledExceptionEventArgs e)
{
    MessageBox.Show("Something else has happened.");
}
You might also notice the signature is different. Rather then getting a ThreadExceptionEventArgs object we get an UnhandledExceptionEventArgs one. The differences are subtle:
The question is, does that make our ThreadException handler obsolete? Not really but there's different behaviour around the exception handler based on another setting. In the Application class there's a method called SetUnhandledExceptionMode which lets you control how thread exceptions are handled:
[STAThread]
static void Main()
{
    ...
    Application.SetUnhandledExceptionMode(UnhandledExceptionMode.ThrowException);
    ...
}
Adding this to your setup can result in two different behaviours:
One little extra note, if you choose option #1 and call SetUnhandledExceptionMode to ThrowException your AppDomain handler gets called but running outside the IDE you'll get this lovely dialog box:
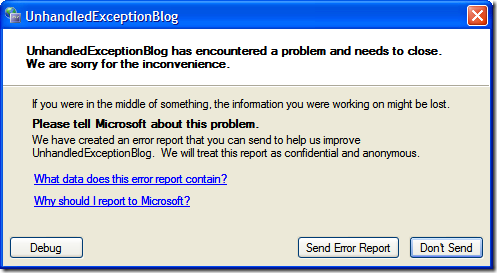
Your app generally shouldn't report information to Microsoft (unless you're really important), but this is what happens when running your app in normal user mode rather than developer mode. I'm not sure if there's a way to prevent having this bad boy popup on you when you hook into the AppDomain event handler (feel free to chime in on the blogs comments if you know how).
Hope that clears up a little on how exceptions work and the different behaviours you can get out of them. Happy exception handling!
Recently at the MVP Summit, Scott Cate was stuck in an elevator for a short stint (last night actually as he told the world his ordeal via Twitter). Elsewhere in the universe, a video surfaced of Nicholas White who was trapped in a New York elevator back in 1999. For 41 hours. Being stuck in an elevator is one thing, being stuck there for 3 days without the ability to pee is a whole 'nuther world.
It piqued my curiosity though. If you were trapped in an elevator for 41 hours who would you want to have with you and what would you talk about? So here's my Internet meme experiment. Blog your idea and link back or leave a comment here on my blog. There are of course some rules:
Being locked up with someone for this long, what would you talk about? Would you pit Linus Torvalds against Bill Gates on an open source discussion, or pair up Martin Fowler with Donald Belcham to discuss the finer points of Canadian whiskey?
Okay, go.
I have Mingle 2.0 upgraded in our test environment and have been going through the new features, upgrade woes, and some remarks from the peanut gallery. Here's the rundown on this Agile planning tool.

Upgrading
Upgrading was a bit of a pain. To do the test I backed up our Mingle db and restored it to sandbox database on the same MySQL instance and installed a clean copy of Mingle 1.1. Then upgraded 2.0 over top of it (once the 1.1 was working with the new db).
Mingle didn't know what port I originally installed on (my test install was on 888) and defaults to 8080. This can be confusing to a user who's installing an upgrade and didn't perform the original install or doesn't know what port was originally used.
I have unlocker running and it briefly kicked in on some .rb file (it flashed by so quickly you couldn't tell what it was). Didn't seem to be a problem but the Mingle upgrade killed off a whole bunch of processes running on my desktop. For example WinZip, Unlocker, and my anti-virus were all killed off (which might explain the brief flash of Unlocker as it went down) during the install. I know it's "traditional" to shut down all running processes during an install of something new, but I think it's a little over the top to shut them down for you (and especially since it did it without warning)
After the install browsing to localhost:888 failed. I checked the logs and found it had a problem trying to add a column to the db that was already there. After a 10 minute restore/reset (with a couple of well-placed reboots after each install) the install finally worked.
It was painful and luckily I was working on a test database. For sure I recommend doing a backup and upgrade over a temporary working database. Then if all goes well, backup your production db and do the upgrade (backing out if it doesn't work). Don't get too torqued if the browse to the instance doesn't work after the upgrade, just reboot the server (I know, pretty severe) and it should be all fine when you get back.
All in all, the upgrade wasn't horrible. You'll probably want/need to go in and make some mass changes to cards and stories in play in order to leverage the new features but it's fairly quick and painless with the Web 2.0 UI they've built on.
For sure check out the Mingle forums on upgrading/installing as there are a few people trying it on different systems and experiencing various pain points.
New Project Creation
The new project creation screen is basically the same. They have upgraded the Agile hybrid, Scrum, and Xp templates to version 2.0 (but only left the Xp 1.1 template, not sure why here). A minor change in the UI in 2.0 is they added a header/footer with the "Create Project | Cancel | Back to project list" links which is handy.
Project Admin
There's some minor shifts in project admin that are both cosmetic and functional. The Project Settings screen now has the SVN repository info separated out and adds a new field, Numeric Precision. This lets you deal with precision in your numbers on cards, stories, etc. By default it's set to 2 but you can increase it if you need it. I don't recall seeing this as a high priority feature but whatever. It's there now.
Like I said, the Project Repository settings (for integration into source control) has been pulled out into it's own screen. This is for good reason. The first thing you do is pick the version control system you're using from a drop down. Only Subversion is supported in this release, but you can see where it's going (perhaps with support from 3rd party providers). Somewhere in my browsing today I saw TW announce a future release to incorpoate Clear Case or some other SCM so others won't be far behind.
They've introduced the notion of "Project variables". Think of NAnt properties or something that can be used in cards or views. For example you can create a project variable called "Current Release" and give it a value of "1" or "3.2 GA" or whatever (with various data types including numeric, text, date, etc.). Wherever you use this it'll just replace that value. Then you can change en-mass "3.2 GA" to "4.0 RC1" or something and anywhere it's being used it gets swapped out.
The new advanced admin feature is recaluating project aggregates. We'll talk about aggregates later but if you find the numbers might be out of whack, go to Advanced prroject admin to recalculate them.
In 1.1, any view could be saved. From the "Saved views & tabs option" you could take a view a make a tab out of it. Now the feature is called "Favorites & tabs". Favorites are saved views that have not been added as tabs and there's two tables here to show you tabs vs. views. Tomatoe, tomatoe.
Card trees are available to edit or delete so let's talk about this in-depth.
Card trees

Card trees let you define a heirachy that works for your system. You can check out a video here that explains it well. For example, tasks can roll up under stories that roll up into features that roll up in epics. This is the ultimate in flexibility and lets you move things around as sets. There's a new Card explorer that lets you drag and drop cards from the right hand flyout so you can quickly (and visually) move your cards around in the view.
This is great and how I work. I usually break a system down by epics which then might flow into features which are made up of stories (I personally don't like getting down to the task level but YMMV). Now I can lay my project out visually and see where everything fits in and this lets me do things like track stories against a feature or bugs against a story. The notion of Done, Done, Done gets much clearer with Mingle 2.0.
Aggregates
In addition to Card trees there are attributes in cards trees called Aggregates that will allow you to roll up information into swimlanes. For example I can sum up all the story points in a feature or functional areas and in the Grid display, show that value. At a glance I see how many points I can deliver for that group. This is great for say release planning where you create a plan showing the sum of all points for each story in the sprint. Knowing your velocity of say 12, you know you can't drag more than 12 points into a sprint. Nice.
The UI is improved and starts to border on a video game like approach to Agile planning. If you drag an aggregate root, all it's children will follow. This makes for easily positioning things on the screen and moving things around, and is pretty fun to watch. Also I would hope a future feature will be a PNG or JPEG export of the tree (much like the image export from Visual Studio's class designer) as you might need an image for documentation or discussion where you don't have online access to Mingle.
Configuration
There's a new option on the main screen, configure email settings. This allows you to change where you SMTP server is and who the email comes from and includes a test link. A huge improvement over having to hunt for the config file and edit it by hand. I know screens like this start bloating out the product which is very lean, but I feel it's better served to have configuration this way rather than 100 text files buried in the file system somewhere. And the test feature is nice as it helps you as you go.
Templates
I didn't get a chance to look at all the templates but the updates to the include some new transitions. Transitions are one of the lesser-known features of Mingle and lets you set up a pseudo-workflow for Cards. In the new Scrum 2.0 template for example there are transitions that let you do a single click "Complete Development" or "Soft Delete". Transitions have filters and constraints (for example you can only invoke a transition if the card type is a Story and was created Today) and just make it easier to use Mingle. Check out the ones in the new templates and create your own. The new Scrum template includes a new dashboard (the Overview page) with story metrics (project status by points) and new graphs like a burndown chart and % of completed tasks per story. These use the new aggregate functions and quite useful to get a quick overview of the project.
Overall
Overall I'm happy with the upgrade. Even though it was a little painful and didn't work initially, in the end it's for the better. The heirachial cards feature is great and there are lots of nice little improvements everywhere (for example the consistent command bar on forms) that make this product even more useful for Agile planning. They spoke of better documentation and I'm looking to integrate Mingle with LDAP. I see there's a new LDAP configuration page but like most Mingle documenation, it's just a rehash of what you might see on the screen or lines in a config file with no real explanation of what is valid and what isn't.
I guess it's part trial-and-error, part knowledge, but I had hoped for more detailed documentation. Perhaps in the future they'll provide something like a wiki interface to the documentation and allow contributions from users to improve the readability of topics and additions of scenarios. To me, that's of the best things with projects like MySQL and PHP (and to a lesser extent the MSDN documentation). Hopefully TW will follow in these footsteps.
With the short release cycles ThoughtWorks employs I don't have to wait a year to see new improvements to a overall good product. Well done guys!
For a list of the top 10 new features in Mingle 2.0, check out this page by ThoughtWorks. Happy upgrading!
When ThoughtWorkers watch too many Julie Andrews movies:
 It's funny how the world works. A butterfly flaps it's wings in Brazil, and a tornado forms in Texas 1,000 miles away. Phil Haack posted a poll about unit test project structure and asked the very question we've come to on our current project. Should unit tests belong in their own project or as part of the system? I was going to post a comment on Phil's entry, but figured I would drag my explanation and description out to a full post here.
In the past I've *always* created a separate test project. Tree Surgeon by default does this (and now I'm looking at adding an option to let you decide at code generation time) and most projects I know of work this way. You create your MyApp.Core project (containing your domain logic) and a MyApp.Test project with all the unit tests. More recently I've been creating MyApp.Specs project but that's just a different evolution.
In the next project we're working on, we're looking to shift this approach. A shift to include unit tests in our MyApp.Core project. Here's some reasons and thinking behind it.
With unit tests (or specifications) in a separate project you end up mimicking the structure of your domain and create a namespace hierarchy. By default .NET assemblies have a default namespace for your application and then the name of any folder in the project is appended to the default namespace. So if your assemblies default namespace is MyApp.Core (and the namespace defaults to the name of the assembly) and you create a folder called Customer, all classes in that folder will be in the MyApp.Core.Customer namespace. In your test project you have a similar thing and usually you'll have the default namespace to be MyApp.Test (the name of the assembly).
Since there is only one test assembly (assuming you don't break them up that is) then you don't necessarily want to create a folder called CustomerSpecs (or CustomerTests or even Customer) so you might create a folder called Domain. After all, you're unit testing the domain but then they'll be the UI, Presenters, Factories, Data Access, etc. Do you create a separate test assembly for all of these? Probably not.
Let's see, we have an assembly (MyApp.Core), a class (Customer) in a namespace (MyApp.Core.Customer). Now you've got a test assembly (MyApp.Test), a set of Customer tests (CustomerSpecs.cs or CustomerTests.cs or whatever) in a domain namespace (MyApp.Test.Domain). This is getting a little complicated, but no big deal from a resolution perspective. You'll just bring in the namespaces you need and bang (or BAM!).
However two things seem to arise out of this setup.
First (which might kick off it's own huge debate) you need access to your Customer class and potentially other classes, enumerations, etc. that it uses which are locked away in MyApp.Core.dll. That means you have two options. Either you make the Customer class public or you use the InternalsVisibleTo attribute to let MyApp.Test.dll see the stuff inside of MyApp.Core.dll. There's another option here, slam all the files into one assembly and don't worry about it from a testing perspective. That might alleviate the problem but that's a different blog entry.
The second thing that comes out of this is a fairly deep and wide namespace hierarchy in your test assembly. That might not be a big deal unto itself, but could be an inconvenience. In addition the deep impact this might cause, let's say you have 30 domain classes and the subsequent 30 or so fixtures (or more, or less, doesn't really matter). And these are scattered around in various folders. Each time you touch the fixture to write a test or look at the domain object and create some test, you're playing hunt and peck inside your test assembly to find the right spot to match the folder structure. Of course if you don't care and toss everything into a single folder you won't care, but I think that's a different type of maintenance you don't want to get into. Then, let's say you restructure your domain (which can happen a few times throughout a project) and now some of the classes relating to Customer move into some other place in the hierarchy in your domain. That's easy enough with ReSharper and a move like this is pretty low-maintenance. Except now your test folder structure doesn't match your logical domain structure (or folder structure for that matter).
Okay, that's the side of the conversation about issues that we've come to on using a separate test project. Now the positives on including your tests with the code you're testing.
Here are some arguments I've heard for including your test code with production code that I'll address.
"If my tests are in my domain, I have a reliance on my unit test framework assemblies" - Yeah? So. If I wrap log4net I have a dependency on deploying log4net.dll as well. I'm not sure I see a disadvantage to this. There's been people saying they were "bitten" by this, but I'm sure what the bite is like or what the impact of that bite might be. Optionally, when we deploy we can decide to deploy our test code and it's dependencies as needed. Just because it's there doesn't mean it needs to go out the door. If we use our NAnt build scripts, we can not include the *Test* code and omit the MbUnit.Framework.dll files. Clean and lean.
"I want to see my tests and only my tests in one project and what I'm testing in another" - Again, not sure the advantage to this. If anything, keeping them together reduces the amount of "jumping" around you do in your IDE from this project to a test project, then back again. I'm not convinced or sure why you "want" to see tests in one project.
"Production code is production code and not test code!" - Not sure what this means, since I consider *all* code production code, tests, classes, etc. The ability to unit test my "production code" in a "production environment" rather than some simulation is a bonus for me.
All in all there's no clear cut answer here. What works for you works and I think the general mass keep tests in a separate project. I want to buck the norm here and for the next project we're going to try it out differently. I think there's advantages to it (and potentially disadvantages, like having to potentially clutter up my .Core assembly with a bunch of ObjectMother classes for example) but we'll see how it goes.
I don't like not trying something because "that's the way we always did it". Doesn't make it right. So give it a shot if you want, try it out, share your experience, or leave a comment that I'm a mad coder and putting my devs through unnecessary torture.
Like Phil said, this is not "a better way" or "the right" or "wrong" way to do things. I'm going with a Test folder under my aggregate classes in my domain and we'll how that goes. YMMV.
It's that time of the year for me again. The MVP cycle is upon us (it happens 3 or 4 times a year, my cycle lands ironically on April 1st). So as much of a joke as it may be, I'm here for another year. Yes, Mr. TooManyProjectsOnHisPlate is a SharePoint Server MVP again. Maybe I'll get off my laurels and pump something cool out this year. Or maybe I'll just sit on my big fat buttocks and think up clever ways to incorporate comic book art into blog entries. In any case, SharePoint MVP April 2008-April 2009 again (4th year running now. Or is it 5? I've lost count).
 Okay, by now all of you with a few ounces of grey matter have figured out that today's earlier post was an April Fools joke. I am not the ALT.NET pursefight guy and in fact, the blog post wasn't even written by me.
Here's skinny. A few days ago ex-Canadian cool kat Kyle came up with the plan (yes, he's the mastermind behind this madness). We would all post about something and post on each other's blogs, thereby confusing said reader (that would be you) and hilarity should ensure.
Various topics were thrown out (Google, Yahoo, Geeks who get laid, best goat raping techniques, etc.) but one seemed to be an interesting diamond in a bed of coal. The elusive identity of the ALT.NET Pursefight blogger (whom to this day I still don't know who it is).
The schedule was set and we all went to create our masterpieces. Of course The Mad Mexican made his appearance, albeit in the shower and in video. I'm not sure if I'm still over the Beth Massi affair in Vancouver so seeing MM in the shower just threw my whole day off.
In any case, here's the lowdown on who posted what and where:
And Sean Chambers, who wasn't really in this little ALT.NET pursefight meme of ours, went ahead and posted his own claim to fame. Good for you Mr. Glory Hound ;)
There you have it. The circle is now complete. The kimono is open and the magicians have shown you how we sawed the lady in half.
See you next year!
The darkness of anonymity has finally gotten to me. I can't take it any more. First it was a group of alcoholics that I hung around with who decided to go 'anonymous' *. Then it was my poker buddies **. It finally got to me and before I knew it I was an anonymous blogger. Oh, you knew it all along folks. I'm the bad ass, Perez Hilton wanna-be exposing the dirty laundry of the Alt.Net world. I am Pursefight.

Today I'm coming clean and claiming what is rightfully mine. I've been silent for some time now as I've wrestled with this decision. I'm not sure I'm ready for the lime light, the paparazzi or the fame. I know that if it starts to be a burden I will post to the newsgroup asking you for your opinion and guidance. The initial four weeks of discussion will be spent deciding on how, or even if, we should define 'fame'. After that we will settle down into a fine bit of Alt.Net name calling and personal attacks.
Regardless, I have been, and will continue to be, here for you. Every day I will be at the pier waiting for you...for I am Pursefight.
* While I don't condone binge drinking, I sure hate a quitter.
** I don't suggest gambling away your child's pre-school tuition. I named her Vista though...I'm guessing that pre-school isn't going to help her get over that.
Capital One is offering the ability to design your own credit card. So I did. Naturally I chose the first thing the popped into my head.
Fluffy Kittens?
Nope.
Giant Monster Trucks.

No way.
Hugo Chavez?

Nah.
Well of course, I picked my favourite blogger.
Ladies and Gentlemen, I present to you the Justice Gray Capital One card.

Don't leave home without him!
My better half turned me on tonight on a new search engine in beta.
searchme.com is an interesting twist on an old thing. When you log in you get the main screen. Lots of black and kind of retro looking. Enter a search term and it dynamically fetches the results and shows you where your hits are in a category fashion. For example here's my results:
Pretty good as it shows Software, Web Development, Computer Programming, Architecture, and Blogs. All relevant.
When you go further into results you get a Web 2.0 look and feel that resembles something like the Windows Vista task switcher, but done for the web. It's Flash rather than (what I thought was Silverlight) but it's still pretty cool.
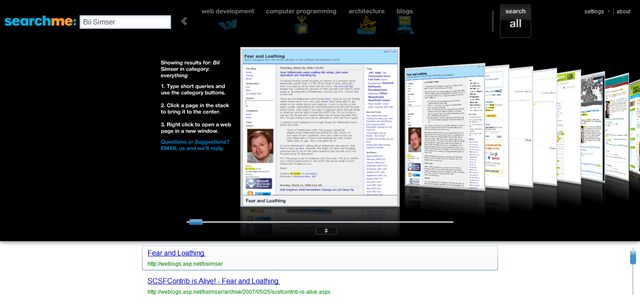
You can page through the results like flipping through your iTouch and see previews of the pages in your search results. Clicking on a page takes you to it. There's also a text description below that lets you navigate that way and the title of these items scroll and attach themselves to the search result page as you flip through them (you can also maximize the search results and only see the graphical navigator if you prefer). If you click on one of the categories the engine puts the search results into (how it decides what goes where is black magic) the results will filter down to only that category. Also if you prefer night over day, you can change this in the minimal settings dialog in the top right corner:

The big advantage to this is you can not only see the result page (and decide visually if you want to go there) but also if you hover over the bottom of the preview it pops up the text of the page and highlights your search term. Again, this will help you decide if it's worth going to the page or not without loading it up. Form and functionality, now that's a first!
I seriously feel like my web browser turned into an iPod or iTouch and the it makes vanity searching that much more fun now. Me likes Web 2.0 (some days).
If you're interested checkout searchme.com but you'll have to hurry. When I signed up there were only a few hundred beta slots left and by the time I finished this blog entry (about 15 minutes with screen caps) 50 of them were gone!
I'm always finding myself Googling an answer to a question about NHibernate (either that or I fire off an email to Oren, although I think I've used up all my chits with him now). The SourceForge project has a mailing list (several of them actually) but they're really aimed at development of NHibernate, not the use of it. I found that a little odd.
There are the NHibernate User Forums here, however I'm just finding online forums don't work very well. Rather than being able to get emails on my mobile device and respond, I have to log into a web page (usually remembering my username/password) and sift through what's there. With email I can keep it organized either through Gmail or whatever and be able to keep the stuff I like. I'm not trying to subvert the forums and I realize there may be some backlash from this, I'm just trying to provide an alternative. We'll see how it goes.
I created a new mailing list on Google Groups for NHibernate Users. Here's the blurb:
Users of NHibernate unite! This group is aimed at people using NHibernate and looking for tips, tricks, or just want to ask a question. Post your code on how you use NHibernate or share some experiences with it here. Good, bad, or ugly, this is the place for it!
If you're interested in talking about NHibernate and using it, feel free to hook up here. Hopefully this might cut down the Googling everyone has to do for the same questions and provide a bit of a focused group for discussion.
P.S. The group is set to moderate your first post. This is to confirm your carbon based status in the world. Flip me an email if you're human and I'll approve you.
Enjoy!
 Wow. What a mess. For eons (ever since I got my latest Dell laptop) I've suffered from the dreaded "Resolution Change" issue. Close the lid (putting the computer in stand-by) and open it up again, only to find your resolution dropped down a notch (for me from 1440x900 to 1280x768) and have to reposition/resize windows all over the place.
It's been a common problem on the internet (or Internet if you prefer) with lots of people with various fixes. Some people blame the chipset and tell you to upgrade to the latest, others want you to give them your video specs only to tell you some lame excuse to use the stock drivers and not the Dell ones, some say it's inherent in Dell machines, others say "works on my machine" (Good for you, I should get them a sticker).
In any case, I finally found a solution that works for me so I'll share with the rest of the class in the hopes that someone might be able to fix their own plight with this problem. For my system I have a Dell Inspiron 9400 running Windows XP (SP2). The video is the stock Mobile Intel 945GM Express Chipset Family. From the various explainations on the net, I have a feeling this fix will work for different configurations (e.g. different Dell models, other Intel Chipsets or even nVideo drivers). The specifics will vary but you should be a smart enough dog to figure it out. Adapt!
Here goes. Crack open regedit (Windows Key+R, "regedit", Enter) and lets go. You can back up your registry if you really want but this change seems pretty minor and I don't think you'll be in a bad place after it.
When the sytem restarts, you can close your lid; wait a minute; re-open it and "voila" it *should* retain the resolution. "Should" is the key word here as these instructions are pretty black magic (as is most of the registry, and frankly, the operating system in general). Should because this "worked for me" but YMMV. Even if you have the same Dell laptop, OS and drivers that I have this *might* not work. I'm not going to guarantee anything here.
If it does work for you, you can now happily open and close your laptop without having your resolution change on you. If it doesn't, thanks for coming out and I'll be here all week.
Enjoy!
 I've been using Omea Pro as my primary news reader for a long time now. It's one of the better ones IMHO as it let's me track RSS feeds and newsgroups (I don't use the mail integration). It's not as bloated as I found with RSS Bandit, chewing up memory all over the place, but it has its share of bulge and it tends to bog the system down a bit. Still, I like it and it's from one of my favourite software publishers, JetBrains.
A few months ago Omea (and Omea Pro) went free and they announced they would release the product as open source at some point in the future. It's been a long time coming and now it appears to be available, or at least the announcement was made:
Dear JetBrains Omea Users,
We are pleased to finally come to you with these news.
We know that many of you were waiting for this news for so long, and we would like to thank you for your patience.
So, after several months of thorough work on polishing the software itself and its API, we are happily ready to announce the full availability of our "Omea" line of products in their open-source incarnation.
We hope that this step will allow us to rise the development of this great product to a new level and to attract energy and talents of everybody who likes to participate in this "adventure".Omea - both source and companion files - is now distributed under GNU GPL v2 License (http://www.gnu.org/licenses/old-licenses/gpl-2.0.html).
Problem is, I can't find it? The regular page still offers the 2.2 version and I've combed the Confluence site but can't seem to find a download or the name of the subversion repository to get the code from. I must be blind.
Anyone know where it is?
Update: Michael left a comment that the SVN repository is here.
James squeaked in our latest Plumbers @ Work podcast we recorded on Sunday night with his mystical editing skills. It took him just a little over 24 hours to post the podcast as we've switched the format over to a more casual half-hour of "3 guys and a small dog having a conversation" format. It was interesting as we stumbled through the first in this format as we really didn't have our usual 1-2 hour prep work done (links to sites, blog posts, news, etc.). We just... talked. It was fun and relaxed and I'm digging the format. Hopefully we'll get a little more comfortable with it ourselves and maybe pick up a listener or two (in addition to the 4 we have now, which includes John, James, and I re-listening to it ourselves to hear how dorky we sound). Anyways, catch the show directly here in MP3 format or here on the site.
P.S. Community Server weirdness. If you highlight something like "Plumbers @ Work" and try to create a hyperlink to it, Community Server refutes this attempt and makes the text the same as the link. The @ symbol must be throwing it off or something. Odd.
 This might be old information to some, but I wasn't able to find the answer (very clearly) on the web so here it is.
If you're building a new website with Visual Studio 2005 and want to use the AJAX Control Toolkit there are two different variations you can download, one with source and one without. The most excellent videos by Joe Stagner and co. only shows using the toolkit by building from the sources. For most people that just want to use the toolkit, it's a little confusing as to where they can browse the toolkit after installing the VSI package.
The non-source version of the toolkit includes a VSI package that will install a new template (for creating your own AJAX extensions) and the sample website. When you install the base AJAX extensions, you'll get a new section in your Visual Studio toolbox appropriately named "AJAX Extensions". However it only includes the basics (ScriptManager, UpdatePanel, etc.). What about all those mew uber-cool extenders you get with the Control toolkit? Well, you have to add those to your toolbox yourself. While you can copy the sample website somewhere and refer to that copy, there's already a copy of the toolkit installed when you install the VSI.
To add the Control Toolkit Controls to your Toolbox (say that 3 times fast kids) following the bouncing bullet points:
Here's the "see below" section from above. The VSI package installs a new template for building new extenders, but new projects built from that template need a copy of the toolkit when they're created. So you already have the toolkit installed if you install the VSI, it's just buried in your Application Data directory. You'll find it in:
{Documents and Settings}\[username]\Application Data\Microsoft\VisualStudio\8.0\ProjectTemplatesCache
Depending on which VSI package you installed they'll be a copy in the "Visual C#\AjaxControlExtensionProjectCS.zip" or "Visual Basic\AjaxControlExtensionProjectVB.zip" folders. If you installed both, it'll be there in duplicate so it doesn't matter which one you pick.
Alternately, you can just install the VSI files (or not) and squirrel away the AjaxControlToolkit.dll away from the Sample Website folder somewhere to refer to later (under the {Program Files}\Microosft ASP.NET\ASP.NET 2.0 AJAX Extension folder where AJAX is installed to is a good place). Just remember to grab the whole tree with all the langauge resource files. You'll find them in the "bin" directory under the Sample Website.
HTH.
<rant number="1">The Application Data directory is something that bewilders me, much like anything Microsoft creates and produces. Let's say you want to do a back up of all your data (for re-imaging or just for kicks). One would think it might make sense to just copy the entire "Application Data" folder to a backup and all is golden. No. Files in here are locked by the OS so even if you shut everything down, you won't be able to copy the folder out (and don't even try to move it, that'll bring down the wrath of God upon your system). In addition the folder is hidden, so for those people (like your father in law who insists on "cleaning up" his hard drive by deleted folders in the Program Files folder) they'll never see it, much less know what it's for. Also, if you manage to make a copy of your Application Data folder and drop it onto a new system, don't expect anything to work right. It's a bad, bad, place I've been to a few times. The Application Data folder is a neat place to put stuff and a good idea on paper, all nice and tidy in a single location but other than a big storage place a little functionally useless when it comes to backups and restores</rant>
<rant number="2">When will Microsoft learn and stop burying important files deep in the OS? More importantly, we need a file system that doesn't have limitatations on path length and applications that won't bomb out because of it. The Ajax Control Toolkit above is, by default, located in a directory with 143 characters in it's name (depending on your user name). It's also a bugger to navigate to. Path lengths are so 1990s so why are we still living with them as a constraint? For example I had a developer who would checkout source code to his desktop. It was convienient because it was right there. Problem is that the Desktop is in reality under the {Documents and Settings}\username\blah\blah\blah folder, so his builds were breaking because by the time you got down into a 20 or 30 character folder/filename combo in our solution, you blew the path length. And Windows wasn't very forgiving on what the error was. You think "Path length too long" would be the approprirate error message but no, there would be some cryptic error from Visual Studio (or maybe the file system, or both) saying "Invalid assembly" or "Corrupted assembly file". Anyways, we need a better file system.</rant>
Just a quick note as I try to pry my eyes open this Monday morning. The Heroes Happen Here launch is going on in Calgary tommorow and myself, John Bristowe, and James Kovacs will all be there hanging out, getting drunk, and bashing Linux and Apple (well, maybe not so much on the last two).
Here's the Canadian site. Calgary is sold out but if you're in Winnipeg and Ottawa you're still in luck. You can see below the "official" Ask The Experts booth garb that all MVPs will be wearing so watch for James and I to be decked out in something similar (I personally wanted to dress up as Spiderman but apparently Marvel are being difficult when it comes to licensing so Supes is it).

This is another huge launch for Microsoft, like the 2005 one. This time we're launching Windows Server 2008, Visual Studio 2008, and SQL Server 2008. I haven't had a chance to really dig into Server 2008 or even install SQL 2008 so be sure to ask me about those things. See you there!
Guess what kids? Install IE8 and you won't be able to go to Microsoft Update anymore (at least in IE8 mode).
Yeah. You heard me.
In my IE8 exploits tonight, I have to re-image the Mrs. Fear and Loathing's laptop (goodbye Vista, hello XP) so I wanted to grab a copy of service pack 2 (I have to slipstream the install with some updated SATA drivers so XP can find the hard drive). That took me to the Windows Update site which got me this raspberry:
Brilliant!
You *can* get around this. Click on the "IE8 is screwed so pretend you're IE7 please" button then re-launch Internet Explorer. You'll be able to visit your precious update site again.
Yeah, ask me how thrilled I am now?
Grabbed a copy of IE8 and installed it. I like to live dangerously. Here's some first thoughts.
Developer Toolbar
I have the IE developer toolbar installed so I can mess around with sites. It's still a toolbar, but in IE8 everything has become a giant popup like this:
I remember this being a docked window in IE7. You can't select "Outline | Table Cells or Tables" anymore and when you do select to outline an element, it's wrong. Also when you click on the page, the popup goes away now. Not very useful anymore IMHO. So much for that little tool.
Web Slices
This is a new feature in IE8 and let's you "slice" part of a web page for later retrieval. WebSlices allow users to connect to websites by subscribing to content directly within a webpage. WebSlices behave just like feeds where clients can subscribe to get updates and notify the user of changes. A WebSlice is a portion within a webpage that is treated like a subscribe-able item, just like a feed. To enable a WebSlice on your website, annotate your webpage with class names for the title, description, and other subscribe-able properties.
When you add a web slice to IE8 you get a link added to your Links (I never use these) but it's not just a link to the page, it'll create a menu that previews the content you've sliced. They have an example where you can slice the content from Facebook
Here's a web slice I created in this blog entry:
If you're viewing this in IE8 you'll see the little icon hover over the section above and paint a faint box around it.
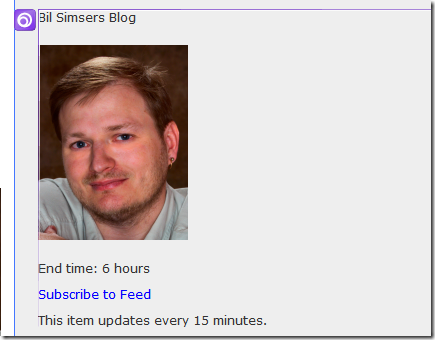
Click on the icon it and it'll let you add it as a slice.
Consider it my slice of life I give to you today, free of charge.
Anywho, now in your Links Toolbar, you'll see the entry for the slice you just created and subscribed to.
This is a pretty boring slice. Here's my web slice from my Facebook Friends update which is a little sexier:
My issues with Web Slices
These are just my issues, and might be very well unfounded since I've only been playing with this specific feature for all of 10 minutes so YMMV.
IE8 is *supposed* to be W3C compliant (by default, you can turn it off via an option). This means that a) most old sites that were built to "work" in IE7 with IE hacks and workarounds, might not render properly in IE8 and b) IE8 is compliant to a standard not set or dictated by Microsoft (although they are on the committee).
So I'm confused.
A new compliant browser yet they're now introducing this "feature" called Web Slices that requires you to markup your system using specific codes. Grant you, when you look at the code to create a web slice (below) it's minimal and isn't non-compliant but to me something just seems funny here. Here's the code you need to implement a web slice:
<div class="hslice" id="1">
   <p class="entry-title">Game System - $66.00</p>
      <div class="entry-content">
         <img src="game.jpg">
         <p>End time: <abbr class="endtime" title="2008-02-28T12:00:00-05:00"> 6 hours</abbr></p>
      </div>
      <a rel="feedurl" href="www.ebay.com/game.xml">Subscribe to Feed</a>
      <p>This item updates every <span class="ttl">15</span> minutes.</p>
   </p>
</div>
Also this is my first exposure to something called hAtom Microformat (which by the way doesn't navigate properly with IE8, can't page up/down on the site) so it's interesting that you specific fixed name classes (entry-title, entry-content, etc.) to tag content. IE8 Web Slices builds on this and adds it's own "hslice" tag to the mix.
So I can tag content this way, but now I'm going to have to be very careful when I design my CSS to not override these classes (no idea what havok we'll wroth if we change the "hslice" class, perhaps the universe will open up and we'll all be whisked away to a land of lean naked bodies on the shores of an endless river?).
In any case, watch for these web slices to show up soon. Not sure how much this is going to catch on, we're already in information overload with email, RSS feeds, newsgroups, mailing lists, etc. Is another notification mechanism something the world needs now? Are web slices going to give me anything more than what I already get with RSS (except maybe the mechanism to subscribe, which can be pretty easy with RSS now anyways).
Domain Names
When browsing a website you'll see in the address bar the domain name of the site you're browsing highlighted. Everything else is grayed out.
![]()
This filters out any subdomains and all the other stuff that I suppose you don't need to know. Guess this is to help people know they're on a site that's about to steal their identity and credit card info and run off to Bora Bora (well, that's what *I* would do).
Problems
Of course there are issues with this release. It is beta 1 after all so don't expect wine and roses. For example, I had to turn off my Google toolbar to even read the Web Slices Specification Format page on MSDN. It kept crashing the browser.
I think the biggest problem with the release is that there are rendering issues, rendering issues, and more rendering issues. You would think by version 8 rendering out an interpretation of a bunch of codes with angle brackets would be understood by now. Guess not.
For example the new Code Gallery site doesn't quite render properly in IE8,
neither does weblogs.asp.net:

neither does CodePlex (another site Google toolbar + IE8 = crash),
neither does SourceForge,
neither does CodeBetter (holy ugly step sister batman!)
neither does this blog.
Rendering is a problem which is a result of Internet Explorer being a victim of it's own success. So many websites coded in hacks and workarounds and fixes to "get around" buggy rendering IE5, IE6, etc. and now comes along IE8 to fix the problem and render things correctly. Problem is all those sites (and there are a lot) may not have the manpower to go back and unfix their bugs (or whatever the term is as I'm all bass ackwards).
Am I being too hard? After all it *is* beta 1 after all. I feel a product like Internet Explorer is mature enough that things like rendering pages should be second nature by now. Software that matters. For a web browser, I think the only thing that really matters is "can I view a web page as it was designed?". Apparently not yet.
Oh well, at least we can always rely on Jakob Nielsen.
I stumbled on a little known fact (well, little known to me, I'm sure the rest of the world already knows about it) that the Koders.com site (a site that indexes source code and lets you explore open source projects) actually indexes CodePlex projects and let's you navigate the source code from their site.
Kind of fun because Koders.com includes some stats that CodePlex doesn't, like the (approximated) development cost of a project (I think it's based on LOC). Okay, it's not accurate in any sense, but it sure is neat. SharePoint Forums (the 2003 version, 2007 version isn't posted yet) is apparently worth $43,815 although I don't remember getting a cheque for it.
Here's my CodePlex SharePoint Forums project on Koders.com.
In another ego search (on Koders.com) I found it had indexed my CDX project (a mature C++ DirectX wrapper, development cost $325,625; still waiting on my cheque) and a long lost project I worked on called Harbour (basically an open source version of Clipper) that I wrote back in 1999 (I wrote the console API for it, among other things).
Amazing crap you discover on the net some days...
 The Moth, aka Daniel Moth, a former MVP and now Microsoft UK dude posted a blog entry The ABCDEFGHI of setting up Visual Studio for Demos. In it he makes some good points about setting up Visual Studio when you're on the road to present. I totally agree with him on look and feel. I still use a white-on-black theme (a modified version of Jeff Attwoods look and feel) for my own day to day development because at 1600x1200 IJW. When I'm presenting though I flip over to a secondary computer account (called DemoBoy) that has all the settings for the colours and themes in Visual Studio set to default (along with a toned down desktop, bigger fonts, etc.). The font size in the IDE is set at Consolas 14 (imagine coding at that all the time) and I favour using ZoomIt for zooming in on code as it lets me do markup and such which is mucho better than changing font size (although you can get the VS Power Toys which has a font mouse wheel scroller in it).
However I was taken aback from his point on leaving the 3rd party addins at home. I'm a ReSharper and keyboard junkie and won't work without my R#. I stumble through Visual Studio when it's not installed or activated, hitting all kinds of crazy keystrokes that get me nowhere. Now grant you, when you're on the demo scene (either live or screencasting) 9 times out of 10 I've been asked "What's that little red/green thing on the side" or "How did you create that class so quickly?"
So it's a toss up. I'm guilty of using R# in my IDE but can't fathom not using it, even for demos. I mean, I'm going to stumble through a demo looking pretty silly when I pound on my keyboard hitting Ctrl+N and not getting the list I expect. It's unnatural to me. Like not writing unit tests.
Are you presenting code somewhere? Do you suffer from the same fate as I? Do you suck it up and learn the dreaded default Visual Studio keystrokes or do you factor in the interruption you're going to get explaining R# to someone. What say you peeps? R# or no, when it comes to presenting?
Registration for the ALT.NET event in Seattle (April 18-20) is closed so if you register you'll get put onto the waiting list (there are only a few people on it right now). However the participant list is simply amazing. It's like the who's who of the Agile software development world.
Phil Haack, Tom Opgenorth, Craig Beck, Kevin Hegg, Miguel Angel Saez, Dustin Campbell, Justin-Josef Angel, David Pokluda, Carlin Pohl, Matthew Podwysocki, Adam Dymitruk, Wendy Friedlander, Oliver, Chris Bilson, Jeff Certain, Dave Foley, Joe Pruitt, Jeff Tucker, Jeffrey Palermo, Anil Verma, Greg Banister, Chris Salahub, Jesse Johnston, Robert Ream, Jim Hugunin, Chantal Laplante, Owen Rogers, Mike Stockdale, Cameron Frederick, Dan Miser, Greg Sangha, Joey Beninghove, Jean-Paul S. Boodhoo, Ben Scheirman, D'Arcy Lussier, Chris Patterson, Ronald S Woan, Rob Reynolds, Adam Tybor, Eric Holton, Scott Hanselman, Gabriel Schenker, Wade Hatler, Arvind Palaniswamy, Weston Binford, Jonathan de Halleux, Joseph Hill, Matt Hinze, Dave Laribee, Nick Parker, Ray Houston, Steven "Doc" List, Jason Grundy, Brian Donahue, John Quach, Alex Hung, James Thigpen, Chris Sutton, Ian Cooper, Rajbeer Dhatt, John Teague, Eli Lopian, Eric Ness, Scott Allen, Aaron Jensen, Rustan Leino, Bil Simser, Rob Zelt, Jeff Brown, Phil Dennis, Tom Dean, Tim Barcz, Sean Solbak, David Pehrson, James Franco, Bryce Budd, Scott Guthrie, Jay Flowers, david p buchanan, Howard Dierking, David Airth, Jonathan Wanagel, Matt Pisut, Julie Poole, Jarod Ferguson, Jacob Lewallen, Rhys Campbell, Joe Ocampo, Brad Abrams, Russell Ball, Michael Bradley, Bertrand Le Roy, Simon Guest, Alvin Lee, khalil El haitami, Roy Osherove, Scott Koon, Charlie Poole, Pete McKinstry, Sergio Pereira, Brad Wilson, Piriya Thongtanunam, Neil Blake, Brian Henderson, Martin Salias, Grant Carpenter, Colin Jack, James Shore, Kirk Jackson, Rod Paddock, Alan Buck, John Nuechterlein, Rajiv Das, Jeremy D. Miller, Chris Ortman, Robert Smith, Kelly Leahy, Chris Sells, Dru Sellers, Robin Clowers, Terry Hughes, Ashwin ParthasarathyOsidosi, Drew Miller, Dennis Olano, Anand Raju Narayan, Glenn Block, Brandon Lang, Pete Coupland, Trevor Redfern, Ward Cunningham, Troy Gould, Don Demsak, Neil Bourgeois, John Lam, Donald Belcham, Phil MCmillan, Udi Dahan, Martin Fowler, James Kovacs, Ayende Rahien, Danieljakob Homan, Raymond Lewallen, Jeff Olson, Justice Gray, Douglas Schroeder, Justin Bozonier, Luke Foust, Michael Henderson, Shawn Wildermuth, Dave Woods, Chad Myers, Shane Bauer, Michael Nelson, Kyle Baley, Buchanan Dunn, Scott C Reynolds, Greg Young.
I wish I had a tag cloud for the names or something as so many people have so much influence on ALT.NET practices today. It's going to be an awesome get together!
I found it rather funny (thanks Jenn!) having a conference named after me. Well, not exactly named *after* me, but when you're basically the only guy on the planet who spells his name "BIL" you have to laugh when you see this.
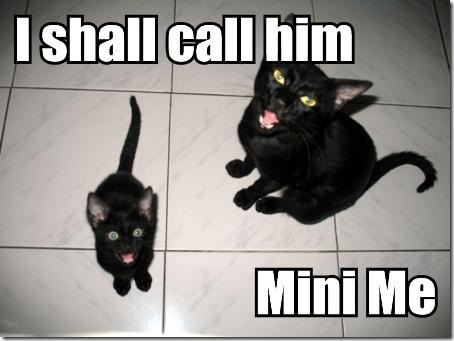
Best of all is the description of What is BIL? (something I always ponder myself each morning as I head into work).
"BIL is to TED, what BarCamp is to FooCamp".
We should probably break down and tell TED this at some point.
Andrew Connell wrote an excellent blog entry on building your WSS solution packages with MSBuild. My problem is that I can't stand MSBuild and find it crazy complicated for even the simplest of tasks. Andrew's post possibly led to the creation (or at least contribution) of STSDEV, a very interesting value-added tool by Ted Pattison and co. that helps ease the pain of building SharePoint solutions. However I found it has it's issues and doesn't really work the way I like to (for example I don't like having everything in one single assembly).
My choice of build tool these days is NAnt (although I'm starting to look at something like Rake or even Boo to make building easier using a DSL) and I find it easier (in my feeble brain anyway) to build and deploy SharePoint solutions with NAnt. I've blogged about it before, but that was v2.0 and here we are in 2008 with new shiny happy solution packages. So here we go.
First we'll start with a basic NAnt build script. When I start a project I create it and set a default target of "help" then in that describe the targets you can run. This provides some documentation on the build process and let's me get a build file up and running.
<?xml version="1.0" encoding="utf-8"?>
<project name="SharePointForums" default="help">
<target name="help">
<echo message="--------------------" />
<echo message="targets in this file" />
<echo message="--------------------" />
<echo message="help - display targets in the nant script. This is the default target." />
<echo message="clean - cleans up the temporary directories" />
<echo message="init - sets up the temporary directories" />
<echo message="compile - compiles the solution assemblies" />
<echo message="test - compiles the solution assemblies then runs unit tests" />
<echo message="build - builds the entire solution for packaging/installation/distribution" />
<echo message="dist - creates a distribution zip file containing solution installer, wsp, and config files" />
<echo message="---------------------------" />
<echo message="targets in SharePoint.build" />
<echo message="---------------------------" />
<echo message="addsolution - installs the solution on the SharePoint server making it avaialble for deployment" />
<echo message="deploysolution - deploy the solution to the local server for the first time" />
<echo message="retractsolution - removes the deployed solution from the local server" />
<echo message="deletesolution - removes the solution from the server completely. calls retractsolution first" />
</target>
</project>
In fact, at this point I can check this into CruiseControl.NET and it'll build successfully.
Doesn't do much at this point, but it's our roadmap. You'll notice there are a few targets listed in a file called SharePoint.build. I've found that these are typical and never change, you just change the properties of the filenames they act on. Let's take a look at this file:
<?xml version="1.0" encoding="utf-8"?>
<project name="SharePoint">
<!-- directory and file names, generally won't change -->
<property name="build.dir" value="${root.dir}\build" />
<property name="solution.dir" value="${source.dir}\solution" />
<property name="deploymentfiles.dir" value="${solution.dir}\DeploymentFiles" />
<property name="tools.dir" value="${root.dir}\tools" />
<!-- executable files that shouldn't change -->
<property name="makecab.exe" value="${tools.dir}\makecab\makecab.exe" />
<property name="stsadm.exe" value="${tools.dir}\stsadm\stsadm.exe" />
<target name="buildsolutionfile">
<exec program="${makecab.exe}" workingdir="${solution.dir}">
<arg value="/F" />
<arg value="${deploymentfiles.dir}\${directives.file}" />
<arg value="/D" />
<arg value="CabinetNameTemplate=${package.file}" />
</exec>
<move
file="${deploymentfiles.dir}\${package.file}"
tofile="${build.dir}\${package.file}" />
</target>
<!-- stsadm targets for deployment -->
<target name="addsolution">
<exec program="${stsadm.exe}" verbose="${verbose}">
<arg value="-o" />
<arg value="addsolution" />
<arg value="-filename" />
<arg value="${build.dir}\${package.file}" />
</exec>
<call target="spwait" />
</target>
<target name="spwait" description="Waits for the timer job to complete.">
<exec program="${stsadm.exe}" verbose="${verbose}">
<arg value="-o" />
<arg value="execadmsvcjobs" />
</exec>
</target>
<target name="deploysolution" depends="addsolution">
<exec program="${stsadm.exe}" workingdir="${build.dir}" verbose="${verbose}">
<arg value="-o" />
<arg value="deploysolution" />
<arg value="-name" />
<arg value="${package.file}" />
<arg value="-immediate" />
<arg value="-allowgacdeployment" />
<arg value="-allcontenturls" />
<arg value="-force" />
</exec>
<call target="spwait" />
</target>
<target name="retractsolution">
<exec program="${stsadm.exe}" verbose="${verbose}">
<arg value="-o" />
<arg value="retractsolution" />
<arg value="-name" />
<arg value="${package.file}" />
<arg value="-immediate" />
<arg value="-allcontenturls" />
</exec>
<call target="spwait" />
</target>
<target name="deletesolution" depends="retractsolution">
<exec program="${stsadm.exe}" verbose="${verbose}">
<arg value="-o" />
<arg value="deletesolution" />
<arg value="-name" />
<arg value="${package.file}" />
</exec>
<call target="spwait" />
</target>
</project>
This file contains a few targets for directly installing and deploying solutions into SharePoint (using stsadm.exe). It simply calls makecab.exe or stsadm.exe (which are local to the project in a tools directory) and executes them with the appropriate filenames. The filenames are set as properties in your main build file, then that build file includes this one. This SharePoint.build file generally never has to change and you can use it from project to project.
You might notice a "DeploymentFiles" folder used as the "deploymentfiles.dir" property. This is taking a queue from STSDEV, using it as a root folder in the solution where the *.ddf and manifest.xml file live for the solution. There's also a RootFiles folder which contains various subfolders with the webparts, features, images, resources, etc. in it. Here's a look at the development tree:

All source code that will be compiled into assemblies lives under "src". The "solution" folder is the root folder where DeploymentFiles and RootFiles lives as I consider things like feature and site defintions to be part of the solution and source code, just like say a SQL script. Under "src" I have "app" which contains the web parts, feature receivers, etc. and "test" which contains unit test assemblies. This allows you (as you'll see) to build each independently as I don't want my unit test code mixing up with my web parts or domain code. Under "src" they'll be many projects, but in the build file we collapse them all down to one assembly for testing purposes.
The "lib" folder contains external assemblies I reference (but not necessarily deploy) in the solution. This actually contains a copy of SharePoint.dll and SharePoint.Search.dll. You might wonder why I have copies of the files here while they exist in the GAC or buried in the 12 hive. It's because I prefer to have my solution trees to be self-contained. Anyone can grab this entire tree, no matter what version of what they have installed and build it (that includes the tools folder with all the tools they need to build it).
In the "tools" folder I have a copy of stsadm.exe (again, if the version changes on the server I'm protected and using the version I need), NAnt (for the build itself), makecab.exe to create the .wsp file and SharePoint Solution Installer, a really cool tool that runs against my WSP and lets you install and configure it without having to write an installer. You just edit a .config file and provide it the .wsp file.
Back to our project.build file. We'll setup some properties that will get used both in our build file and the SharePoint.build one (like the root directory where things are, etc.)
<!-- global properties, generally won't change -->
<property name="nant.settings.currentframework" value="net-2.0" />
<!-- filenames and directories, generally won't change -->
<property name="root.dir" value="${directory::get-current-directory()}" />
<property name="source.dir" value="${root.dir}\src" />
<property name="directives.file" value="${project::get-name()}.ddf" />
<property name="package.file" value="${project::get-name()}.wsp" />
<property name="dist.dir" value="${root.dir}\dist" />
<property name="lib.dir" value="${root.dir}\lib" />
<!-- properties that change from project to project but not often -->
<property name="webpart.source.dir" value="${source.dir}\app\SharePointForums.FeatureReceiver" />
<property name="feature.source.dir" value="${source.dir}\app\SharePointForums.WebParts" />
<property name="test.source.dir" value="${source.dir}\test" />
<property name="webpart.lib" value="${project::get-name()}.WebParts.dll" />
<property name="feature.lib" value="${project::get-name()}.Feature.dll" />
<property name="test.lib" value="${project::get-name()}.Test.dll" />
<!-- "typical" properties that change -->
<property name="version" value="2.0.0.0" />
<property name="debug" value="true" />
<property name="verbose" value="false" />
Then we'll include our SharePoint.build file:
<!-- include common SharePoint targets -->
<include buildfile="SharePoint.build" />
Recently I've switched to using patternsets inside of filesets in NAnt as it's more flexible. So we'll define a patternset for source files and assemblies, then use this in our filesets for the webpart, feature, and test sources and assembly files.
<!-- filesets and pattern sets for use instead of naming files in targets -->
<patternset id="cs.sources">
<include name="**/*.cs" />
</patternset>
<patternset id="lib.sources">
<include name="**/*.dll" />
</patternset>
<fileset id="feature.sources" basedir="${feature.source.dir}">
<patternset refid="cs.sources" />
</fileset>
<fileset id="webpart.sources" basedir="${webpart.source.dir}">
<patternset refid="cs.sources" />
</fileset>
<fileset id="test.sources" basedir="${test.source.dir}">
<patternset refid="cs.sources" />
</fileset>
<fileset id="sharepoint.assemblies" basedir="${lib.dir}">
<patternset refid="lib.sources" />
</fileset>
<fileset id="solution.assemblies" basedir="${build.dir}">
<patternset refid="lib.sources" />
</fileset>
Finally here are the targets in our project build file.
Clean will just remove any temporary directories we built:
<target name="clean">
<delete dir="${build.dir}" />
<delete dir="${dist.dir}" />
</target>
Init will first call clean, then create the directories:
<target name="init" depends="clean">
<mkdir dir="${build.dir}" />
<mkdir dir="${dist.dir}" />
</target>
Compile will call init, then using the <csc> task, build our sources into assemblies. We're using a strongly named keyfile so we specify this in our csc task (otherwise when we deploy we'll get warnings about unsigned assembies, feature receivers must be put into the GAC and require signing).
<target name="compile" depends="init">
<csc output="${build.dir}\${feature.lib}" target="library" keyfile="${project::get-name()}.snk" debug="${debug}">
<sources refid="feature.sources" />
<references refid="sharepoint.assemblies" />
</csc>
<csc output="${build.dir}\${webpart.lib}" target="library" keyfile="${project::get-name()}.snk" debug="${debug}">
<sources refid="webpart.sources" />
<references refid="sharepoint.assemblies" />
</csc>
</target>
Test first calls compile to get all the web part, feature, and domain assemblies built then compiles the unit test assembly. Finally it will call our unit test runner (MbUnit.Cons.exe or whatever). The output of the unit test run can be used in a CI tool like CruiseControl.NET.
<target name="test" depends="compile">
<csc output="${build.dir}\${test.lib}" target="library" debug="${debug}">
<sources refid="test.sources" />
<references refid="sharepoint.assemblies" />
<references refid="solution.assemblies" />
</csc>
<!-- run unit tests with test runner (mbunit, nunit, etc.) -->
</target>
Our "build" task just calls test (to ensure everything compiles and works) then delegates to the SharePoint.build file to build the solution. This will create our .wsp file and put us in a position to deploy our solution.
<target name="build" depends="test">
<call target="buildsolutionfile" />
</target>
Finally in this build file we have a dist task. This will build the entire solution then zip up the Solution Installer files and wsp file into a zip file that we'll distribute. End users just download this, unzip it, and run Setup.exe to install the solution.
<target name="dist" depends="build">
<zip zipfile="${dist.dir}\${project::get-name()}-${version}.zip">
<fileset basedir="${build.dir}">
<include name="**\*.wsp" />
</fileset>
<fileset basedir="${tools.dir}\SharePointSolutionInstaller">
<include name="**\*" />
</fileset>
</zip>
</target>
There's a lot of NAnt script here, but it's all pretty basic stuff. The nice thing is that from the command line I can build my system, install it locally, deploy it for testing, and event create my distribution for release on CodePlex (or whatever site you use). There's a go.bat file that lives in the root of the solution and looks like this:
@echo off
tools\nant\nant.exe -buildfile:SharePointForums.build %*
It simply calls NAnt with the buildfile name and passes any parameters to the build. For example from the command line here's the output of "go build deploysolution" which will compile my system, run all the unit tests, then add the solution to SharePoint and deploy it. After this I can simply browse to my website and do some integration testing.
NAnt 0.86 (Build 0.86.2898.0; beta1; 12/8/2007)
Copyright (C) 2001-2007 Gerry Shaw
http://nant.sourceforge.net
Buildfile: file:///C:/Development/Forums/SharePointForums.build
Target framework: Microsoft .NET Framework 2.0
Target(s) specified: build deploysolution
clean:
[delete] Deleting directory 'C:\Development\Forums\build'.
[delete] Deleting directory 'C:\Development\Forums\dist'.
init:
[mkdir] Creating directory 'C:\Development\Forums\build'.
[mkdir] Creating directory 'C:\Development\Forums\dist'.
compile:
[csc] Compiling 22 files to 'C:\Development\Forums\build\SharePointForums.Feature.dll'.
[csc] Compiling 182 files to 'C:\Development\Forums\build\SharePointForums.WebParts.dll'.
test:
[csc] Compiling 41 files to 'C:\Development\Forums\build\SharePointForums.Test.dll'.
build:
buildsolutionfile:
[exec] Microsoft (R) Cabinet Maker - Version (32) 1.00.0601 (03/18/97)
[exec] Copyright (c) Microsoft Corp 1993-1997. All rights reserved.
[exec]
[exec] Parsing directives
[exec] Parsing directives (C:\Development\Forums\src\solution\DeploymentFiles\SharePointForums.ddf: 1 lines)
[exec] 140,309 bytes in 7 files
[exec] Executing directives
[exec] 0.00% - manifest.xml (1 of 7)
[exec] 0.00% - SharePointForums.Feature.dll (2 of 7)
[exec] 0.00% - SharePointForums.WebParts.dll (3 of 7)
[exec] 0.00% - SharePointForums\Feature.xml (4 of 7)
[exec] 0.00% - SharePointForums\WebParts.xml (5 of 7)
[exec] 0.00% - SharePointForums\WebParts\SharePointForums.webpart (6 of 7)
[exec] 0.00% - IMAGES\SharePointForums\SharePointForums32.gif (7 of 7)
[exec] 100.00% - IMAGES\SharePointForums\SharePointForums32.gif (7 of 7)
[exec] 0.00% [flushing current folder]
[exec] 93.59% [flushing current folder]
[exec] 5.60% [flushing current folder]
[exec] 100.00% [flushing current folder]
[exec] Total files: 7
[exec] Bytes before: 140,309
[exec] Bytes after: 50,736
[exec] After/Before: 40.09% compression
[exec] Time: 0.04 seconds ( 0 hr 0 min 0.04 sec)
[exec] Throughput: 349.34 Kb/second
[move] 1 files moved.
addsolution:
[exec]
[exec] Operation completed successfully.
[exec]
spwait:
[exec]
[exec] Operation completed successfully.
[exec]
deploysolution:
[exec]
[exec] Timer job successfully created.
[exec]
spwait:
[exec]
[exec] Executing solution-deployment-sharepointforums.wsp-0.
[exec] Operation completed successfully.
[exec]
BUILD SUCCEEDED
Total time: 22.2 seconds.
Hope this helps your build process. Creating SharePoint solutions is a complicated matter. There are features, web parts, solutions, manifests, various tools, and lots of command line tools to make it all go. NAnt helps you tackle this and these scripts boil the solution down to only a few simple commands you need to remember.
One of the cool features in SharePoint 2007 are Feature Event Classes. These classes allow you to trap and respond to an event that fires when a feature is installed, activated, deactived, or removed. While you can't cancel an installation or activation through the events, you can use them to your advantage to manipulate the scoped item they're operating on.
In my SharePoint Forums Web Part, I had delegated the creation of the lists to the web part itself whenever it was added to a site. Of course I didn't go farther and clean up the lists the web part created when it was removed because there was no way to tell when someone removed a web part from a page (since it might not be the only one on the page). This has led to various problems (users had to be server admins to make this work 100% of the time, lists left over from old installs) but in the 2007 version Feature Event Recievers come to the rescue. Now when you activate the Forums on a web, it creates the needed lists and when you deactivate it the receiver removes them. You create a Feature Reciever by inheriting from the base class of SPFeatureReceiver. In it there are 4 methods you can override (activating, deactivating, installing, uninstalling).
One thing you don't have is a Context object so it makes it a little tricky to get the SPSite/SPWeb object the feature is activating on. Luckily there's a nice property (of type object) in the SPFeatureReceiverProperites object that gets passed to each method. This class contains a property class Feature which in turn contains a property called Parent. The Parent property is the scoped item that is working against the feature so if you scope your feature to Web, you'll get a SPWeb object (Site for an SPSite object, etc.). This is the key in getting a hold of and manipulating your farm/server/site/web when a feature is accessed.
Here's an example of a feature. When the feature is activated, it creates a new list. When it's deactivated it removes the list.
public class FeatureReceiver : SPFeatureReceiver
{public override void FeatureActivated(SPFeatureReceiverProperties properties)
{ using (SPWeb web = (SPWeb) properties.Feature.Parent) {web.Lists.Add("test", "test", SPListTemplateType.GenericList);
}
}
public override void FeatureDeactivating(SPFeatureReceiverProperties properties)
{ using (SPWeb web = (SPWeb) properties.Feature.Parent) { SPList list = web.Lists["test"];web.Lists.Delete(list.ID);
}
}
public override void FeatureInstalled(SPFeatureReceiverProperties properties)
{ /* no op */}
public override void FeatureUninstalling(SPFeatureReceiverProperties properties)
{ /* no op */}
}
BTW, it's not clear to me if getting an SPWeb object through this means requires the disposing of it. See Scott Harris and Mike Ammerlaans excellent must-read article here on scoped items which might help. For me, this is the safest approch (the object will always fall out of scope and dispose of itself). It might be overkill but it works. Feature receivers are not the easiest things to debug.
Enjoy!
 WPF is all the rage (at least that's what they tell me) and it's IMHO one of the best technologies to come out of Microsoft. Still, however, companies choose to stay the course with building on WinForms. Karl Shifflett has a great blog entry on choosing WPF over ASP.NET (and great entries on WPF in general so check his blog out here). To me it's a no-brainer choosing WPF over ASP.NET, unless you're really enamored with a browser app (or forced to build one due to some constraints) and with Silverlight and XBAP (and the new features coming out shortly in Silverlight 2) building a rich interface for the web gets better and better. AJAX just doesn't cut it and is a hack IMHO.
Making the decision between WPF and WinForms however is a different story. Sure, WPF is the new hotness and WinForms is old and busted but is it the right choice? Obviously "it depends" on the situation and Microsoft is continuing to deliver and support WinForms so it won't be going away anytime soon. So what are the compelling factors to choose WPF over WinForms? Karl hints at choices of WPF over WinForms in his WPF Business Application series, but the reasons might be subtle for some.
If you're struggling here are some reasons for choosing WPF over WinForms, and let's play devils advocate as you might have to fight for some of these.
Latest Technology
Why start new development on old technologies? There's bleeding edge (Silverlight 2 perhaps) and then there's cutting edge (WPF?) and we can probably start to talk about WinForms as legacy. Start, not come to that conclusion. WinForms development can be painful (much like moose bites) but the latest technology debate is a tough one. One on hand it's lickety-split to create WPF using the tools available today (see below) and from a development perspective WPF shines because everything is an object. The crazy hoops you have to jump through just to get an image on a button or menu are all but gone when you try embedding an object onto another one in XAML. On the flipside though, most of the large UI suites (DevExpress, Infragistics, Component One, Telerik) haven't fully completed their WPF implementations and the maturity lies in their WinForm incantations. Still, starting a new project today that might be delivered say 6-12 months from now doesn't make a lot of sense building on what some might consider legacy but as usual, you have to pick the right tool for the right job.
Mature Product
While WPF is pretty young in the eyes of consumers, Microsoft has invested 5+ years of development in it. WinForms arguably has the edge on maturity here (existing since the .NET 1.0 days) but don't knock WPF as a babe in the woods. It popped up on the R&D radar back in shortly after .NET 1.1 and Visual Studio 2003 came out and has been gestating ever since. This is a plus point if you're in a boardroom or meeting with some stuffies who think it's new and shiny but with no meat behind it. Combined with its own set of unique features, try something like UI automation and WinForms and we'll talk maturity. 10 years after WinForms was born and we're still struggling with UI automation. WPF solves this in one fell swoop, and does a nice job of it to boot.
Silverlight
WPF is based on XAML for it's definitions (both application code and UI design). Silverlight is the same because after all crunching down and serializing XML is dead simple these days. While Silverlight uses a subset of WPF for it's rendering, you can re-use a lot of what you might create in WPF and your application. This makes for building multiple UIs a happy-happy-joy-joy scenario. Too many times I've been faced with the problem of building a system for web users *and* desktop users. Too many times we've had to dumb down the web because it couldn't handle the rich experience the desktop provides, or be faced with 100k of JavaScript (yeah, try debugging that mess after a few sleepless nights) so anything has to be better than this. Silverlight lets you leverage a lot of your XAML investment you make in a WPF app and with technologies like BAML you can push the envelope even further. It's a win-win scenario for everyone and lays the smack down on Flash or Java anyday.
Tools
While we live in a domain driven design world (at least some of us do, you have come out of your cave right?) with objects and collections and tests oh my, there is still the UI to design. I'm not a huge fan of the move to CSS validated Expression Web, but I understand (and agree with) the choices Microsoft made with the model. Kicking it up a notch and delivering Expression Blend with it's integration into Visual Studio makes building WPF apps a breeze. In fact, I strongly advocate and support handing the UI design off to someone better suited to it. Let's face it, developers suck the big one at building UIs (unless it's "Hello World" with a big button and an image of Scott Hanselmans face on it) so let's let the UI designers design. Blend lets you do this by just letting the designers "go wild" as it were, without having to worry about "how in the heck am I going to hook this up later". Giving a designer a copy of Visual Studio to design a WinForm app is just plain crazy, and don't even try to convert their JPG mockups that have been signed off on into a Windows Form (been there, more t-shirts, I have a lot of them) but getting a XAML file from them just plugs right into our development environment and is dead simple to wire up to whatever back-end you have going at the time.
UI Resolution
How many bugs do you have logged on your current project that say something like "cannot see button x when my screen resolution is 800x600"? As a developer, we generally work at crazy resolutions that no sane person would run at (my current desktop runs at 1680x1050) so building forms on this just plain doesn't translate well (read: at all) to a users desktop of 800x600 or 1024x768. Buttons vanish, menu options disappear, and that oh so beautiful grid that is the lynchpin of your appplication is missing the bottom 20 rows and last 10 columns. Sure, WinForm containers and whatnot help but far too many times we forget about this and end up building things off in unseen areas of the screen. WPF doesn't solve this problem, but really helps. Not only that, we're not asking users to change the resolution or font size on their screen to see things clearly. In this day and age, users need to be able to dynamically change the system at will when they're working. I've seen users running with the extra large font theme as their eyes give out on them but apps just plain don't work well when your system font is 36pt Verdana. Look at the iPhone as an example of clever UI integration. It dynamically zooms in and out as you choose to make things readable. We need more of this on the desktop applications we build to suite the needs of users who want "to see it all" at once. WPF let's us do this with less pain than WinForms.
Databinding
WPF allows for much easier data binding through its model and this can result in faster development time. Now Unka Bil isn't telling you to go out and bind your WPF creations directly to ADO.NET models. I still live and die by Domain Driven Design so binding happens on objects (probably best through a Binding<T> adapter of your domain classes) but WPF does make it easier to do this if that's your thang.
So overall it's a better experience, both from the development side and consumer side. Again, you might have some battles to fight with Corporate to jump onto the technology band-wagon, but this is might be a battle worth fighting for. WPF is no silver bullet (as I always harp, the is no silver bullet unless you're fighting werewolves) but hopefully this will help you make a more informed choice. The choice is yours, but choose wisely.
 First off let me start the disclaimer. I do not work for Microsoft and have no decision making powers in anything that goes into a piece of software. You might call me an "influencer" as we MVPs may suggest things at times (sometimes very verbally) but we don't take a laundry list to Microsoft and make demands of new features. Keep that in mind while you read this post.
One of the biggest complaints a lot of us hear about SharePoint development is the need to build on Windows 2003 server. I still to this day have no idea what the critical dependency on Windows 2003 Server is, but obviously there must be one. Otherwise we would be building solutions on XP and Vista. As an ASP.NET developer, we have a local IIS (5.1) instance available to us for development and with VS2005 there's even a built-in web server for building websites. So forcing developers to use a server for SharePoint development can seem a little harsh, hence all the complaints.
Working on a real server (say a development one in your network) is a no-go, unless you're the only developer on the machine. You just can't do things like hang the worker process or force a iisreset for other developers. That's just not cool. And from a SharePoint perspective, you'll be clobbering each other all the time if you're on a shared server (been there, done that, got the t-shirt).
That leaves virtual development (using either Virtual PC, Virtual Server, or VMWare). This is probably the best choice but it's costly. Setting up the VM requires a significant time investment to get all your ducks in a row, even more if you want to keep this long term so you're going to have to create some parent-child relationships on VM hierarchies (see AC's post here about this).
Hardware *is* cheap but in the corporate world it's not always cheap that wins. Trying to get network services convinced you're not going to bring down their network with your little VM isn't easy (more t-shirts) and you'll battle issues of software updates, virus protection, licensing, and a host of others. It's a hard battle, but perhaps one worth fighting.
The MVP community is a little splintered on whether or not a Developer Version of SharePoint would be value-add (BizTalk has one, so why not SharePoint?). Some think it's necessary, others would rather have MS focus their efforts elsewhere and live with VM development. Microsoft is listening and going over ideas and approaches to ease the pain here but nothing to tell you from the trenches right now.
So what say you? Would you want a Developer Edition of SharePoint (maybe only WSS so no Excel/InfoPath/BDC services that MOSS offers) that you could install on XP/Vista to local development? Should the efforts be focused on making the Virtual Experience better? Or does none of this matter and all is rosy in the world when it comes to building SharePoint solutions?
Feel free to chime in here. Like I said, I'm not guarantying this is going to get back to Microsoft but some people read my blog (or so they tell me) so you never know.
 A co-worker turned me onto Project White, an automated UI testing framework by ThoughtWorks. This along the same lines as NUnitForms and other automated systems. It's basically Selenium for WinForms (which rocks in its own right) so I thought I would dig more into White (it has support for WPF as well, but I haven't tried that out yet). It was good timing as we've been talking and coming up with strategies for testing and UI testing is a big problem (and it is everywhere else based on people I've talked to).
The White library is nice and simple. All you really need to do is add in the Core.dll from White and your unit test framework and write some tests. I tested it with MbUnit but any framework seems to work. Ben Hall posted a blog entry about White along with some sample code. This, combined with the library got me started.
As Ben did, I created a simple application with a single form and started to write some tests. I couldn't use Ben's complete sample as it was written for VS2008 and I only had VS2005 for my testing. No problem. You can use White with VS2005, but you'll need the 3.0 framework installed.
I came across the intial problem with testing though. The first test that failed left the window up on the screen. This was an issue. I also wrote the same test Ben did, looking for a non-existant form, which appropriately threw a UIActionException. The test passed as it threw the exception I was looking for, but again the form was up on the screen. The Application.Kill() method wasn't being called if the test would fail or an exception was thrown. Ben's method was to put a call to Application.Kill in the [TearDown] method on the test fixture. This is great but I'm not a big fan of [SetUp] and [TearDown] methods. Another option was to surround each test with a try/catch/finally and in the finally code call out to the Application.Kill() method. This was ugly as I would have to do this on every test.
Following Ben's example I created a WhiteWrapper class which would handle the White library features for me. I made it implement IDisposable so I could do something like this:
  1 using(WhiteWrapper wrapper = new WhiteWrapper(_path))
  2 {
  3 	...
  4 }
  5
I also added a method to fetch me a control from the main window (using a Generic) so I could grab a control, execute a method on it (like .Click()) and check the result of another control (like a Label). Note that these are not WinForm controls but rather a White wrapper around them called UIItem. This provides general features for any control like a .Click method or a .Text property or items in a listbox.
Here's my WhiteWrapper code:
  1 class WhiteWrapper : IDisposable
  2 {
  3 	private readonly Application _host = null;
  4 	private readonly Window _mainWindow = null;
  5
  6 	public WhiteWrapper(string path)
  7 	{
  8 		_host = Application.Launch(path);
  9 	}
 10
 11 	public WhiteWrapper(string path, string mainWindowTitle) : this(path)
 12 	{
 13 		_mainWindow = GetWindow(mainWindowTitle);
 14 	}
 15
 16 	public void Dispose()
 17 	{
 18 		if(_host != null)
 19 			_host.Kill();
 20 	}
 21
 22 	public Window GetWindow(string title)
 23 	{
 24 		return _host.GetWindow(title, InitializeOption.NoCache);
 25 	}
 26
 27 	public TControl GetControl<TControl>(string controlName) where TControl : UIItem
 28 	{
 29 		return _mainWindow.Get<TControl>(controlName);
 30 	}
 31 }
 32
And here are the refactored tests to use the wrapper (implemented via a using statement which makes using the library fairly clean in my test code):
  1 public class Form1Test
  2 {
  3 	private readonly string _path = Path.Combine(Directory.GetCurrentDirectory(), "WhiteLibSpike.WinForm.exe");
  4
  5 	[Test]
  6 	public void ShouldDisplayMainForm()
  7 	{
  8 		using(WhiteWrapper wrapper = new WhiteWrapper(_path))
  9 		{
 10 			Window win = wrapper.GetWindow("Form1");
 11 			Assert.IsNotNull(win);
 12 			Assert.IsTrue(win.DisplayState == DisplayState.Restored);
 13 		}
 14 	}
 15
 16 	[Test]
 17 	public void ShouldDisplayCorrectTitleForMainForm()
 18 	{
 19 		using (WhiteWrapper wrapper = new WhiteWrapper(_path))
 20 		{
 21 			Window win = wrapper.GetWindow("Form1");
 22 			Assert.AreEqual("Form1", win.Title);
 23 		}
 24 	}
 25
 26 	[Test]
 27 	[ExpectedException(typeof(UIActionException))]
 28 	public void ShouldThrowExceptionIfInvalidFormCalled()
 29 	{
 30 		using (WhiteWrapper wrapper = new WhiteWrapper(_path))
 31 		{
 32 			wrapper.GetWindow("Form99");
 33 		}
 34 	}
 35
 36 	[Test]
 37 	public void ShouldUpdateLabelWhenButtonIsClicked()
 38 	{
 39 		using (WhiteWrapper wrapper = new WhiteWrapper(_path, "Form1"))
 40 		{
 41 			Label label = wrapper.GetControl<Label>("label1");
 42 			Button button = wrapper.GetControl<Button>("button1");
 43 			button.Click();
 44 			Assert.AreEqual("Hello World", label.Text);
 45 		}
 46 	}
 47
 48 	[Test]
 49 	public void ShouldContainListOfItemsInDropDownOnLoadOfForm()
 50 	{
 51 		using (WhiteWrapper wrapper = new WhiteWrapper(_path, "Form1"))
 52 		{
 53 			ListBox listbox = wrapper.GetControl<ListBox>("listBox1");
 54 			Assert.AreEqual(3, listbox.Items.Count);
 55 			Assert.AreEqual("Red", listbox.Items[0].Text);
 56 			Assert.AreEqual("Versus", listbox.Items[1].Text);
 57 			Assert.AreEqual("Blue", listbox.Items[2].Text);
 58 		}
 59 	}
 60 }
The advantage I found here was handling exceptions and unknown states. For example in the last test, ShouldUpdateLabelWhenButtonIsClicked I ran the test before I even had the controls on the form. The test failed but it didn't hang or crash the system. That's what the IDisposable gave me, a nice way to always clean up without having to remember to create a [TearDown] method.
One of the philosophical questions we have to ask here is when is this kind of testing appropriate? For example, if I have good presenters I can test these kind of things with mocked out views and presenter/model tests. So am I duplicating effort here by testing the UI directly? Should I get my QA people to write these kind of tests? There's a long discussion to have in your organization around this so it's not just a "tool problem". You need to dig deep into what you're testing and how. At some point, you begin to divorce yourself from behaviour driven development and you end up testing UI edge cases and integration from a UI perspective. If your UI doesn't line up with your domain, how do you reconcile this? There are probably more questions than answers for this type of thing and software design is more art than science. The answer "it depends" goes a long way, but don't try to solve your business or design problems with a tool. There is no silver bullet here, just a few goodies to help you along the way. It's you who needs to decide what's appropriate for the situation and how much time, money, and resources you're going to invest in something.
The library works pretty good and I'm happy with the test code so far. We'll have to see now how it deals with far more complex UIs (we have things like crazy 40-column grids with all kinds of functionality). Back later on how that goes. In the meantime, check out Project White here on CodePlex to help you with your automated UI testing.
Finished up at Winnipeg Code Camp today with a good turnout for my sessions. I was pretty happy as lots of people are interested in the topics I presented on (BDD and DDD) which is a good thing. The more the merrier.
Of course finding the location was a bit of a problem for me. I punched in Red River College into my Garmin GPS we got with the rental (thank god for technology) and it instructed that my destination was a mere 5 minutes away from the hotel. Sounded about right (I know I was close, wasn't sure how close). I got there and wandered around for a bit. It was a little off because the map on site didn't seem to resemble the school. I pulled it up on my BlackBerry and showed it to a few people, but nobody seemed to know what I was talking about (someone commented on the BlackBerry and it's ability to show JPG files from the web, but that was about it). Finally I tracked down a security guy who told me I was on the wrong campus and wanted the downtown campus. Silly rabbit. Should have read the GPS before clicking "Go".
It was a good day, the sessions went well and I think the Winnipeg guys did a bang up job on their first (and not last) code camp. I got to draw the lucky winner who walked away with a new XBox 360 Arcade so that made my day.
I'll post the code and resources for the two sessions later here on my blog (and I think the Code Camp guys are setting up a resource page that we'll add info to as well).
I also did a quick two-minute interview with D'Arcy before my sessions. Brad Pitt I am not, but you can watch the painful video below by clicking on the big giant arrow that looks like my head.
 I'm heading out tomorrow to the airport to spend the weekend in Winnipeg for the first annual Winnipeg Code Camp. I'm very honoured to be invited to speak there but there is that weather. Grant you, Calgary isn't all that great these days. We went through a spell where it was -50 C with the windchill factor (yeah, that's "5-0"). Checking the weather site for Winterpeg, tomorrow its currently minus 34 and the high tomorrow is minus 21. Oh well.
I'm doing two sessions, one on Behaviour Driven Development and getting the "test" word out of your vocabulary (as well as some tricks with turning executable specs into end-user documentation). The other session is on Domain Driven Design. We'll do a brief overview of what DDD is and cover the patterns usually associated with it. Then we'll dig into validation techniques and keeping your domain clean (including bubbling things up to the UI layer).
Should be fun and it's my first time in Winnipeg for any amount of time. Not sure with the weather what we'll be doing but Vista and Mommy are in tow and we'll see if we can paint the town red while we're there (do the drinking laws in Winnipeg preclude 9 month olds I wonder?). See you there!
 Dave Laribee and team have done an excellent job of getting the next Seattle ALT.NET open space conference up and going. I'm pleased to say registration is open up now (and will probably fill up by the time I finish writing this blog entry). So get going and register now!
We've made things hopefully easier by incorporating OpenID so all you need is an OpenID identity (I use myopenid.com and it's quite good but any old one will do, including Yahoo) with your name and email set up (other information is optional). Note: Please do not use openid.org as it doesn't seem to work. We're not sure why and even if the openid.org site is real or a phishing site, so stick with myopenid.com or other provider.
In addition to the OpenID integration, we've negotiated a discount for the hotel nearby so that'll be available to you. As always, the event is free but like I said, it's limited to 100 participants. First come, first served.
Get going and see you in Seattle!
I was bugging Scott Hanselman about his Ultimate Tools List on Friday. The guys at the office were talking and we thought it would be more valuable to find out not what Scott recommends, but what he's using (and how much). The last check he was trying to track some of it, but his latest results were "Visual Studio". Then I stumbled onto Wakoopa, which really looks interesting as you pull back the covers.
Wakoopa is yet-another-social-networking site but in disguise. Wakoopa tracks what kind of software or games you use, and lets you create your own software profile. It does this by having you run a small app in your tray and it tracks what you're running. Fairly simple concept. It's when you start logging your work and you see the results is where IMHO it kicks social networking up a notch.
Rather than me going onto say Facebook and setting up my profile with my interests, what games I play, etc. Wakoopa sort of does this for you. Then combined with the results of every one else on the site, shows you what's going on. I've been running it for a couple of hours, just ignoring that it's there. Then I went to my personal Wakoopa page and found a wealth of information, not only about me but well, everyone.
The main page contains a scrolling marquee of all the apps people are using. Of course, when you have information like this to mine you use it. So there's a list of the most used titles (including World of Warcraft in the top 10, figures) and some newcomers, popular titles that are just gaining momentum with enough people. Each title has it's own dedicated page with some stats and a brief description. I was intrigued by a title called Flock as I had never heard of it and it turned up on the most used page so here's it's page. In addition to the stats, there are user reviews and a list of who's using it.
It even creates a cloud tag on your personal profile page about "what you do". Here's mine:
The mouse cursor isn't present in my screen grab, but I was hovering over the "code" tag, indicating I had been using various tools relating to coding for 18 minutes and 4 seconds. The other tags are interesting. Obviously communicate relates to Outlook (which I generally have running all the time). Surf the web are my IE and Firefox windows and the screensaver kicked in so it tracked that (that feature should probably be turned off, as everyone will be doing this). The usage page lists what you're actively using, but since the little widget is running on your desktop it has access to everything so items you have running in the background are separated out and listed here too.
The "kick it up a notch" aspect to all this, is on your profile page where it suggest software you might like (based on your own usage and popular titles others are using) and goes so far as to list "people I might like". Of course I'm not going to go out and make friends with DynaCharge1033 just because they use Notepad++ too, but it's a nice feature.
All in all, Wakoopa is an interesting twist on what you do and providing the ability to share that information. Here's hoping to see this little community grow and expand and maybe provide services for others to hook into. Then we'll get into some serious cross-pollination of social aspects across multiple contexts, which is something I think the whole social networking scene might be missing.
I got an email from ScrumMaster Andrea about an update I should do to my Scrum Tools Roundup post. Andrea drew my attention to the Agilo for Scrum tool, an open source add-on for the Trac Project. The Trac project is a wiki/issue tracking system (written in Python, my #2 favourite language next to C# these days) which has been around for ages and quite successful in it's own right. Agilo for Scrum is an add-on that sits on top of Trac and provides features to support the Scrum process.
I tried Agilo out this morning with a few projects. I always keep some data in Excel of some past projects with things like user stories, releases, iteration lengths, tasks, etc. that can be plugged into some tool for testing. It's my reference data for doing evaluations of tools like this.
The tool looks great. It has all the basics you need in a tool to support your use of the Scrum process (daily stand-up, burndown charts, etc.). A nice feature is the ability to link items together. This also has the capability of copying information from parent to child. Being able to do this, you can create some useful relationships with tasks relating to features, features relating to iterations or sprints, and all of these rolling up to releases (or whatever way you want to organize your projects). A key thing missing from tracking tools is the ability to link these items together easily. This facilitates creating a dashboard view of the project so you know at a glance where things are. Not something easily accomplished with an Excel spreadsheet. An added bonus with Agilo for Scrum is the ability to navigate back and forth between the relationships. Neat.
Something that I've come to realize over the years, it's not the tool that fixes the problem. Taking a more lean approach to things, if you need a tool to fix some problem you have a real problem on your hands. For example if you *need* a tool to manage your Scrum process, it might be an indicator that your Scrum process is too complicated. While I'm happy to see all of these tools out there evolving (and more new ones popping up), I'm a strong advocate of "fix the problem" rather than "get a tool" mentality. YMMV.
One note I wanted to mention. Being a blogger you make posts of course (well, duh!). These are sometimes series, or popular individual posts but they come back. 6 or 12 months later that original post might need some update love. That's the cool thing is that you can go back, look at what you've done and apply some new knowledge to it creating something interesting for everyone out there. I have a large backlog in my blog queue of just posts I've written that need updating like this, this, and this. Nothing like keeping yourself busy with your own work eh?
Anywho, check out the Agilo for Scrum tool here if you have Trac and if you're looking for a good bug tracking tool, you can't go wrong with Trac so check it out here.
 My most favorite feature of VMware Workstation today. The ability to right-click on a .vmdk file (VMware virtual disk file) and create a mapping to the inside of the disk contents to a new drive letter in your system. Pure goodness for pulling out files from an image when the image might not boot or you don't want to start it up.
My least favorite feature of VMware Workstation today. Resizing a parent disk when you have linked clones causes all of the linked clones to be invalidated. I needed more space in my guest OS (apparently 8Gb just doesn't cut it anymore with VS2008 and Windows Server 2008) so I used the vmware-vdiskmanager.exe console tool to expand the disk. Then found out all my linked clones were now invalid. Guess how many VMs I'm recreating this weekend?
Sometimes I feel like a nut...
A new year, a new series as I get my WSS site online and finish up some crusty old 2007 SharePoint projects.
Dear Microsoft,
Why in the name of all that is holy did you make the Slide Library a MOSS only feature? I still fail to see what "enterprise features" a modified document library that has some extra functionality for slide shows needs from MOSS. Sigh.
P.S. Deleting all the content in a slide library when you deactivate the feature was a nice touch too, thanks for that.
 The RunAsRadio.com guys invited me to chat with them for a show yesterday about SharePoint. In it Richard Campbell, Greg Hughes, and I talk about SharePoint deployment, management, logging chains, tools, DotNetNuke, taxonomies, concealed lizards, information architecture, security, and spinning plates. All in 30 minutes.
Greg and I go way back in SharePoint history with our experience, struggling (and surviving) with the early incarnations (Microsoft's "digital dashboard" technology from 2000) and Richard continues to think of SharePoint deployments as a "virus" (we'll cut him some slack as he's Canadian and it's snowing in Vancouver).
It was a fun, relaxed show that's now online in all the flavours they usually offer (MP3, WMA, etc.) with full downloads or torrents (which is frickin' awesome if you ask me). You can check out RunAsRadio.com here and my show, show #43, here. I think it's awesome that we're talking about cool stuff one day and it gets published on the site the next. That's efficiency from the PWOP Productions team! PDF transcript should follow in a couple of weeks.
 A cohort turned my attention to something from Microsoft Research called "Pex: Dynamic Analysis and Test Generation for .NET".
I only took a quick glance at it (there doesn't seem to be any downloads available, just whitepapers and a screencast), but from what I see I already don’t like it.
First off, I have an issue with a statement almost right off the bat “By automatically generating unit tests, it helps to find bugs early”. First, I don’t believe “automatically generating unit tests” is of very much value. TDD (and more recently BDD) is about building a system that meets a business need with a solution and driving that solution out with executable specifications that can be understood by anyone. With the release of VS2005 Microsoft gave us “automatically generated unit tests” by pointing it at code and creating a bunch of crap tests that more or less really only tested the .NET framework (make sure string x is n long, lather, rinse, repeat). Also I'm not sure how automatically generating unit tests can find bugs early (which is what Pex claims). That seems to be a mystical conjuration I missed out on.
Pex claims to be taking test driven development to the next level. I don't think it even knows what level it itself is at yet.
Pex feels to me like it's trying to be like an automated FxCop (and we all know what that might be like). Looking at the walkthrough you still write a test (now called a "Parameterized Unit Test"). This smells to me like a RowTest in MbUnit terms but doesn't look like one and is used to generate more tests (it seems as partial classes to your own test class). Then you run Pex against it from inside the IDE. Here's where it gets a little fuzzy. Pex generates test cases and reports from them, with suggestions as to how to fix the failing code. For example in the walkthrough the test case suggestion is to validate the length of a string before trying to extract a substring. What is a little obscure is what exactly that suggested snippet is for, the test case or the code you're testing?
"High Code Coverage". The test cases generated by Pex "give high code coverage". Again a monkey's paw here. High code coverage means very little in the real world. Just because you have some automated "thing" hitting your code, doesn't mean it's right. Or that your code is really doing what you intended it to. I can have 100% code coverage on a lot of crap code and still have a buggy system. At best you'll catch stupid programmer errors like bounds checking and null object references. While this is a good thing, just writing a little code you can accomplish the same task a lot quicker than writing a specific unit test to generate other tests for you. Maybe it's grunt work and silly unit test code to write and maybe that's the benefit of Pex.
"Integrates with Unit Testing Frameworks". This is another red herring. What it really means is "Integrates with VSTS Unit Testing Framework". Nowhere in the documentation or site can I see it integration with MbUnit or NUnit. It does however mention it can run with MbUnit or NUnit so I assume something can be done here (maybe through template generation), but little substance is available right now.
Then there's the mock objects, [PexMock]. Again, no meat here as these are early looks but Pex supports mocking interfaces and virtual methods. Yes, in addition to building it's own NUnit clone (MSTest), NDoc clone (SandCastle), Castle.Windsor (DIAB), and NAnt (MSBuild), you can now get your very own Rhino clone in the form of PexMock! It looks a little more complex to setup and use than Rhino, but then who says Microsoft tools are simple. If it's simple to use, it can't be powerful can it?
I watched the screencast which walks through the chunker demo (apparently the only demo code they have as everything is based around it). It starts innocently enough with someone writing a test, decorated with the [PexTest] attribute. Once enough code is written to make it compile (red) you "Pex It" from the context menu. This generates some unit tests, somehow giving 73% coverage and failing (because at this point the Chunker class returns null). Pex suggests how to fix your business code along with suggestions for modifying the test.
From the error list you can jump to the generated test code (there's also an option to "Fix it" which we'll get to in a sec). The developer then implements the logic code to try to fix the test. By selecting the "Fix it" option, Pex finds the place where the null reference might occur (in the constructor) and injects code into your logic (by surrounding it with "// [Pex]" tags, ugh, horror flashbacks of Rational Rose come to my mind).
The problem with the tool is that generated tests come out like "DomainObjectValueTypeOperation_70306_211024_0_01" and "DomainObjectValueTypeOperation_70306_211024_0_02". One of the values of TDD and unit tests is for someone to look at a set of unit tests and know how the domain is supposed to behave. I know for example exactly what a spec or test called "Should_update_customer_balance_when_adding_a_new_item_to_an_existing_order" does. I don't have to crack open my Customer.cs, Order.cs and CustomerOrder.cs files to see what's going on. "CustomerStringInt32_1234_102965_0_01" means nothing to me. Okay, these are generated tests so why should I care?
This probably gets to the crux of what Pex is doing. It's generating tests for code coverage. Nothing more. I can't tell what my Pex system does from test names or maybe even looking at the tests themselves. Maybe there's an option in Pex to template the naming but even that's just going to make it a little more readable, but far from soluble to a new developer coming onto the project. Maybe I'm wrong, but if all Pex is doing is covering my butt for having bad developers, then I would rather train my developers better (like checking null references) than to have them rely on a tool to do their job for them.
A lot of smart dudes (much smarter than me) have worked on this and obviously Microsoft is putting a lot of effort into it. So who am I to say this is good, bad, or ugly. I suppose time will tell as it gets released and we see what we can really do with it. These are casual observations from a casual developer who really doesn't have any clout in the grand scheme of things. For me, I'm going to continue to write executable specs in a more readable BDD form that helps me understand the problems I'm trying to solve and not focus on how much code coverage I get from string checking, but YMMV.
 Plumbers @ Work is a podcast I do with NHibernate Mafia leader James Kovacs and John "The Pimp" Bristowe, Microsoft Canada Developer Advisor and 5 time winner of the Buckeye Newshawk award (hey, I need a nickname!). We blabber about goings on in the .NET community and whatever else is out there to complain about.
We're back after a 6 month European tour with the Spice Girls with our new lean, mean ready-in-30-minutes format for you to iPod to your hearts content. In our latest episode we stumble over:
You can download the podcast directly here in MP3 format or visit our site here. We're aiming to produce the 30 minute version of our show every 2 weeks now. Come back later to see how that goes...
For the longest time, I've been using NCover for coverage. It was free, gave good results and with NCoverExplorer and CI integration it was the perfect tool. Easy to use, easy to setup, and worth the typical hassle of new tools (setup, learning, configuration, etc.)
NCover has since gone commercial and the old versions won't run properly against 3.0/3.5 code. I'm ditching NCover support in TreeSurgeon because of this. TS nees to be friction free and something anyone can just grab and run and not have to deal with buying or obtaining licenses for products the generated code depends on. I looked at Clover.NET as an alternative (last time I checked it was free?) but it's $600 just for an "academic" version.
So what's with coverage and .NET these days? Are these the only options? Have all the open source/free tools gone the way of the Dodo for coverage and .NET 3.0 projects? My quick Google checks this freezing morning (it was minus 38 as I drove in this morning, that's -36 in Fahrenheit kids) don't show anything.
To be friction-free a code coverage tool needs to be:
Nice to haves:
Looking for some feedback on your experience here. Thanks!
 This morning I stumbled across a project on SourceForge named Micropolis. Of course this got my attention and after realizing there was nothing there (no code, no web pages, nothing) I fired a note off to Don to see what was up? I knew his distaste of SourceForge and there was talk of setting up a Google code repository. Don visited the SourceForge site and left a nice happy-happy-joy-joy note for the to-be-named-at-a-later-date owner:
Would the person who started this Micropolis project on sourceforge please identify themselves and contact me?
I'm Don Hopkins, dhopkins@DonHopkins.com, who developed SimCity for Unix and Micropolis for the OLPC.
I did not start this sourceforge project myself, and I don't know who did.
This is not the official Micropolis project repository.I strongly want to avoid using sourceforge for hosting the Micropolis project, because I dislike sourceforge's baroque user interface and slow response time, and I absolutely do not want to use CVS.
Sourceforge requires far too many clicks and waits to simply download a file, and it takes far too long for all the heavy weight ads and pointlessly complex php, html and javascript pages to load.
There is never any reason for a web site to say "please wait for a while until your download begins, and if eventually nothing ever happens, then click this link just in case." I usually end up downloading two copies because it takes so long for the delayed download to start that I click the emergency link, and eventually a while later the other "automatic" one starts as well.I can't understand why web sites like sourceforge use this flakey "please wait" user interface for downloading, instead of simply presenting a link that you can click to download instantly. Sourceforge's bizarre approach to making what should be a simple download be so annoying and "automatic" never saves any time. The computer should never ask the user to "please wait for a while until your download begins" for no good reason, and it's ridiculous to have a javascript count down timer in the loop just to slow everything down, with no way to cancel it if you click the emergency download link. That is one of the most annoying things about sourceforge! My impression is that showing lots of ads is more important to Sourceforge than making it easy for developers to host and download code.
I would much rather use google code to host the project in subversion, so I have set up the official Micropolis project there:
http://code.google.com/p/micropolis/-Don Hopkins
I didn't have heart to tell Don that SF does support Subversion, the owner of the Micropolis project there just didn't set it up that way. However I agree with him on all other points. Too many clicks to get simple stuff. CodePlex suffers from this as well. You have to click and accept a license agreement for *every download* you make. Overkill IMHO.
In any case, there it is. The new "official" Micropolis code repository up on Google code, where it should be. This latest version includes changes to the initial release in the C++/Python project to enable callbacks into the Python code. This will enable the UI to respond to the engine rather than the other way around. My next blog post covers using this in extensive detail which should be done sometime this weekend.
Have fun!

Here's a twist on that old adage that the machines are taking over the world.
In a freaky SkyNet like fashion, I *discovered* that my XBox 360 is blogging. You heard me right. My game console is blogging, and it's not me writing the blog.
Here's my XBox 360's blog in all it's glory.
I did not sign up or create this (at least I don't remember doing it). I simply turn my machine on from time to time and get my butt kicked by 15 year old pre-pubescent's who simply rock at Gears of War.
Somehow, somewhere, for some reason my game console just started blogging one day. And it does it every day.
Some of the oddly weirder moments in my Xbox 360's posts:
And:
And:
What worries me now is the Wii and PlayStation 3. With the XBox (well, he's been blogging for a good year or so now) what are *they* going to do?
Bil needs to take a drink and lie down now...
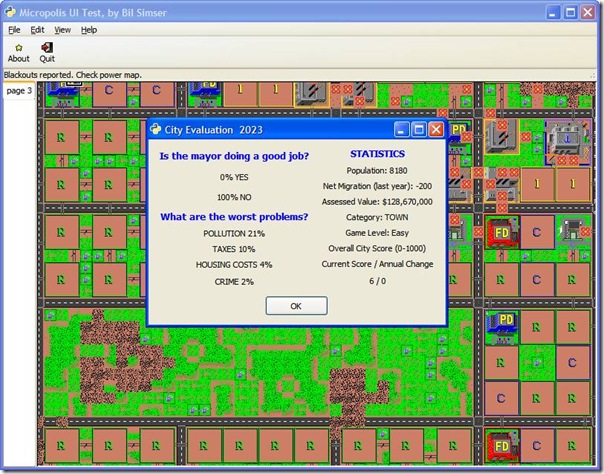
As you can tell, I really suck at running a city. By the year 2023 nobody likes me, power blackouts are everywhere and pollution has consumed the city creating a race of carbon dioxide breathing mutants. The UI is Python using Glade.
Yes, the numbers are real and being fed from the Micropolis game engine.
No, source is not available yet as we're still working building it out (and making it pretty, oh so pretty).
 Title says all. We're pleased to announce the 2nd major ALT.NET Open Spaces conference. This time we're in Redmond at the DigiPen Institute of Technology. It's a 5 minute drive from the Microsoft Campus and we're looking to have some softies come down for the fun.
We start up April 18th (Friday) with the similar Open Spaces approach that was quite successful in Austin, getting together a list of topics to discuss and hammer out over the weekend. The 19th is for sessions, informal talks and whatever code mashups may come out of it. Finally we wind down on Sunday with maybe a closing session or discussion.
We've bumped up the number of first-come, first-served attendees from 120 to 150 this time. When registration opens up (sometime in early February) you'll have a chance at grabbing one of the 150 spots. Just get your name on the list. That's all. No mess. No fuss. And best of all, no cost!
Yes, the event is free again (you'll have to provide your way to the conference and any hotel bills you might incur along the way, whether it be by plane, train, or automobile).
The main website is up and running here. It's very minimalistic and not much to see there right now. Of course, that will change...
So mark it in your calendars, get your traveling boots on, and make your way to Washington in April. It'll be a blast and you know it.

As I spend more time with the SimCity Micropolis source code I'm digging the Python interface, trying to get used to Glade and GTK all over again (I haven't used it for years) and trying to build something useful from the excellent core C++ engine that Don Hopkins has provided us.
Out of this passion I'm starting to build several posts around exploring the code. So here's the plan for the series with links to the various entries I'll complete over the next while.

Now you've got a runtime distribution running of the Micropolis demo. Doesn't do much does it? Sure you can spin around and navigate throughout the city. Perhaps you've changed the name of the city to load and checked out the other layouts. Otherwise, it's pretty bland and boring. Let's spend a little time building a new Python script to exercise two parts of the engine, terraforming and file access.
Catching Up
First let's catch up on what we need to get going here. To compile, please read Part I to get the required software installed and the C++ code compiled on Windows. Once you've done that, check out Part II where we get the additional files needed for runtime and launching the Python code. You can grab a binary release of the files if you don't want to build your own from here (note: You'll still need to install Python and the extensions listed in Part II to run the simulator).
Codebase Reflections
Just a side note about the codebase that I wanted to point out in order to try to clear up some confusion. The micropolis-activity-source package is the TCL/Tk version for x86 Linux (there's also a compiled version available here). This is the updated X11 version Don wrote and ported to use TCL/Tk for it's windowing system. This comes in C source form and can be compiled (with TCL/Tk) on a Linux system.
The C source was then cleaned up and "ported" to non-managed C++ and reborn into the MicropolisCore package, the focus of this series of blog entries. The code can be compiled on Linux but there's also Visual Studio 2005 project files for building on Windows. This version is ported from the original C code into a C++ class called Micropolis. That class is then processed by SWIG (as part of the Visual Studio compile) to generate export libraries and wrappers so the routines can be called by Python.
The "new" C++ code isn't complete but it is arguably better than the C code. The Micropolis project is fully devoid of any UI or Windowing libraries of any kind. At some point that means we can make the Micropolis project testable with unit tests (yeah, that'll come later). However it also means the new project is not just something you can plug in and run Micropolis as a full game on Windows. The TCL/Tk version is fully functional, this project isn't (yet). There are stubs for the calls and when you dig into the code you'll find that none of the routines that display screens or allow you to place tiles works yet. This is all coming so we'll grow into it.
Why Python? In lieu of TCL/Tk it's a godsend. At least it's a real object oriented language (even if it is a scripting language) and using SWIG allows you to expose C or C++ methods and classes to Python, which is what we're working with here. So why not take the original C code and run SWIG against it? Because the code is tied to the GUI toolkit and trying to get all that running on Windows is an exercise left for the bored. Sure, the Micropolis-mega class isn't the way I would have done it but the code is out there and able for blokes like me to break apart and make it, let's say, more testable and extensible. Stay tuned on that front.
More Tools
Yes, even more tools and downloads are needed. As we're going to be working (mostly) in Python we need a half decent editor. Notepad++ is fine for editing files, but you want some kind of debugging capabilities and perhaps some syntax checking or intellisense. I have a low tolerance for patience when it comes to tools. If I can't get something to work or figure out a tool within a few minutes I move on. It might be cruel but software has to be intuitive and make sense, just like a codebase. You should be able to work your way around a good codebase or a new tool without scratching your head saying "Huh?".
After combing the net I found a few reviews of Python IDEs. The pickings are not great but I settled on taking a look at Komodo, Wing IDE, and PyScripter.
Komodo was a bit of a mess. There was a free editor-only version which I tried, but gave up instantly with it. I switched gears to the professional version which I thought would help but it's like a bad episode of Hell's Kitchen. It bears no resemblance to any IDE I've worked with. Creating a "project" led to some folder that linked into the file system and there was no way to organize files (that I could see anyways). In the end, it seemed like nothing but bloatware so I gave up on that tool quick.
Wing IDE from Wingware is a pretty sophisticated set of tools and generally looks nice and performs well. If you're looking to do some serious Python work I highly recommend it. It has all the features you would want in an IDE and doesn't suffer from a confusing UI or bloated load times like Komodo was.
PyScripter was small but powerful and overall very nice. Both a project (file) explorer and a class explorer which was handy. Uncluttered interface and even detected when a new version was available (complete with a quick download, shutdown and restart) however it lacked any intellisense and would only launch the app the first time. First time it worked like a charm, any subsequent launch would produce an error that it couldn't find the gdk library (even though it launched fine the first time). Restart the app and it can launch it without error.
In the end I settled on the free version of Wing IDE (Wing IDE 101). First, it was free and that's a good thing. I don't do enough Python development to warrant the $129 price tag. There's a personal version for $30 but it doesn't give you much over the free editor version, so that's what I'm using. It has syntax highlighting and formatting (a must), can launch and debug a Python script, and even has intellisense. Unfortunately the class browser doesn't come with the free or even personal versions and I'm not that dedicated to the language to shell out for the professional version (not to mention the fact that I'm a cheap bastard) so it's the free version for us.
Whatever tool you use, launch it and let's go about cleaning up the initial script.
Starting Clean
We want to clean up the Python code a little and focus on the changes we'll make for this exercise. We'll build a new Python file (exercise-1.py) for this. Mainly we're just making things a little easier to maintain and read. In the code we mimic what the micropoliswindow.py file does (just with a few less lines). Now we're ready for our modifications.
Terraforming
Terraforming is the process where the game engine creates a new blank landscape. It's called when you start a new blank city. We'll do this in the startup of our engine by calling the GenerateNewCity function. Here's the original Python code called to start the Micropolis engine:
1: def createEngine(self):
<pre style="padding-right: 0px; padding-left: 0px; font-size: 8pt; padding-bottom: 0px; margin: 0em; overflow: visible; width: 100%; color: black; border-top-style: none; line-height: 12pt; padding-top: 0px; font-family: consolas, 'Courier New', courier, monospace; border-right-style: none; border-left-style: none; background-color: #f4f4f4; border-bottom-style: none"><span style="color: #606060"> 2:</span>  </pre>
<pre style="padding-right: 0px; padding-left: 0px; font-size: 8pt; padding-bottom: 0px; margin: 0em; overflow: visible; width: 100%; color: black; border-top-style: none; line-height: 12pt; padding-top: 0px; font-family: consolas, 'Courier New', courier, monospace; border-right-style: none; border-left-style: none; background-color: white; border-bottom-style: none"><span style="color: #606060"> 3:</span> engine = micropolis.Micropolis()</pre>
<pre style="padding-right: 0px; padding-left: 0px; font-size: 8pt; padding-bottom: 0px; margin: 0em; overflow: visible; width: 100%; color: black; border-top-style: none; line-height: 12pt; padding-top: 0px; font-family: consolas, 'Courier New', courier, monospace; border-right-style: none; border-left-style: none; background-color: #f4f4f4; border-bottom-style: none"><span style="color: #606060"> 4:</span> self.engine = engine</pre>
<pre style="padding-right: 0px; padding-left: 0px; font-size: 8pt; padding-bottom: 0px; margin: 0em; overflow: visible; width: 100%; color: black; border-top-style: none; line-height: 12pt; padding-top: 0px; font-family: consolas, 'Courier New', courier, monospace; border-right-style: none; border-left-style: none; background-color: white; border-bottom-style: none"><span style="color: #606060"> 5:</span> print <span style="color: #006080">"Created Micropolis simulator engine:"</span>, engine</pre>
<pre style="padding-right: 0px; padding-left: 0px; font-size: 8pt; padding-bottom: 0px; margin: 0em; overflow: visible; width: 100%; color: black; border-top-style: none; line-height: 12pt; padding-top: 0px; font-family: consolas, 'Courier New', courier, monospace; border-right-style: none; border-left-style: none; background-color: #f4f4f4; border-bottom-style: none"><span style="color: #606060"> 6:</span>  </pre>
<pre style="padding-right: 0px; padding-left: 0px; font-size: 8pt; padding-bottom: 0px; margin: 0em; overflow: visible; width: 100%; color: black; border-top-style: none; line-height: 12pt; padding-top: 0px; font-family: consolas, 'Courier New', courier, monospace; border-right-style: none; border-left-style: none; background-color: white; border-bottom-style: none"><span style="color: #606060"> 7:</span> engine.ResourceDir = <span style="color: #006080">'res'</span></pre>
<pre style="padding-right: 0px; padding-left: 0px; font-size: 8pt; padding-bottom: 0px; margin: 0em; overflow: visible; width: 100%; color: black; border-top-style: none; line-height: 12pt; padding-top: 0px; font-family: consolas, 'Courier New', courier, monospace; border-right-style: none; border-left-style: none; background-color: #f4f4f4; border-bottom-style: none"><span style="color: #606060"> 8:</span> engine.InitGame()</pre>
<pre style="padding-right: 0px; padding-left: 0px; font-size: 8pt; padding-bottom: 0px; margin: 0em; overflow: visible; width: 100%; color: black; border-top-style: none; line-height: 12pt; padding-top: 0px; font-family: consolas, 'Courier New', courier, monospace; border-right-style: none; border-left-style: none; background-color: white; border-bottom-style: none"><span style="color: #606060"> 9:</span>  </pre>
<pre style="padding-right: 0px; padding-left: 0px; font-size: 8pt; padding-bottom: 0px; margin: 0em; overflow: visible; width: 100%; color: black; border-top-style: none; line-height: 12pt; padding-top: 0px; font-family: consolas, 'Courier New', courier, monospace; border-right-style: none; border-left-style: none; background-color: #f4f4f4; border-bottom-style: none"><span style="color: #606060"> 10:</span> # Load a city file.</pre>
<pre style="padding-right: 0px; padding-left: 0px; font-size: 8pt; padding-bottom: 0px; margin: 0em; overflow: visible; width: 100%; color: black; border-top-style: none; line-height: 12pt; padding-top: 0px; font-family: consolas, 'Courier New', courier, monospace; border-right-style: none; border-left-style: none; background-color: white; border-bottom-style: none"><span style="color: #606060"> 11:</span> cityFileName = <span style="color: #006080">'cities/deadwood.cty'</span></pre>
<pre style="padding-right: 0px; padding-left: 0px; font-size: 8pt; padding-bottom: 0px; margin: 0em; overflow: visible; width: 100%; color: black; border-top-style: none; line-height: 12pt; padding-top: 0px; font-family: consolas, 'Courier New', courier, monospace; border-right-style: none; border-left-style: none; background-color: #f4f4f4; border-bottom-style: none"><span style="color: #606060"> 12:</span> print <span style="color: #006080">"Loading city file:"</span>, cityFileName</pre>
<pre style="padding-right: 0px; padding-left: 0px; font-size: 8pt; padding-bottom: 0px; margin: 0em; overflow: visible; width: 100%; color: black; border-top-style: none; line-height: 12pt; padding-top: 0px; font-family: consolas, 'Courier New', courier, monospace; border-right-style: none; border-left-style: none; background-color: white; border-bottom-style: none"><span style="color: #606060"> 13:</span> engine.loadFile(cityFileName)</pre>
<pre style="padding-right: 0px; padding-left: 0px; font-size: 8pt; padding-bottom: 0px; margin: 0em; overflow: visible; width: 100%; color: black; border-top-style: none; line-height: 12pt; padding-top: 0px; font-family: consolas, 'Courier New', courier, monospace; border-right-style: none; border-left-style: none; background-color: #f4f4f4; border-bottom-style: none"><span style="color: #606060"> 14:</span>  </pre>
<pre style="padding-right: 0px; padding-left: 0px; font-size: 8pt; padding-bottom: 0px; margin: 0em; overflow: visible; width: 100%; color: black; border-top-style: none; line-height: 12pt; padding-top: 0px; font-family: consolas, 'Courier New', courier, monospace; border-right-style: none; border-left-style: none; background-color: white; border-bottom-style: none"><span style="color: #606060"> 15:</span> # Initialize the simulator engine.</pre>
<pre style="padding-right: 0px; padding-left: 0px; font-size: 8pt; padding-bottom: 0px; margin: 0em; overflow: visible; width: 100%; color: black; border-top-style: none; line-height: 12pt; padding-top: 0px; font-family: consolas, 'Courier New', courier, monospace; border-right-style: none; border-left-style: none; background-color: #f4f4f4; border-bottom-style: none"><span style="color: #606060"> 16:</span>  </pre>
<pre style="padding-right: 0px; padding-left: 0px; font-size: 8pt; padding-bottom: 0px; margin: 0em; overflow: visible; width: 100%; color: black; border-top-style: none; line-height: 12pt; padding-top: 0px; font-family: consolas, 'Courier New', courier, monospace; border-right-style: none; border-left-style: none; background-color: white; border-bottom-style: none"><span style="color: #606060"> 17:</span> engine.Resume()</pre>
<pre style="padding-right: 0px; padding-left: 0px; font-size: 8pt; padding-bottom: 0px; margin: 0em; overflow: visible; width: 100%; color: black; border-top-style: none; line-height: 12pt; padding-top: 0px; font-family: consolas, 'Courier New', courier, monospace; border-right-style: none; border-left-style: none; background-color: #f4f4f4; border-bottom-style: none"><span style="color: #606060"> 18:</span> engine.setSpeed(2)</pre>
<pre style="padding-right: 0px; padding-left: 0px; font-size: 8pt; padding-bottom: 0px; margin: 0em; overflow: visible; width: 100%; color: black; border-top-style: none; line-height: 12pt; padding-top: 0px; font-family: consolas, 'Courier New', courier, monospace; border-right-style: none; border-left-style: none; background-color: white; border-bottom-style: none"><span style="color: #606060"> 19:</span> engine.setSkips(100)</pre>
<pre style="padding-right: 0px; padding-left: 0px; font-size: 8pt; padding-bottom: 0px; margin: 0em; overflow: visible; width: 100%; color: black; border-top-style: none; line-height: 12pt; padding-top: 0px; font-family: consolas, 'Courier New', courier, monospace; border-right-style: none; border-left-style: none; background-color: #f4f4f4; border-bottom-style: none"><span style="color: #606060"> 20:</span> engine.SetFunds(1000000000)</pre>
<pre style="padding-right: 0px; padding-left: 0px; font-size: 8pt; padding-bottom: 0px; margin: 0em; overflow: visible; width: 100%; color: black; border-top-style: none; line-height: 12pt; padding-top: 0px; font-family: consolas, 'Courier New', courier, monospace; border-right-style: none; border-left-style: none; background-color: white; border-bottom-style: none"><span style="color: #606060"> 21:</span> engine.autoGo = 0</pre>
<pre style="padding-right: 0px; padding-left: 0px; font-size: 8pt; padding-bottom: 0px; margin: 0em; overflow: visible; width: 100%; color: black; border-top-style: none; line-height: 12pt; padding-top: 0px; font-family: consolas, 'Courier New', courier, monospace; border-right-style: none; border-left-style: none; background-color: #f4f4f4; border-bottom-style: none"><span style="color: #606060"> 22:</span> engine.CityTax = 9</pre>
<pre style="padding-right: 0px; padding-left: 0px; font-size: 8pt; padding-bottom: 0px; margin: 0em; overflow: visible; width: 100%; color: black; border-top-style: none; line-height: 12pt; padding-top: 0px; font-family: consolas, 'Courier New', courier, monospace; border-right-style: none; border-left-style: none; background-color: white; border-bottom-style: none"><span style="color: #606060"> 23:</span>  </pre>
<pre style="padding-right: 0px; padding-left: 0px; font-size: 8pt; padding-bottom: 0px; margin: 0em; overflow: visible; width: 100%; color: black; border-top-style: none; line-height: 12pt; padding-top: 0px; font-family: consolas, 'Courier New', courier, monospace; border-right-style: none; border-left-style: none; background-color: #f4f4f4; border-bottom-style: none"><span style="color: #606060"> 24:</span> tilewindow.TileDrawingArea.createEngine(self)</pre>
It loads the deadwood.cty file from the cities folder using the loadFile method of the engin. Here's the changes we'll make to generate the blank landscape:
1: def createEngine(self):
<pre style="padding-right: 0px; padding-left: 0px; font-size: 8pt; padding-bottom: 0px; margin: 0em; overflow: visible; width: 100%; color: black; border-top-style: none; line-height: 12pt; padding-top: 0px; font-family: consolas, 'Courier New', courier, monospace; border-right-style: none; border-left-style: none; background-color: #f4f4f4; border-bottom-style: none"><span style="color: #606060"> 2:</span>  </pre>
<pre style="padding-right: 0px; padding-left: 0px; font-size: 8pt; padding-bottom: 0px; margin: 0em; overflow: visible; width: 100%; color: black; border-top-style: none; line-height: 12pt; padding-top: 0px; font-family: consolas, 'Courier New', courier, monospace; border-right-style: none; border-left-style: none; background-color: white; border-bottom-style: none"><span style="color: #606060"> 3:</span> engine = micropolis.Micropolis()</pre>
<pre style="padding-right: 0px; padding-left: 0px; font-size: 8pt; padding-bottom: 0px; margin: 0em; overflow: visible; width: 100%; color: black; border-top-style: none; line-height: 12pt; padding-top: 0px; font-family: consolas, 'Courier New', courier, monospace; border-right-style: none; border-left-style: none; background-color: #f4f4f4; border-bottom-style: none"><span style="color: #606060"> 4:</span> self.engine = engine</pre>
<pre style="padding-right: 0px; padding-left: 0px; font-size: 8pt; padding-bottom: 0px; margin: 0em; overflow: visible; width: 100%; color: black; border-top-style: none; line-height: 12pt; padding-top: 0px; font-family: consolas, 'Courier New', courier, monospace; border-right-style: none; border-left-style: none; background-color: white; border-bottom-style: none"><span style="color: #606060"> 5:</span>  </pre>
<pre style="padding-right: 0px; padding-left: 0px; font-size: 8pt; padding-bottom: 0px; margin: 0em; overflow: visible; width: 100%; color: black; border-top-style: none; line-height: 12pt; padding-top: 0px; font-family: consolas, 'Courier New', courier, monospace; border-right-style: none; border-left-style: none; background-color: #f4f4f4; border-bottom-style: none"><span style="color: #606060"> 6:</span> engine.ResourceDir = <span style="color: #008000">'res'</span></pre>
<pre style="padding-right: 0px; padding-left: 0px; font-size: 8pt; padding-bottom: 0px; margin: 0em; overflow: visible; width: 100%; color: black; border-top-style: none; line-height: 12pt; padding-top: 0px; font-family: consolas, 'Courier New', courier, monospace; border-right-style: none; border-left-style: none; background-color: white; border-bottom-style: none"><span style="color: #606060"> 7:</span> engine.InitGame()</pre>
<pre style="padding-right: 0px; padding-left: 0px; font-size: 8pt; padding-bottom: 0px; margin: 0em; overflow: visible; width: 100%; color: black; border-top-style: none; line-height: 12pt; padding-top: 0px; font-family: consolas, 'Courier New', courier, monospace; border-right-style: none; border-left-style: none; background-color: #f4f4f4; border-bottom-style: none"><span style="color: #606060"> 8:</span> engine.GenerateNewCity()</pre>
<pre style="padding-right: 0px; padding-left: 0px; font-size: 8pt; padding-bottom: 0px; margin: 0em; overflow: visible; width: 100%; color: black; border-top-style: none; line-height: 12pt; padding-top: 0px; font-family: consolas, 'Courier New', courier, monospace; border-right-style: none; border-left-style: none; background-color: white; border-bottom-style: none"><span style="color: #606060"> 9:</span> </pre>
<pre style="padding-right: 0px; padding-left: 0px; font-size: 8pt; padding-bottom: 0px; margin: 0em; overflow: visible; width: 100%; color: black; border-top-style: none; line-height: 12pt; padding-top: 0px; font-family: consolas, 'Courier New', courier, monospace; border-right-style: none; border-left-style: none; background-color: #f4f4f4; border-bottom-style: none"><span style="color: #606060"> 10:</span> engine.<span style="color: #0000ff">Resume</span>()</pre>
<pre style="padding-right: 0px; padding-left: 0px; font-size: 8pt; padding-bottom: 0px; margin: 0em; overflow: visible; width: 100%; color: black; border-top-style: none; line-height: 12pt; padding-top: 0px; font-family: consolas, 'Courier New', courier, monospace; border-right-style: none; border-left-style: none; background-color: white; border-bottom-style: none"><span style="color: #606060"> 11:</span> engine.setSpeed(1) </pre>
<pre style="padding-right: 0px; padding-left: 0px; font-size: 8pt; padding-bottom: 0px; margin: 0em; overflow: visible; width: 100%; color: black; border-top-style: none; line-height: 12pt; padding-top: 0px; font-family: consolas, 'Courier New', courier, monospace; border-right-style: none; border-left-style: none; background-color: #f4f4f4; border-bottom-style: none"><span style="color: #606060"> 12:</span> engine.SetFunds(1000000000)</pre>
<pre style="padding-right: 0px; padding-left: 0px; font-size: 8pt; padding-bottom: 0px; margin: 0em; overflow: visible; width: 100%; color: black; border-top-style: none; line-height: 12pt; padding-top: 0px; font-family: consolas, 'Courier New', courier, monospace; border-right-style: none; border-left-style: none; background-color: white; border-bottom-style: none"><span style="color: #606060"> 13:</span> engine.autoGo = 0</pre>
<pre style="padding-right: 0px; padding-left: 0px; font-size: 8pt; padding-bottom: 0px; margin: 0em; overflow: visible; width: 100%; color: black; border-top-style: none; line-height: 12pt; padding-top: 0px; font-family: consolas, 'Courier New', courier, monospace; border-right-style: none; border-left-style: none; background-color: #f4f4f4; border-bottom-style: none"><span style="color: #606060"> 14:</span> engine.CityTax = 9</pre>
<pre style="padding-right: 0px; padding-left: 0px; font-size: 8pt; padding-bottom: 0px; margin: 0em; overflow: visible; width: 100%; color: black; border-top-style: none; line-height: 12pt; padding-top: 0px; font-family: consolas, 'Courier New', courier, monospace; border-right-style: none; border-left-style: none; background-color: white; border-bottom-style: none"><span style="color: #606060"> 15:</span> </pre>
<pre style="padding-right: 0px; padding-left: 0px; font-size: 8pt; padding-bottom: 0px; margin: 0em; overflow: visible; width: 100%; color: black; border-top-style: none; line-height: 12pt; padding-top: 0px; font-family: consolas, 'Courier New', courier, monospace; border-right-style: none; border-left-style: none; background-color: #f4f4f4; border-bottom-style: none"><span style="color: #606060"> 16:</span> tilewindow.TileDrawingArea.createEngine(self)</pre>
Rather than calling engine.loadFile, we'll call engine.GenerateNewCity. This is found in generate.cpp in the Micropolis project and exposed to us via SWIG (from the _micropolis.pyd file generated by the Visual Studio project). Launch the app ("Python.exe -i exercise-1.py" or from your IDE) and you'll get something like this:
Here's the source file exercise-1.py so far. Now that we have a new, blank city to work with we can make it more interactive. First, let's create a popup menu and add it it our window. Start by adding a call to a method we'll create called createPopupMenu by modifying the constructor of the MicropolisDrawingArea class:
1: self.engine = engine
<pre style="padding-right: 0px; padding-left: 0px; font-size: 8pt; padding-bottom: 0px; margin: 0em; overflow: visible; width: 100%; color: black; border-top-style: none; line-height: 12pt; padding-top: 0px; font-family: consolas, 'Courier New', courier, monospace; border-right-style: none; border-left-style: none; background-color: #f4f4f4; border-bottom-style: none"><span style="color: #606060"> 2:</span> self.createPopupMenu()</pre>
<pre style="padding-right: 0px; padding-left: 0px; font-size: 8pt; padding-bottom: 0px; margin: 0em; overflow: visible; width: 100%; color: black; border-top-style: none; line-height: 12pt; padding-top: 0px; font-family: consolas, 'Courier New', courier, monospace; border-right-style: none; border-left-style: none; background-color: white; border-bottom-style: none"><span style="color: #606060"> 3:</span> tilewindow.TileDrawingArea.__init__(self, **args)</pre>
1: def createPopupMenu(self):
<pre style="padding-right: 0px; padding-left: 0px; font-size: 8pt; padding-bottom: 0px; margin: 0em; overflow: visible; width: 100%; color: black; border-top-style: none; line-height: 12pt; padding-top: 0px; font-family: consolas, 'Courier New', courier, monospace; border-right-style: none; border-left-style: none; background-color: #f4f4f4; border-bottom-style: none"><span style="color: #606060"> 2:</span> </pre>
<pre style="padding-right: 0px; padding-left: 0px; font-size: 8pt; padding-bottom: 0px; margin: 0em; overflow: visible; width: 100%; color: black; border-top-style: none; line-height: 12pt; padding-top: 0px; font-family: consolas, 'Courier New', courier, monospace; border-right-style: none; border-left-style: none; background-color: white; border-bottom-style: none"><span style="color: #606060"> 3:</span> # main popup menu</pre>
<pre style="padding-right: 0px; padding-left: 0px; font-size: 8pt; padding-bottom: 0px; margin: 0em; overflow: visible; width: 100%; color: black; border-top-style: none; line-height: 12pt; padding-top: 0px; font-family: consolas, 'Courier New', courier, monospace; border-right-style: none; border-left-style: none; background-color: #f4f4f4; border-bottom-style: none"><span style="color: #606060"> 4:</span> self.popup = gtk.Menu()</pre>
<pre style="padding-right: 0px; padding-left: 0px; font-size: 8pt; padding-bottom: 0px; margin: 0em; overflow: visible; width: 100%; color: black; border-top-style: none; line-height: 12pt; padding-top: 0px; font-family: consolas, 'Courier New', courier, monospace; border-right-style: none; border-left-style: none; background-color: white; border-bottom-style: none"><span style="color: #606060"> 5:</span>  </pre>
<pre style="padding-right: 0px; padding-left: 0px; font-size: 8pt; padding-bottom: 0px; margin: 0em; overflow: visible; width: 100%; color: black; border-top-style: none; line-height: 12pt; padding-top: 0px; font-family: consolas, 'Courier New', courier, monospace; border-right-style: none; border-left-style: none; background-color: #f4f4f4; border-bottom-style: none"><span style="color: #606060"> 6:</span> # file/system menu</pre>
<pre style="padding-right: 0px; padding-left: 0px; font-size: 8pt; padding-bottom: 0px; margin: 0em; overflow: visible; width: 100%; color: black; border-top-style: none; line-height: 12pt; padding-top: 0px; font-family: consolas, 'Courier New', courier, monospace; border-right-style: none; border-left-style: none; background-color: white; border-bottom-style: none"><span style="color: #606060"> 7:</span> menu = gtk.MenuItem(<span style="color: #006080">"File"</span>)</pre>
<pre style="padding-right: 0px; padding-left: 0px; font-size: 8pt; padding-bottom: 0px; margin: 0em; overflow: visible; width: 100%; color: black; border-top-style: none; line-height: 12pt; padding-top: 0px; font-family: consolas, 'Courier New', courier, monospace; border-right-style: none; border-left-style: none; background-color: #f4f4f4; border-bottom-style: none"><span style="color: #606060"> 8:</span> childMenu = gtk.Menu()</pre>
<pre style="padding-right: 0px; padding-left: 0px; font-size: 8pt; padding-bottom: 0px; margin: 0em; overflow: visible; width: 100%; color: black; border-top-style: none; line-height: 12pt; padding-top: 0px; font-family: consolas, 'Courier New', courier, monospace; border-right-style: none; border-left-style: none; background-color: white; border-bottom-style: none"><span style="color: #606060"> 9:</span>  </pre>
<pre style="padding-right: 0px; padding-left: 0px; font-size: 8pt; padding-bottom: 0px; margin: 0em; overflow: visible; width: 100%; color: black; border-top-style: none; line-height: 12pt; padding-top: 0px; font-family: consolas, 'Courier New', courier, monospace; border-right-style: none; border-left-style: none; background-color: #f4f4f4; border-bottom-style: none"><span style="color: #606060"> 10:</span> menuItem = gtk.MenuItem(<span style="color: #006080">"Generate City"</span>)</pre>
<pre style="padding-right: 0px; padding-left: 0px; font-size: 8pt; padding-bottom: 0px; margin: 0em; overflow: visible; width: 100%; color: black; border-top-style: none; line-height: 12pt; padding-top: 0px; font-family: consolas, 'Courier New', courier, monospace; border-right-style: none; border-left-style: none; background-color: white; border-bottom-style: none"><span style="color: #606060"> 11:</span> menuItem.connect(<span style="color: #006080">"activate"</span>, self.GenerateNewCity)</pre>
<pre style="padding-right: 0px; padding-left: 0px; font-size: 8pt; padding-bottom: 0px; margin: 0em; overflow: visible; width: 100%; color: black; border-top-style: none; line-height: 12pt; padding-top: 0px; font-family: consolas, 'Courier New', courier, monospace; border-right-style: none; border-left-style: none; background-color: #f4f4f4; border-bottom-style: none"><span style="color: #606060"> 12:</span> childMenu.append(menuItem)</pre>
<pre style="padding-right: 0px; padding-left: 0px; font-size: 8pt; padding-bottom: 0px; margin: 0em; overflow: visible; width: 100%; color: black; border-top-style: none; line-height: 12pt; padding-top: 0px; font-family: consolas, 'Courier New', courier, monospace; border-right-style: none; border-left-style: none; background-color: white; border-bottom-style: none"><span style="color: #606060"> 13:</span>  </pre>
<pre style="padding-right: 0px; padding-left: 0px; font-size: 8pt; padding-bottom: 0px; margin: 0em; overflow: visible; width: 100%; color: black; border-top-style: none; line-height: 12pt; padding-top: 0px; font-family: consolas, 'Courier New', courier, monospace; border-right-style: none; border-left-style: none; background-color: #f4f4f4; border-bottom-style: none"><span style="color: #606060"> 14:</span> menu.set_submenu(childMenu)</pre>
<pre style="padding-right: 0px; padding-left: 0px; font-size: 8pt; padding-bottom: 0px; margin: 0em; overflow: visible; width: 100%; color: black; border-top-style: none; line-height: 12pt; padding-top: 0px; font-family: consolas, 'Courier New', courier, monospace; border-right-style: none; border-left-style: none; background-color: white; border-bottom-style: none"><span style="color: #606060"> 15:</span> self.popup.append(menu)</pre>
1: def GenerateNewCity(self, widget):
<pre style="padding-right: 0px; padding-left: 0px; font-size: 8pt; padding-bottom: 0px; margin: 0em; overflow: visible; width: 100%; color: black; border-top-style: none; line-height: 12pt; padding-top: 0px; font-family: consolas, 'Courier New', courier, monospace; border-right-style: none; border-left-style: none; background-color: #f4f4f4; border-bottom-style: none"><span style="color: #606060"> 2:</span> self.engine.GenerateNewCity()</pre>
Finally we need to invoke the popup menu. We'll do this from the right-click menu. The mouse handling is already dealt with in the tilewindow class (you can see this in tilewindow.py in the handleMousePress method) but we're going to intercept the call in our own class and pass it on if we don't handle it. Add this method to the MicropolisDrawingArea class:
1: def handleButtonPress(
<pre style="padding-right: 0px; padding-left: 0px; font-size: 8pt; padding-bottom: 0px; margin: 0em; overflow: visible; width: 100%; color: black; border-top-style: none; line-height: 12pt; padding-top: 0px; font-family: consolas, 'Courier New', courier, monospace; border-right-style: none; border-left-style: none; background-color: #f4f4f4; border-bottom-style: none"><span style="color: #606060"> 2:</span> self,</pre>
<pre style="padding-right: 0px; padding-left: 0px; font-size: 8pt; padding-bottom: 0px; margin: 0em; overflow: visible; width: 100%; color: black; border-top-style: none; line-height: 12pt; padding-top: 0px; font-family: consolas, 'Courier New', courier, monospace; border-right-style: none; border-left-style: none; background-color: white; border-bottom-style: none"><span style="color: #606060"> 3:</span> widget,</pre>
<pre style="padding-right: 0px; padding-left: 0px; font-size: 8pt; padding-bottom: 0px; margin: 0em; overflow: visible; width: 100%; color: black; border-top-style: none; line-height: 12pt; padding-top: 0px; font-family: consolas, 'Courier New', courier, monospace; border-right-style: none; border-left-style: none; background-color: #f4f4f4; border-bottom-style: none"><span style="color: #606060"> 4:</span> <span style="color: #0000ff">event</span>):</pre>
<pre style="padding-right: 0px; padding-left: 0px; font-size: 8pt; padding-bottom: 0px; margin: 0em; overflow: visible; width: 100%; color: black; border-top-style: none; line-height: 12pt; padding-top: 0px; font-family: consolas, 'Courier New', courier, monospace; border-right-style: none; border-left-style: none; background-color: white; border-bottom-style: none"><span style="color: #606060"> 5:</span>  </pre>
<pre style="padding-right: 0px; padding-left: 0px; font-size: 8pt; padding-bottom: 0px; margin: 0em; overflow: visible; width: 100%; color: black; border-top-style: none; line-height: 12pt; padding-top: 0px; font-family: consolas, 'Courier New', courier, monospace; border-right-style: none; border-left-style: none; background-color: #f4f4f4; border-bottom-style: none"><span style="color: #606060"> 6:</span> <span style="color: #0000ff">if</span> <span style="color: #0000ff">event</span>.button == 3: # right-click</pre>
<pre style="padding-right: 0px; padding-left: 0px; font-size: 8pt; padding-bottom: 0px; margin: 0em; overflow: visible; width: 100%; color: black; border-top-style: none; line-height: 12pt; padding-top: 0px; font-family: consolas, 'Courier New', courier, monospace; border-right-style: none; border-left-style: none; background-color: white; border-bottom-style: none"><span style="color: #606060"> 7:</span> self.popup.show_all()</pre>
<pre style="padding-right: 0px; padding-left: 0px; font-size: 8pt; padding-bottom: 0px; margin: 0em; overflow: visible; width: 100%; color: black; border-top-style: none; line-height: 12pt; padding-top: 0px; font-family: consolas, 'Courier New', courier, monospace; border-right-style: none; border-left-style: none; background-color: #f4f4f4; border-bottom-style: none"><span style="color: #606060"> 8:</span> self.popup.popup(None, None, None, <span style="color: #0000ff">event</span>.button, <span style="color: #0000ff">event</span>.time)</pre>
<pre style="padding-right: 0px; padding-left: 0px; font-size: 8pt; padding-bottom: 0px; margin: 0em; overflow: visible; width: 100%; color: black; border-top-style: none; line-height: 12pt; padding-top: 0px; font-family: consolas, 'Courier New', courier, monospace; border-right-style: none; border-left-style: none; background-color: white; border-bottom-style: none"><span style="color: #606060"> 9:</span> <span style="color: #0000ff">else</span>:</pre>
<pre style="padding-right: 0px; padding-left: 0px; font-size: 8pt; padding-bottom: 0px; margin: 0em; overflow: visible; width: 100%; color: black; border-top-style: none; line-height: 12pt; padding-top: 0px; font-family: consolas, 'Courier New', courier, monospace; border-right-style: none; border-left-style: none; background-color: #f4f4f4; border-bottom-style: none"><span style="color: #606060"> 10:</span> tilewindow.TileDrawingArea.handleButtonPress(self, widget, <span style="color: #0000ff">event</span>)</pre>
Now when we run the app and right-click on the drawing surface, we can use our new popup menu:
And when clicked it runs through the various routines creating a new landscape each time. You can check out the C++ code in the generate.cpp file for details on how it works. You can grab the Python script exercise-2.py with this new functionality. Here are some variations the engine produces:
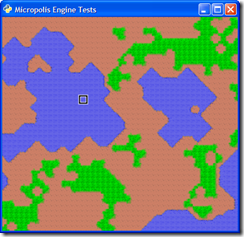
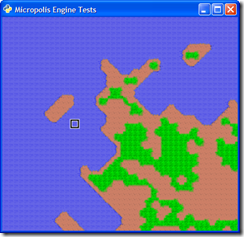
Now that we have an interface to let the user interact with the system, we can extend this. Two features of the system are loading existing cities (from the cities folder) and loading scenarios. Let's wire these up to the new interface.
Loading Cities
Cities are kept as binary files in the cities folder. The engine loads them up via the LoadCity method that takes in a filename for a parameter. So first we'll add some code to our menu to allow the user to select a Load City option:
1: menuItem = gtk.MenuItem("Generate City")
<pre style="padding-right: 0px; padding-left: 0px; font-size: 8pt; padding-bottom: 0px; margin: 0em; overflow: visible; width: 100%; color: black; border-top-style: none; line-height: 12pt; padding-top: 0px; font-family: consolas, 'Courier New', courier, monospace; border-right-style: none; border-left-style: none; background-color: #f4f4f4; border-bottom-style: none"><span style="color: #606060"> 2:</span> menuItem.connect(<span style="color: #006080">"activate"</span>, self.GenerateNewCity)</pre>
<pre style="padding-right: 0px; padding-left: 0px; font-size: 8pt; padding-bottom: 0px; margin: 0em; overflow: visible; width: 100%; color: black; border-top-style: none; line-height: 12pt; padding-top: 0px; font-family: consolas, 'Courier New', courier, monospace; border-right-style: none; border-left-style: none; background-color: white; border-bottom-style: none"><span style="color: #606060"> 3:</span> childMenu.append(menuItem)</pre>
<pre style="padding-right: 0px; padding-left: 0px; font-size: 8pt; padding-bottom: 0px; margin: 0em; overflow: visible; width: 100%; color: black; border-top-style: none; line-height: 12pt; padding-top: 0px; font-family: consolas, 'Courier New', courier, monospace; border-right-style: none; border-left-style: none; background-color: #f4f4f4; border-bottom-style: none"><span style="color: #606060"> 4:</span>  </pre>
<pre style="padding-right: 0px; padding-left: 0px; font-size: 8pt; padding-bottom: 0px; margin: 0em; overflow: visible; width: 100%; color: black; border-top-style: none; line-height: 12pt; padding-top: 0px; font-family: consolas, 'Courier New', courier, monospace; border-right-style: none; border-left-style: none; background-color: white; border-bottom-style: none"><span style="color: #606060"> 5:</span> # Start New Load City menu option</pre>
<pre style="padding-right: 0px; padding-left: 0px; font-size: 8pt; padding-bottom: 0px; margin: 0em; overflow: visible; width: 100%; color: black; border-top-style: none; line-height: 12pt; padding-top: 0px; font-family: consolas, 'Courier New', courier, monospace; border-right-style: none; border-left-style: none; background-color: #f4f4f4; border-bottom-style: none"><span style="color: #606060"> 6:</span> menuItem = gtk.MenuItem(<span style="color: #006080">"Load City..."</span>)</pre>
<pre style="padding-right: 0px; padding-left: 0px; font-size: 8pt; padding-bottom: 0px; margin: 0em; overflow: visible; width: 100%; color: black; border-top-style: none; line-height: 12pt; padding-top: 0px; font-family: consolas, 'Courier New', courier, monospace; border-right-style: none; border-left-style: none; background-color: white; border-bottom-style: none"><span style="color: #606060"> 7:</span> menuItem.connect(<span style="color: #006080">"activate"</span>, self.LoadCity)</pre>
<pre style="padding-right: 0px; padding-left: 0px; font-size: 8pt; padding-bottom: 0px; margin: 0em; overflow: visible; width: 100%; color: black; border-top-style: none; line-height: 12pt; padding-top: 0px; font-family: consolas, 'Courier New', courier, monospace; border-right-style: none; border-left-style: none; background-color: #f4f4f4; border-bottom-style: none"><span style="color: #606060"> 8:</span> childMenu.append(menuItem)</pre>
<pre style="padding-right: 0px; padding-left: 0px; font-size: 8pt; padding-bottom: 0px; margin: 0em; overflow: visible; width: 100%; color: black; border-top-style: none; line-height: 12pt; padding-top: 0px; font-family: consolas, 'Courier New', courier, monospace; border-right-style: none; border-left-style: none; background-color: white; border-bottom-style: none"><span style="color: #606060"> 9:</span> # End New Load City menu option</pre>
<pre style="padding-right: 0px; padding-left: 0px; font-size: 8pt; padding-bottom: 0px; margin: 0em; overflow: visible; width: 100%; color: black; border-top-style: none; line-height: 12pt; padding-top: 0px; font-family: consolas, 'Courier New', courier, monospace; border-right-style: none; border-left-style: none; background-color: #f4f4f4; border-bottom-style: none"><span style="color: #606060"> 10:</span>  </pre>
<pre style="padding-right: 0px; padding-left: 0px; font-size: 8pt; padding-bottom: 0px; margin: 0em; overflow: visible; width: 100%; color: black; border-top-style: none; line-height: 12pt; padding-top: 0px; font-family: consolas, 'Courier New', courier, monospace; border-right-style: none; border-left-style: none; background-color: white; border-bottom-style: none"><span style="color: #606060"> 11:</span> menu.set_submenu(childMenu)</pre>
<pre style="padding-right: 0px; padding-left: 0px; font-size: 8pt; padding-bottom: 0px; margin: 0em; overflow: visible; width: 100%; color: black; border-top-style: none; line-height: 12pt; padding-top: 0px; font-family: consolas, 'Courier New', courier, monospace; border-right-style: none; border-left-style: none; background-color: #f4f4f4; border-bottom-style: none"><span style="color: #606060"> 12:</span> self.popup.append(menu)</pre>
Now let's write the LoadCity method. This is going to use the gtk.FileChooserDialog which let's us pick a file from a directory. The Python version doesn't use the standard Windows File Open look and feel so it might look weird when you run it, but it does the job.
In the new LoadCity method we'll make a few modifications like only allowing to load local files; we'll set the working folder to the cities folder; and we'll add a filter to show *.cty files. Here's the new code snippet to add:
1: def LoadCity(self, widget):
<pre style="padding-right: 0px; padding-left: 0px; font-size: 8pt; padding-bottom: 0px; margin: 0em; overflow: visible; width: 100%; color: black; border-top-style: none; line-height: 12pt; padding-top: 0px; font-family: consolas, 'Courier New', courier, monospace; border-right-style: none; border-left-style: none; background-color: #f4f4f4; border-bottom-style: none"><span style="color: #606060"> 2:</span> dialog = gtk.FileChooserDialog(<span style="color: #006080">"Open City.."</span>,</pre>
<pre style="padding-right: 0px; padding-left: 0px; font-size: 8pt; padding-bottom: 0px; margin: 0em; overflow: visible; width: 100%; color: black; border-top-style: none; line-height: 12pt; padding-top: 0px; font-family: consolas, 'Courier New', courier, monospace; border-right-style: none; border-left-style: none; background-color: white; border-bottom-style: none"><span style="color: #606060"> 3:</span> None,</pre>
<pre style="padding-right: 0px; padding-left: 0px; font-size: 8pt; padding-bottom: 0px; margin: 0em; overflow: visible; width: 100%; color: black; border-top-style: none; line-height: 12pt; padding-top: 0px; font-family: consolas, 'Courier New', courier, monospace; border-right-style: none; border-left-style: none; background-color: #f4f4f4; border-bottom-style: none"><span style="color: #606060"> 4:</span> gtk.FILE_CHOOSER_ACTION_OPEN,</pre>
<pre style="padding-right: 0px; padding-left: 0px; font-size: 8pt; padding-bottom: 0px; margin: 0em; overflow: visible; width: 100%; color: black; border-top-style: none; line-height: 12pt; padding-top: 0px; font-family: consolas, 'Courier New', courier, monospace; border-right-style: none; border-left-style: none; background-color: white; border-bottom-style: none"><span style="color: #606060"> 5:</span> (gtk.STOCK_CANCEL, gtk.RESPONSE_CANCEL, gtk.STOCK_OPEN, gtk.RESPONSE_OK))</pre>
<pre style="padding-right: 0px; padding-left: 0px; font-size: 8pt; padding-bottom: 0px; margin: 0em; overflow: visible; width: 100%; color: black; border-top-style: none; line-height: 12pt; padding-top: 0px; font-family: consolas, 'Courier New', courier, monospace; border-right-style: none; border-left-style: none; background-color: #f4f4f4; border-bottom-style: none"><span style="color: #606060"> 6:</span> dialog.set_local_only(True)</pre>
<pre style="padding-right: 0px; padding-left: 0px; font-size: 8pt; padding-bottom: 0px; margin: 0em; overflow: visible; width: 100%; color: black; border-top-style: none; line-height: 12pt; padding-top: 0px; font-family: consolas, 'Courier New', courier, monospace; border-right-style: none; border-left-style: none; background-color: white; border-bottom-style: none"><span style="color: #606060"> 7:</span> dialog.set_select_multiple(False)</pre>
<pre style="padding-right: 0px; padding-left: 0px; font-size: 8pt; padding-bottom: 0px; margin: 0em; overflow: visible; width: 100%; color: black; border-top-style: none; line-height: 12pt; padding-top: 0px; font-family: consolas, 'Courier New', courier, monospace; border-right-style: none; border-left-style: none; background-color: #f4f4f4; border-bottom-style: none"><span style="color: #606060"> 8:</span> cityFolder = os.getcwd() + <span style="color: #006080">"\\cities"</span></pre>
<pre style="padding-right: 0px; padding-left: 0px; font-size: 8pt; padding-bottom: 0px; margin: 0em; overflow: visible; width: 100%; color: black; border-top-style: none; line-height: 12pt; padding-top: 0px; font-family: consolas, 'Courier New', courier, monospace; border-right-style: none; border-left-style: none; background-color: white; border-bottom-style: none"><span style="color: #606060"> 9:</span> dialog.set_current_folder(cityFolder)</pre>
<pre style="padding-right: 0px; padding-left: 0px; font-size: 8pt; padding-bottom: 0px; margin: 0em; overflow: visible; width: 100%; color: black; border-top-style: none; line-height: 12pt; padding-top: 0px; font-family: consolas, 'Courier New', courier, monospace; border-right-style: none; border-left-style: none; background-color: #f4f4f4; border-bottom-style: none"><span style="color: #606060"> 10:</span> </pre>
<pre style="padding-right: 0px; padding-left: 0px; font-size: 8pt; padding-bottom: 0px; margin: 0em; overflow: visible; width: 100%; color: black; border-top-style: none; line-height: 12pt; padding-top: 0px; font-family: consolas, 'Courier New', courier, monospace; border-right-style: none; border-left-style: none; background-color: white; border-bottom-style: none"><span style="color: #606060"> 11:</span> filter = gtk.FileFilter()</pre>
<pre style="padding-right: 0px; padding-left: 0px; font-size: 8pt; padding-bottom: 0px; margin: 0em; overflow: visible; width: 100%; color: black; border-top-style: none; line-height: 12pt; padding-top: 0px; font-family: consolas, 'Courier New', courier, monospace; border-right-style: none; border-left-style: none; background-color: #f4f4f4; border-bottom-style: none"><span style="color: #606060"> 12:</span> filter.set_name(<span style="color: #006080">"All files"</span>)</pre>
<pre style="padding-right: 0px; padding-left: 0px; font-size: 8pt; padding-bottom: 0px; margin: 0em; overflow: visible; width: 100%; color: black; border-top-style: none; line-height: 12pt; padding-top: 0px; font-family: consolas, 'Courier New', courier, monospace; border-right-style: none; border-left-style: none; background-color: white; border-bottom-style: none"><span style="color: #606060"> 13:</span> filter.add_pattern(<span style="color: #006080">"*"</span>)</pre>
<pre style="padding-right: 0px; padding-left: 0px; font-size: 8pt; padding-bottom: 0px; margin: 0em; overflow: visible; width: 100%; color: black; border-top-style: none; line-height: 12pt; padding-top: 0px; font-family: consolas, 'Courier New', courier, monospace; border-right-style: none; border-left-style: none; background-color: #f4f4f4; border-bottom-style: none"><span style="color: #606060"> 14:</span> dialog.add_filter(filter)</pre>
<pre style="padding-right: 0px; padding-left: 0px; font-size: 8pt; padding-bottom: 0px; margin: 0em; overflow: visible; width: 100%; color: black; border-top-style: none; line-height: 12pt; padding-top: 0px; font-family: consolas, 'Courier New', courier, monospace; border-right-style: none; border-left-style: none; background-color: white; border-bottom-style: none"><span style="color: #606060"> 15:</span> </pre>
<pre style="padding-right: 0px; padding-left: 0px; font-size: 8pt; padding-bottom: 0px; margin: 0em; overflow: visible; width: 100%; color: black; border-top-style: none; line-height: 12pt; padding-top: 0px; font-family: consolas, 'Courier New', courier, monospace; border-right-style: none; border-left-style: none; background-color: #f4f4f4; border-bottom-style: none"><span style="color: #606060"> 16:</span> filter = gtk.FileFilter()</pre>
<pre style="padding-right: 0px; padding-left: 0px; font-size: 8pt; padding-bottom: 0px; margin: 0em; overflow: visible; width: 100%; color: black; border-top-style: none; line-height: 12pt; padding-top: 0px; font-family: consolas, 'Courier New', courier, monospace; border-right-style: none; border-left-style: none; background-color: white; border-bottom-style: none"><span style="color: #606060"> 17:</span> filter.set_name(<span style="color: #006080">"Micropolis City Files"</span>)</pre>
<pre style="padding-right: 0px; padding-left: 0px; font-size: 8pt; padding-bottom: 0px; margin: 0em; overflow: visible; width: 100%; color: black; border-top-style: none; line-height: 12pt; padding-top: 0px; font-family: consolas, 'Courier New', courier, monospace; border-right-style: none; border-left-style: none; background-color: #f4f4f4; border-bottom-style: none"><span style="color: #606060"> 18:</span> filter.add_pattern(<span style="color: #006080">"*.cty"</span>)</pre>
<pre style="padding-right: 0px; padding-left: 0px; font-size: 8pt; padding-bottom: 0px; margin: 0em; overflow: visible; width: 100%; color: black; border-top-style: none; line-height: 12pt; padding-top: 0px; font-family: consolas, 'Courier New', courier, monospace; border-right-style: none; border-left-style: none; background-color: white; border-bottom-style: none"><span style="color: #606060"> 19:</span> dialog.add_filter(filter)</pre>
<pre style="padding-right: 0px; padding-left: 0px; font-size: 8pt; padding-bottom: 0px; margin: 0em; overflow: visible; width: 100%; color: black; border-top-style: none; line-height: 12pt; padding-top: 0px; font-family: consolas, 'Courier New', courier, monospace; border-right-style: none; border-left-style: none; background-color: #f4f4f4; border-bottom-style: none"><span style="color: #606060"> 20:</span> </pre>
<pre style="padding-right: 0px; padding-left: 0px; font-size: 8pt; padding-bottom: 0px; margin: 0em; overflow: visible; width: 100%; color: black; border-top-style: none; line-height: 12pt; padding-top: 0px; font-family: consolas, 'Courier New', courier, monospace; border-right-style: none; border-left-style: none; background-color: white; border-bottom-style: none"><span style="color: #606060"> 21:</span> response = dialog.run()</pre>
<pre style="padding-right: 0px; padding-left: 0px; font-size: 8pt; padding-bottom: 0px; margin: 0em; overflow: visible; width: 100%; color: black; border-top-style: none; line-height: 12pt; padding-top: 0px; font-family: consolas, 'Courier New', courier, monospace; border-right-style: none; border-left-style: none; background-color: #f4f4f4; border-bottom-style: none"><span style="color: #606060"> 22:</span> <span style="color: #0000ff">if</span> response == gtk.RESPONSE_OK:</pre>
<pre style="padding-right: 0px; padding-left: 0px; font-size: 8pt; padding-bottom: 0px; margin: 0em; overflow: visible; width: 100%; color: black; border-top-style: none; line-height: 12pt; padding-top: 0px; font-family: consolas, 'Courier New', courier, monospace; border-right-style: none; border-left-style: none; background-color: white; border-bottom-style: none"><span style="color: #606060"> 23:</span> filename = dialog.get_filename()</pre>
<pre style="padding-right: 0px; padding-left: 0px; font-size: 8pt; padding-bottom: 0px; margin: 0em; overflow: visible; width: 100%; color: black; border-top-style: none; line-height: 12pt; padding-top: 0px; font-family: consolas, 'Courier New', courier, monospace; border-right-style: none; border-left-style: none; background-color: #f4f4f4; border-bottom-style: none"><span style="color: #606060"> 24:</span> self.engine.LoadCity(filename)</pre>
<pre style="padding-right: 0px; padding-left: 0px; font-size: 8pt; padding-bottom: 0px; margin: 0em; overflow: visible; width: 100%; color: black; border-top-style: none; line-height: 12pt; padding-top: 0px; font-family: consolas, 'Courier New', courier, monospace; border-right-style: none; border-left-style: none; background-color: white; border-bottom-style: none"><span style="color: #606060"> 25:</span> dialog.destroy()</pre>
Now run the app and select Open City from the popup menu and you'll see something like this:
Click on a double-click on a city file or select one and click "Open". The new city will load in your window and you can move around the new landscape.
You can find the code up to this point in the exercise-3.py file.
Loading Scenarios
There are 8 "custom" scenarios pre-built for Micropolis. Think of a scenario as a situation composed of a map file, location, funds, and a timeline. While cities have their own timeline stored with them, scenarios are loaded and set to a certain point in time along with a set of fixed funds. Scenarios include the 1906 earthquake of San Francisco; Hamburg, Germany during the height of World War II in 1944; and and futuristic Boston in the year 2010.
The scenarios are hard coded inside fileio.cpp and can't be changed without modifications to the C++ source. There is an engine method called LoadScenario that takes in a number (1-8) for the scenario number to load. Again, like the Load City option with scenarios we'll build 8 menu items and hook them up to a callback. In this case, we can use a single call back and pass in (from the creation of the menu item) the number of the scenario to load.
Here's the new menu code for the scenarios:
1: playMenu = gtk.MenuItem("Play Scenario")
<pre style="padding-right: 0px; padding-left: 0px; font-size: 8pt; padding-bottom: 0px; margin: 0em; overflow: visible; width: 100%; color: black; border-top-style: none; line-height: 12pt; padding-top: 0px; font-family: consolas, 'Courier New', courier, monospace; border-right-style: none; border-left-style: none; background-color: #f4f4f4; border-bottom-style: none"><span style="color: #606060"> 2:</span> subMenu = gtk.Menu()</pre>
<pre style="padding-right: 0px; padding-left: 0px; font-size: 8pt; padding-bottom: 0px; margin: 0em; overflow: visible; width: 100%; color: black; border-top-style: none; line-height: 12pt; padding-top: 0px; font-family: consolas, 'Courier New', courier, monospace; border-right-style: none; border-left-style: none; background-color: white; border-bottom-style: none"><span style="color: #606060"> 3:</span>  </pre>
<pre style="padding-right: 0px; padding-left: 0px; font-size: 8pt; padding-bottom: 0px; margin: 0em; overflow: visible; width: 100%; color: black; border-top-style: none; line-height: 12pt; padding-top: 0px; font-family: consolas, 'Courier New', courier, monospace; border-right-style: none; border-left-style: none; background-color: #f4f4f4; border-bottom-style: none"><span style="color: #606060"> 4:</span> menuItem = gtk.MenuItem(<span style="color: #006080">"Dullsville"</span>)</pre>
<pre style="padding-right: 0px; padding-left: 0px; font-size: 8pt; padding-bottom: 0px; margin: 0em; overflow: visible; width: 100%; color: black; border-top-style: none; line-height: 12pt; padding-top: 0px; font-family: consolas, 'Courier New', courier, monospace; border-right-style: none; border-left-style: none; background-color: white; border-bottom-style: none"><span style="color: #606060"> 5:</span> menuItem.connect(<span style="color: #006080">"activate"</span>, self.PlayScenario, 1)</pre>
<pre style="padding-right: 0px; padding-left: 0px; font-size: 8pt; padding-bottom: 0px; margin: 0em; overflow: visible; width: 100%; color: black; border-top-style: none; line-height: 12pt; padding-top: 0px; font-family: consolas, 'Courier New', courier, monospace; border-right-style: none; border-left-style: none; background-color: #f4f4f4; border-bottom-style: none"><span style="color: #606060"> 6:</span> subMenu.append(menuItem)</pre>
<pre style="padding-right: 0px; padding-left: 0px; font-size: 8pt; padding-bottom: 0px; margin: 0em; overflow: visible; width: 100%; color: black; border-top-style: none; line-height: 12pt; padding-top: 0px; font-family: consolas, 'Courier New', courier, monospace; border-right-style: none; border-left-style: none; background-color: white; border-bottom-style: none"><span style="color: #606060"> 7:</span>  </pre>
<pre style="padding-right: 0px; padding-left: 0px; font-size: 8pt; padding-bottom: 0px; margin: 0em; overflow: visible; width: 100%; color: black; border-top-style: none; line-height: 12pt; padding-top: 0px; font-family: consolas, 'Courier New', courier, monospace; border-right-style: none; border-left-style: none; background-color: #f4f4f4; border-bottom-style: none"><span style="color: #606060"> 8:</span> menuItem = gtk.MenuItem(<span style="color: #006080">"San Francisco"</span>)</pre>
<pre style="padding-right: 0px; padding-left: 0px; font-size: 8pt; padding-bottom: 0px; margin: 0em; overflow: visible; width: 100%; color: black; border-top-style: none; line-height: 12pt; padding-top: 0px; font-family: consolas, 'Courier New', courier, monospace; border-right-style: none; border-left-style: none; background-color: white; border-bottom-style: none"><span style="color: #606060"> 9:</span> menuItem.connect(<span style="color: #006080">"activate"</span>, self.PlayScenario, 2)</pre>
<pre style="padding-right: 0px; padding-left: 0px; font-size: 8pt; padding-bottom: 0px; margin: 0em; overflow: visible; width: 100%; color: black; border-top-style: none; line-height: 12pt; padding-top: 0px; font-family: consolas, 'Courier New', courier, monospace; border-right-style: none; border-left-style: none; background-color: #f4f4f4; border-bottom-style: none"><span style="color: #606060"> 10:</span> subMenu.append(menuItem)</pre>
<pre style="padding-right: 0px; padding-left: 0px; font-size: 8pt; padding-bottom: 0px; margin: 0em; overflow: visible; width: 100%; color: black; border-top-style: none; line-height: 12pt; padding-top: 0px; font-family: consolas, 'Courier New', courier, monospace; border-right-style: none; border-left-style: none; background-color: white; border-bottom-style: none"><span style="color: #606060"> 11:</span>  </pre>
<pre style="padding-right: 0px; padding-left: 0px; font-size: 8pt; padding-bottom: 0px; margin: 0em; overflow: visible; width: 100%; color: black; border-top-style: none; line-height: 12pt; padding-top: 0px; font-family: consolas, 'Courier New', courier, monospace; border-right-style: none; border-left-style: none; background-color: #f4f4f4; border-bottom-style: none"><span style="color: #606060"> 12:</span> menuItem = gtk.MenuItem(<span style="color: #006080">"Hamburg"</span>)</pre>
<pre style="padding-right: 0px; padding-left: 0px; font-size: 8pt; padding-bottom: 0px; margin: 0em; overflow: visible; width: 100%; color: black; border-top-style: none; line-height: 12pt; padding-top: 0px; font-family: consolas, 'Courier New', courier, monospace; border-right-style: none; border-left-style: none; background-color: white; border-bottom-style: none"><span style="color: #606060"> 13:</span> menuItem.connect(<span style="color: #006080">"activate"</span>, self.PlayScenario, 3)</pre>
<pre style="padding-right: 0px; padding-left: 0px; font-size: 8pt; padding-bottom: 0px; margin: 0em; overflow: visible; width: 100%; color: black; border-top-style: none; line-height: 12pt; padding-top: 0px; font-family: consolas, 'Courier New', courier, monospace; border-right-style: none; border-left-style: none; background-color: #f4f4f4; border-bottom-style: none"><span style="color: #606060"> 14:</span> subMenu.append(menuItem)</pre>
<pre style="padding-right: 0px; padding-left: 0px; font-size: 8pt; padding-bottom: 0px; margin: 0em; overflow: visible; width: 100%; color: black; border-top-style: none; line-height: 12pt; padding-top: 0px; font-family: consolas, 'Courier New', courier, monospace; border-right-style: none; border-left-style: none; background-color: white; border-bottom-style: none"><span style="color: #606060"> 15:</span>  </pre>
<pre style="padding-right: 0px; padding-left: 0px; font-size: 8pt; padding-bottom: 0px; margin: 0em; overflow: visible; width: 100%; color: black; border-top-style: none; line-height: 12pt; padding-top: 0px; font-family: consolas, 'Courier New', courier, monospace; border-right-style: none; border-left-style: none; background-color: #f4f4f4; border-bottom-style: none"><span style="color: #606060"> 16:</span> menuItem = gtk.MenuItem(<span style="color: #006080">"Bern"</span>)</pre>
<pre style="padding-right: 0px; padding-left: 0px; font-size: 8pt; padding-bottom: 0px; margin: 0em; overflow: visible; width: 100%; color: black; border-top-style: none; line-height: 12pt; padding-top: 0px; font-family: consolas, 'Courier New', courier, monospace; border-right-style: none; border-left-style: none; background-color: white; border-bottom-style: none"><span style="color: #606060"> 17:</span> menuItem.connect(<span style="color: #006080">"activate"</span>, self.PlayScenario, 4)</pre>
<pre style="padding-right: 0px; padding-left: 0px; font-size: 8pt; padding-bottom: 0px; margin: 0em; overflow: visible; width: 100%; color: black; border-top-style: none; line-height: 12pt; padding-top: 0px; font-family: consolas, 'Courier New', courier, monospace; border-right-style: none; border-left-style: none; background-color: #f4f4f4; border-bottom-style: none"><span style="color: #606060"> 18:</span> subMenu.append(menuItem)</pre>
<pre style="padding-right: 0px; padding-left: 0px; font-size: 8pt; padding-bottom: 0px; margin: 0em; overflow: visible; width: 100%; color: black; border-top-style: none; line-height: 12pt; padding-top: 0px; font-family: consolas, 'Courier New', courier, monospace; border-right-style: none; border-left-style: none; background-color: white; border-bottom-style: none"><span style="color: #606060"> 19:</span>  </pre>
<pre style="padding-right: 0px; padding-left: 0px; font-size: 8pt; padding-bottom: 0px; margin: 0em; overflow: visible; width: 100%; color: black; border-top-style: none; line-height: 12pt; padding-top: 0px; font-family: consolas, 'Courier New', courier, monospace; border-right-style: none; border-left-style: none; background-color: #f4f4f4; border-bottom-style: none"><span style="color: #606060"> 20:</span> menuItem = gtk.MenuItem(<span style="color: #006080">"Tokyo"</span>)</pre>
<pre style="padding-right: 0px; padding-left: 0px; font-size: 8pt; padding-bottom: 0px; margin: 0em; overflow: visible; width: 100%; color: black; border-top-style: none; line-height: 12pt; padding-top: 0px; font-family: consolas, 'Courier New', courier, monospace; border-right-style: none; border-left-style: none; background-color: white; border-bottom-style: none"><span style="color: #606060"> 21:</span> menuItem.connect(<span style="color: #006080">"activate"</span>, self.PlayScenario, 5)</pre>
<pre style="padding-right: 0px; padding-left: 0px; font-size: 8pt; padding-bottom: 0px; margin: 0em; overflow: visible; width: 100%; color: black; border-top-style: none; line-height: 12pt; padding-top: 0px; font-family: consolas, 'Courier New', courier, monospace; border-right-style: none; border-left-style: none; background-color: #f4f4f4; border-bottom-style: none"><span style="color: #606060"> 22:</span> subMenu.append(menuItem)</pre>
<pre style="padding-right: 0px; padding-left: 0px; font-size: 8pt; padding-bottom: 0px; margin: 0em; overflow: visible; width: 100%; color: black; border-top-style: none; line-height: 12pt; padding-top: 0px; font-family: consolas, 'Courier New', courier, monospace; border-right-style: none; border-left-style: none; background-color: white; border-bottom-style: none"><span style="color: #606060"> 23:</span>  </pre>
<pre style="padding-right: 0px; padding-left: 0px; font-size: 8pt; padding-bottom: 0px; margin: 0em; overflow: visible; width: 100%; color: black; border-top-style: none; line-height: 12pt; padding-top: 0px; font-family: consolas, 'Courier New', courier, monospace; border-right-style: none; border-left-style: none; background-color: #f4f4f4; border-bottom-style: none"><span style="color: #606060"> 24:</span> menuItem = gtk.MenuItem(<span style="color: #006080">"Detroit"</span>)</pre>
<pre style="padding-right: 0px; padding-left: 0px; font-size: 8pt; padding-bottom: 0px; margin: 0em; overflow: visible; width: 100%; color: black; border-top-style: none; line-height: 12pt; padding-top: 0px; font-family: consolas, 'Courier New', courier, monospace; border-right-style: none; border-left-style: none; background-color: white; border-bottom-style: none"><span style="color: #606060"> 25:</span> menuItem.connect(<span style="color: #006080">"activate"</span>, self.PlayScenario, 6)</pre>
<pre style="padding-right: 0px; padding-left: 0px; font-size: 8pt; padding-bottom: 0px; margin: 0em; overflow: visible; width: 100%; color: black; border-top-style: none; line-height: 12pt; padding-top: 0px; font-family: consolas, 'Courier New', courier, monospace; border-right-style: none; border-left-style: none; background-color: #f4f4f4; border-bottom-style: none"><span style="color: #606060"> 26:</span> subMenu.append(menuItem)</pre>
<pre style="padding-right: 0px; padding-left: 0px; font-size: 8pt; padding-bottom: 0px; margin: 0em; overflow: visible; width: 100%; color: black; border-top-style: none; line-height: 12pt; padding-top: 0px; font-family: consolas, 'Courier New', courier, monospace; border-right-style: none; border-left-style: none; background-color: white; border-bottom-style: none"><span style="color: #606060"> 27:</span>  </pre>
<pre style="padding-right: 0px; padding-left: 0px; font-size: 8pt; padding-bottom: 0px; margin: 0em; overflow: visible; width: 100%; color: black; border-top-style: none; line-height: 12pt; padding-top: 0px; font-family: consolas, 'Courier New', courier, monospace; border-right-style: none; border-left-style: none; background-color: #f4f4f4; border-bottom-style: none"><span style="color: #606060"> 28:</span> menuItem = gtk.MenuItem(<span style="color: #006080">"Boston"</span>)</pre>
<pre style="padding-right: 0px; padding-left: 0px; font-size: 8pt; padding-bottom: 0px; margin: 0em; overflow: visible; width: 100%; color: black; border-top-style: none; line-height: 12pt; padding-top: 0px; font-family: consolas, 'Courier New', courier, monospace; border-right-style: none; border-left-style: none; background-color: white; border-bottom-style: none"><span style="color: #606060"> 29:</span> menuItem.connect(<span style="color: #006080">"activate"</span>, self.PlayScenario, 7)</pre>
<pre style="padding-right: 0px; padding-left: 0px; font-size: 8pt; padding-bottom: 0px; margin: 0em; overflow: visible; width: 100%; color: black; border-top-style: none; line-height: 12pt; padding-top: 0px; font-family: consolas, 'Courier New', courier, monospace; border-right-style: none; border-left-style: none; background-color: #f4f4f4; border-bottom-style: none"><span style="color: #606060"> 30:</span> subMenu.append(menuItem)</pre>
<pre style="padding-right: 0px; padding-left: 0px; font-size: 8pt; padding-bottom: 0px; margin: 0em; overflow: visible; width: 100%; color: black; border-top-style: none; line-height: 12pt; padding-top: 0px; font-family: consolas, 'Courier New', courier, monospace; border-right-style: none; border-left-style: none; background-color: white; border-bottom-style: none"><span style="color: #606060"> 31:</span>  </pre>
<pre style="padding-right: 0px; padding-left: 0px; font-size: 8pt; padding-bottom: 0px; margin: 0em; overflow: visible; width: 100%; color: black; border-top-style: none; line-height: 12pt; padding-top: 0px; font-family: consolas, 'Courier New', courier, monospace; border-right-style: none; border-left-style: none; background-color: #f4f4f4; border-bottom-style: none"><span style="color: #606060"> 32:</span> menuItem = gtk.MenuItem(<span style="color: #006080">"Rio de Janeiro"</span>)</pre>
<pre style="padding-right: 0px; padding-left: 0px; font-size: 8pt; padding-bottom: 0px; margin: 0em; overflow: visible; width: 100%; color: black; border-top-style: none; line-height: 12pt; padding-top: 0px; font-family: consolas, 'Courier New', courier, monospace; border-right-style: none; border-left-style: none; background-color: white; border-bottom-style: none"><span style="color: #606060"> 33:</span> menuItem.connect(<span style="color: #006080">"activate"</span>, self.PlayScenario, 8)</pre>
<pre style="padding-right: 0px; padding-left: 0px; font-size: 8pt; padding-bottom: 0px; margin: 0em; overflow: visible; width: 100%; color: black; border-top-style: none; line-height: 12pt; padding-top: 0px; font-family: consolas, 'Courier New', courier, monospace; border-right-style: none; border-left-style: none; background-color: #f4f4f4; border-bottom-style: none"><span style="color: #606060"> 34:</span> subMenu.append(menuItem)</pre>
<pre style="padding-right: 0px; padding-left: 0px; font-size: 8pt; padding-bottom: 0px; margin: 0em; overflow: visible; width: 100%; color: black; border-top-style: none; line-height: 12pt; padding-top: 0px; font-family: consolas, 'Courier New', courier, monospace; border-right-style: none; border-left-style: none; background-color: white; border-bottom-style: none"><span style="color: #606060"> 35:</span>  </pre>
<pre style="padding-right: 0px; padding-left: 0px; font-size: 8pt; padding-bottom: 0px; margin: 0em; overflow: visible; width: 100%; color: black; border-top-style: none; line-height: 12pt; padding-top: 0px; font-family: consolas, 'Courier New', courier, monospace; border-right-style: none; border-left-style: none; background-color: #f4f4f4; border-bottom-style: none"><span style="color: #606060"> 36:</span> playMenu.set_submenu(subMenu)</pre>
<pre style="padding-right: 0px; padding-left: 0px; font-size: 8pt; padding-bottom: 0px; margin: 0em; overflow: visible; width: 100%; color: black; border-top-style: none; line-height: 12pt; padding-top: 0px; font-family: consolas, 'Courier New', courier, monospace; border-right-style: none; border-left-style: none; background-color: white; border-bottom-style: none"><span style="color: #606060"> 37:</span> childMenu.append(playMenu)</pre>
And here's the PlayScenario method. Note we'll grab the scenario number as a parameter passed in and call the engine.LoadScenario method using it:
1: def PlayScenario(self, widget, scenario):
<pre style="padding-right: 0px; padding-left: 0px; font-size: 8pt; padding-bottom: 0px; margin: 0em; overflow: visible; width: 100%; color: black; border-top-style: none; line-height: 12pt; padding-top: 0px; font-family: consolas, 'Courier New', courier, monospace; border-right-style: none; border-left-style: none; background-color: #f4f4f4; border-bottom-style: none"><span style="color: #606060"> 2:</span> self.engine.LoadScenario(scenario)</pre>
Now with the modifications we've done we can load up scenario files, load up cities, and generate a new blank terrain all driven from a popup menu.
Finally we'll just add the remaining menu items that represent the ones in the game. We'll stub these out for now to call a placeholder method. You can grab the final exercise-final.py file from here. Just drop it in your distribution folder and you're ready to go.
Things you can do to extend these ideas:
That's it for file access and getting started in the guts of the engine. If you have any questions so far, feel free to email me with them. Next up we'll continue to extend the UI and talk to more parts of the Metropolis engine.
This is a series of posts exploring and extending the Micropolis code. You can view the full list of posts here.
 MicropolisCore is package put together that is a fairly clean port of the original C code into a C++ mega class (called Micropolis). The distribution is a set of three projects, but this post focuses on the main one Micropolis. This contains the core simulation code. One other project we need is the TileEngine which (via it's default implementation using Cairo built on top of GTK+) provides a UI so we can see our city.
The new MicropolisCore project is all C++ and Python code. There is no TCL required, however it still uses GTK for it's UI. You'll need to download PyGTK, a GTK+ wrapper in Python, from here and install it. It'll find Python and install it for you. Also grab PyGObject which are the Python bindings for GObject and PyCairo and install them (you can get them all from the same location).
Assuming you followed the last post and compiled the system, you'll have the Micropolis and TileEngine projects built, along with the generated Python files and other goodies that came along for the ride. You can run this from the MicropolisCore python folder, but I prefer to put everything together into a distribution folder to keep things clean.
I've created a binary distribution for you which you can download here. It contains all the assets along with Micropolis and TileEngine (CellEngine isn't needed for this demo) and is ready to go once you install the pre-requisite files listed here (see the end of this post for a list of all the files you need with links for downloading).
To create your own distribution, just copy the "python" folder from the Micropolis project. Add in the _micropolis.pyd file from the Release directory. Copy in the _tileengine.pyd file from the TileEngine release directory. Finally copy the *.py files from the TileEngine python directory. This is everything you need to run the demo.
Now for the final moment. Run the following command from where you have your distribution files:
C:\Python25\Python.exe -i micropoliswindow.py
If the stars align, you should see this:
You now have Micropolis running on Windows! Well, at least a demo running the Micropolis engine from Python. Go ahead and explore your city. Everything is there that you'll remember from the original SimCity, complete with traffic running around.
There are a few keystrokes you can use while the demo is running. You can use the arrow keys to move the cursor box around. "O" will zoom in and allow you to see the demo city (the demo script loads up the "cities/haight.cty" file). Messing around with the zoom lets you get something like this displayed:
Other keystrokes:
Go ahead and maximize the screen. Here's the full city in all it's Python/GTK glory:
Running from the command line is fine and dandy, but how about debugging the program? Glad you asked.
First, you'll need to switch your configuration to ReleaseSymbols. This will output the export libraries for Python to find in the correct directory. If you want to change this, you'll need to edit a bunch of the *.py files in the python directory for each project. Just look and you'll see where it references the ReleaseSymbols folder right before it does the import.
After you switch to the ReleaseSymbols configuration, you'll need to set python.exe as your debugger and have it launch the micropoliswindow.py file. Right click on the Micropolis project and select Debugger from the tree. Then setup the debugger options like this:
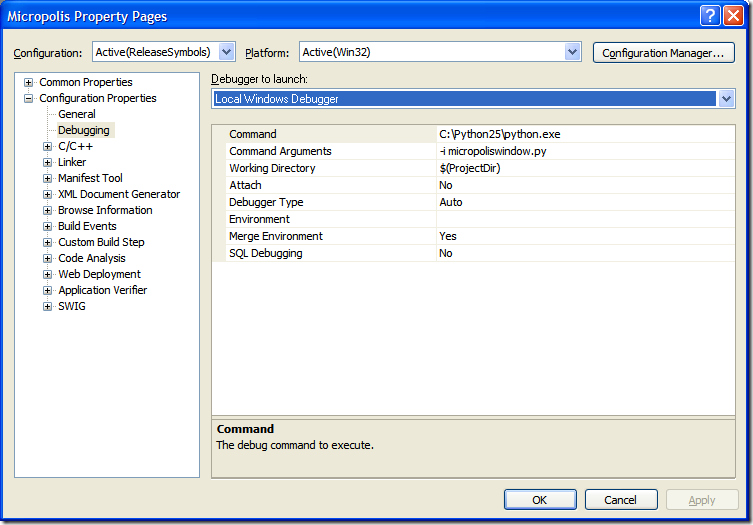
Now you're ready to debug. Pick a file and set a breakpoint then hit F5. You'll see the GTK Window popup with the demo city loaded, and you can fully debug the C++ code at this point.
Small victories.
Next up is building some additional functionality into the system, writing a new Python front-end, and starting to build out a full blow Micropolis client on Windows. You might also notice that there's a sample micropoliswebserver.py file. Now that the system is compiled and can be driven from Python, thanks to SWIG, why not? I haven't looked at the webserver yet, but Python itself has the facilities to launch one. And now that Python is hooked into the Micropolis engine you can easily serve up the core to the web. Pretty slick.
Here's that list of additional files you'll need to install for running the system:
This is a series of posts exploring and extending the Micropolis code. You can view the full list of posts here.
 Well. My last post was a little, ummm... popular? Slashdot, Boing Boing, BluesNews, and pretty much the rest of the planet have all linked to it. Glad everyone is happy about the source release.
Anyways, there's been a lot of buzz about the code and the main questions that come up are "how do I get it to compile?". Let's go through this.
This is the first part of a series. In this post we'll go through the tools you need to install and the steps to get the Python and Windows code compiled. In part II, we'll hook up what we've built with a UI. Beyond that I'll dig into the various engines and ways to manipulate and change them.
Tools of the Trade
The Micropolis code isn't just C code. There is that (bascially the original code slightly retrofitted and updated for OLPC). There's also the python and TCL code. Python is an OO programming language that Don Hopkins chose to work with. Python itself is a pretty good language to work with but there's additional power using a tool called SWIG. SWIG let's you take your existing C/C++/etc. code and "pythonify" it. No, we don't mean to teach it how to lop off the Black Knight's arms and legs in battle. We mean expose your already existing property (in this case the SimCity code) to python. This will allow us to plug in scripting to Micropolis and make it do our bidding.
Anywho, here's the rundown of the tools you'll need to get started.
SWIG
SWIG is a software development tool that connects programs written in C and C++ with a variety of high-level programming languages. It's run by the projects to generate Python files from the C++ ones. Grab the latest version of SWIG for Windows from here and install to C:\SWIG.
GTK
GTK is a multi-platform graphical windowing library. Download and install the gtk++win32-devel package here. Use the default C:\GTK folder for installing. The GTK install includes Cairo, a 2D graphics library used by Micropolis so you don't have to install it separately.
Pycairo
While you get the Cairo libraries for free with the GTK install, you'll need the python bindings for Cairo. These are available through the pycairo project here. Install to C:\pycairo. This will enable you to build the TileEngine project.
Python 2.5
Python is an OO scripting language that has a lot of flexibility and power. Micropolis exposes its internals using SWIG to python so you can plug it in as an engine to drive the core functionality. Download Python 2.5 from here. You can install 2.5 just to get going although the site recommends 2.5.1. Install it to the default location (C:\Python25) and you're all set.
Compiling
The source code comes in two packages. The first one, micropolis-activity-source.tgz, is the TCL/Tk version for Linux with the (mostly) original C code. The second package, MicropolisCore.tgz, (the one we're going to build with Visual Studio) is a C++ version which has the following features:
Once you have all the pre-requisite tools listed above installed you're ready to go. Note that if you installed the tools in anywhere but the path mentioned, you'll have to modify the projects in Visual Studio so it can find them accordingly.
First, right click on the Micropolis project and build it. You should get output similar to this:
1>------ Build started: Project: Micropolis, Configuration: Release Win32 ------
1>Executing tool...
1>..\micropolis.h(1240): Warning(462): Unable to set dimensionless array variable
1>..\micropolis.h(1242): Warning(462): Unable to set dimensionless array variable
1>..\micropolis.h(2093): Warning(462): Unable to set dimensionless array variable
1>..\micropolis.h(2095): Warning(462): Unable to set dimensionless array variable
1>..\micropolis.h(2097): Warning(462): Unable to set dimensionless array variable
1>..\micropolis.h(2099): Warning(462): Unable to set dimensionless array variable
1>Compiling...
1>micropolis_wrap.cpp
1>Linking...
1> Creating library d:\Development\Projects\MicropolisCore\src\Micropolis\python\\Release\_micropolis.lib and object d:\Development\Projects\MicropolisCore\src\Micropolis\python\\Release\_micropolis.exp
1>Generating code
1>Finished generating code
1>Embedding manifest...
1>Build log was saved at "file://d:\Development\Projects\MicropolisCore\src\Micropolis\python\Release\BuildLog.htm"
1>Micropolis - 0 error(s), 0 warning(s)
========== Build: 1 succeeded, 0 failed, 0 up-to-date, 0 skipped ==========
Once this is built in your Micropolis project you'll see that the SWIG folder is now populated. This contains all the python wrappers that talk to the C++ Micropolis code (generated by the SWIG tool).
Now build the CellEngine project. You should get output similar to this:
1>------ Build started: Project: CellEngine, Configuration: Release Win32 ------
1>Executing tool...
1>Build log was saved at "file://d:\Development\Projects\MicropolisCore\src\CellEngine\python\Release\BuildLog.htm"
1>CellEngine - 0 error(s), 0 warning(s)
========== Build: 1 succeeded, 0 failed, 0 up-to-date, 0 skipped ==========
Finally build TileEngine project. You should get output similar to this:
1>------ Build started: Project: TileEngine, Configuration: Release Win32 ------
1>Executing tool...
1>..\tileengine.h(125): Warning(454): Setting a pointer/reference variable may leak memory.
1>Build log was saved at "file://d:\Development\Projects\MicropolisCore\src\TileEngine\python\Release\BuildLog.htm"
1>TileEngine - 0 error(s), 0 warning(s)
========== Build: 1 succeeded, 0 failed, 0 up-to-date, 0 skipped ==========
Now that everything is built you've got yourself 3 import libraries that can be used by python. At this point you could drive the system purely from python. The Linux port uses Tcl/Tk as it's windowing system and we'll get into using this to interact with the python output we created here in the next blog post.
This is a series of posts exploring and extending the Micropolis code. You can view the full list of posts here.
 This past holiday (I've been bugging him since November about it) my good friend Don Hopkins got a lot of work done on the finishing touches on releasing the original SimCity source code under the GNU General Public Library (GPL). The code won't have reference to any SimCity name as that has all be renamed to Micropolis. Micropolis was the original working title of the game and since EA requires that the GPL open source version not use the same name as SimCity (to protect their trademark) a little work had to be done to the code.
There's been changes to the original system like a new splash screen, some UI feedback from QA, etc. The plane crash disaster has been removed as a result of 9/11. What is initially released under GPL is the Linux version based on TCL/Tk, adapted for the OLPC (but not yet natively ported to the Sugar user interface and Python), which will also run on any Linux/X11 platform. The OLPC has an officially sanctioned and QA'ed version of SimCity that is actually called SimCity. EA wanted to have the right to approve and QA anything that was shipped with the trademarked name SimCity. But the GPL version will have a different name than SimCity, so people will be allowed to modify and distribute that without having EA QA and approve it. Future versions of SimCity that are included with the OLPC and called SimCity will go through EA for approval, but versions based on the open source Micropolis source code can be distributed anywhere, including the OLPC, under the name Micropolis (or any other name than SimCity).
The "MicropolisCore" project includes the latest Micropolis (SimCity) source code, cleaned up and recast into C++ classes, integrated into Python, using the wonderful SWIG interface generator tool. It also includes a Cairo based TileEngine, and a cellular automata machine CellEngine, which are independent but can be plugged together, so the tile engine can display cellular automata cells as well as SimCity tiles, or any other application's tiles.
The key thing here is to peek inside the mind of the original Maxis programmers when they built it. Remember, this was back in the day when games had to fit inside of 640k so some "creative" programming techniques were employed. SimCity has been long a model used for urban planning and while it's just a game, there are a lot of business rules, ecosystem modeling, social dependencies, and other cool stuff going on in this codebase. It may not be pretty code but it's content sure is interesting to see.
In any case, it's out there for you to grab and have fun with. It was originally written in C and of course is old (created before 1983 which is ancient in Internet time). Don spent a lot of time cleaning the code up (including ANSIfying it, reformatting it, optimizing, and bullet-proofing it) as best he could. Don ported the Mac version of SimCity to SunOS Unix running the NeWS window system about 15 years ago, writing the user interface in PostScript. A year or so later he ported it to various versions of Unix running X-Windows, using the TCL/Tk scripting language and gui toolkit. Several years later when Linux became viable, it was fairly straightforward to port that code to Linux, and then to port that to the OLPC.
There's still a lot of craptastic code in there, but the heart of the software (the simulator) hasn't changed. I know there will be efforts underway to port it to a better platform, replace the age old graphics with new ones, rewrite the graphic routines with modern-day counterparts, etc. The modern challenge for game programming is to deconstruct games like SimCity into reusable components for making other games! The code hopefully serves as a good example of how to use SWIG to integrate C++ classes into Python and Cairo, in a portable cross platform way that works on Linux and Windows.
Don also wrote some example Python code that uses the TileEngine module to make a scrolling zooming view of a live city with the Micropolis module, and a scrolling zooming view of a cellular automata with the CellEngine module. The TileEngine comes with a Python TileWindow base class that implements most of the plumbing, tile display and mouse tracking, so SimCity and the CellEngine can easily subclass and customize to suit their needs. You can pan with the mouse and arrow keys, and zoom in and out by typeing "i" or "o", or "r" to reset the zoom. The TileEngine supports zooming in and out, and has a lazy drawing feature that calls back into Python to render and cache the scaled tiles right before they're needed (so you can implement the tile caching strategy in Python, while the rendering is in efficient C++ code calling hardware accelerated Cairo -- and the Python code could easily render tiles with pretty scaled SVG graphics). The Micropolis engine can load a SimCity save file and run it, and use the TileEngine to draw it, but you can't actually interact with it or edit the map yet, since the user interface and other views haven't been implemented, just a scrolling zooming view of its tiles.Grab the source code from here and go have some fun!
Enjoy!
This is a series of posts exploring and extending the Micropolis code. You can view the full list of posts here.
I mentioned we were getting a release of TreeSurgeon out that included 2005 and now 2008 support. The code is all checked in so if you're interested in getting it, go for it. The "official" release hasn't been put together yet for due to problems with the third party libraries and tools TS includes when creating a new project.
The problem stems from the fact that TreeSurgeon uses old(er) and public releases of things like NCover in the build file it generates. These files are kept in a skeleton tree (where TreeSurgeon is installed to) and copied to the new tree you create when starting a new project. Trouble is Internet time has marched on and some of these tools no longer work for 2008.
When we updated the code/project generation for 2005/2008 support, it was a pretty simple matter of cleaning up the templates and generating new ones. The trouble comes from the tools that don't work with the 2008 compilers or .NET 3.5 framework. This is compounded by the fact that NCover is now commercial. The last (free) version is 1.5.8 but won't work against 3.5 assemblies and the new version (2.0) requires a trial key.
So it's a bit of a pickle when it comes to what version of a tool do we include with the latest version of TreeSurgeon that works for the new compilers? I didn't want to put together a released version of TS with a build that breaks (without developer intervention). There doesn't seem to be any other free coverage tool that I can find that will work here so I'm feeling a little stuck and looking for options.
Anyways, that's the cause for the delay in the official release. As I said, you can still grab the change set which will generate a 2005 or 2008 project however you'll need to manually upgrade the version of NCover and perhaps some other tools in the generated solution in order to get it to compile and pass all the tests. Need to take a look at the latest version of CI Factory to see what they're doing and maybe see if anyone else has some ideas. Feel free to chime in with your thoughts either in the comments here on the blog or the discussion forums here.
First post of the year and hopefully this is something useful. I think it is.
I'm currently doing a major automation-overhaul to our projects, trying to streamline everything. Part of this involves doing automated deployments of the projects to a location (say a file or web server) where a QA person can come along later and with the click of a button they can just launch an installer for any build of an application. This is very much structured like the JetBrains Nightly Build page you see here, but 100% automated for all projects using NAnt.
A lofty goal? Perhaps.
Anywho, the time to update the builds and page has come and I went hunting to see how I could do it (without having to write a silly little console app or something). To start with (and I'm not done here, but this works and is a model anyone can use) we have a basic XML file:
<?xml version="1.0" encoding="utf-8"?>
<builds>
<build>
<date>01/03/2008 15:03:41</date>
<build>0</build>
</build>
</builds>
This contains build information for the project and will be transformed using XSLT into something pretty (and useful once I add more attributes).
The challenge is that we want to append an XML node to this file during the deployment process, which is kicked off by CruiseControl.NET. Sounds easy huh. There are a few ways to do this. First, I could write that console app or something and have it update some file. Or maybe it would even write to a database. Or... no, that's getting too complicated. The next thought was to use the ability to write C# code in NAnt scripts, but then that started to get ugly real fast and more maintenance than I wanted.
Then I turned to xmlpoke. This little NAnt task let's you replace a node (or nodes) in an XML file. Trouble is that's what it's designed to do. Replace a node or property. Not append one. After about 15 minutes of Googling (my patience is pretty thin for finding an answer on the 3rd page of Google) I realized xmlpoke wasn't going to be good enough for this. Someone had come up with xmlpoke2 which did exactly what I wanted (appended data to an XML file), but to date it hasn't made it into the core or even NAntContrib.
After looking at the XML file I realized I might be able to use xmlpeek (read some XML from a file) and combine it with xmlpoke (modifying it on the way out) and write it back to the file. Maybe not the most elegant solution, but I think it's pretty nifty and it gets the job done.
First we have our XML file (above) so I created a target in NAnt to handle the update to the XML file:
<target name="publish-report" description="add the version deployed to an existing xml file">
</target>
Step 1 - Use xmlpeek to read in the entire XML node tree containing the current builds:
<!-- read in all the builds for rewriting -->
<property name="xmlnodes" value=""/>
<xmlpeek xpath="//builds" file="c:\autobuild.xml" property="xmlnodes"></xmlpeek>
Step 2 - Modify it by appending a new node with the new build info and saving it into a new property:
<!-- modify the node by adding a new one to it -->
<property name="newnode" value="<build><date>${datetime::now()}</date><build>${CCNetLabel}</build></build>" />
<property name="xmlnodes" value="${xmlnodes}${newnode}" />
Step 3 - Write it back out to the original XML file replacing the entire XML tree using xmlpoke:
<!-- rewrite it back out to the xml file using xmlpeek -->
<xmlpoke file="c:\autobuild.xml" xpath="//builds" value="${xmlnodes}" />
The result. Here's the updated XML file after running NAnt with our target task (and faking out the CCNetLabel that would usually get set by CruiseControl via a command line definition):
tools\nant\nant.exe publish-report -D:CCNetLabel=1
NAnt 0.85 (Build 0.85.2478.0; release; 14/10/2006)
Copyright (C) 2001-2006 Gerry Shaw
http://nant.sourceforge.net
Buildfile: file:///C:/development/common/Library/Common/Common.build
Target framework: Microsoft .NET Framework 2.0
Target(s) specified: publish-report
publish-report:
[xmlpeek] Peeking at 'c:\autobuild.xml' with XPath expression '//builds'.
[xmlpeek] Found '1' nodes with the XPath expression '//builds'.
[xmlpoke] Found '1' nodes matching XPath expression '//builds'.
BUILD SUCCEEDED
Total time: 0.2 seconds.
<?xml version="1.0" encoding="utf-8"?>
<builds>
<build>
<date>01/03/2008 15:03:41</date>
<build>0</build>
</build>
<build>
<date>01/03/2008 15:30:07</date>
<build>1</build>
</build>
</builds>
Now I have a continuously growing XML file with all my build numbers in them. Of course there's more info to add here like where to get the file and such but the concept works and I think it's a half decent compromise (to having to write my own task or more script). The cool thing is that you can even use it against a file like this:
<?xml version="1.0" encoding="utf-8"?>
<builds>
</builds>
This lets you start from scratch for new projects and start with build 1 (which will come from CruiseControl.NET). If the file didn't exist at all, you could even use the echo task or something like it to create the file, then update it with the task info above. Is it bullet proof? Hardly. It should work though and gives me the automation I want.
Well, I'm done for the day. That was a worthwhile hour to build this. Now I just have to go off and add in all the extra goop and hook it up to our builds.
Enjoy!
It's a party, last post of the year, let's see how we start off 2008.

Have a safe and happy evening!