Archives
-
Looking for a New Year's Resolution?
There are many exciting .NET topics waiting for us in 2004. Simply too much stuff to be tried and understood, too much knowledge to be gained. If you're making plans for 2004, here's one single thing I can fully recommend:
If you're not already doing it, start writing unit tests using a test framework.
Unit testing is one of these "I really should be doing this" concepts. Even though I read and heard about unit testing years ago, I only started doing it in 2003. Sure, I always had some kind of test applications for e.g. a library - who hasn't written one of those infamous programs consisting of a form and dozens of buttons ("button1", "button2", ...), each starting some test code. And it's not as if my software was of poor quality. But looking back, unit testing was the thing in 2003 that made me a better developer.
I'm using NUnit for my unit tests; it's so easy to use that a typical reaction of developers being introduced to NUnit is "What? That's all I have to do?". To get started, visit this page on the NUnit website, and follow the steps in the first paragraph "Getting Started with NUnit".
When I began writing unit tests in early 2003, I wrote tests for existing code. If this code (e.g. a library) is already successfully in use, this can be pretty frustrating, because the most basic tests are all likely to succeed. My first tests where pretty coarse, testing too much at once - maybe because the trivial tests (e.g. create a class instance, set a property and test whether reading it has the expected result) seemed like a waste of time.
In the course of time I moved more towards "test driven development", i.e. writing tests along with the code, often even before the implementation is ready. Now, if I create a new project, I always add a test project to the solution. This way my code and the corresponding tests never run out of sync. If I make a breaking change, the solution won't compile - it's that easy.
If you take this approach (writing test very early), even testing the most basic stuff can be pretty rewarding:
- Sometime typos or copy/paste mistakes are not caught by the compiler (e.g. when the property getter accesses a different member variable than the property setter) - one bug like this found by a unit test written in 5 Minutes can save you hours of debugging through a complete application.
- It's a very good test for the usability e.g. of your API. If it turns out that even a simple task requires many lines of code, you definitely should re-design your API (which is less of a problem at that early stage of development).
- The unit tests is some sort of documentation of how your code is used - don't underestimate how helpful this can be (by the way: I wrote a simple tool for generating examples for online documentation from unit tests).
- Last but not least: I know that some of the unit-testing folks don't like debuggers, but fine-grained unit tests are very good entry points for single stepping through your code.
So... what about a New Year's Resolution to start writing unit tests?
-
Dialogs are too much Stupid Code
If you develop a complicated dialog (editing non-trivial data structures, showing/hiding parts of the dialog), it usually turns out to be a lot of work until everything is working as it should - and this doesn't really surprise anyone. If you use something trivial as a OpenFileDialog or a MessageBox, you know that this is just a matter of minutes.
But what really gets on my nerves are these "simple dialogs". Imagine a dialog consisting of a couple of text fields and some checkboxes. Some text fields are disabled unless a certain checkbox is checked. And so on, I think you get the idea. Each time I have to write one of these dialogs, I...
- underestimate the actual time required to "get things right", and
- ask myself "how often did I write code similar to this?" when I move data in and out the dialog, handling OK and Cancel, enabling/disabling controls.
Sometimes I feel like a "human code generator" because there's virtually no real thinking involved when writing down the code for such a dialog.
Is this something I just have to get over with? Any ideas to keep the amount of code as low as possible?
-
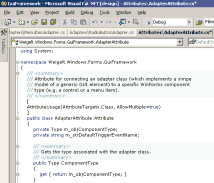
My First VS.Net Addin
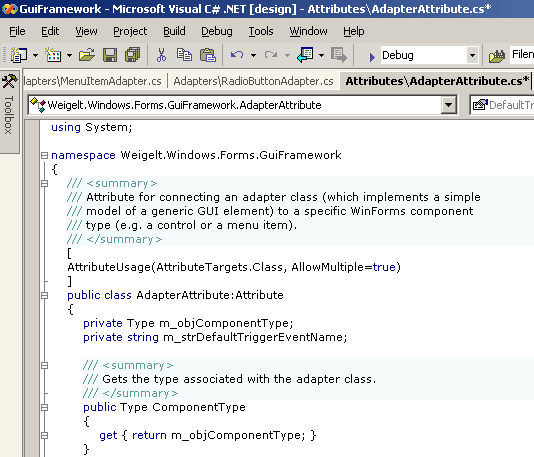
GhostDoc is my first VS.Net Addin. To get started, the first thing I did was to run the Addin wizard and look at the code (of course without reading any documentation...) -- and it all seemed pretty obvious. But what I couldn't find was how to define a hotkey in code. The method
AddNamedCommandhas a lot of parameters, really a lot. But where is the hotkey specified? In case anybody else is wondering: You have to set theBindingsproperty on the command object returned byAddNamedCommand.Usually I'm pretty good at finding stuff using Google, but this took me quite some time to find out. The problem was that my search dug up lots of questions and answers on how to redefine the keys using the dialog of the VS.Net IDE. The actual description of the
Bindingsproperty is completely fine, by the way, I just didn't find it at first. Maybe a comment regarding a possible key binding should be included in the code generated by the wizard. Speaking of the generated code for the addin, there's one thing I really want to know: Who came up with the name "Connect" for a class? -
GhostDoc News
My project GhostDoc is now a VS.Net Addin. But before I release the next version, there are a couple of things on my ToDo list I want to finish first:
- A rewrite of the configuration storage code
- A GUI for editing the configuration
The actual documentation generation will be the same for the next release; there are already a lot of things that can be done with the existing features, just by using the capabilities of the configuration settings.
More information on what's planned for GhostDoc after the release (no specific date yet).
-
Introducing: GhostDoc
[2004-08-22] As this old post has a pretty high Google rating, I'd like to emphasise that it does not contain up-to-date information. If you are interested in GhostDoc, I'd suggest to take a look at the GhostDoc homepage./// <summary>
/// GhostDoc is a VS.Net macro for automatically generating those
/// parts of a C# doc comment that can be deduced from the name
/// and/or type of a method or property.
/// </summary>In my previous post I already mentioned my current project "GhostDoc"; now a first public release is ready. Before I start explaining a lot of things, why don't just watch the small video showing GhostDoc in action (400k).
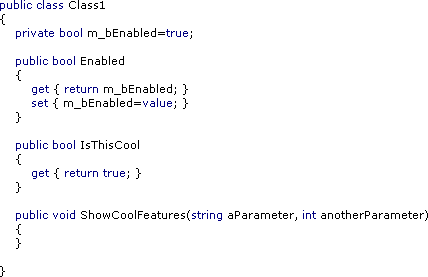
Now here's the basic idea for GhostDoc: When writing documentation comments (e.g. for an API) I tend to use "documentation patterns", e.g. the infamous "Gets or sets a value indicating whether" for a boolean property. And my summary often consists of what I call "method/property name as a sentence plus X", with X being something that adds some value. Example: if I have e.g. a method "void CreateDocumentBuffer(int bytes)", I write "Creates the document buffer with the specified size in bytes". Of this sentence, typing the words "Creates the document buffer" is pretty brainless labor (because I already typed the method name). So wouldn't it be cool if some macro would do that for me? Well, that's what GhostDoc is about; or to be exact, what the very first version started with.
GhostDoc works the following way: When you hit a hotkey inside the c# source editor of VS.Net, GhostDoc finds out what kind of code element the cursor is currently in (e.g. a method), determines the name and (return) type and uses these to look up a matching template for the documentation comment (the templates are stored in an XML configuration file).
The current version of GhostDoc is definitely a "technical preview". It's the result of a macro that grew bigger and bigger until it had to be supported by code in a C# assembly. Now all code is in the assembly and the macro consists only of a single method call. So GhostDoc is not (yet) a VS.Net addin. It's pretty stable; stable enough for me to use it both at home and at work. The good thing is that because of the way GhostDoc works, it simply can't mess up your source code (unless VS.Net has some serious problems) and undo works nicely, too.
Installation
The installation is currently completely manual
- Download GhostDoc_0.5.zip
- Unzip it to a directory of your choice
- Move "Weigelt.Tools.GhostDoc.dll" and "Weigelt.Tools.GhostDoc.Texts.xml" to the "Common7\IDE\PublicAssemblies" subdirectory inside your VS.Net 2003 installation directory.
- Start Visual Studio and go to the Macros IDE (Tools - Macros - Macros IDE)
- Open the MyMacros node in the project explorer
- Add a reference to the "GhostDoc macro support" assembly (it will appear automatically in the list of the "Add Reference" dialog)
- Right click "MyMacros" and "Add existing item", browsing for the "GhostDoc.vb" file in the directory you unzipped to.
- Save and leave the Macros IDE.
- Open the options dialog (Tools - Options) and define the keyboard bindings; simply type "ghost" in the "show commands containing" input field and you'll see the two commands (I use Ctrl-D for CreateComment, and Ctrl-Shift-D for RefreshConfiguration, but it's completely up to you)
Getting started
Move the cursor into a method or a property without a documentation comment, and hit e.g. Ctrl-D (if a documentation comment already exists, nothing will happen). Note that your code should use .NET naming conventions, otherwise the results can be pretty strange, sometimes even funny. GhostDoc is highly configurable, but in this version the default configuration is far from being finished. Simply take a look into the file "Weigelt.Tools.GhostDoc.Texts.xml" and you'll get an idea how things work.
Known Issues
- As already mentioned, the generated summary can sometimes be pretty off. In many cases, a new rule in the configuration will help - if you add such a rule, please send me a copy.
- There is virtually no user documentation. Some information can be found inside comments in the configuration file.
Plans for the future
- More entries in the configuration file
- A GUI for editing the configuration
- Better installation
- A release including source code, maybe opening a GDN workspace.
- ...
Update 01.12.2003: I'm now working on turning GhostDoc into a Visual Studio .NET addin. So if you're put off by the ugly installation of the current version, you may want wait just a little.
-
Coming soon... GhostDoc
It's pretty late here in Germany, but I cannot go to bed without posting screenshots of the first successful runs of my new VS.Net macro (with a little help from some C# code):
Before:
After:
(Macro called three times)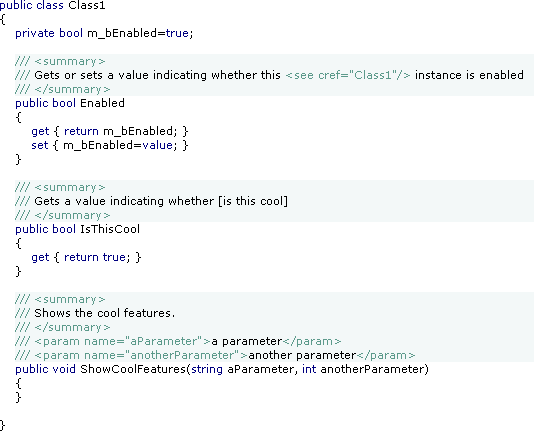
GhostDoc helps writing API documentation by generating the "obvious" parts of the documentation from the identifier names. This is not a replacement for real documentation, but it's a good starting point. The text generation can be customized, here's an excerpt from the configuration file:
<Properties>
    <!-- Default -->
    <Property>
        <summary>
        $$NameAsSentence$$
        </summary>
    </Property>


    <!-- Default for all boolean properties -->
    <Property type="System.Boolean">
        <summary>
        $$Access$$ a value indicating whether [$$NameAsWords$$]
        </summary>
    </Property>


    <!-- Specific definition for the "Enabled" property -->
    <Property type="System.Boolean" name="Enabled">
        <summary>
        $$Access$$ a value indicating whether this $$Class$$ instance is enabled
        </summary>
    </Property>
</Properties>
I'll have a beta ready soon - stay tuned.
-
Personal VS.Net Editor Color/Font Settings (again)
Sometimes after quite some time an old weblog entry unexpectedly starts drawing feedback. So for those who like my VS.Net font and color settings...
...here's the registy file that I use to transfer my settings when I install VS.Net on a new system. As this registry file may contain more settings than you would like to have changed, please do yourself a favor and backup your current settings by exporting
HKEY_CURRENT_USER\Software\Microsoft\VisualStudio\7.1\FontAndColorsin Regedit before using the registry file. -
Slow "Project Location" Dialog?
If you ever wonder why the "Look in" drop down list in your VS.Net is suddenly extremely slow (hey, I never had any problems, and it worked just fine yesterday...), think about your network drives. A network drive connected to a computer that isn't available can remain unnoticed for days, until you use that drop down list... Simply disconnect the network drive and the problem is gone.
-
Avalon/XAML: Cool, but...
I spent most of the past evening (European Time) reading blogs, soaking every little bit of information about the things to come and I must say that I was as excited as I am when following my favorite basketball team's away games reading text messages on the their home page.
Avalon/XAML sounds like a really good idea to me, but I'm a bit dissappointed that we still seem to be stuck with the same old VB model of "here's the control, it's got an event, there's the event handler". In all the years I have programmed desktop-style applications, it never has been a problem to get a function called when the user clicks on something. What I have been struggling with is the visible/invisible, enabled/disabled logic.
At some point in a developer's life, most either have written or had to maintain a monster application where adding one additional button would mean changing code in many different places just to make sure the view state of the button is correct. Of the different approaches how to solve this problem, I currently favor the use of the command pattern, which I have used successfully in several applications.
The command pattern is only one approach, I'm pretty open for other solutions if they're getting the job done. If Microsoft is all about creating next-gen stuff, I definitely expect an improvement in this area. Because that's where a lot of development and testing time is spent ("if I click here, that button is disabled until you select a list item here, which causes this icon to disappear...")
To those who are at the PDC:
- In the demos, are there examples of handling the view state (visible/enabled) logic? I suspect that demo code is usually limited to "hey, look how I call this method my clicking that button".
- Could somebody please ask about plans for solving this problem?
[For those interested in the command pattern]
In the C#/.NET world, I've seen the use of the command pattern in different variations. There was an article in MSDN magazine 10/2002 (which explained the basic ideas well, but I think the actual library sucked in many ways), and SharpDevelop does use the command pattern, too. (Regarding SharpDevelop, I must admit that I didn't look beyond the public interface of a command, as I wanted the library I was writing at that time to be as clean as possible from other peoples ideas/code. Right now I'm working on the third version of that library; I will release it under a BSD-style license in the coming weeks). -
More Layout with Docking
After my recent articles about visual inheritance (Visual Inheritance - How to escape Layout Hell and Visual Inheritance Revisited) I received some mails in which people asked me about docking and windows forms layout in general. One question was about how to resize elements of a layout proportionally when the form is resized, without calculating lots of coordinates.
Imagine you have a form like this:
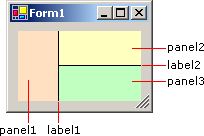
and you want it to resize like this:
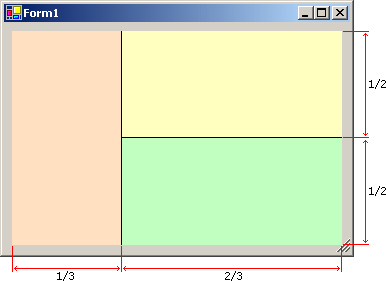
Using docking, this is really easy:
Step 1: Docking
- panel1: Dock left
- label1: Width 1, Dock left
- panel2: Dock top
- label2: Height 1, Dock top
- panel3: Dock fill
(DockPadding.All=8)
Step 2: Handling the form's resize event
protected override void OnResize(EventArgs e)
{
    base.OnResize(e);
    int dx=this.ClientSize.Width - this.DockPadding.Left - this.DockPadding.Right - label1.Width;
    int dy=this.ClientSize.Height - this.DockPadding.Top - this.DockPadding.Bottom - label2.Height;
    panel1.Size=new Size(dx/3,panel1.Height);
    panel2.Size=new Size(panel2.Width,dy/2);
}
You only need to calculate one width and one height - everything else is taken care of automatically by simply docking the layout elements.
-
Visual Inheritance Revisited
- V...I.... What's the "V" stand for?
- Visual.
- What's the --
- Inheritance.
- Ohhhhh........ What was the "V" again?My recent article about visual inheritance generated a lot of positive feedback (at least what I would call "a lot"). In this post, I'll try to answer some the questions I received via email.
Question: How can I reproduce the problems you describe? My first quick test ran without problems...
Create a new Windows Forms application, and add two labels and a button to the form "Form1" (setting the background colors of the labels makes it easier to see what is happening later). Arrange the controls on the form as shown in the following screenshot:
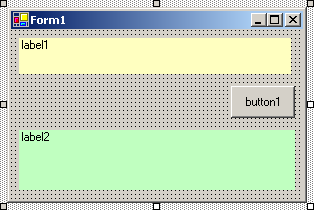
Now anchor the controls:
- label1: Top, Left, Right
- button1: Top, Right
- label2: Top, Bottom, Left, Right
Compile the project, and add an inherited form ("Form2"). The form will look like this:
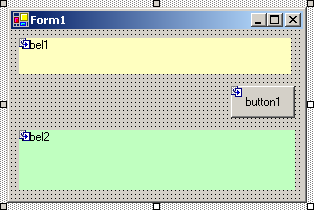
Set the
Textproperty to "Form2". Resize the form and add a button ("button2"):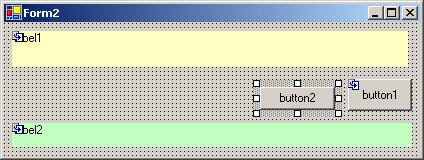
Anchor the button to Top, Right, then compile again.
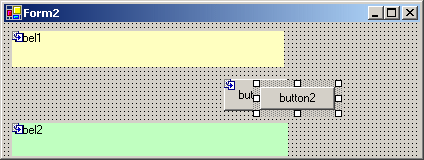
Be prepared for a surprise: after the project is compiled, you get something like this...
Question: What's the reason for this odd behavior?
Let's take a look at the code of the
InitializeComponent()method of base form:private void InitializeComponent()
{
this.label1 = new System.Windows.Forms.Label();
this.button1 = new System.Windows.Forms.Button();
this.label2 = new System.Windows.Forms.Label();
this.SuspendLayout();...code for the controls...
    //
    // Form1
    //
    this.AutoScaleBaseSize = new System.Drawing.Size(5, 13);
    this.ClientSize = new System.Drawing.Size(292, 169);
    this.Controls.Add(this.label2);
    this.Controls.Add(this.button1);
    this.Controls.Add(this.label1);
    this.Name = "Form1";
    this.Text = "Form1";
    this.ResumeLayout(false);
}
Obviously, this is generated code. When speaking of "serialization" of objects, people usually think of serializing an object to binary data or XML; in this case the object (instance of class
Form1) is serialized to code. This code contains everything that is required to create the layout and the controls ofForm1exactly the way it was specified in the forms designer. Every property is set exact to the required value, e.g. if a panel is docked, not only is theDockproperty set, but also theLocationandSize. So events are neither necessary nor wanted (because of their sheer quantity when settings properties like like e.g.Sizefor each control). This is why basically everything except the creation of the control instances is kept inside the linesthis.SuspendLayout();
and
this.ResumeLayout(false)
The call to
SuspendLayout()temporarily suspends the layout logic,ResumeLayout()turns it back on. The argumentfalsetells the form not to handle pending layout requests, because there's no need to - everything is already laid out as it was designed. So far, everything is ok.Now, what's happening inside the derived class
Form2?In each form class, the constructor of the class calls the method
InitializeComponent(). This method is private, so each class has its own method. When an instance of classForm2is created, the order of execution is- Enter Constructor
Form2() - Enter Constructor
Form1() - Call
InitializeComponent()of classForm1 - Exit Constructor
Form1() - Call
InitializeComponent()of classForm2
In the moment the constructor of the base class is left, the layout and the controls are perfect for a
Form1instance - but that's not what we want. The methodInitializeComponent()of classForm2contains the code that is necessary to achieve the desired layout by tweaking the base form and adding the second button. While setting theTextproperty to "Form2" is rather trivial, setting theClientSizeproperty causes serious trouble. The problem is that the size is set while the layout logic is suspended; i.e. the size of the form is changed, but the anchored elements of the base class are not updated.If you're interested, try the following:
- Remove class
Form2 - Save everything, close all windows
- Recompile
- Create
Form2again (as described above), but don't recompile. - Close the designer window, open the code window
- Remove the
SuspendLayout()andResumeLayout()statements fromInitializeComponent()in classForm2. - Save and close the window
- Recompile
If you now open
Form2in the designer, the form will be fine. But if you change anything (e.g. move the second button) and recompile, the form will be scrambled again. This is because the code ofInitializeComponent()was generated again - including theSuspendLayout()andResumeLayout()statements. By the way: if you don't put a control on the derived form, the two statements are not generated, and thus the derived form is displayed as expected. This explains why some people at first couldn't reproduce the effects I described in the other article.Question: So why does docking work, but not anchoring?
- Docking tells a control to grab as much space as possible (for top/bottom/left/right: towards to the specified direction) until a border of the container is reached. When the size of the control's container changes, the border is moving, so the docked control will resize itself accordingly.
- Anchoring tells a control to keep a constant distance between a specified border (top/bottom/left/right) of the control and the corresponding border of the container at all times. Now if the container is resized while layout is suspended (which is the case in
InitializeComponent()of classForm2), the anchored control does not notice the change. When layout is resumed, the control will keep the distance that exists at this time. This can be observed if you resize the form either inside the forms designer or at run time. The anchoring works perfectly, but unfortunately using the wrong offsets...
-
I just can't get used to the Command Window
I have been using VS.Net for slightly more than 2 years now, and still there's one thing that really can't get used to: the command window (to be exact: the command window in immediate mode). Maybe it's because it is different from the command window of VB6 (which is more like a C64-style full-screen editor). This is one of those cases where I'm really willing to get used to something but I just can't.
- I want to clear the command window - so what do I do? When I think about doing it, I use the context menu (right click -> popup menu -> clear all). But when I act instinctively, I hit Ctrl-A, Del (which doesn't work)
- I want to copy something from the text in the lines above the current line and use it - not possible without using the mouse, because I cannot move the cursor with the cursor keys. It is a fully understandable design decision to use the cursor keys for scrolling in the command history, but I somehow don't get it. Maybe it's because I don't need items from the command history that much (unlike when I use "cmd.exe" where I don't have a problem with the line-oriented editor).
- I want to clear only parts of the output - not possible. That can be very frustrating.
Is it just me? Am I getting inflexible? Am I missing some option I can switch? Or did somebody write an addin for VS.Net?
-
Just for Fun: Simple Control for Terminal-style Output
The other day I was playing around with the RichTextBox, learning how to use this control. One of my experiments produced the effect of text being displayed on an old terminal, character by character.

Now I've wrapped this code in a simple control. Please don't ask me what it can be used for. Maybe for an "About..." dialog. I don't even know what I will do with it. It's just that from time to time I have to write some useless fun stuff to relax a little ;-).
You can download the code (VS.Net 2003) here; an example project is included so it's just "unzip, open solution, hit F5".
The
Write()andWriteLine()methods are used for adding text to the output,ClearScreen()empties the output area. The control can be customized using the propertiesBackColor,ForeColor,FontandCharactersPerSecond. -
Visual Inheritance - How to escape Layout Hell
Visual inheritance (VI) is a very powerful feature; unfortunately, some of the more tricky bits are not that well-documented. A lot of things can go terribly wrong (like controls moving themselves to unexpected locations), as I had to learn the hard way in the last weeks. But if you follow a few simple rules, VI does work reliably.
First a short introduction for those who haven't looked into VI yet (actually, it took me some time to really discover VI). In C# (and other .NET languages) forms and controls are no longer "magic" things (like e.g. in VB6) but simply classes derived from special base classes (e.g. System.Windows.Forms.Form). Such a class can in turn be used as the base class for another class; if a base form contains controls, the derived form inherits them. Again, there's nothing magical to this all; when looking at the code (or better: single stepping through it), it's pretty obvious how VI works. The constructor of each form/control class contains a call of a private method "InitializeComponent()". If B is derived from A, then the constructor of A is called first (thus "InitializedComponent()" of A), then the constructor of B (and "InitializeComponent()" of B).
VS.NET directly supports VI, i.e. it is possible to edit a derived form (or user control) in the windows forms designer. By default, "editing" a derived form means adding additional controls. This is because controls added to a form are marked as "private", i.e. they are not accessible from a derived class. Again, as we're simply dealing with classes, it's just a matter of changing the access specifier to e.g. "protected". Inside the forms designer, this can be done by changing the control's "Modifiers" property.
Here's a typical example for visual inheritance: Imagine you want to have a nice looking header on all of your dialog windows, maybe something like this:
With VI, you define a base class for all your dialogs, containing the header (a panel docked to the top, with a picture box for the image and a label for the text). You then define two properties on the form for setting the icon and title text:
public string TitleText
{
    get { return m_lblTitle.Text; }
    set { m_lblTitle.Text=value; }
}
public Image TitleImage
{
    get { return m_picTitle.Image; }
    set { m_picTitle.Image=value; }
}
If you derive a form from this base class, your derived form will automatically feature the header defined in the base class; using the two properties, the header can be customized. Cool, huh?
This is usually the point where articles describing visual inheritance stop, leaving out some of the really important questions:
Question: How do I make sure the controls on the derived form are positioned correctly if the size of the header changes?
Define a panel on the base form below the header and make it accessible from the derived form by setting its access specifier to e.g. "protected". Set "Dock" to "Fill". In your derived form, you drop your controls into this panel. If the size of the header changes, the controls will be repositioned automatically, as they are positioned relative to the upper left corner of the panel they live in.
DON'T position the panel manually and set the anchor to "Top, Bottom, Left, Right". This will not work correctly if the size of the derived form differs from the size of the base form.
Question: But I want to define specific areas for the controls on the derived form - how do I do this without using anchors?
Use nested panels and the "DockPadding" property. The following image shows a base form with two panels to be used in derived forms (panels #3 for buttons like OK and Cancel, and #5 for all other controls):

Of all the panels, only #3 and #5 are set to "protected", the remaining are set to "private".
Question: What is so bad about anchors?
As a rule of thumb, use anchors other than "Top, Left" only on forms/controls that are not used as the base for other forms/controls. This is because the layout of anchored controls will not be updated if the size of the derived form/control is changed in the "InitializeComponent()" method of the derived class. If the form is resized later, things are Ok. This is one of the reasons why this problem sometimes remains unnoticed until some time later, when suddenly VI seems to be broken.
Question: But I can fix it by making the controls "protected"?
Yes and no. First of all, if form A contains a control X that is anchored, and form B is derived from A and has a different size, then setting X to "protected" fixes the problem only for B, but not for a form C derived from B. And under some circumstances there still seem to be some problems left even in B (I didn't invest too much time into researching this, though)
From a OOD point of view, making lots of controls accessible from derived classes only to fix layout problems isn't such a good idea, anyway. If your base form contains e.g. a list, then it's better to offer only the concept of a list through properties, methods and events, but not the actual listbox control. If you decide to switch to a dropdown list or a listview at a later time, you don't have to touch the code in the derived classes.
Question: How do I position OK and Cancel buttons in the lower right corner without a gazillion nested panels?
A lot of layout can be done with surprisingly few panels. Of the panels shown in the image shown above, the divider panel is actually not necessary (I just added it to make things a bit easier to understand in the first step). The secret is the right combination of docking and dock padding. Take a look at this:
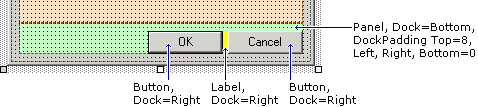
The buttons are 23 pixels high, the padding at the top is 8 pixels, so the height of the panel was set to 31 pixels.
Question: But what about more complex layouts?
From my own experience, if you have a base form with a complex layout, something already went wrong in the (non-visual) design of your code. Note the word "base": On a normal form e.g. for data entry, a complex layout is nothing unusual or even bad. But if you have a base form, you want to reuse something on that form - if this "something" is too complex, it should be encapsulated in a user control. User controls are a powerful tool for reducing the complexity of layout and code. Most layouts can be broken down to a few user controls which in turn can be positioned easily using docking and dock padding. And it's not a secret that code definitely benefits from dividing it into smaller units.
If you know that your user control will not be used as the base for another control (you could make it
sealedas a reminder), you can again use anchoring. Here's the funny part: You can use anchoring inside a control that lives on a form that in turn is used as the base for another form. But of course, you cannot use anchoring to position the user control on the base form.Conclusion
- Don't use anchoring on forms or (user) controls you want to use as the base for other forms/controls
- Look at what you can achieve with panels, docking and dock padding
- Reduce complexity by using user controls (you may want to read a bit about user controls here).
Update (28.10.2003)
Since the original post, I have written two follow-ups that may be of interest for developers using VI and/or docking:
- Visual Inheritance Revisited (more detailed information about VI) and
- More Layout with Docking (not VI-related)
-
Find (Wouldn't it be cool, part 3)
Each time I'm searching my source code for the word "is", I wish VS.Net had something like this:
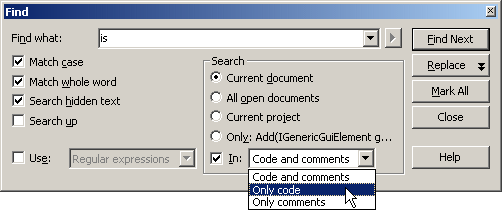
-
When your WinForms UserControl drives you nuts
WinForms user controls are that kind of technology that seems to be very easy at first, works pretty well for quite a while and then BAM! explodes in your face. I spent some hours today solving problems with a control that was working fine in the running application, but just didn't like the IDE's designer anymore, throwing exceptions all over the place. Here are some tips based on what I learned today searching Google's Usenet archive:
1. Don't take things for granted
Just because you can create a simple user control (e.g. combining a text field and a buttons) without reading any documentation, doesn't mean that knowledge about what is actually happening in design mode isn't necessary. Always keep in mind that there's some code running even though your program is not started. When a form or a control is displayed in the IDE in designer view, its (default) constructor is called which in turn calls InitializeComponent(). And this is where the trouble usually starts when this form/control contains a badly written user control.2. Take care of your control's public properties
If you don't add any attributes to a read/write property (huh, what attributes?), two things happen:- The property is shown in the "properties" window in the IDE.
- The initial value of the property is explicitly set in the
InitializeComponent()method.
Hiding properties that don't make sense to be edited at design time is a good idea even if you don't intend to write a commercial-quality, bullet-proof control ready to be shipped to thousands of developers. It's simply a matter of good style and it's done with very little effort using the
Browsableattribute:[ Browsable(false) ]
public string MyProperty
{
...
}The second point can be quite a shocker in some cases, because it means that
- the property is read when the control is placed on a form (quick experiment: throw an exception in the "getter" and see what happens in the designer).
- the property is set at the time the control is created, not when it is actually added to the form.
As long as your control only gets or sets the value of a private member variable, things are fine. But if e.g. reading the property triggers some actions that require the control to be completely initialized, you can get into trouble (remember the "Add any initialization after the InitializeComponent call" comment in the constructor?). And setting the property "too early" can be a problem e.g. if your property's setter contains code that performs some kind of automatic update.
This behavior of the designer can be avoided by using the
DefaultValueattribute:private string m_strMyText="";
...
[ DefaultValue("") ]
public string MyText
{
...
}The
MyTextproperty will not be set to "" in theInitializeComponent()method (which would be the case without the attribute).While you're at it, consider adding the
DescriptionandCategoryattributes as well. Adds a nice touch.3. Don't rely on
this.DesignModetoo much
The inheritedDesignModeproperty of your user control is an easy way to find out whether the control's code is running in the designer. Two problems:- You can't use it in the control's constructor. At that point, the control's "Site" (which provides the actual value of
DesignMode) hasn't been set, thusDesignModeis always false in the constructor. - "Running in the designer" is a matter of point of view:
- When editing a control
MyControlin the designer,MyControlis obviously in "design mode". - When using
MyControlon a form being edited in the designer,MyControlis still in "design mode". - But if
MyControlis placed onMyOtherControl, andMyOtherControlis placed on a form,MyControlis no longer in design mode (butMyOtherControlstill is)
- When editing a control
4. If you just don't know what to do: debug!
Open the project's properties dialog, set the debug mode to "program", apply, set "start application" to your VS.Net IDE ("devenv.exe" in the "Common7\IDE" directory). Set some breakpoints in your code (e.g. in property getters/setters) and start debugging. A new IDE will open (empty), you load the project and then open the control in designer view. Cool stuff. -
Intellisense (Wouldn't it be cool, part 2)
Everytime I use intellisense on a class with a lot of members (e.g. a class derived from System.Windows.Forms.Form) I get overwhelmed by the huge dropdown list if I'm looking for a member I don't know the exact name of.
So wouldn't it be cool if instead of this...
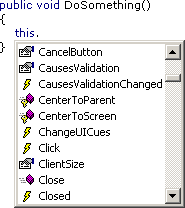
... VS.Net 200x would offer something like this:
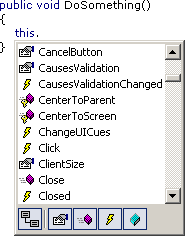
Hiding inherited members...
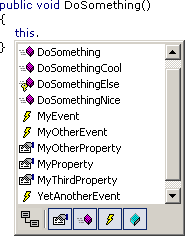
...or showing only certain kinds of members (e.g. only events)...
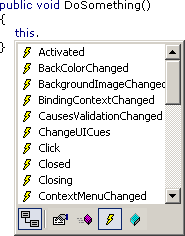
...would be really nice features (and of course something like this is still on my wish list).
-
C# Project File Quote Madness
When looking at a ".csproj" file, a developer's first reaction is "cool, it's XML, I can read and write it". It may be missing the "<?xml ... ?>" processing instruction, but who cares - you can Load() it into a System.Xml.XmlDocument, so everything's fine.
As long as you intend to only read from the ".csproj" file, that's the end of the story. But if you actually want to write to a ".csproj" file (not such a good idea anyway), be prepared for an unpleasant surprise. If you Save() the XmlDocument to a file, and one of the of the gazillion attributes contains a quote, the saved project file is virtually worthless.
An example: Say you put echo "Hello World!" into your post build step. If you load the resulting project file into an XmlDocument and save it back to a file, you'll get something like this:
... PostBuildEvent="echo "Hello World!"" ...
Looks ok, right? Not to VS.Net. Because VS.Net expects this:
... PostBuildEvent = 'echo "Hello World!"' ...
So when you load the project file back into VS.Net, the next time the post build step is performed, VS.Net tries to execute "echo "Hello World"", which of course fails with a lot of noise (remember that "&" has a special meaning on the command line). XmlDocument is smart enough to read and understand the original ".csproj" file (the single quotes are valid XML after all), but when saving to a file, it uses double quotes to surround the attribute value and escapes quote characters inside the value if necessary.
The fact that VS.Net is not able to read the file makes me wonder what kind of XML parser is used inside VS.Net - did somebody have the stupid idea to write one from scratch?
Before somebody tells me that I'm not supposed to manipulate the ".csproj" file, here's a way to make VS.Net look stupid without any external help:
Put echo "Hello 'World'!" into the post build step. VS.Net writes the following into the project file:
... PostBuildEvent = "echo "Hello 'World'!"" ...
Oops... attribute value surrounded by double quotes, escaped quotes inside... that means trouble. If you build the project immediately after setting the post build step, "Hello 'World'!" appears in the build output as expected. But if you (re)load the project, BLAM! "Post-Build Event failed".
-
Documentation Patterns
Keith writes about documentation - or the lack thereof. Even though writing documentation inside C# source files brings immediate benefits (e.g. tooltips when using intellisense) and is generally a good idea for any non-trivial library, a lot of code is written without proper documentation. An amazing fact is the huge difference between the number of people who have heard about NDoc and the number of people who have actually tried it (let alone use it on a regulary basis). C'mon, spend the 15 minutes of your life to install and try it. I tend to be rather impatient when trying new tools, and even I got quick results that did convince me to spend a little more time getting to know the different options.
On the non-technical side, there's the problem that good developers are not necessarily good authors (note that I'm not speaking about very good developers). So even if IDE support for writing documentation gets better and better (maybe something like this?), some people feel that they would have to spend too much time to write useful documentation.
Let's forget about that extensive seven-part hands-on tutorial for your library that you would write if you were a fast writer so could squeeze it into the typical tight schedule (did I just hear somebody saying "I don't read these anyway, just gimme the reference docs, some short samples and I'll get started myself"?).
What really gets on my nerves is a library without the minimal online documentation for intellisense while typing and a help file for browsing through the library to get a "feel" for the overall structure. Every public method or property should be described in one or two sentences. If this is not possible, the method or property either a) does something absolutely incomprehensible amazing in one single step, or b) it sucks. While a) may be fascinating, not being able to write the short summary usually means b), i.e. identifies bad structure in the code.
What about "self-describing" method or property names? What else to write e.g. about a method "BuildCache" rather than "Builds the cache"? If you look at such a method and think about it just a bit longer, you'll come up with at least one more fact (no implementation details, I think we'll all agree on that), that may be trivial at first sight (e.g. what cache?), but can be a help for future users (or for yourself in a couple of weeks). If a method has parameters, it's a good idea to mention the most important one or two, e.g. "Builds the foo cache from the specified bar" - this helps getting a rough idea about the method. By the way, keep in mind that online documentation is not necessarily read in a particular order.
But what if you still have problems finding the right words for even a short description? Well, simply look at the .NET framework documentation and
steal sentencesget inspiration from there. A lot of bread-and-butter stuff can be documented using simple "patterns" you'll find there. An example: Before switching to .NET, I used to have many different ways to document a flag. Now I always begin with "Gets or sets a value indicating whether ..." for boolean properties. This may not be the best way to do it, but people are so used to it from the Microsoft docs, that they feel right at home.Conclusion: Reading other people's documentation with open eyes (to detect the patterns used over and over again to achieve consistency) is an important step to writing documentation with less effort.
Update 2006-09-28: Fixed some broken links
-
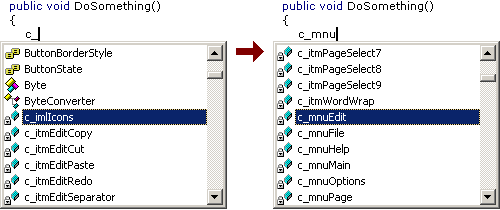
One Reason why I use Hungarian Notation
While I adjusted my coding style for "everything publicly visible" to match the Microsoft guidelines, I still use Hungarian Notation internally (in a simplified form). One can argue whether or not it increases the readability of code, resulting in long discussions about the pros and cons.
One feature of HN I really love (and just don't want to give up) is how well it works in conjunction with Intellisense.
Example 1: Member variables ("m_" prefix):
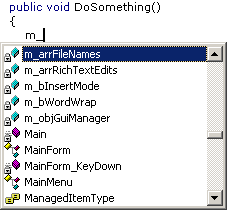
Example 2: Controls ("c_" prefix):
-
ExtractXml: Including Examples in Your API Documentation
When using an API it's always nice to have some examples showing how the different classes and their methods and properties are actually used. Examples usually come in two flavors:
- Full projects (more or less) ready to compile
- Code snippets in the documentation (e.g. generated by NDoc)
Ok, I have to admit that I tend to ignore the full projects. When I need an example to understand something, I'm often looking for quick answers - not easy to get in an example project sometimes showing several concepts at once.
The small examples usually consist of maybe only a few lines of code, that in many cases are not ready to be compiled (at least not without adding some more code). But often these examples are exactly what is required to get quick help, getting straight to the point.
Unfortunately for the API developer, sample code inside the <example> tag of the XML Doc comments is a pain to create and maintain.
- The code has to be tested.
A missing semicolon in an example is definitely not the best way to convince the API users of the quality of the documentation. And if the code shows something that simply is not possible (e.g. a feature that was planned, but later cut from the release), people get really upset. - The code has to reflect the current state of the API.
As the work on the API continues, sample code copied and pasted into your documentation has to be updated over and over again.
With a large number of examples, the only real solution is to take sample code from actually working code (e.g. from some of the NUnit tests for the API) and to automatically insert these code snippets into the doc comments.
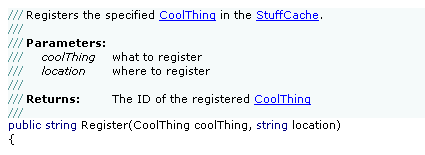
The <include> tag of the XML doc comments allows the inclusion of XML fragments stored in an external XML file. I wrote a small command line tool (ExtractXml) that generates an XML file from a ".cs" file. Read more about it here.
-
ExtractXml: Including Examples in Your API Documentation
When using an API it's always nice to have some examples showing how the different classes and their methods and properties are actually used. Examples usually come in two flavors:
- Full projects (more or less) ready to compile
- Code snippets in the documentation (e.g. generated by NDoc)
Ok, I have to admit that I tend to ignore the full projects. When I need an example to understand something, I'm often looking for quick answers - not easy to get in an example project sometimes showing several concepts at once.
The small examples usually consist of maybe only a few lines of code, that in many cases are not ready to be compiled (at least not without adding some more code). But often these examples are exactly what is required to get quick help, getting straight to the point.
Unfortunately for the API developer, sample code inside the <example> tag of the XML Doc comments is a pain to create and maintain.
- The code has to be tested.
A missing semicolon in an example is definitely not the best way to convince the API users of the quality of the documentation. And if the code shows something that simply is not possible (e.g. a feature that was planned, but later cut from the release), people get really upset. - The code has to reflect the current state of the API.
As the work on the API continues, sample code copied and pasted into your documentation has to be updated over and over again.
With a large number of examples, the only real solution is to take sample code from actually working code (e.g. from some of the NUnit tests for the API) and to automatically insert these code snippets into the doc comments.
The <include> tag of the XML doc comments allows the inclusion of XML fragments stored in an external XML file. I wrote a small command line tool (ExtractXml, download here) that generates an XML file from a ".cs" file. It's pretty much of a quick hack without much planning, but it's good enough for my own work.
This is how it works: the ".cs" file is decorated with "////" comments containing XML processing instructions and tags:
//// <?xml version="1.0" encoding="utf-16" ?>
//// <Documentation><!--
using System;
using System.Diagnostics;
namespace ExtractXml
{
    /// <summary>
    /// Summary description for Example.
    /// </summary>
    public class Example
    {
        /// <summary>
        /// Does something really cool.
        /// </summary>
        public void DoSomething()
        {
            //// -->
            //// <Example name="HowToAddStrings">
            //// <example>
            //// <b>How add two strings:</b>
            //// <code>
            //// <![CDATA[
            string str1="Hello ";
            string str2="World";
            string str3=str1+str2;
            //// ]]></code>
            //// </example>
            //// </Example><!--
            Debug.WriteLine(str3);
        }
    }
}
//// --></Documentation>
The tool is called like this:
ExtractXml inputFile.cs outputFile.xml
It removes the "////" comments, loads the resulting text into an XML document (detecting errors in the XML), removes the XML "<!-- ... -->" comments and saves the result:
<?xml version="1.0" encoding="utf-16"?>
<Documentation>
<Example name="HowToAddStrings">
<example>
<b>How add two strings:</b>
<code>
<![CDATA[
string str1="Hello ";
string str2="World";
string str3=str1+str2;
]]></code>
</example>
</Example>
</Documentation>
In your API code you reference the example like this:
/// ...
/// <include file="Example.xml" path="Documentation/Example[@name='HowToAddStrings']/*"/>
/// ...
Note that you are completely free regarding the structure of the XML tags, as long as the result is a valid XML document.
Download
The download contains the executable (for .NET Framework 1.1) and the source (project file for VS.Net 2003).
Recommended Links
- XML Comments Let You Build Documentation Directly From Your Visual Studio .NET Source Files (MSDN Magazine, June 2002)
- <include> (C# programmer's reference)
-
Part 2: My First Computer - The "CoCo"
(continued from part 1, "How it all began")
My First Computer - The "CoCo"
So in May 1983 a green screen showing 32x16 black characters appeared on the TV screen in my room. From this day on, I was completely hooked. At first, my father tried to learn BASIC, too, but after some time he lost interest in programming and became what could be best described as an "advanced user". Programming turned out to be very frustrating. With about 5 days of programming experience I tried to write a "Space Invaders" clone - the first of my many software development disasters.What became pretty clear after rather short time was that the "TRS-80 Color Computer" was a rare thing in Germany. It was only sold in Tandy stores, definitely not to be found in every town. One day we were told by word-of-mouth that a newspaper shop in Cologne (about 25km from Bonn) sold imported US magazines exclusively covering the Color Computer: "Hot CoCo" and "The Rainbow". That was a turning point, because the program listings where the first "large" programs I could use as programming examples. My father, being a fast typist, did the monotoneous work of typing in the listings line by line, page by page. After playing around with e.g. a game typed in from a magazine for some time, I began modifying the code. I learned a lot reading other people's code, but still it was pretty tough.
It was a strange situation. More and more people around me started using computers, but no one was seriously into programming. To them, I was the "guy who could really program", but I knew how limited my abilities were. I started project after project, few of them were actually finished. Loss of interest, or code I could not understand myself after a few days - there were many reasons. One of the few projects I did actually finish was the inevitable "Lunar Lander":
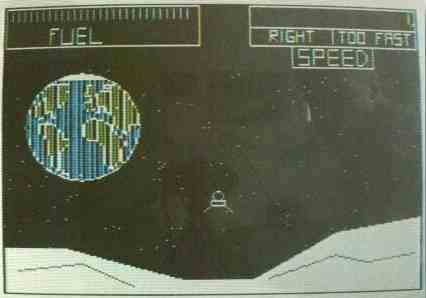
Note that the game used a black/white graphics mode (256x192 Pixels). The colors blue and green are in fact produced by the TV set, depending on the pattern of vertical black and white lines. This trick didn't really work too well on the PAL system used in Europe; in the US, with its NTSC system, a lot more colours could be produced.
I also attempted to learn assembly language using a book about the 6809 processor - but I simply had too little information about the computer itself to do anything useful. At least I learned the absolute basics (e.g. binary and hexadecial numbers).
In 1984 I had the opportunity to take a Pascal course. Coming from a completely self-taught BASIC background, without any education about algorithms and data structures, I was pretty much shocked. It was so hard for me to write code without GOTOs. The implementation of the Pascal compiler running on a Philips P2000 machine wasn't too exciting; everything was slow and I didn't really see any advantage over the BASIC of my CoCo. I finished the course to get a certificate, but couldn't envision myself programming in Pascal.
In fall 1984 it became pretty clear that the CoCo was some kind of a dead-end. The Commodory C64, after dropping in price significantly, became really popular, and games for the C64 showed what this computer could do, pushing the limit more and more. But I wanted a computer that would be easy to write programs on, and that definitely wasn't the case on the C64 (at least compared to my CoCo). To my rescue came a new computer that got a lot of hype in the magazines: the Schneider CPC 464, the German version of the Amstrad CPC 464. With a monitor showing 80x25 characters included, that machine was pretty hot. It lacked the hardware sprites and the sound capabilities of the C64, but that didn't matter to me. I wanted such a computer so badly, that I cannot count how often I sat on my bed reading every bit of information I could get my hands on over and over again. Fortunately my father got equally excited, so Christmas 1984 a CPC 464 was standing next to the christmas tree.
(To be continued in part 3: "My Second Computer - Codename Arnold")
-
Part 1: How it all Began
In fall of 1982 the local department store began selling strange looking typewriters connected to TV sets - so-called "home computers". Interesting, but not really lighting a burning desire in me to get one of these machines. Sure, I saw that they could be used to play video games, but for a video game, the price was incredibly high. The presentation of the machines wasn't too clever as well. Nobody could really demonstrate anything useful on the computers and the "information" printed on glossy paper didn't generate this "I have to get this" feeling, either. At that time, the computers were either switched off or would run game software from modules, so no chance to watch somebody typing the typical
10 PRINT "Hello"
20 GOTO 10
to impress everybody else (especially parents and salesmen) standing behind.
In January 1983 German television started broadcasting the "Computer Club". I watched it a couple of times, but this was all a bit too much for me. At age 13, being just an average kid, without anybody around me knowing anything about computers, I just didn't understand what they were talking about on TV. What I needed was somebody giving me an introduction, just for the first, very small steps.
Arund easter 1983 I spent two weeks at my uncle's house, visiting the youngest of three cousins. At that time the oldest cousin served his (mandatory) military service in the German army. When he came back for the weekend, he showed me what he had bought: a ZX81 computer. Simple, but affordable. I watched him writing small BASIC programs for a whole weekend, tried to write some code on my own and I now knew that this was something I was really interested in.
My parents weren't too excited though, remembering all too well the money spent on the model railway that was catching dust, never really being used. But my father slowly got interested in computers, too. So the research for the "right computer to buy" began. The ZX81 was not seriously considered, as its limits were already too obvious. The TI99/4a and the VIC20 couldn't convince us, either. Technically, the C64 was an attractive machine (really nice looking graphics), but it did cost around 1400,- DM (714 EUR), which was a lot of money back then. The computer my father eventually bought was a TRS-80 Color Computer (around 800,- DM). The manual was perfect for beginners, even though it was written in English, and the "Extended Color BASIC" had commands for drawing lines and circles (the C64 BASIC did not).
(continued in part 2: "My First Computer")
-
Getting rid of the 'File' Concept for Source Code?
Frans writes: After the recent sourcecode control debate I started thinking: why on earth are we still using the 'file' as the base unit to store sourcecode in? The whole 'file' concept is pretty bad and limiting when it comes to sourcecode control, code reuse and overall code management. Much better would it be if we could work with a code repository as the container for our sourcecode which would work with sourcecode elements like we know, e.g.: namespaces, classes, assemblies, resource objects etc. etc.
Well, I must admit that I'm torn back and forth.
- I agree that moving away from files could lead to interesting developments, maybe even getting rid of the text-only nature of source code. I'm not only speaking about (gimmicky?) features like photos and drawings inside source code. It's also about getting rid of the need to "serialize" every bit of meta information into stone age raw text.
- On the other hand, it's just too easy to write or at least use lots of nice little tools outside the IDE that work exactly because of the concept of source code being a bunch of files. And then there's the fear to lose the many workarounds possible with files if things don't work like they should. In case your IDE just won't let you do anything after installing some other software, at least you can copy your source files to some other place and continue your work.
I honestly don't know. I just can't decide what is better. Maybe it's just the fear to put source "into something I cannot look into using Notepad". Maybe I'm already too traditional. But then I remember the first time I had to trust a new thing called clipboard that text I would "cut" would re-appear using "paste"... so maybe it's time for a different approach.
- I agree that moving away from files could lead to interesting developments, maybe even getting rid of the text-only nature of source code. I'm not only speaking about (gimmicky?) features like photos and drawings inside source code. It's also about getting rid of the need to "serialize" every bit of meta information into stone age raw text.
-
VS.Net and the FontSize Parameter
Roy wrote about the /fs (FontSize) command line parameter of devenv.exe and using it for presentations: cool feature I didn't know about. Maybe I should have called "devenv.exe /?" before, but it just didn't came to my mind at all, not expecting any interesting parameters. Anyway, first thing I did was to try a large number (/fs 20), but I also tried "/fs 7" which is smaller than the default (/fs 8).
Font size 7 is kind of interesting. While I use 1280x1024 on a 19" screen both at home and at work, and feeling ok with it (more would be nice, but it's ok), I'm sometimes forced to work with 1024x768 on another computer connected to the same 19" monitor. This is where every pixel in VS.Net counts, especially because you cannot make every window fly-in/out without going mad after some time.
With "/fs 7" dialogs and helper windows are a bit smaller, while the text editor font remains unchanged. The following screenshots show the solution explorer:
Default:
With /fs 7:

As you can see, you can save a few pixels - with 1280x1024 not really a reason to switch. But if you're in the strange situation of viewing low resolution on a big screen, "/fs 7" is worth giving a try.
-
Nice Buttons
As I wrote in my first post, I'm currently developing some kind of "DJ software" in my spare time. The first versions grew by adding feature by feature over several years, the new version is a complete rewrite from bottom up. This whole project will take a lot of time, with lots of coding to be done before there's actually something usable.
While I'm implementing the framework, I also work on "visible" stuff to keep my motivation up (this is a private project, and I don't expect making [much] money from it). Something "visible" is e.g. the audio player control. I don't use the Windows Media Player control directly, instead I'm using the (non-GUI) WMP object hidden behind an abstraction layer, which is accessed by a user control showing the GUI..
A GUI for a player has to be cool (but no "unusable 1337 skinz", please), including nice looking buttons for "start/stop/pause/etc.". So here's what my buttons look like:

Nice, huh? So how much effort went into those buttons? Very little. If you're not looking for a "100% perfect" solution, you can get pretty good results just playing around with the properties "BackColor", "BackgroundImage" and "Image" of a WinForms button.
- Step 1: Decide how high the button will be; for this example, let's choose a height of 32 pixels. The width doesn't play a role as the image can be repeated horizontally without looking bad. Fire up your favorite paint program, create a 32x32 image and perform a vertical gradient fill from white (#FFFFFF) to gray (#C0C0C0):

- Step 2: Let's try it in VS.Net:
- Put a button on a form, 32 pixels high.
- Set the "BackColor" to white
- Set the "BackgroundImage" property

- Step 3: Design the button image:

and save it as a GIF file with transparent background:
- Step 4: In VS.Net, clear the button text and set the "Image" property:

- That's it!
Remarks:
- Leave an empty pixel column/row at the right/bottom border of your button image, otherwise the image will not appear centered on the button.
- Of the background image, the outer 2 pixel rows/columns will not be visible, they are hidden behind the border of the button.
- Step 1: Decide how high the button will be; for this example, let's choose a height of 32 pixels. The width doesn't play a role as the image can be repeated horizontally without looking bad. Fire up your favorite paint program, create a 32x32 image and perform a vertical gradient fill from white (#FFFFFF) to gray (#C0C0C0):
-
Wouldn't it be cool...?
This is what XML comments look like on my computer today:

Wouldn't it be cool if someday (in VS.Net 200x?) we could have something like this:
It's kind of frustrating to see computers rendering 3D worlds with 100s of frames/sec, but source code editors advancing only in very small steps...
-
Better Keyboard Support for #region ... #endregion
Of all the elements that can be collapsed in the VS.Net editor (namespaces, classes, methods, comments, ...), only regions are of actual importance for my everyday work. Here are three macros that are quite helpful for expanding/collapsing regions using the keyboard:
Macro Purpose Keys (example) ExpandAllRegions expands all regions in the current document Ctrl-Shift-'+' CollapseAllRegions collapses all regions in the current document Ctrl-Shift-'-' ToggleParentRegion expands/collapses the region the cursor is currently in Ctrl-'+' and Ctrl-'-' Installation:
- Open the Macros IDE (Tools - Macros - Macros IDE)
- Create a new module, replace the code in the created file with the posted source code, save file
- Assign keys in VS.Net (Tools - Options - Keyboard).
Tip: type "Region" in the input field under "show commands containing" to limit the list of shown commands (don't laugh, it's always amazing how many people don't know about this rather obvious feature...)
Known Issues
- The code runs fine in VS.Net 2003; in VS.Net 2002 I had strange problems with "Selection.FindText" not working reliably.
- ToggleParentRegion is "good enough", but not perfect; e.g. when the cursor is at the end of a line containing a collapsed region, it won't expand the region, but move the cursor to the start of the line (where a second invocation will work fine).
- (Update 14.08.2003): The macro ExpandAllRegions does not work in VB.Net (see comments below). The macro ToggleParentRegion didn't work correctly, either, but could be fixed (see "Updated" comment in code).
Source Code
Imports EnvDTE
Imports System.Diagnostics
' Macros for improving keyboard support for "#region ... #endregion"
Public Module RegionTools
    ' Toggles the current region surrounding the cursor
    Sub ToggleParentRegion()
        Dim objSelection As TextSelection
        objSelection = DTE.ActiveDocument.Selection
        Dim objPosition As EnvDTE.TextPoint
        objPosition = objSelection.AnchorPoint
        objSelection.SelectLine()
        If (InStr(objSelection.Text.ToLower(), "#region") <> 0) Then  ' Updated 14.08.2003
            objSelection.MoveToPoint(objPosition)
            DTE.ExecuteCommand("Edit.ToggleOutliningExpansion")
            DTE.ActiveDocument.Selection.StartOfLine(vsStartOfLineOptions.vsStartOfLineOptionsFirstColumn)
        ElseIf (objSelection.FindText("#region", vsFindOptions.vsFindOptionsBackwards)) Then
            DTE.ActiveDocument.Selection.StartOfLine(vsStartOfLineOptions.vsStartOfLineOptionsFirstColumn)
            DTE.ExecuteCommand("Edit.ToggleOutliningExpansion")
            DTE.ActiveDocument.Selection.StartOfLine(vsStartOfLineOptions.vsStartOfLineOptionsFirstColumn)
        Else
            objSelection.MoveToPoint(objPosition)
        End If
    End Sub

    ' Expands all regions in the current document
    Sub ExpandAllRegions()
        DTE.ExecuteCommand("Edit.StopOutlining")
        DTE.ExecuteCommand("Edit.StartAutomaticOutlining")
    End Sub

    ' Collapses all regions in the current document
    Sub CollapseAllRegions()
        ExpandAllRegions()
        Dim objSelection As TextSelection
        objSelection = DTE.ActiveDocument.Selection
        objSelection.StartOfDocument()
        While (objSelection.FindText("#region"))
            objSelection.StartOfLine(vsStartOfLineOptions.vsStartOfLineOptionsFirstColumn)
            DTE.ExecuteCommand("Edit.ToggleOutliningExpansion")
            objSelection.StartOfDocument()
        End While
        DTE.ActiveDocument.Selection.StartOfDocument()
    End Sub
End Module -
Personal VS.Net Editor Color/Font Settings
Roy writes "I was fiddling with the color settings for visual studio, and was trying to get a less eye-straining environment for coding in". What he came up with is definitely a matter of personal taste ;-)
Speaking of personal taste, here's a screenshot of my settings:
Most important for me (and my eyes) is the use of a proportional-width font. Verdana 8pt is the font I use for virtually every editor I use. Unlike e.g. Arial, you can call it a "developer's font", because you can distinguish the small "L" and the large "i".
Switching to a proportional font wasn't easy for me at first, because I had to break with old habits; most of them (e.g. aligning end-of-line comments running over several lines) were a waste of time, anyway.
-
First entry / Fun with Media Player SDK
This entry may surprise some people I know that are reading the main feed every day - I didn't tell them I would start a blog... For everybody else some quick info about me: I'm 34 years old, started programming in 1983 on a TRS-80 Color Computer and got my first PC in 1989. I live in Bonn, Germany, working as a software developer for a local company. In my spare time I enjoy writing tools and macros, and - in many iterations over the last years, using different languages/technologies - a kind of DJ'ing software for sports events like basketball games. Currently I'm doing a complete rewrite in C#, using the windows media player 9 SDK.
So far, my experiences using the media player object, its properties, methods and events have been very good. But yesterday I ran into something rather strange.
Say you open a sound file like this:
objPlayer.URL=@"D:\MySound.wav"; and now you want to know the duration
double dDuration=objPlayer.currentMedia.duration; but dDuration is 0. If you play the sound file, currentMedia.duration contains the correct value. But you want the duration before starting playback. Ok, next try:
IWMPMedia objMedia = objPlayer.newMedia(filename);<br>objPlayer.currentMedia=objMedia<br>double dDuration=objPlayer.currentMedia.duration;<br> Again, dDuration is 0. Now try this:
IWMPMedia objMedia = objPlayer.newMedia(filename);<br>double dDummy=objMedia.duration;<br>objPlayer.currentMedia=objMedia<br>double dDuration=objPlayer.currentMedia.duration;<br> And... dDuration contains the correct value!
Took me some time to figure out that one...