Roland Weigelt
Born to Code
-
Using a Video Device with getUserMedia in WebView2 in a Kiosk Scenario (Update)
Back in July I wrote about my experiments with using a video capture device on a web page loaded into the WebView2 component. Since then, WebView2 has received a few updates. I am not sure when or how things have changed (or which version exactly I was using back then), but the workaround I described for using
getUserMedia()without HTTPS no longer worked when I revisited this topic recently.While switching to HTTPS is my goal in the long run, I encountered problems with certificates that look like they could be solved by WebView2 feedback item #624, so I shelved the work on this for my application for now. Fortunately, there is a way to “fake” HTTPS in WebView2 that is good enough to meet the requirements for
getUserMedia().The
CoreWebView2.SetVirtualHostNameToFolderMapping()function allows you to map a server name to a local folder. This way navigating to e.g.https://someServer/somePage.htmlwill load the local filesomePage.htmlcontained in that folder. If the server part and the display part of your application run on different computers, you will obviously have transfer the files e.g. to a temporary folder.The Microsoft documentation contains everything you need to know, so I will not go into further detail here. As usual, when working with WebView2, make sure
yourWebView.EnsureCoreWebView2Async()has been executed before callingyourWebView.CoreWebView2.SetVirtualHostNameToFolderMapping().See also
- ”Get started with WebView2 in WPF” – step by step tutorial in the Microsoft documentation.
- Web search for “webcam video getUserMedia” – useful resources for using video devices in JavaScript.
- Using a Video Device with getUserMedia in WebView2 in a Kiosk Scenario – my previous blog post on this topic, containing information on how to handle the request for permission to use the camera.
-
Emaroo 4.8.0 - Support for Visual Studio 2022 / Adobe CC 2022
Emaroo is a free utility for browsing most recently used (MRU) file lists of programs like Visual Studio, VS Code, Word, Excel, PowerPoint, Photoshop, Illustrator and more. Quickly open files, jump to their folder in Windows Explorer, copy them (and their path) to the clipboard - or run your own tools on files and folders with custom actions!
- Download Emaroo on www.roland-weigelt.de/emaroo
About this Release
- Added: Support for Visual Studio 2022.
-
Added: Support for Photoshop / Illustrator / InDesign CC 2022.
-
Changed: Emaroo no longer looks for Adobe CC versions prior to 2020 by default. This does not affect support for CS6 versions.
If you still need support for older CC versions, you can enable it as follows:
- Close Emaroo
- Start Notepad as Administrator
-
Open the file
in the installation directory (usuallyEmaroo.exe.config
)C:\Program Files (x86)\Weigelt\Emaroo -
Set
option toSearchForOldAdobeCCApplicationsTrue - Save the config file and start Emaroo.
-
How to Create a PNG File with Transparent Background from a Powerpoint Slide in C#
Exporting a PowerPoint slide to a PNG file of a specific size (e.g. 1920x1080 pixels) is easy:
var powerPoint = new Microsoft.Office.Interop.PowerPoint.Application();
var presentation = powerPoint.Presentations.Open("Input.pptx", MsoTriState.msoFalse, MsoTriState.msoFalse, MsoTriState.msoFalse);
var slide = presentation.Slides[1]; // one-based!
slide.Export("Output.png", "PNG", 1920, 1080);
(For complete code, download the demo project on GitHub)
This will create a PNG file that looks like what you see on screen (minus animations, of course).
So, for instance, something like this:

But what if we only want the foreground? Like this:

(Border added for illustration only)
In this case, we need to export the shapes of the slide, not the slide itself. We can ask the
Shapescollection for aShapeRange, and that offers anExport()method (while that method is not well-documented and it seems like it is deprecated / for internal use only, it works for me and I do not see an alternative at this time).Because the shapes do not cover the whole slide, we need to add a transparent rectangle that has the width and height of the slide. The required information is available in the
PageSetupobject.This is the code for exporting a PNG file with a size of 1920x1080 pixels:
var shapes = slide.Shapes;

var pageSetup = presentation.PageSetup;
var rectangle = shapes.AddShape(MsoAutoShapeType.msoShapeRectangle, 0, 0, pageSetup.SlideWidth, pageSetup.SlideHeight);
rectangle.Fill.Visible = MsoTriState.msoFalse;
rectangle.Line.Visible = MsoTriState.msoFalse;

var range = shapes.Range();
range.Export(
    "Output.png",
    PpShapeFormat.ppShapeFormatPNG,
    (int)(1920 * 72 / 96),
    (int)(1080 * 72 / 96),
    PpExportMode.ppScaleXY);
You will notice that the
ShapeRange.Export()method expects different values for the width and height than theSlide.Export()method. The number of pixels has to be multiplied by 72 and divided by 96 to get the desired result.The 72 is the number of points in an inch. The 96 left me wondering whether it has to be adjusted in some scenarios, but this does not seem to be the case:
- PowerPoint’s default resolution for image exports is 96 dots per inch. This default can be changed via a registry setting (see the Microsoft documentation for more details), but that does not influence the
ShapeRange.Export()method. - My main monitor is set at 100% scaling (= “96 DPI”). I tested with other monitors / different settings, whether the scaling has to be taken into account (that is why the window of the demo program shows the monitor’s DPI setting). Again, no influence.
About the Demo Project
The demo is a WPF/C#/.NET 5 project that includes a PPTX file with a single slide. I tried to make the code as simple as possible, which results in this minimal UI:
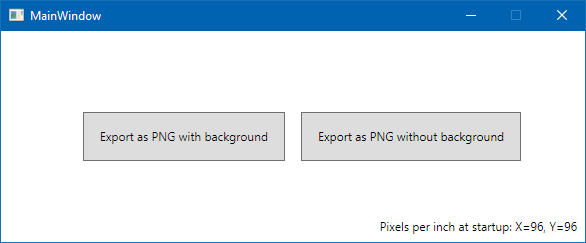
When you press one of the buttons, a PNG file (“SlideWithBackground.png” or “SlideWithoutBackground.png”) will be written to your “Pictures” directory. Accordingly, the interesting parts of the code can be found in
ExportSlideWithBackground_ClickandExportSlideWithoutBackground_Click. - PowerPoint’s default resolution for image exports is 96 dots per inch. This default can be changed via a registry setting (see the Microsoft documentation for more details), but that does not influence the
-
Confirmations in User Interfaces: Explicit vs. Implicit
Confirmations are a tricky subject in user interface design. As a UI designer, you want to avoid them, but you cannot always implement an undo/redo system. As users, we do not want to be nagged constantly, but if an action has serious consequences and something goes wrong, we angrily ask why there was no confirmation.
In addition to interrupting the flow of our work, confirmations can also introduce a tiny bit of stress. Confirming too fast and losing work is not fun. Even if the action was not permanent and, e.g., files can be brought back from the recycle bin, there is some kind of hassle involved. So, you do want to be sure about what you confirm.
In theory, when you directly look at something and trigger an action, a generic question like “Do you want to do this?” should be sufficient. The context of your action determines what “this” means (I cannot help myself thinking of an old JavaScript joke, but I digress).
In practice though, in a world full of distractions, sometimes when you see a dialog like this…
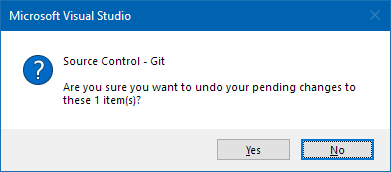
…, you may notice that your eye wanders back to the selection of the “item”.
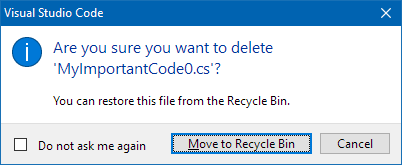
This is why a dialog that explicitly tells you the name is a better solution:
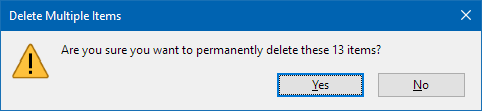
But what about deleting multiple files? Depending on how large the number is, a dialog cannot show all names. The following dialog stops at ten files:
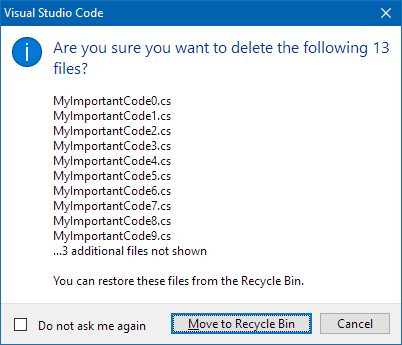
This is far from being perfect. And of course, one could think of a dialog with a scrolling list that allows you to view all files. For certain projects this may important enough to invest the necessary budget. On the other hand, the dialog shown above simply works by concatenating one large string and putting it into a standard dialog. This is a pragmatic solution that does its job well in many cases. Even though you are not told the names of the “3 additional files”, chances are that it is easier for you to remember them by looking at the ten names you can read. This may be less the case as the number of “additional files” grows, but anything is better than just a number like in this dialog.
Confirmation dialogs should contain enough information to work without looking at the rest of the user interface. When you design the dialog, imagine that the user must leave the room for a short moment and comes back to the computer (just a moment, not a lunch break). Make sure he or she can make then an informed decision.
-
A Stupid Little TypeScript Mistake (Part 2)
After my blog post in June, here is another tale from a C# developer getting his feet wet with TypeScript.
TypeScript’s type checking makes my life so much easier, but it does not catch everything. Recently I forgot an important part of a for-loop. Here is a stripped-down example:
var items=["item0", "item1", "item2"];
for (var n=0;items.length;n++)
{
    // ...
}
The code compiles, but runs into an endless loop – the “n<” is missing in the condition.
If I write similar code in C#…
var items=new[] {"item0", "item1", "item2"};
for (var n=0;items.Length;n++)
{
    // ...
}
… the compiler tells me what I did wrong:
Cannot implicitly convert type 'int' to 'bool'
Ok, another (TypeScript) lesson learned.
-
Using a Video Device with getUserMedia in WebView2 in a Kiosk Scenario
I use Microsoft’s WebView2 control for a digital signage desktop application running in fullscreen mode (“kiosk client”). All visible content is HTML coming from a server (on a private network), so the kiosk client itself has to be updated very rarely.
Right now, I am exploring how to display the output of another computer that is (physically) standing nearby, but on a different network, using a video capture device. Showing the video stream in HTML is pretty straightforward using
navigator.mediaDevices.getUserMedia(). I will not go into detail on this, as a web search for “webcam video getUserMedia” gives you helpful information on how to get things up and running very quickly.Instead, the focus of this article is on two problems that I ran into:
How to avoid the request for permission to use the camera
When browsing the web with a normal browser, nobody wants a web page to be able to simply switch on a webcam or a microphone without the user’s consent. That is why it is a good thing that
getUserMedia()opens a prompt asking the use for permission.For an unattended kiosk display, though, such a prompt is a no-go. The request for permission must be handled programmatically. Fortunately, the
WebView2control offers a way to do this.Let’s say you followed the first steps of the “Get started with WebView2 in WPF” tutorial in the Microsoft documentation, so you have
WebView2control called “webView” in your application window. Now, instead of setting theSourceproperty in XAML, you add an event handler for theLoadedevent. After callingEnsureCoreWebView2Async()you can add an event handler for thePermissionRequestedevent, where things work pretty much as expected: If the requested permission is for the camera, your code allows it.public partial class MainWindow : Window { public MainWindow() { InitializeComponent(); Loaded += HandleLoaded; } private async void HandleLoaded(object sender, RoutedEventArgs e) { await webView.EnsureCoreWebView2Async(); // important webView.CoreWebView2.PermissionRequested += HandlePermissionRequested; webView.Source = new Uri("...URI of your page..."); } private void HandlePermissionRequested(object? sender, CoreWebView2PermissionRequestedEventArgs e) { if (e.PermissionKind == CoreWebView2PermissionKind.Camera) { e.State = CoreWebView2PermissionState.Allow; } } }If you want, you can check the
Uriproperty of theCoreWebView2PermissionRequestedEventArgsto lock down the automatic permission to specific URIs.How to circumvent the requirement for HTTPS for
getUserMedia()- for the purposes of this scenarioMy digital signage solution is currently using HTTP. A web page loaded into Edge/WebView2 this way cannot use
navigator.mediaDevices.getUserMedia(). What does work is using a file URI, both for a local file or a file a remote file share.A local file deployed with the setup for the kiosk application could require more frequent update installations, though. And a file share for this sole purpose is not exactly an elegant solution.
So what I did was to use
WebClient.DownloadFileto download the HTML file on startup via HTTP from the server to a local file in a temporary folder. Then I could navigate to that file using a file URI.At some point in the future, I will move my application to HTTPS. But until then, this solution is good enough.
Update 2021-12-29: The approach described above no longer works. Please see my other blog post for updated information on a workaround.
-
Save and Restore Webcam Properties with CamProps 1.1.0 (ahora también en español)
CamProps is a free utility for quickly adjusting and managing the properties of webcams and other video capture devices. I wrote it when I struggled with my Logitech C920 that required some manual tweaking to achieve a good picture quality. CamProps enables you to store and quickly recall settings which comes in handy if you have different lighting situations in your room – or when the webcam once again simply “forgets” its settings.
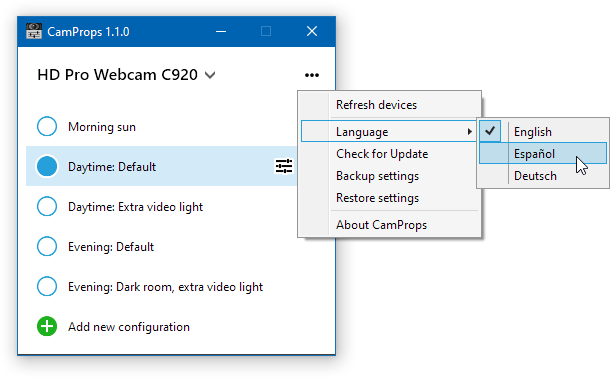
Recently José M. Alarcón contacted me to tell me he had written a Spanish article about CamProps. I seized the opportunity and asked him whether he could translate the UI texts. Thanks to José, version 1.1.0 of CamProps now supports Spanish in addition to English and German. When you first start CamProps, it selects the UI language according to your Windows settings. You can override this in the “•••” menu in the upper right corner of the window:
Where can I get it?
You can download CamProps at https://www.roland-weigelt.de/camprops/
Which devices can I use?
CamProps works with all webcams and video capture devices that support opening the webcam driver property dialog (either the default provided by Windows or a specific dialog by the manufacturer's driver).
For instance, when you press the “
 ” button for a Logitech C920 without the Logitech software installed, this will open the following dialog:
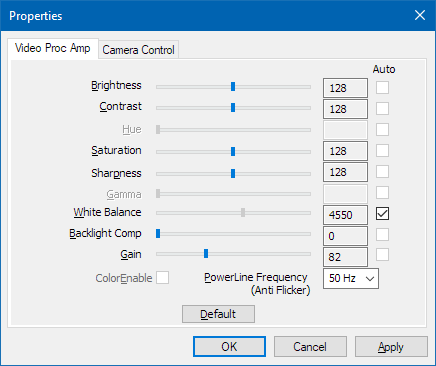
(This dialog may look different for other devices)
-
A Stupid Little TypeScript Mistake
For context: I am a C# developer who uses TypeScript just every now and then. Recently I added a few string constants to an existing TypeScript class. The program compiled just fine, but when I ran the program, the result was different from what I expected.
For a repro scenario, copy the following script code into the Windows clipboard:
class MyStrings {
    public static LoremIpsumDolorSitAmet = "Lorem ipsum dolor sit amet";
    public static ConsecteturAdipiscingElit = "consectetur adipiscing elit";
    public static VestibulumFeugiatLigulaEuOdioPosuereVelTristiqueDiamIaculis = "Vestibulum feugiat ligula eu odio posuere, vel tristique diam iaculis";
    public static FusceUrnaLiberoEfficiturNecTortorSed = "Fusce urna libero, efficitur nec tortor sed";
    public static UllamcorperFaucibusAugueProinUtPurusMetus = "ullamcorper faucibus augue. Proin ut purus metus";
    public static CurabiturAPosuereDiamSedElementumSedNislVitaeMaximus = "Curabitur a posuere diam. Sed elementum sed nisl vitae maximus";
    public static PraesentVitaeEnimVestibulumUltriciesNuncInGravidaSapien = "Praesent vitae enim vestibulum, ultricies nunc in, gravida sapien";
    public static ProinIaculisMiOrciUtRhoncusDuiVenenatisId : "Proin iaculis mi orci, ut rhoncus dui venenatis id";
    public static MorbiSedCongueLigulaSedFinibusNeque : "Morbi sed congue ligula, sed finibus neque";
    public static PellentesqueEuMolestieExIdFermentumEllus : "Pellentesque eu molestie ex, id fermentum tellus";
}

console.log(MyStrings.LoremIpsumDolorSitAmet);
console.log(MyStrings.ConsecteturAdipiscingElit);
console.log(MyStrings.VestibulumFeugiatLigulaEuOdioPosuereVelTristiqueDiamIaculis);
console.log(MyStrings.FusceUrnaLiberoEfficiturNecTortorSed);
console.log(MyStrings.UllamcorperFaucibusAugueProinUtPurusMetus);
console.log(MyStrings.CurabiturAPosuereDiamSedElementumSedNislVitaeMaximus);
console.log(MyStrings.PraesentVitaeEnimVestibulumUltriciesNuncInGravidaSapien);
console.log(MyStrings.ProinIaculisMiOrciUtRhoncusDuiVenenatisId);
console.log(MyStrings.MorbiSedCongueLigulaSedFinibusNeque);
console.log(MyStrings.PellentesqueEuMolestieExIdFermentumEllus);
Now head to the TypeScript Playground at https://www.typescriptlang.org/play, replace the text on the left side with the content of the clipboard and run the script.
This will give you the following output:
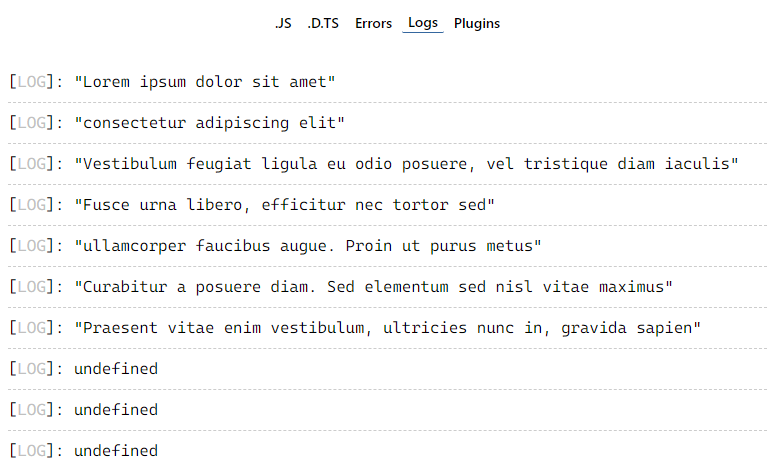
It took me a bit until it dawned on me why the last three strings are undefined – can you immediately figure out what the problem is?
A hint: Just before I edited the class, I worked on a couple of JSON files.
-
Kostenloser Online-Workshop am 4.6.2021: User Interfaces und User Experience für Entwickler (Teil 2)
Am 4. Juni 2021 bin ich ab 20:30 wieder auf dem Twitch-Kanal von Gregor Biswanger zu Gast. Um mehr Zeit für Fragen und Antworten zu haben, hatten Gregor und ich den Workshop am 7. Mai spontan aufgeteilt.
Für diejenigen, die den ersten Teil verpasst haben:
- Gregor hat eine Aufnahme des Streams auf YouTube hochgeladen und mit detaillierten Kapitelmarken versehen.
- Ich werde mit einem groben Schnelldurchlauf starten.
Inhalt
Thema des zweiten Teils sind User Interface Patterns und andere Kochrezepte, die das Design von Bedienoberflächen vereinfachen. Die konkreten UI-Technologien spielen dabei keine Rolle, dementsprechend sind für den Workshop keine technischen Vorkenntnisse notwendig.
Darüber hinaus stelle ich vor, mit welchen Tools und Methoden ich in meinem Alltag Ideen skizziere, GUIs entwerfe und die Abläufe ausprobiere.
Wie beim ersten Mal wird die Interaktion mit Euch eine große Rolle spielen. Habt Ihr Fragen zum Was, Wann und Wie von UI/UX-Design im Umfeld der (agilen) Software-Entwicklung? Habt Ihr Screenshots von GUIs, die Ihr verbessern möchtet? Oder gibt es Designs, die Euch gefallen und die man gemeinsam auf wiederverwendbare Gestaltungsmittel und User Interface Patterns untersuchen könnte? Immer her damit, lasst uns darüber sprechen!
Wie nehme ich teil?
Wenn Ihr nur mal vorbeischauen möchtet, dann ruft am 7. Mai um 20:30 in Eurem Browser einfach https://www.twitch.tv/GregorBiswanger auf.
Um auch am Chat teilnehmen zu können, benötigt Ihr einen (kostenlosen) Twitch Account.
-
Kostenloser Online-Workshop am 7.5.2021: User Interfaces und User Experience für Entwickler
Am 7. Mai 2021 bin ich ab 20:30 auf dem Twitch-Kanal von Gregor Biswanger mit einem Workshop zu UI/UX-Grundlagen zu Gast.
Zielgruppe sind Entwickler und andere Interessierte, die entweder
- in einem Team ohne ein Budget für externe UI-Designer arbeiten, oder
- mit einem besseren Verständnis in die Zusammenarbeit mit Externen gehen möchten.
Inhalt
Nach Grundlagen des Visual Designs stelle ich wichtige UI/UX-Fachbegriffe und -Konzepte in Theorie und Praxis vor, z.B. User Interface Patterns, Empathie, mentale Modelle oder Szenarien. In Live-Demos zeige ich Möglichkeiten zum Skizzieren von User Interfaces.
Der Kanal von Gregor hat eine aktive Chat-Community, dementsprechend interaktiv werde ich den Workshop gestalten. Stellt Eure Fragen im Chat. Vielleicht habt Ihr eine UI, die Ihr gerne verbessern möchtet? Schickt Screenshots und wir wenden das Gelernte direkt live an.
An einem Freitagabend darf natürlich der Spaß nicht fehlen: Problemlösungen à la Indiana Jones, Datenbanken für außerirdische Lebensformen oder Gedanken zum Einfluss von Rallye-Streifen auf die Geschwindigkeit von Sportwagen. Alles frei nach dem Motto “Wenn das Beispiel merkwürdig genug ist, dann ist die Idee dahinter merk-würdig”. Last-but-not-least: Kein UI-Vortrag ohne Beispiele für epische UI-Fails!
Wie nehme ich teil?
Wenn Ihr nur mal vorbeischauen möchtet, dann ruft am 7. Mai um 20:30 in Eurem Browser einfach https://www.twitch.tv/GregorBiswanger auf. Um am Chat teilnehmen zu können, benötigt Ihr einen (kostenlosen) Twitch Account.